Category: Creating automations

  • Creating Your First Automation

    Intro

    This guide explains how to create your first automation in Sender using the Email Automation feature. It shows where to find it, how the setup process works, and what happens after saving.


    What Email Automation Does

    Email Automation in Sender allows you to build automated email sequences that trigger based on subscriber behavior or specific events. It is typically used when you need to send timely, personalized messages to subscribers without manual effort—such as welcome emails, birthday greetings, abandoned cart reminders, or re-engagement campaigns.


    Where to Find This Feature

    In the Sender dashboard, go to: Automations (in the left sidebar)

    email-automation

    Steps to Create Your First Automation

    Step 1 — Start the Workflow

    From the Automations page, click Create new workflow in the top right corner.

    automation-templates

    A modal appears offering two paths: browse ready-made workflow templates organized by category (Win-back customers, Onboarding, Welcome, etc.) or select Create from scratch to build a custom automation. Choose your preferred starting point to proceed.


    Step 2 — Select a Trigger

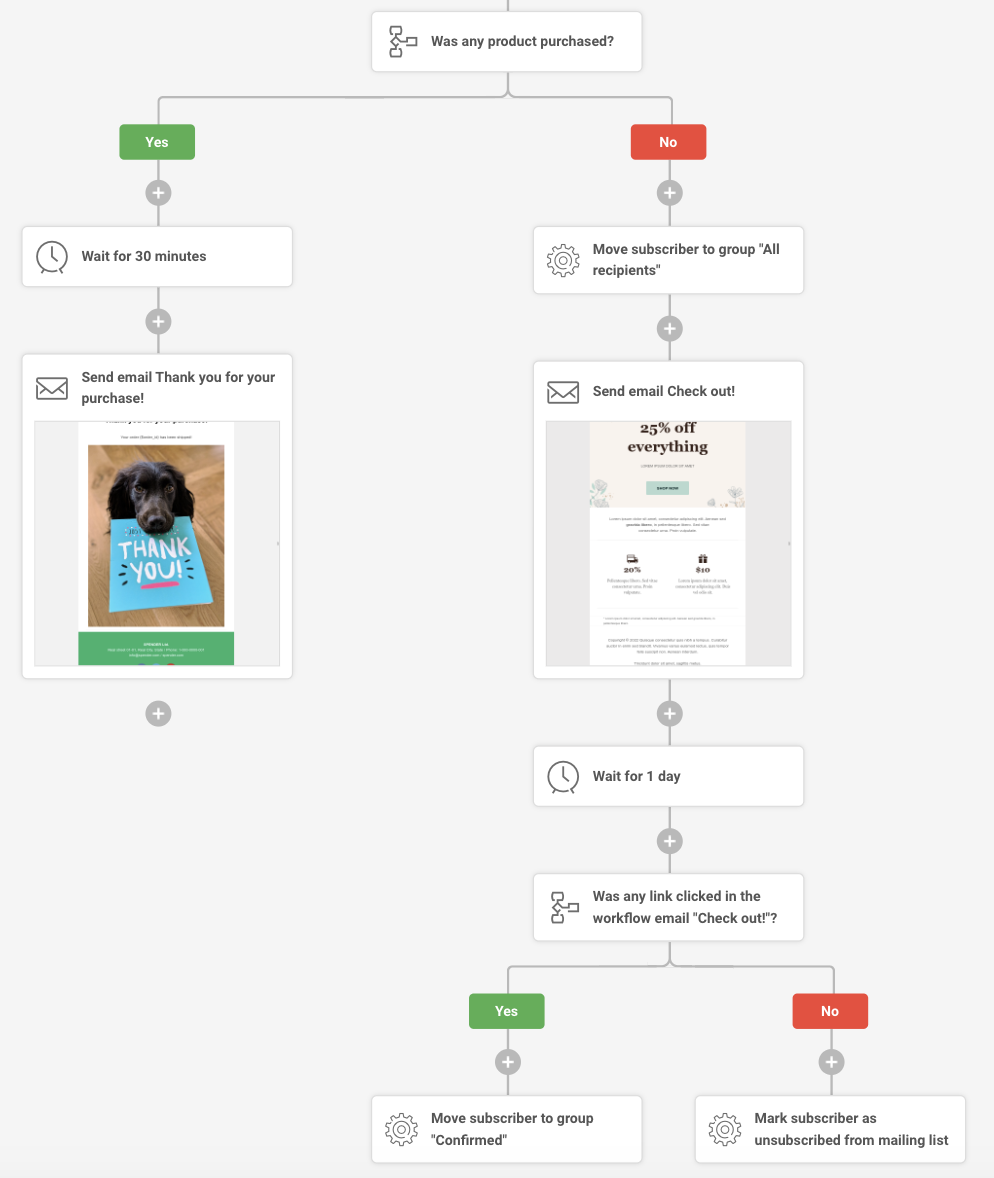
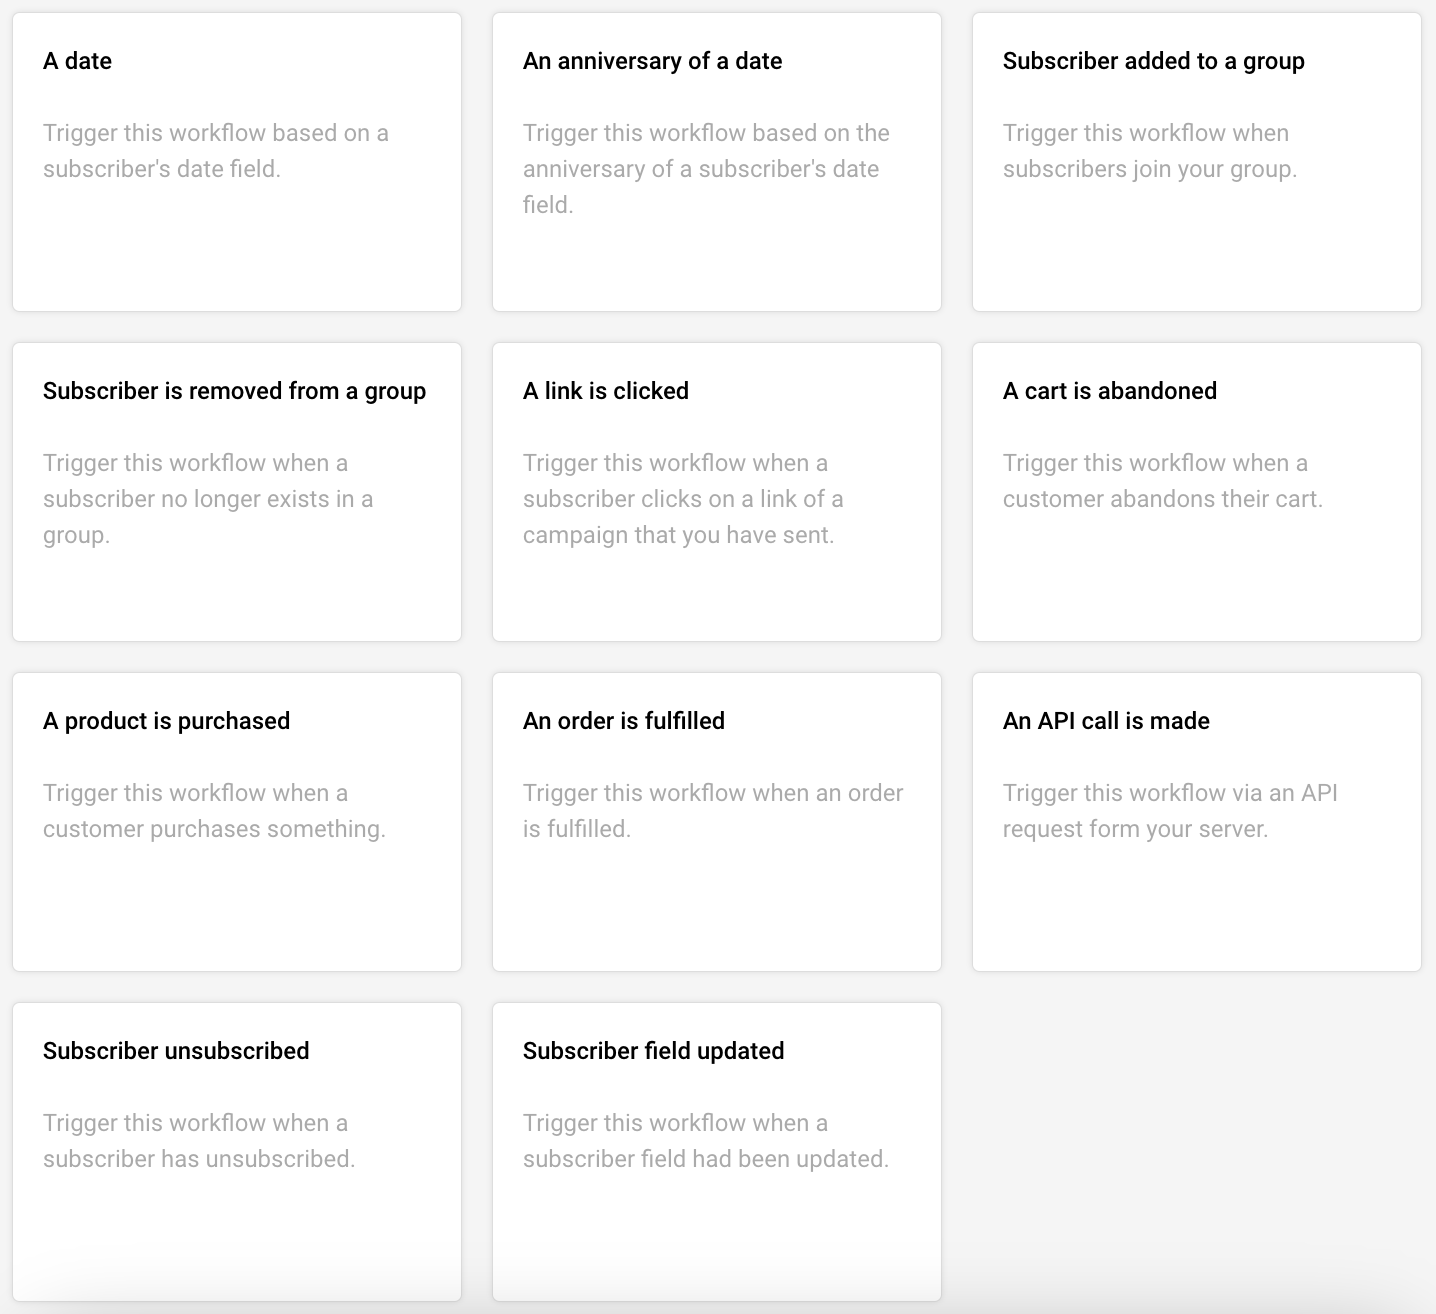
    If creating from scratch, the next screen displays all available trigger types. Options include subscriber joins a group, a date, anniversary of a date, link clicked, cart abandoned, product purchased, order fulfilled, and more.

    automation-triggers

    Click Create automation on your chosen trigger, then enter a name for your workflow in the popup dialog and click Create to open the visual workflow builder.


    Step 3 — Configure the Trigger and Build the Workflow

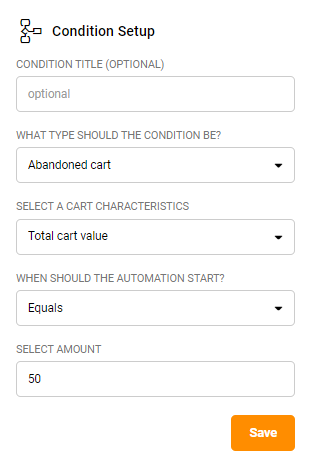
    The automation builder opens with a visual canvas showing your trigger block and a settings panel on the right. Configure the trigger details—such as selecting which subscriber group activates the workflow—then click Save.

    automation-trigger-setup

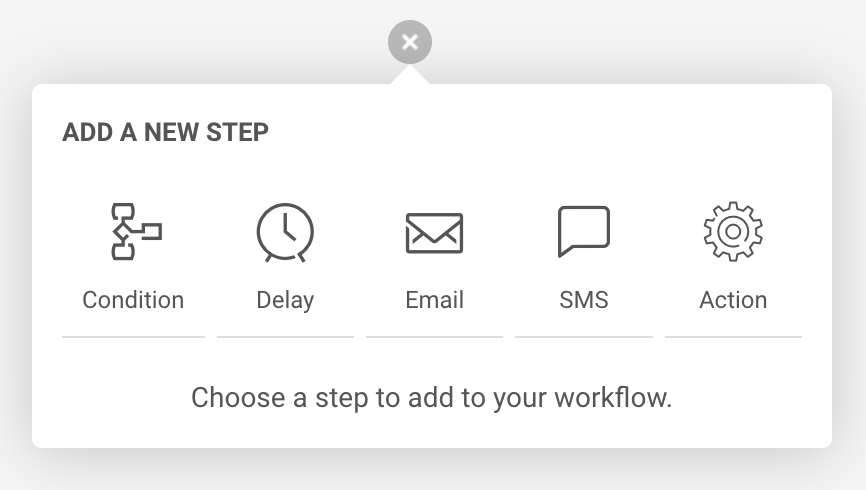
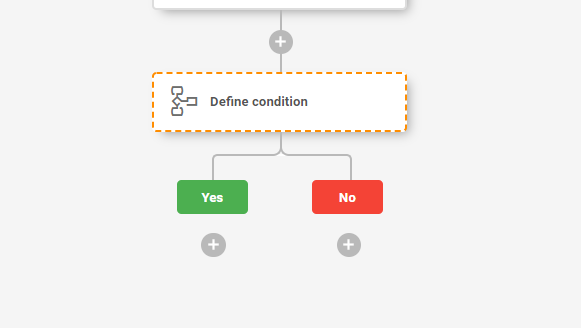
    The completion indicator at the top tracks your progress. Click the + icon below the trigger to add steps: Email, SMS, Delay, Condition, Action, or Split for A/B testing.


    Step 4 — Design Your Email Content

    When you add an Email step, the right panel displays email settings including step name, sender details, subject line, and preview text.

    automation-email-setup

    Click Create email content to open the email editor. Choose from pre-built templates or start with a blank canvas.

    drag-drop-email-builder

    The drag-and-drop builder offers building blocks like headlines, paragraphs, images, buttons, and social icons. Click Save & continue when finished to return to the workflow builder.


    Step 5 — Activate the Automation

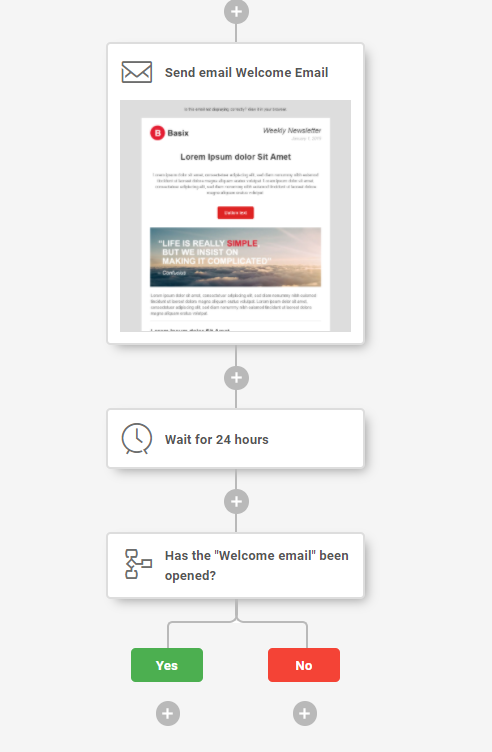
    Review your complete workflow in the visual builder. When all steps show as configured (the completion indicator displays full progress), click Activate in the top right corner. The status changes from DRAFT to ACTIVE, and the automation begins running immediately for any subscribers who match your trigger conditions.


    What Happens After You Save

    After activating, the automation appears in the Automations list with an ACTIVE status badge. You can continue editing the workflow or monitor performance. Statistics including emails sent, open rate, click rate, and revenue attribution become available in the Email report panel and through the Full report button after the automation starts sending.


    Common Issues

    Automation won’t activate → At least one complete email step with designed content is required before activation.

    Trigger not firing → Verify the correct subscriber group is selected and that new subscribers are actually joining that group.

    Email step shows incomplete → The email content must be created and saved using the email editor before the step registers as complete.


    FAQs

    Can I edit an active automation? Yes, you can modify steps and content while the automation is active. Changes apply to new subscribers entering the workflow.

    How do I pause an automation? Click the Deactivate button in the top right of the workflow builder to pause the automation. Subscribers already in the workflow will complete their sequence.

    Can I use templates instead of building from scratch? Yes. When creating a new workflow, select Create from template and choose from categories like Onboarding, Welcome, Win-back customers, or Order confirmation.

    What triggers are available? Sender offers triggers for subscriber joins a group, date fields, anniversaries, link clicks, cart abandonment, product purchases, order fulfillment, unsubscribes, and field updates.

  • Use automation blocks

    We have added four new blocks to our Automation Email Campaign Drag & Drop Builder to help you create effective eCommerce campaigns. These additions will streamline the process of building and customizing your eCommerce email campaigns.

    These automation blocks include:

    Note: these blocks are available only in Automation email campaign Drag&Drop builder.

    Abandoned cart block

    This block in the email campaign helps recover lost sales by re-engaging customers who left items in their shopping carts. 

    It includes the abandoned product image and description, price and discount as well as a button to go back to the checkout page to encourage customers to complete their purchases.

    Once the block is dragged into the template, you will see a sample preview of abandoned cart block, it’s content will be replaced with actual product from the cart. Nevertheless, the block itself is highly customizable to fit your template and brand.

    You can edit:

    • Image layout and size
    • Product title and description
    • Price
    • Checkout button
    • Block’s overall appearance

    Order details block

    The Order details block provides a comprehensive overview of a customer’s purchase and its details.

    This block enhances customer experience by offering a clear and detailed summary of their transaction.

    Once the block is dragged into the template, a sample preview of the order details will appear. When the campaign is sent after an automation is triggered by an actual purchase, this content will be replaced with the customer’s order details. 

    The block is customizable to better fit your overall campaign.

    You can edit:

    • Summary header
    • Product title and body
    • Price and currency
    • Summary footer
    • Block’s overall appearance

    Order total block

    The Order total block provides customers with a summary of their purchase.

    If discounts or other elements are not part of the order, those sections will not be added to the Order total block automatically.

    After dragging the block into the template, you’ll see a sample preview of the order total. When the campaign is sent due to an actual purchase triggered by automation, this sample will be replaced with the real order data. 

    The block is highly editable to fit your specific needs.

    You can edit:

    • Title
    • Body and its labels
    • Price and currency
    • Footer
    • Block’s overall appearance

    Billing & Shipping block

    The Shipping & Billing block in our email campaign builder provides key information about the delivery timeline and addresses.

    Once you add the block to your template, a preview of the shipping and billing details will be displayed. When the campaign is triggered by an actual purchase, this preview will update with the accurate shipping method, billing address, and shipping address. 

    The block is fully customizable to suit your requirements.

    You can edit:

    • Title
    • Shipping method settings
    • Address settings
    • Block’s overall appearance

    If you got stuck on a specific task or can’t find a way to execute a particular job, contact our support team via LiveChat or [email protected] – we’re here to help 24/7.

  • Start building a workflow

    First, you will need to pick a trigger and then start creating a required sequence (newsletters must be created within the automation’s workflow). Start by creating a simple welcome email to greet recently joined subscribers.

    This short video guide below will illustrate the whole process and how easily it can be done.


    All automated workflows are composed of different types of action steps. When a particular step is completed, the subscriber will continue moving to the next one. Sophisticated scenarios are easily created using different action and condition steps.

    Creating large and powerful customer journeys to win-back customers should be a necessity. It’s easy to remind people about their abandoned carts and/or automatically manage subscribers’ lists based on their previous activity.

    A brief illustration how such sequence could look.


    If you got stuck on a specific task or can’t find a way to execute a particular job, contact our support team via LiveChat or [email protected] – we’re here to help 24/7.

  • Understand automation steps

    A highly customizable automation is the key to the free-and-easy, experience; therefore a various type of action steps is included.

    Here are all available steps and conditions:

    • Condition – continue the workflow in a different way depending on whether conditions are matched.
    • Delay – set a delay between workflow steps.
    • Email – a newsletter which will be sent to a subscriber.
    • SMS – an SMS which will be sent to a subscriber.
    • Action – change subscriber’s details or group membership, notify yourself or send a web-hook.

    Detailed description

    Condition step is one of the most effective ways to create unique route for a different occasions. What activity can be selected?

    • Subscriber details (any custom field can be chosen),
    • Subscriber status
    • Workflow email activity 
    • Campaign activity 
    • Group membership (e.g. move to different group)

    Delay can be set for:

    • Minutes
    • Hours
    • Days
    • Weeks
    • Months

    Email step is pretty basic, enter these fields:

    • Email title 
    • From name
    • Sender’s email address (the same as reply-to email address)
    • Email subject
    • Email preview text (optional)

    Then choose how you want to design the campaign:

    • Drag and drop builder
    • Plain text
    • Custom HTML

    Action step is used for executing activities for specific conditions. These are possible actions:

    • Move subscriber to another group
    • Copy subscriber to another group
    • Remove subscriber from a group
    • Mark subscriber as unsubscribed
    • Update subscriber’s custom field
    • Remove subscriber’s custom field
    • Notify me
    • Send webhook

    If you got stuck on a specific task or can’t find a way to execute a particular job, contact our support team via LiveChat or [email protected] – we’re here to help 24/7.

  • Choose a starting trigger

    Automation workflows allow you to create thousands of scenarios for sending automated emails without lifting a finger. Nevertheless, every automation sequence must start with a trigger.

    When creating a new automation workflow, you will be presented with different starting triggers:

    • A Date. For example, you have the  ‘last purchased’ date as a custom field next to each subscriber and want to start a Win-Back Customer email series. In order to activate date trigger subscriber’s custom field must have “date” type selected.
    • An Anniversary Of A Date. Perfect for sending Birthday cards or for any other anniversary date. For this trigger, you need to have a defined date custom field information for each subscriber. The system will require date formatting and automation will start each year automatically.
    • Subscriber Added to a Group. This automation workflow will start when a subscriber gets added to a certain subscriber group via a subscription form or an API call.
    • Subscriber Is Removed From a Group. The automation will start whenever the subscriber is removed from a defined group via an API call or a separate automation workflow. Manually removing subscribers will not trigger the automation.
    • A link Is Clicked. Automation would start its first action whenever a subscriber clicks on a specific defined link. It might be a link to a particular product or any other link used in previous campaigns. After subscribers click on the link, they automatically participate in a secondary automation sequence which starts after the “A link is clicked” trigger.
    • Cart Is Abandoned. Abandoned cart reminders might be a great source of revenue. It starts the automation workflow once a cart is abandoned. Send them emails, add them to tailored-made groups, and get notified if a cart is recovered. This requires integration with e-commerce!
    • A Product Is Purchased. Send customers Thank-you letters, post-purchase feedback requests, or get notified when somebody buys your product or service. This requires e-commerce integration!
    • An API Call Is Made. Start the automation with any of your system’s events. Send an API call from any other system or program and start the automation.
    • Subscriber unsubscribed. Start the automation if any of your subscribers unsubscribes. It can be used to notify yourself about this occasion, move subscribers to a certain group, remove them from future messaging, and even send a confirmation email to the subscriber acknowledging their decision to unsubscribe.
    • Subscriber field updated.  Start the automation sequence when any of the chosen fields receives new information.

    Note: Automation is triggered according to the account’s time zone. If you’re facing any delays, please double-check the time zone set in your account settings. 


    If you got stuck on a specific task or can’t find a way to execute a particular job, contact our support team via LiveChat or [email protected] – we’re here to help 24/7.

  • Choose the right step

    Overall, there are 4 steps:

    • Conditions. Conditions define a certain rule and decide to which of following Paths the subscriber should go: Yes or No.
    • Campaign activity: Define the action based on a subscriber’s activity in the previously sent campaigns. You can choose a certain campaign and check if they opened it or clicked on any links.
    • List membership: Define the actions based on whether the subscriber belongs to a certain list or not.
    • Abandoned cart: Define the following action based on total cart value, also, whether the cart contains specific products or whether the cart was recovered.
    condition

    There are several Condition Rule Types, which all appear in the ‘Select Condition Type’ dropdown:

    automation

    Condition Types:

    • Subscriber details: Set the rule according to each subscriber’s Email, First Name or Last Name.
    • Custom fields: Define the rule according to subscribers’ values of custom fields, if you have imported some. It could be a subscriber’s’ birthday, education, gender, address, location, phone, company, title or any other relevant information you’re able to collect about your subscribers.
    • Workflow email activity: This type of condition checks all the actions related to emails sent on the same workflow. You can check if the subscriber opened previous emails or clicked on some links.

    Example: You want to send the next educational/show-around email to those that have opened your previous emails, and repeat the same email to those that did not open it.

    Create a “Welcome” email

    Add a Delay of “XX” time

    1. Add a condition and set it up as follows:
      1. Choose condition type: Workflow email activity
      2. Set activity type: Opened the campaign. Save.
    2. Add a new email to NO path.
    3. Add other actions to Yes path or leave it empty. It’s up to your imagination.

    NOTE: Add a DELAY before the Condition and Email. Otherwise, this step will be taken immediately after email is sent. Most of the time that would lead all your recipients to the NO path.

    flow

    Example: You want to send a free-shipping voucher for those, whose cart value is more than 50$ and send a simple reminder to those, whose cart is less than 50$ value.

    • Choose starting trigger: A Cart is Abandoned.
    • Add a delay of XX time. (Give some time for the user to come back and recover it manually)
    • Add a condition and setup as follows:

      What type should the condition be? -> Abandoned Cart.

      Cart details -> Total cart value.

      How should the value be compared? -> Is Equal or greater.

      Value -> 50.

      Add the Email containing free-shipping offer to YES path and Reminder Email to NO path.

      Click ‘Activate’. Voila, the workflow is set!

    The ecommerce integrations needs to be setup for this to work! You can find it here.

    value

    • Purchased product: Define the following action depending on whether the product has been purchased or not. You can choose if it should check if any product was bought or a specific one. Moreover, you can choose the date – Should it check if the product was purchased on an exact day, before a specific date, or after a specific date.
    • Emails: Send transactional emails in different stages of automation workflows. These emails are sent automatically based on previously defined rules and actions above.
    • Delays: It’s a simple yet a super important thing in your email marketing automation. If you imagine the workflow as a linear journey – once a subscriber steps on this action it has to wait for a defined amount of time. After a period of time, it automatically goes through to the next step.
      • Time could be defined in minutes, hours, days, weeks or even months.
      • When an automated workflow is active you are able to see how many subscribers are waiting on every step, so you’re able to get the current picture.

    Once you add an email action, you should define the following information:

    1. Title of the email (Title is visible only to you, but NOT to the subscribers).
    2. From line. Who is the sender of this email? This information is visible to subscribers as well.
    3. Reply-to email address. You should write your email address so people could reply to this address. It is mandatory to use your own domain email address i.e. [email protected].
    4. Subject line. Announce to the subscribers what the email is all about.

    Emails: Send transactional emails in different stages of automation workflows. These emails are sent automatically based on previously defined rules and actions above.

    Once you define the information, click on the button: ‘Edit content’ in order to choose the email template and create the content. Then, click ‘Save & Continue’ and voila! The email is ready!

    Automation workflows are able to do even more actions than just sending emails. Action options:

    • Move a subscriber to another list.
    • Copy a subscriber to another list.
    • Remove a subscriber from a list.
    • Mark a subscriber as unsubscribed.
    • Update a subscriber’s custom field.
    • Notify me. (Sends an email to you with a notification text of what just happened).
    • Send a Webhook (Send a custom webhook to URL. Most commonly this feature is used for system integrations).

    If you got stuck on a specific task or can’t find a way to execute a particular job, contact our support team via LiveChat or [email protected] – we’re here to help 24/7, 7 days a week.