Category: Getting started

  • What Is Email Automation in Sender

    This guide shows how to get started with email automation in Sender. It covers setting up your first automation workflow and how to begin automating your email campaigns.

    Where to Find This Feature

    In the Sender dashboard, go to: Automations (sidebar) → Automations.

    email-automations

    You’ll see all your existing workflows listed with their status (DRAFT or ACTIVE), stats, and available actions. Click Create new workflow to begin.

    Steps to Set Up Your First Automation Workflow

    Step 1 — Choose a Starting Point

    Click Create new workflow in the top-right corner. A dialog opens with two options: browse ready-made workflow templates or create from scratch. Templates are grouped by use case such as Welcome, Onboarding, Win-back customers, Abandoned cart recovery, and more.

    automation-templates

    To use a template, click Use this template. To build your own, click Create from scratch.

    Step 2 — Select a Trigger

    If you chose to create from scratch, the next screen asks you to choose a trigger. Triggers determine what starts your automation.

    automation-triggers

    Options include Subscriber joins a group, A cart is abandoned, A link is clicked, A date, An anniversary of a date, A product is purchased, An order is fulfilled, Subscriber is removed from a group, Subscriber unsubscribed, and Subscriber field updated. Click Create automation under the trigger you want.

    Step 3 — Name and Configure the Trigger

    A dialog appears asking you to name your workflow. Enter a name in the Workflow name field and click Create. The workflow editor opens with your trigger on the canvas and a Trigger Setup panel on the right. Configure the trigger settings — for example, select a group under SELECT GROUP if you chose Subscriber joins a group.

    configure-automation-trigger

    Toggle Repeat workflow if new subscribers should enter the automation. Set it to Anytime and click Save.

    Step 4 — Add Workflow Steps

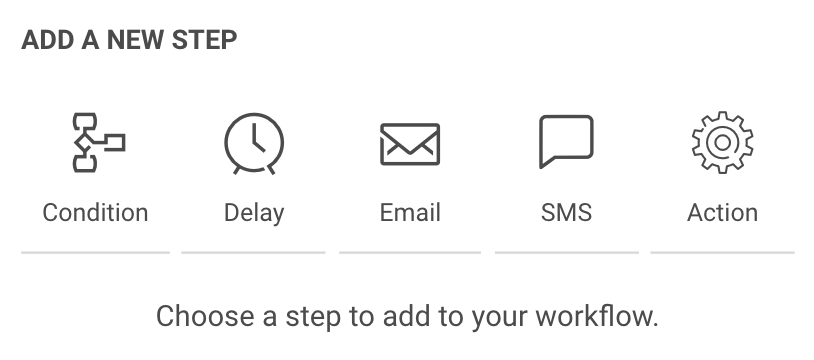
    Click the + icon below the trigger to open the ADD A NEW STEP menu. Six step types are available:

    automation-steps
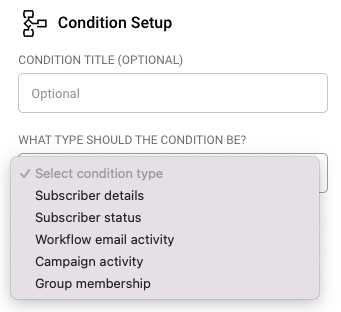
    • Condition — creates a Yes/No branch based on criteria like subscriber details, workflow email activity, campaign activity, group membership, or segments.
    • Delay — pauses the workflow for a set time period (minutes, hours, days, weeks, or months), until a specific date, or based on a custom date field.
    • Email — sends an automated email to the subscriber.
    • SMS — sends an SMS message.
    • Action — performs operations such as moving or copying a subscriber to another group, updating custom fields, or sending a webhook.
    • Split — divides traffic between different paths. Click on a step type to add it. Each step appears on the canvas with a setup panel on the right.

    Step 5 — Configure Each Step

    When you select a step on the canvas, its setup panel appears on the right. For an Email step, fill in the step name, from name, email subject, optional preview text, and choose an email design option (Drag and drop builder, Plain text, or Custom HTML).

    automation-email-template

    Click Create email content to design your email, then click Save.

    automation-delay-setup

    For a Delay step, select a wait type and set the duration. For a Condition, choose a condition type and define the criteria. Each step must be saved individually. The Completion indicator in the top-right corner tracks how many steps are fully configured (e.g., 1/3).

    Step 6 — Build Out Your Workflow Sequence

    Continue clicking the + icon after each step to add more steps. A typical workflow might follow a pattern like trigger, then email, then delay, then condition, then separate emails on the Yes and No branches. Condition steps automatically create Yes and No branches, each with its own + icon so you can add different steps to each path. Repeat until your full sequence is built.

    Step 7 — Review and Activate

    Once all steps show as configured and the Completion indicator reads the same number for both values (e.g., 5/5), your workflow is ready to go live.

    automation-template-review

    Go back to the Automations list by clicking the back arrow.

    automation-lists

    Find your workflow, click the dropdown arrow under Actions, and select Activate. The workflow status changes from DRAFT to ACTIVE.

    What Happens After You Save

    After saving, the automation appears in the Automations list with a status of DRAFT. You can test the workflow, make adjustments, or activate it from the actions dropdown.

    automation-test

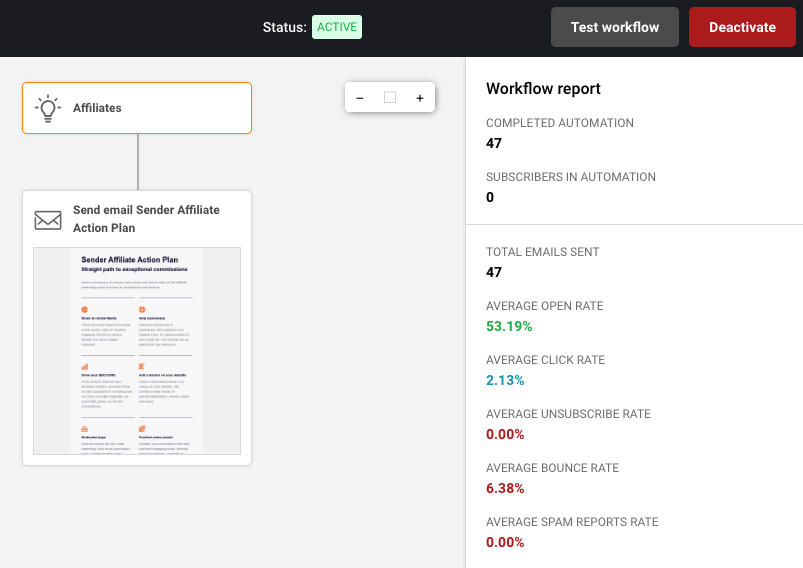
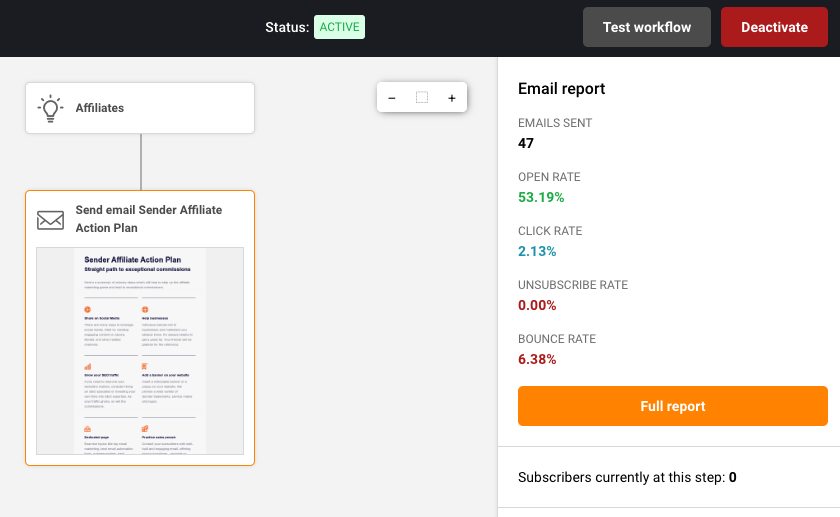
    Once active, the Test workflow and Deactivate buttons appear at the top of the workflow editor. Performance and engagement can be checked in the Workflow report panel after the automation is live, which displays metrics like total emails sent, average open rate, average click rate, and subscriber completion data.

    Common Issues

    Completion indicator does not reach full count → One or more steps are missing required configuration. Click each unconfigured step on the canvas and complete the setup panel fields.

    Cannot activate the workflow → All steps must be fully configured and saved before the Activate option becomes available.

    Trigger not firing → Confirm that the selected group or event condition is correct and that subscribers are entering through the expected path (signup form, integration, or API).

    Email step shows as incomplete → The email content has not been designed yet. Click the email step and use Create email content to build the email body.

    FAQs

    Can I edit a workflow after activation?

    Yes. Open the workflow from the Automations list and make changes. Active workflows can be edited without deactivating them first, though some changes may require deactivation.

    Can a subscriber go through the same workflow more than once?

    Only if you enable the Repeat workflow toggle in the Trigger Setup panel.

    How many steps can I add to a workflow?

    There is no fixed limit. You can chain as many steps as needed using the + icon after each step.

    What is the difference between a Condition and a Split?

    A Condition routes subscribers down a Yes or No path based on criteria you define. A Split divides traffic between different paths.

    Can I use a template and modify it?

    Yes. Click Use this template, then edit any step in the workflow editor to customize it.

  • Transactional vs automated emails

    Automated emails and transactional emails serve different purposes and have distinct characteristics. Here are the key differences between the two:

    Purpose:

    Automated Emails: Automated emails are typically used for marketing and engagement purposes. They are sent to a list of subscribers or customers to deliver promotional content, newsletters, product recommendations, or other marketing messages. These emails are often triggered by specific actions or events, such as signing up for a newsletter or making a purchase.

    Transactional Emails: Transactional emails are primarily functional in nature. They are sent in response to a user’s specific action or transaction, providing important and often time-sensitive information related to that action. Examples include order confirmations, shipping notifications, password reset emails, and account verification emails.

    Content:

    Automated Emails: The content of automated emails is usually marketing-oriented and is designed to encourage user engagement, drive sales, or promote a brand. They may contain promotional offers, news updates, and personalized recommendations. 

    Transactional Emails: Transactional emails contain information directly related to the user’s interaction with a service or platform. They typically include order details, account information, receipts, and other essential data necessary for the completion of a transaction or action.

    Triggering Events:

    Automated Emails: Automated emails are triggered by predefined events or user behaviors, such as subscribing to a newsletter, browsing specific products, or reaching a certain milestone in a customer journey. 

    Transactional Emails: Transactional emails are triggered by specific actions taken by users, such as making a purchase, requesting a password reset, or confirming an email address. They are generated in response to these actions.

    Compliance and Regulations:

    Automated Emails: Marketing emails, including automated ones, must comply with anti-spam laws and regulations, like the CAN-SPAM Act in the United States or the GDPR in Europe. They require recipients’ consent and provide options for unsubscribing. 

    Transactional Emails: Transactional emails are generally exempt from many of the strict marketing email regulations because they are essential for user experience and are expected by users in response to their actions. 

    Open and Click Rates:

    Automated Emails: Marketers often track open rates and click-through rates for automated emails to measure the success of their marketing campaigns.

    Transactional Emails: Transactional emails may also be monitored for delivery and open rates, but their primary focus is on ensuring that users receive critical information.

    In summary, automated emails are marketing-focused and initiated by predefined triggers, while transactional emails are functional and directly related to user actions. Both types of emails play essential roles in communication with customers and subscribers, but they serve different purposes in the email marketing ecosystem.

    That’s it!

    If you got stuck on a specific task or can’t find a way to execute a particular job, contact our support team via LiveChat or [email protected] we’re here to help 24/7.

  • Automation feature overview

    What is email marketing automation?

    It may be a confusing term for those that are new to email marketing. But do not worry, the whole process is easier than you think.

    In simple terms, email marketing automation is a futuristic-sounding name for a tool that takes your email marketing to a whole new level. It makes your campaigns more personalized and precise (time-wise). It converts manual tasks into automated sequences.

    Developing an automated workflow could appear difficult at first, though the entire process is user-friendly and straightforward. In practice, any needed sequence can be built using different steps, conditions, and triggers.

    Here’s how it looks in motion.


    Automation triggers

    Automated workflows allow you to create thousands of different scenarios of sending automated emails without lifting a finger. Nevertheless, every automated sequences must start with a trigger.

    At the start, you will be asked to select a starting trigger. Starting triggers are:

    • A Date – To activate the date trigger subscriber’s custom field must have the “date” type selected. For example, you have the ‘last purchased’ date as a custom field next to each subscriber.
    • An Anniversary Of A Date – Perfect for sending Birthday cards or for any other anniversary date. For this trigger, you need to have a defined date custom field information for each subscriber. The automation will start each year automatically.
    • Subscriber is added to a group – This automation workflow will be started when a subscriber is added to a certain subscriber list via a subscription form or API call.
    • Subscriber Is Removed From a group – The automation will start whenever the subscriber is removed from a defined group via an API call or a separate automation workflow. Manually removing subscribers will not trigger the automation.
    • A link Is Clicked – Automation starts its first action whenever a subscriber clicks on a specific link. It might be a link to a particular product or any other link used in previous campaigns. After subscribers click on a link, they automatically participate in a secondary automation sequence which starts after the “A link is clicked” trigger.
    • Cart Is Abandoned – Abandoned cart reminders might be a great source of revenue. It starts the automation workflow once a cart is abandoned. Requires e-commerce integration!
    • A Product Is Purchased – Send customers Thank-you letters, post-purchase feedback requests, or get notified when somebody buys your product or service. Requires e-commerce integration!
    • An order is fulfilled – This trigger gets activated once a seller marks an order as fulfilled in Shopify.
    • An API Call Is Made – Start the automation with any of your system events. Send an API call from any other system or program and start the automation.

    When the automation trigger is set, continue by adding the following steps.

    Automation Steps

    Each automation sequence is a combination of different steps: condition, delay, email, SMS, action.

    Automation steps selection
    • Condition – continue the workflow in a different way depending on whether conditions are matched.
    • Delay – wait for a certain period of time.
    • Email – a newsletter which will be sent to a subscriber.
    • SMS – an SMS which will be sent to subscriber.
    • Action – change subscribers details or list membership, notify yourself or sent a web-hook.

    The condition step is one of the most effective ways to create a unique route for different occasions. What activity can be selected?

    Condition options
    • Subscriber details (any custom field)
    • Subscriber status
    • Workflow email activity
    • Campaign activity
    • Group membership
    • Abandoned cart (can be chosen if the trigger “A cart is abandoned” is selected)
    • Purchase product (can be chosen if the trigger “A product is purchased” is selected)

    The Delay step is pretty self-explanatory. Delay can be set for a set amount of:

    • Minutes
    • Hours
    • Days
    • Weeks
    • Months

    Email step is pretty basic, firstly, enter these fields:

    • Email title
    • From name
    • Reply-to address
    • Email Subject
    • Email preview text (optional)

    then click on “Create” button and Drag & Drop design builder will be launched.

    SMS setup is all done within the sidebar. Fill in the following information:

    • Campaign name
    • Sender
    • Message text
    • Add Opt-out instructions

    Then click “Save,” and the SMS is prepared.

    The action step is used for executing activities for specific conditions. These are possible actions:

    • Move subscriber to another group
    • Copy subscriber to another group
    • Remove subscriber from a group
    • Mark subscriber as unsubscribed
    • Update subscriber’s custom field
    • Remove subscriber’s custom field
    • Notify me
    • Send webhook

    Automation reports

    Automation’s reports are located in the particular automation workflow itself, open automation to view extensive report statistics.

    Automation reports

    In order to view the complete report of a particular action step – click on the step and select the “Full Report” button. Next, a new window with comprehensive statistics will appear.

    Full report button
    Statistics view

    If you are stuck on a specific task or can’t find a way to execute a particular job, contact our support team via LiveChat or [email protected] – we’re here to help 24/7.

  • Define email marketing automation

    It may be a confusing term for those that are new to email marketing. But do not worry, the whole process is more straightforward than you think.

    In simple terms, email marketing automation is a futuristic-sounding name for a tool that takes your email marketing to a whole new level. It does so by making your campaigns more personalized and precise (time-wise). It simply converts usual manual steps taken into an automated system.

    Setting up automation is relatively easy – here is how it looks in progress:

    automation

    You can create multiple scenarios by implementing different steps and conditions.

    That’s it!

    If you are stuck on a specific task or can’t find a way to execute a particular job, contact our support team via LiveChat or [email protected] – we’re here to help 24/7.