Category: Integrations

  • Available integrations overview

    This guide provides an overview of all available integrations in Sender, organized by category and integration type, so you can identify the right connection for syncing subscribers, automating workflows, capturing leads, and extending your email marketing across third-party platforms.

    Prerequisites

    • An active Sender account.
    • An account on the third-party platform you want to integrate with.
    • An API access token from Sender (required for API-based and third-party integrations).
    • Admin or owner-level access on the third-party platform, depending on the integration.

    Where to Find This Setting

    Sender integrations are accessed from two locations depending on the integration type.

    For ecommerce store connections, go to Account settings → Connected stores in the Sender dashboard. Click Connect store to begin linking a supported ecommerce platform.

    For API-based integrations and third-party connections, go to Account settings → API access tokens to generate the API access token required by external platforms. Webhook-based integrations are managed under Account settings → Webhooks.

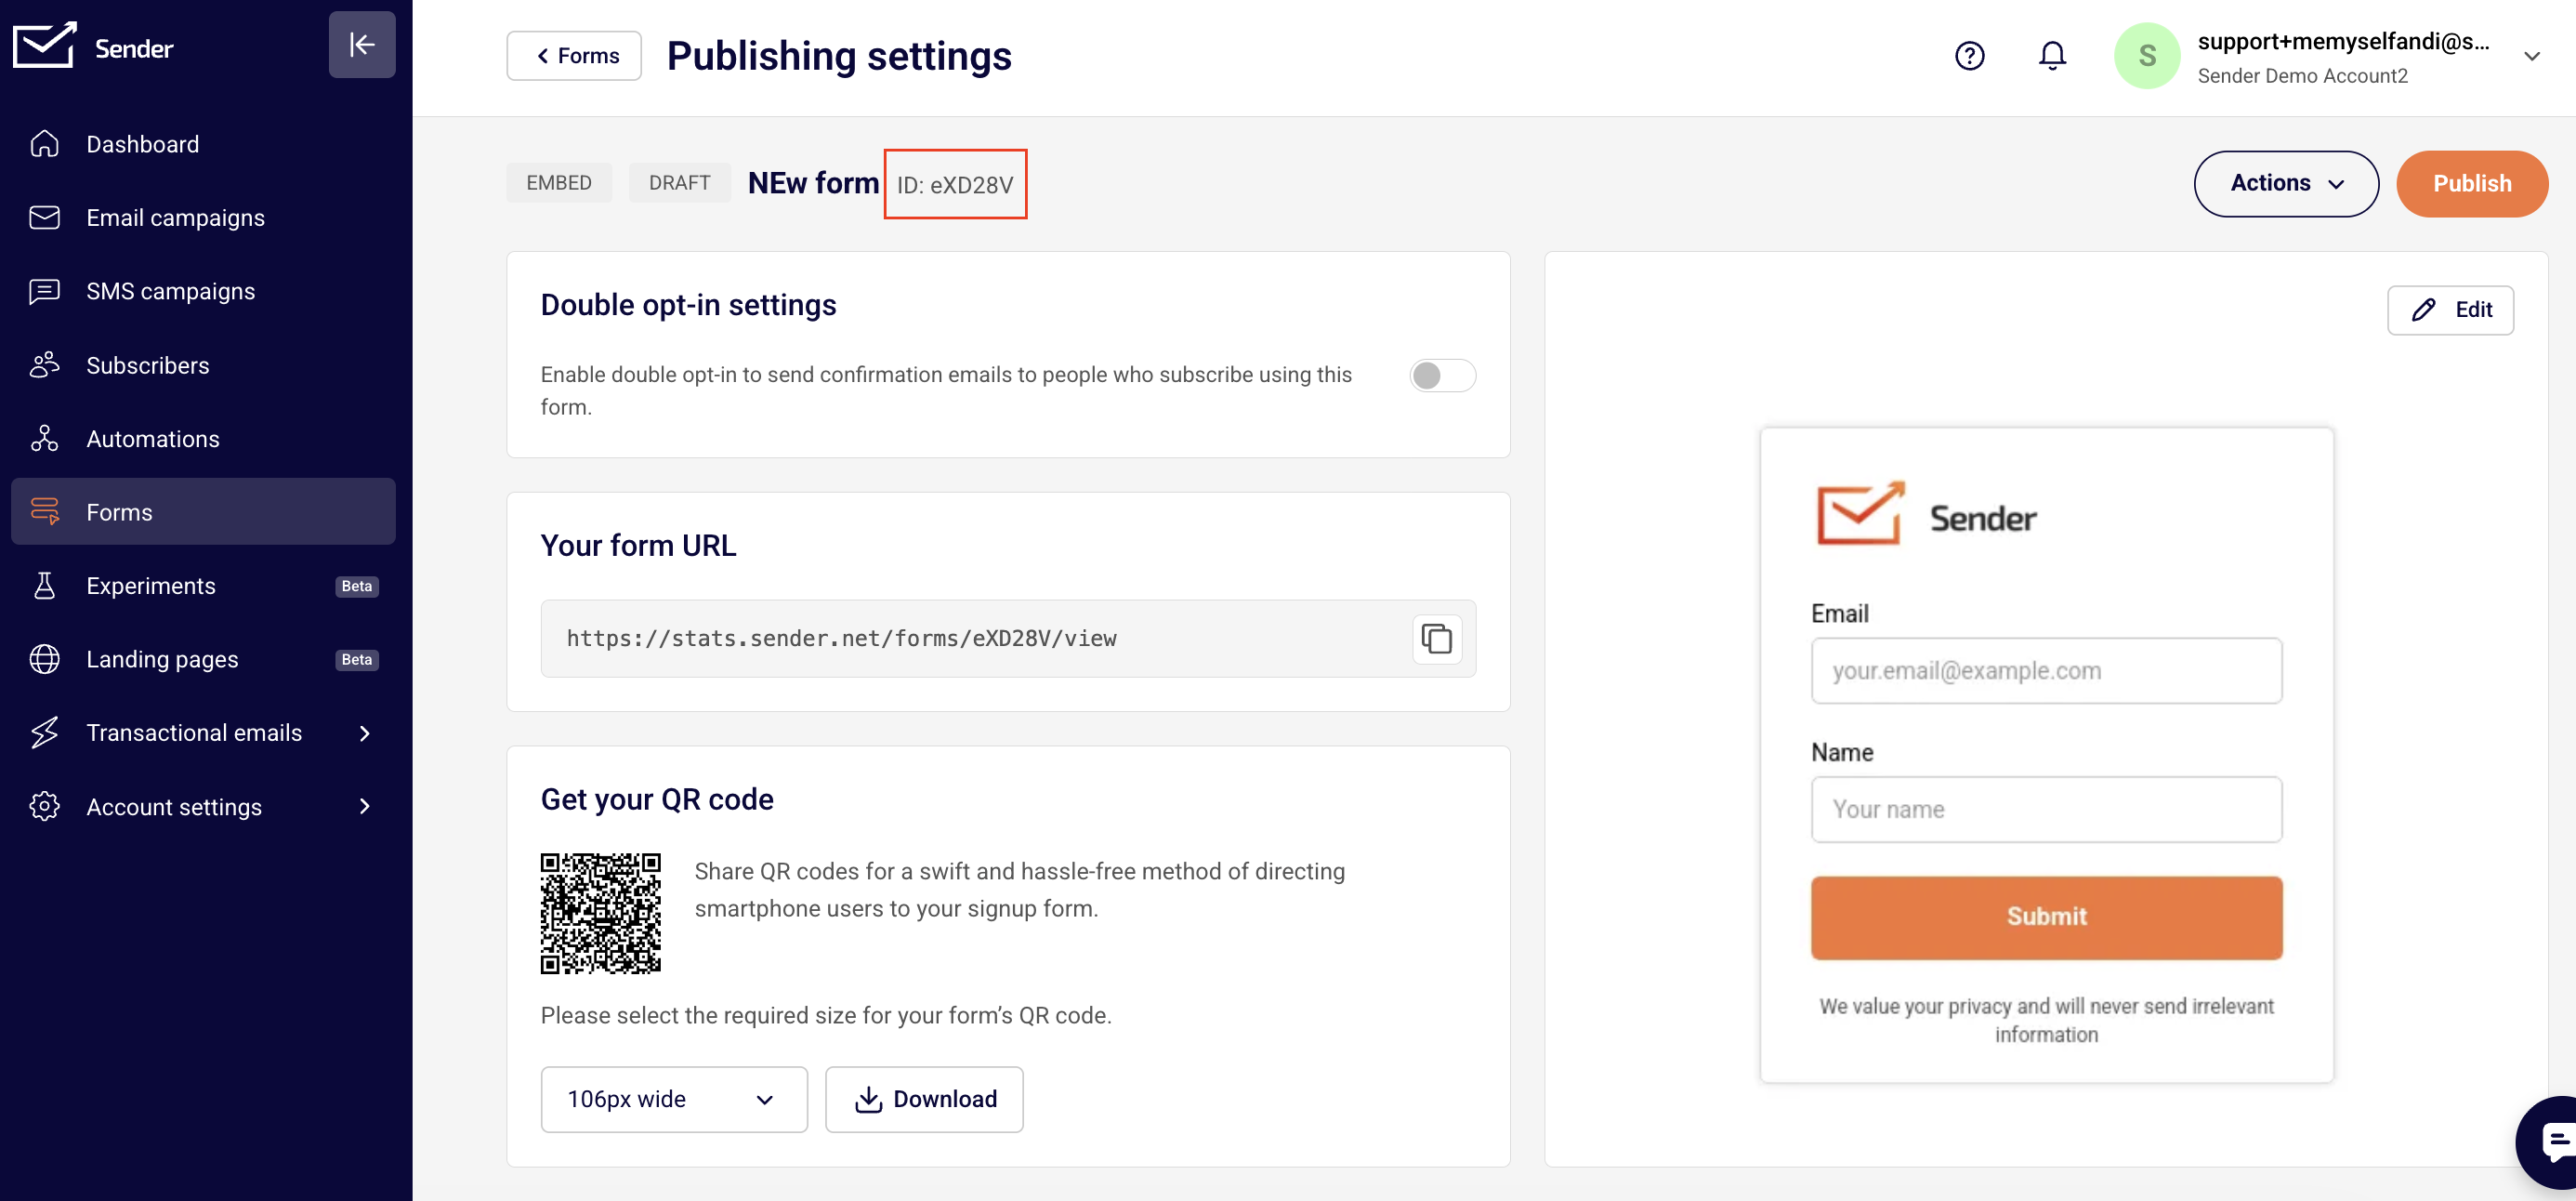
    A full directory of supported integrations is available at https://www.sender.net/integrations/, where you can browse and filter by category and integration type.

    Steps to Browse and Connect an Integration

    Step 1 — Identify the integration type

    Sender organizes integrations into three types. Native integration means a built-in, direct connection configured within Sender or via a dedicated plugin. Automatic import enables one-click contact migration from another email marketing provider into Sender. Third-party integrations connect Sender to external platforms using your API access token or through the third-party platform's own configuration interface.

    Step 2 — Choose the integration category

    Browse integrations by category to find the platform that matches your use case. The available categories are Ecommerce platforms, Content management, Workflow automation, Email builders, Leads capture, Tracking & analytics, Translations, and Email marketing providers. Select a category from the sidebar on the integrations directory page to filter the list.

    Step 3 — Review ecommerce platform integrations

    The Ecommerce platforms category includes native integrations with Shopify, WooCommerce, PrestaShop, Jumpseller, and Drupal. These connect your online store to Sender for syncing customer data, sending automated product recommendations, abandoned cart reminders, and order-based follow-ups. Access these through Account settings → Connected stores in the Sender dashboard.

    Step 4 — Review content management integrations

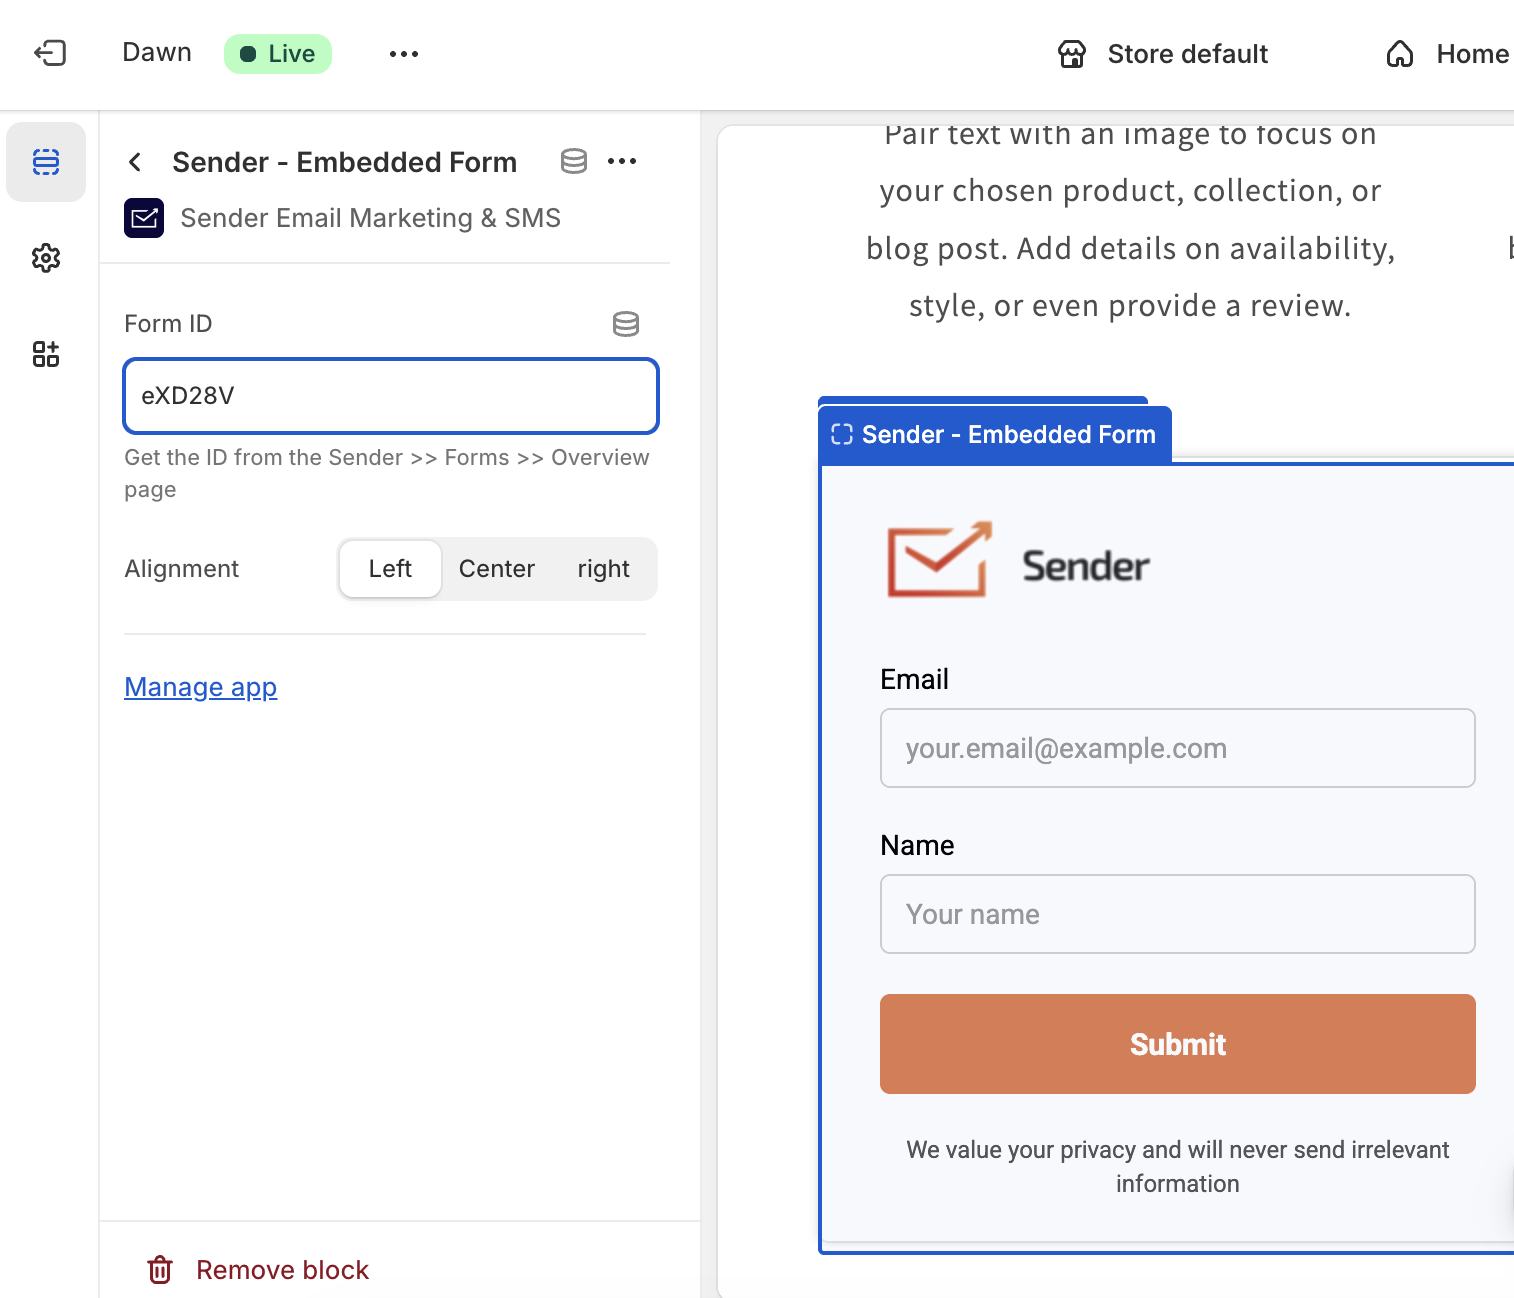
    The Content management category includes a native integration with WordPress. The Sender plugin lets you capture leads directly from your website, sync subscriber lists, and manage campaigns. Install the plugin from the WordPress plugin directory and authenticate using your API access token.

    Step 5 — Review workflow automation integrations

    The Workflow automation category includes Zapier, OttoKit, Make, Pabbly, Pipedream, Integrately, and ZohoFlow. These platforms connect Sender to thousands of other apps through automated workflows. Configure these integrations within each third-party platform by selecting Sender as a connected app and authenticating with your API access token.

    Step 6 — Review email builder integrations

    The Email builders category includes Stripo.email. This integration lets you design fully customized email templates using Stripo's editor and export them directly into Sender for use in campaigns. Configure the connection within Stripo by selecting Sender as the export destination.

    Step 7 — Review leads capture integrations

    The Leads capture category includes Pagefly, Leadsnotify, Brave, Zotabox, Hellobar, and forms.app. These tools capture visitor information through landing pages, pop-ups, contact forms, and floating bars, then push new subscribers directly into your Sender subscriber groups.

    Step 8 — Review tracking and analytics integrations

    The Tracking & analytics category includes Google Tag Manager (GTM). This integration lets you deploy Sender tracking on your website to monitor user behavior, optimize email performance, and implement event-based triggers without modifying your site's code directly.

    Step 9 — Review translation integrations

    The Translations category includes Crowdin. This integration enables you to translate your email content into multiple languages through Crowdin's localization platform, feeding translated content back into your Sender campaigns for international audiences.

    Step 10 — Review email marketing provider integrations

    The Email marketing providers category includes Mailchimp and GetResponse. These are automatic import integrations that let you migrate your existing contacts from these platforms into Sender in just a few minutes, with no manual steps required. All contacts transfer automatically into one place.

    How to Verify the Integration

    After connecting any integration, verify it is working by performing a test action on the third-party platform, such as adding a subscriber or triggering a workflow. In the Sender dashboard, go to Subscribers to confirm that new contacts appear in the correct Subscriber group. For ecommerce integrations, check Account settings → Connected stores to confirm the store shows a connected status. A successful integration displays the connected platform's name and status in the relevant settings page.

    What Syncs Between Platforms

    Ecommerce data (Shopify, WooCommerce, PrestaShop, Jumpseller, Drupal) — Customer information, purchase history, and order data sync from your connected store into Sender. This data enables automated campaigns such as abandoned cart reminders and product recommendations.

    Subscriber data (Workflow automation and leads capture tools) — New subscriber details captured through third-party forms, landing pages, or automation workflows sync into Sender subscriber groups. The direction is typically one-way, from the third-party platform into Sender.

    Contact migration (Mailchimp, GetResponse) — Existing contacts import automatically from the source email marketing provider into Sender. This is a one-time bulk transfer that moves all contacts without manual steps.

    Email templates (Stripo.email) — Completed email designs export from Stripo directly into Sender for use in campaigns. The sync direction is one-way, from Stripo into Sender.

    Tracking events (Google Tag Manager) — Website visitor behavior data flows from your site through GTM into Sender, enabling event-based triggers and performance optimization for your email campaigns.

    Integration Tips

    Generate your API access token first — Most third-party integrations require an API access token. Go to Account settings → API access tokens and click Create API token before starting any integration setup.

    Use one integration per purpose — Avoid connecting multiple integrations that serve the same function, such as two different leads capture tools pushing to the same subscriber group, to prevent duplicate subscribers.

    Check integration type before setup — Native integrations are configured within Sender or via a dedicated plugin. Third-party integrations are configured within the external platform. Knowing the type determines where you start the setup process.

    Test with a single record first — Before relying on any integration for live campaigns, send a test subscriber or trigger a test event to confirm data flows correctly between platforms.

    Keep API tokens secure — Treat your API access token like a password. Do not share it publicly or include it in client-side code. Revoke and regenerate tokens if you suspect unauthorized access.

    Common Issues

    Integration not appearing in Connected stores → This page only shows ecommerce store connections (Shopify, WooCommerce, PrestaShop, Jumpseller, Drupal). Workflow automation and third-party integrations are configured within the external platform using your API access token.

    No data syncing after connection → Verify that your API access token has not been revoked. Go to Account settings → API access tokens and confirm the token is active. Re-authenticate the integration in the third-party platform if needed.

    Duplicate subscribers appearing → Multiple integrations or forms pushing to the same subscriber group can create duplicates. Review your connected integrations and ensure only one source feeds into each group, or use Sender's deduplication based on email address.

    Third-party platform interface looks different → External platforms update their interfaces independently. If the steps described in an integration guide do not match exactly, look for equivalent settings in the platform's current layout or check their help documentation.

    Automatic import not transferring all contacts → Mailchimp and GetResponse imports transfer all contacts from the connected account. If some contacts are missing, verify that they are active subscribers in the source platform and not on a suppression or unsubscribe list.

    FAQs

    Where do I find my Sender API access token?

    Go to Account settings → API access tokens in the Sender dashboard. Click Create API token if you don't have one yet. Copy the token and paste it into the third-party platform's authentication field.

    Does the integration sync existing subscribers or only new ones?

    This depends on the specific integration. Automatic import integrations (Mailchimp, GetResponse) sync all existing contacts on first connection. Most workflow automation and leads capture integrations only sync new subscribers going forward. Check the integration's settings for sync scope options.

    Can I connect Sender to multiple third-party platforms at the same time?

    Yes. Each integration operates independently. You can connect Sender to WordPress, Shopify, Zapier, and other platforms simultaneously without conflicts.

    What happens if I disconnect the integration?

    Disconnecting stops future data sync between the platforms. Subscribers and data already synced to Sender remain in your account and are not deleted.

    The integration stopped syncing data. What should I check?

    Verify that your API access token has not been revoked or expired. Check that the integration is still enabled and properly configured in the third-party platform. Re-authenticate if the platform requires it.

    How many integrations does Sender support?

    Sender currently supports 24 integrations across eight categories: Ecommerce platforms, Content management, Workflow automation, Email builders, Leads capture, Tracking & analytics, Translations, and Email marketing providers. New integrations are added regularly.

    Are integrations available on all Sender plans?

    Integration availability may vary by plan. Check your current plan details under Account settings → Billing or visit the Sender pricing page for specifics.

    Note: Third-party platform interfaces may change over time. The steps and settings described in this article reflect the current state at the time of writing and may vary slightly in the future.

  • Connecting with your store

    This guide explains how to connect your ecommerce store to Sender so you can sync customer data, track cart activity, trigger automations, and send targeted campaigns based on purchase behavior.

    Prerequisites

    • An active Sender account
    • An active ecommerce store on a supported platform (Shopify, WooCommerce, PrestaShop, Jumpseller, or Drupal)
    • Admin access to your ecommerce platform's dashboard or admin panel
    • An API access token from Sender (required for WooCommerce, PrestaShop, and plugin-based integrations)

    Where to Find This Setting

    In the Sender dashboard, go to Account settings → Connected stores. This page displays all currently connected stores and provides the Connect store button to add a new connection.

    For plugin-based integrations (such as WooCommerce or PrestaShop), you also need an API access token. Go to Account settings → API access tokens to generate one.

    The connection process differs depending on your ecommerce platform. Shopify connects directly through the Shopify App Store. WooCommerce, WordPress, and PrestaShop require installing a plugin and authenticating with your Sender API token. Jumpseller connects through an interactive setup flow.

    Note: Third-party platform interfaces may change over time. The steps below reflect the current process but may vary slightly depending on your platform version.

    Steps to Connect Your Store

    Step 1 — Generate an API access token in Sender

    Go to Account settings → API access tokens in the Sender dashboard. Click Create API token. In the dialog that appears, select a validity period — options include Forever, 30 days, 7 days, or 1 day. Click Create. Copy the generated token and store it securely. You will need this token to authenticate plugin-based integrations such as WooCommerce and PrestaShop.

    Step 2 — Install and authenticate the integration on your ecommerce platform

    The installation process depends on your platform:

    Shopify — Log into your Shopify admin. Click Add apps, then go to the Shopify App Store. Search for Sender Email Marketing & SMS. Click Add app and then Install app. You will be redirected to the Sender app inside Shopify to complete the connection.

    WooCommerce — Download the Sender.net plugin from the WordPress plugin store. Install and activate the plugin in your WordPress admin. Enter your API access token from Sender to authenticate. The Sender.net section will appear in your WordPress sidebar.

    PrestaShop — Download the Sender.net module from the Sender website. In your PrestaShop admin panel, go to Modules and Services → Add a new module. Upload the downloaded file and install it. Navigate to the Emailing & SMS section, find the Sender.net module, and click Install. Enter your API access token to authenticate.

    Jumpseller — Follow the interactive tutorial provided by Sender to connect your Jumpseller store directly to your account.

    Step 3 — Configure tracking and sync settings

    Once connected, configure your integration settings within the plugin or app on your ecommerce platform. For WooCommerce and PrestaShop, enable the Enable tracking option to activate cart tracking and customer data sync. Select which subscriber group new customers and guest visitors should be added to. For Shopify, cart tracking is enabled automatically upon connection. Your connected store will now appear on the Connected stores page in Sender.

    How to Verify the Integration

    Go to Account settings → Connected stores in Sender and confirm your store is listed with an active status. Place a test order or add items to a cart on your store, then check the Subscribers section in Sender to verify that customer data has synced. Navigate to Automations and confirm that ecommerce triggers such as A cart is abandoned and A product is purchased are available for use.

    What Syncs Between Platforms

    Customer email addresses → Sender — When a customer makes a purchase, creates an account, or is captured as a guest visitor, their email address is automatically added to the designated subscriber group in Sender. This happens in real time as events occur on your store.

    Cart activity → Sender — Abandoned cart data and product purchase events are tracked and sent to Sender in real time. This data powers the A cart is abandoned and A product is purchased automation triggers.

    Subscriber group assignment → Sender — New customers and guest visitors are assigned to the subscriber groups you configure in the plugin settings. You can set different groups for purchasers, new registrations, and guest cart captures.

    Customer fields → Sender — Depending on the platform and your plugin configuration, additional customer data such as name, gender, and date of birth can be synced to custom fields in Sender. This is configurable in platforms like PrestaShop through the Customer data settings in the plugin.

    Integration Tips

    Use a long-lived API token for stable connections — When generating an API access token for a plugin integration, select Forever as the validity period to avoid unexpected disconnections caused by token expiration.

    Assign separate subscriber groups for different customer types — Configure your plugin to save purchasers, new registrations, and guest visitors into distinct subscriber groups. This makes it easier to create targeted segments and campaigns in Sender.

    Enable tracking before setting up automations — Make sure the Enable tracking option is active in your plugin settings before creating abandoned cart or post-purchase automation workflows. Without tracking enabled, the automation triggers will not receive cart or purchase data.

    Test the connection with a sample transaction — After connecting your store, complete a test purchase or add-to-cart action to confirm data is flowing into Sender before launching live campaigns.

    Common Issues

    Store does not appear on the Connected stores page → The plugin or app installation may not have completed successfully. Revisit your ecommerce platform's plugin settings and confirm that the API access token is entered correctly and the plugin is activated.

    Subscribers are not syncing to Sender → The Enable tracking option may be disabled in your plugin settings. Go to the Sender.net plugin settings in your ecommerce admin and verify that tracking is turned on and a subscriber group is selected.

    API token authentication fails → The token may have expired or been deleted. Go to Account settings → API access tokens in Sender, generate a new token, and re-enter it in your plugin's authentication field.

    Abandoned cart automation is not triggering → Cart tracking must be active and the automation workflow must be set to Active status. Verify both in your plugin settings and in Sender under Automations.

    Pop-up forms are not appearing on the store website → Ensure the form is activated in Sender under Forms. Pop-up forms display automatically on connected stores once they are toggled to active — no additional script installation is needed.

    FAQs

    Where do I find my Sender API access token?

    Go to Account settings → API access tokens in the Sender dashboard. Click Create API token if you do not have one yet. Select a validity period, click Create, then copy the token and paste it into your plugin's authentication field.

    Which ecommerce platforms does Sender support for direct store connections?

    Sender offers direct integrations with Shopify, WooCommerce, PrestaShop, Jumpseller, and Drupal. Each platform has its own connection method — either through an app store, a downloadable plugin, or an interactive setup flow.

    Does connecting my store sync existing customers or only new ones?

    This depends on the platform. Some integrations, such as PrestaShop, offer an Export customers option that lets you sync your full customer list to a subscriber group in Sender. Others sync only new activity going forward. Check your plugin's settings for export or sync options.

    Can I connect multiple stores to the same Sender account?

    Yes. You can connect multiple stores across different platforms. Each connected store will appear separately on the Connected stores page under Account settings.

    What happens if I disconnect a store from Sender?

    Disconnecting stops future data sync between the store and Sender. Subscribers and data already synced to your Sender account remain intact and are not deleted. You can reconnect the store at any time by repeating the setup process.

    Do I need a paid Sender plan to use store integrations?

    Store integrations are available on all plans. However, certain features such as Revenue tracking require a Pro plan. Check the Billing section in Sender for details on your current plan's capabilities.

  • Zapier Integration

    This guide explains how to connect Sender to Zapier so you can automate workflows between Sender and thousands of other apps — such as syncing new subscribers, triggering actions when campaigns are created, or adding contacts from external tools.

    Prerequisites

    • An active Sender account
    • A Zapier account (free or paid plan)
    • An API access token from Sender (generated in Account settings → API access tokens)
    • A Zap idea in mind — knowing which trigger and action you want to automate

    Where to Find This Setting

    The Sender side of the connection is managed through your API access token. To find it, go to Account settings → API access tokens in your Sender dashboard. Click Create API token if you don't have one yet, then copy the token value.

    The Zapier side of the connection is managed entirely within Zapier. You configure the integration when creating or editing a Zap in the Zap editor at https://zapier.com. You can also manage existing connections from the Apps page under My Apps in your Zapier dashboard.

    Note: The Zapier interface may change over time. Steps and menu labels described below reflect the current layout but may vary slightly.

    Steps to Connect Sender to Zapier

    Step 1 — Generate an API Access Token in Sender

    In your Sender dashboard, navigate to Account settings → API access tokens. Click Create API token. Give your token a descriptive name (e.g., Zapier integration) so you can identify it later. Once the token is created, copy it and store it securely. You will paste this token into Zapier during the authentication step.

    Step 2 — Create a Zap and Authenticate Sender

    Log in to your Zapier account and click Create → Zaps (or + Create depending on your interface). In the Zap editor, choose whether Sender will serve as the trigger app or the action app. Search for and select Sender. When prompted to connect your Sender account, click Sign in and paste your API access token into the authentication field. Click Yes, Continue to confirm the connection.

    Step 3 — Configure the Trigger and Action

    Select the specific trigger event or action event you want to use. If Sender is your trigger, choose an event such as New Subscriber or New Campaign. If Sender is your action, choose an event such as Add / Update Subscriber or Add Subscriber to Group. Configure any required fields — such as selecting a subscriber group — then click Continue. Test the step to confirm data is flowing correctly, then publish your Zap by toggling it on.

    How to Verify the Integration

    After publishing your Zap, trigger the event manually to confirm data flows as expected. For example, if your trigger is New Subscriber, add a test subscriber in Sender and check that the action fires in the connected app. In Sender, go to Subscribers to verify that any new contacts pushed by a Zap action appear in the correct subscriber group. In Zapier, check the Zap History page to confirm the Zap ran successfully without errors.

    What Syncs Between Platforms

    Subscriber data (Sender → Zapier) — When a trigger event occurs in Sender (such as a new subscriber being added, updated, or unsubscribed), Zapier receives the subscriber's details in real time. All Sender triggers are instant, meaning data is sent to Zapier immediately when the event happens.

    Subscriber data (Zapier → Sender) — When a Zap action pushes data into Sender, it can create or update subscribers, add or remove subscribers from groups, or unsubscribe email addresses. Data is sent to Sender as soon as the Zap's trigger fires.

    Campaign data (bidirectional) — Sender can trigger a Zap when a new campaign is created. In the other direction, Zapier can create a draft campaign or send an existing draft campaign in Sender.

    Integration Tips

    Use descriptive token names — When creating your API access token in Sender, name it something identifiable like Zapier integration so you can easily manage or revoke it later without affecting other integrations.

    Test before publishing — Always use Zapier's built-in test feature for each step before turning on your Zap. This confirms that authentication works and data maps correctly between platforms.

    Use filters and formatting in Zapier — Add Zapier filter or formatter steps between your trigger and action to control which data flows into Sender. For example, filter out subscribers from a specific domain or format phone numbers before syncing.

    Monitor Zap History — Regularly check the Zap History page in Zapier to catch errors early. Failed Zap runs typically indicate expired tokens, missing required fields, or changed configurations.

    One token per integration — Consider creating a separate API access token for each third-party integration. This way, revoking one token does not break other connected services.

    Common Issues

    Sender account fails to authenticate in Zapier → The API access token may be incorrect or contain extra spaces. Go to Account settings → API access tokens in Sender, create a new token, and paste it carefully into Zapier without any leading or trailing spaces.

    Zap runs but no data appears in Sender → The action step may be misconfigured. Open the Zap in the Zap editor, verify that required fields (such as email address and subscriber group) are correctly mapped, and re-test the step.

    Trigger not firing for new events → All Sender triggers are instant and rely on webhooks. If triggers stop working, go to My Apps in Zapier, find the Sender connection, and click Reconnect to re-establish the webhook connection.

    Duplicate subscribers appearing in Sender → Use the Add / Update Subscriber action instead of creating a new subscriber each time. This action checks for an existing email address and updates the record rather than creating a duplicate.

    Zap turns off automatically → Zapier disables Zaps after repeated errors. Check the Zap History for error details, fix the underlying issue (expired token, deleted group, etc.), and turn the Zap back on.

    FAQs

    Where do I find my Sender API access token?

    Go to Account settings → API access tokens in the Sender dashboard. Click Create API token if you don't have one yet. Copy the token and paste it into the Zapier authentication field when connecting your Sender account.

    What triggers and actions does Sender support in Zapier?

    Sender supports seven instant triggers: New Campaign, New Subscriber, New Group, New Subscriber in Group, New Unsubscriber, New Unsubscriber From Group, and Updated Subscriber. It also supports seven actions: Add / Update Subscriber, Add Subscriber to Group, Remove Subscriber From Group, Create Campaign, Send Campaign, Send Transactional Campaign, and Unsubscribe Email.

    Does the integration sync existing subscribers or only new ones?

    Sender triggers in Zapier only fire for new events going forward — they do not sync historical data. To bring existing subscribers into a Zap workflow, use a Zapier action triggered by another app (such as a spreadsheet) to push contacts into Sender.

    Can I connect Sender to multiple apps through Zapier at the same time?

    Yes. Each Zap operates independently. You can create multiple Zaps that connect Sender to different apps simultaneously without conflicts.

    What happens if I revoke my API access token in Sender?

    Any Zapier Zaps authenticated with that token will stop working. You will need to create a new token in Account settings → API access tokens and reconnect your Sender account in Zapier using the new token.

    Are Sender triggers in Zapier instant or polling-based?

    All Sender triggers in Zapier are instant. They use webhooks to send data to Zapier the moment the event occurs in Sender, with no polling delay.

  • Enable Shopify Theme App Extension

    Once you connected your Shopify store to Sender, it is important to enable theme app extension to add subscription forms with less hassle.

    Here is how the whole process looks like:

    How to insert your embedded form

    Go to your Sender account, access the Form section and head to the overview page of the form that you want to embed.

    Look for the form ID and copy it.

    Locating the form ID

    Now head back to your store site editor and choose to add a section and in the Apps section choose Sender – Embedded Form.

    Shopify App section

    You will be asked to enter the form ID you have just copied. Once you paste it, the form will be displayed immediately. Make alignment changes if needed.

    Entering form ID
    Form preview

    If you got stuck on a specific task or can’t find a way to execute a particular job, contact our support team via LiveChat or [email protected] – we’re here to help 24/7.

  • Integrations Overview

    No matter if you are just getting started with Sender or have been a user for a while already, it’s important to integrate other platforms that you use to maximize your experience and productivity with your Sender account. We have several built-in integrations that allow you to synchronize data with your Sender account and use this information to achieve your marketing goals.

    We have a direct integration with the following platforms:

    Sync your Shopify store with Sender to power up your email marketing. Send automated product recommendations, abandoned cart reminders, and exclusive deals to boost sales.

    Integrate

    Effortlessly connect Sender with WordPress to streamline your email marketing. Capture leads directly from your website, sync subscriber lists, and automate campaigns without hassle.

    Integrate

    Seamlessly link Sender with thousands of apps using Zapier. Automate workflows, sync data between platforms, and create custom triggers without coding.

    Integrate

    Enhance your online store’s communication with Sender and PrestaShop. Sync customer data, automate follow-ups, and send targeted offers to improve conversions and customer retention.

    Integrate

    Connect Sender with Ottokit to automate lead capture, subscriber updates, and campaign triggers across multiple apps, enhancing efficiency and engagement.

    Integrate

    Integrate Jumpseller with Sender to sync customer data, automate promotional emails, and drive repeat purchases through targeted email marketing.

    Integrate

    Boost your eCommerce marketing by integrating WooCommerce with Sender. Automatically send personalized emails based on customer purchases, abandoned carts, and order updates to drive engagement.

    Integrate

    Enhance your email design workflow by integrating Stripo with Sender. Create stunning, fully customized email templates using Stripo’s intuitive editor and vast template library, then seamlessly export them to Sender for high-impact campaigns.

    Integrate

    Automate your email marketing workflows by integrating Pabbly with Sender. Sync contacts, trigger campaigns, and streamline communication effortlessly.

    Integrate

    Easily connect Zotabox with Sender to capture leads from pop-ups, contact forms, and floating bars. Ensure every new subscriber gets added to your email campaigns instantly.

    Integrate

    Use Google Tag Manager with Sender to track user behavior, optimize email performance, and implement event-based triggers without modifying your website’s code.

    Integrate

    That’s it!

    If you are stuck on a specific task or can’t find a way to execute a particular job, contact our support team via LiveChat or [email protected] – we’re here to help 24/7.