Category: Audience and Segments

  • Reasons Subscribers May Not Receive a Campaign

    When a campaign is sent but some subscribers do not receive it, the cause is usually tied to their subscriber status, group or segment assignment, or how the audience was selected. This guide covers how to identify and resolve the most common reasons subscribers are excluded from a campaign in Sender.

    Where to Find This Feature

    In the Sender dashboard, go to:

    Subscribers → Subscribers (to check individual subscriber statuses)

    subscriber-status

    Email campaigns → select a sent campaign → Campaign overview (to review delivery statistics)


    Steps to Identify Why Subscribers Did Not Receive a Campaign

    Step 1 — Check the Subscriber’s Email Status

    Go to Subscribers in the left sidebar. The subscriber list displays a Status column with icons for each contact. Use the Email status dropdown filter at the top to filter by status. Sender assigns one of five email statuses to each subscriber: Active, Bounced, Unsubscribed, Reported spam, and Non-subscribed.

    subscriber-status

    Only subscribers with an Active status are eligible to receive campaigns. Any other status automatically excludes them from sending.

    Step 2 — Verify the Subscriber’s Group and Segment Membership

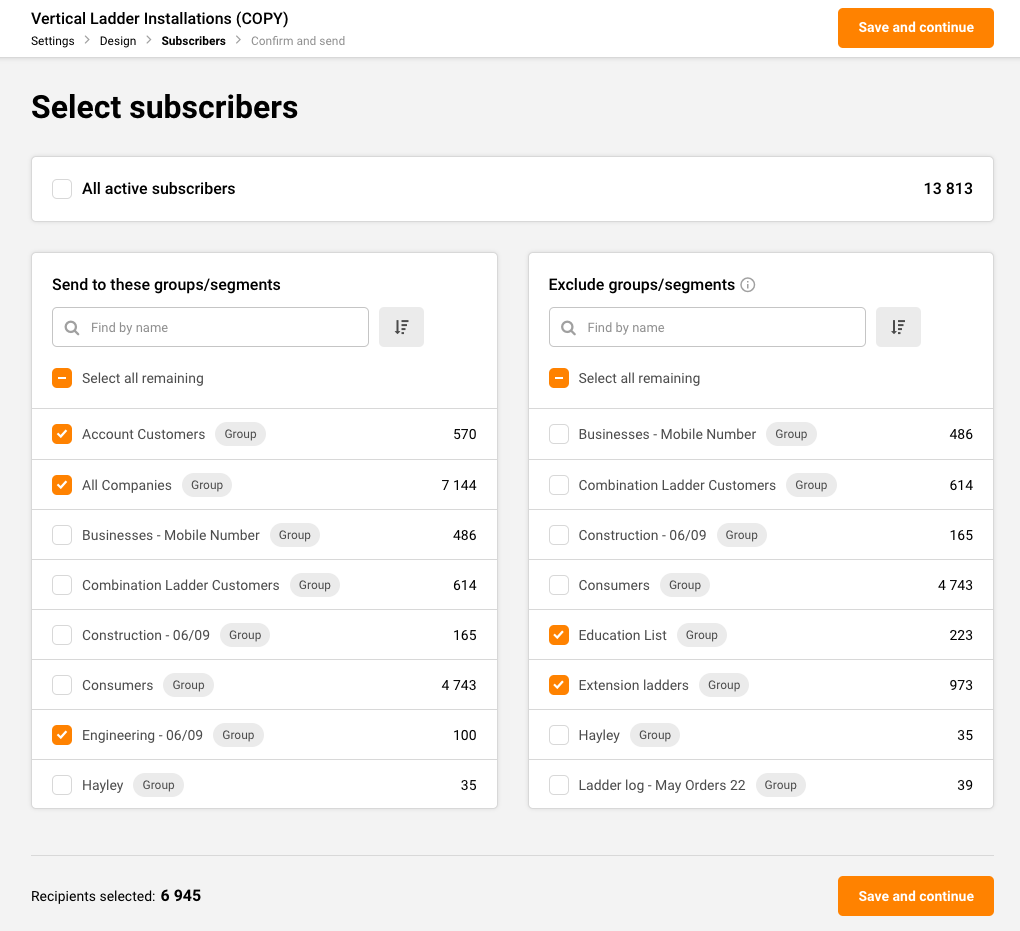
    On the Recipients step of the campaign workflow, Sender shows the section Send to these groups/segments.

    campaign-recipients

    Each entry is labeled either Segment or Group with a subscriber count. If a subscriber is not a member of any selected group or segment, they will not receive the campaign.

    subscriber-profile

    Open the subscriber’s profile by clicking the arrow next to their email to confirm their Groups assignment and status.

    Step 3 — Review the Campaign’s Recipient Selection

    Open the campaign and navigate to the Recipients step (third step in the Settings → Design → Recipients → Review and send workflow). Check which groups or segments were selected. Also check whether the Exclude groups/segments option was used at the bottom of the page. Any subscriber belonging to an excluded group or segment will be skipped, even if they are also in a selected group.

    Step 4 — Check the Campaign Report for Delivery Failures

    After a campaign is sent, go to Email campaigns, find the sent campaign, and click the report icon.

    campaign-report

    The Campaign overview page displays Statistics including total emails sent, total emails delivered, hard bounced, soft bounced, unsubscribed, and spam reports.

    campaign-report-subscriber-actions

    Expand Subscriber actions in the left sidebar to see detailed counts for Hard bounces, Soft bounces, Unsubscribes, and Spam reports. A warning icon appears on the campaign list if bounce rates are high.

    Step 5 — Confirm Domain Authentication

    Go to Account settings → Domains. The Domains page shows each domain with its Ownership confirmed and Authentication status.

    account-settings-domains

    If your sending domain is not verified or authenticated, recipient email providers may reject or filter your messages. Ensure all checkmarks are green for both ownership and authentication before sending campaigns.


    What Happens After You Check

    After identifying the cause, you can take corrective action directly from the relevant page. Subscriber statuses can be reviewed in Subscribers → Email status filter. Group membership can be edited from the subscriber’s profile under Groups → Edit. Campaign recipient selections can be adjusted by editing the campaign’s Recipients step. Domain authentication issues are resolved in Account settings → Domains.


    Common Issues

    Subscriber has a Bounced status → The email address previously returned a hard bounce, and Sender automatically marked it as Bounced. It will be excluded from all future sends.

    Subscriber has an Unsubscribed status → The subscriber opted out of emails. They will not receive campaigns until they re-subscribe.

    Subscriber marked as Reported spam → The subscriber reported a previous campaign as spam. Sender excludes them from future sends.

    Subscriber has a Non-subscribed status → The contact exists in your account but is not subscribed to email campaigns. They were likely added without email opt-in.

    Subscriber is not in the selected group or segment → The campaign was sent to specific groups or segments, and the subscriber does not belong to any of them.

    Subscriber was in an excluded group or segment → The Exclude groups/segments option was used during recipient selection, and the subscriber was part of an excluded audience.

    Domain is not authenticated → Missing authentication on the Domains page can cause recipient providers to reject emails or route them to spam.

    Soft bounce occurred → A temporary delivery failure (e.g., full inbox or server timeout) prevented the email from being delivered. Sender may retry, but the subscriber may still appear as not delivered.


    FAQs

    Can I resend a campaign to subscribers who didn’t receive it?

    You can use the Auto resend toggle on the Settings step to automatically resend to subscribers who did not open. For bounced subscribers, the underlying issue (invalid address, full inbox) must be resolved first.

    Does Sender automatically exclude bounced or unsubscribed contacts?

    Yes. Sender only sends campaigns to subscribers with an Active email status. Contacts marked as Bounced, Unsubscribed, Reported spam, or Non-subscribed are excluded automatically.

    Where can I see which subscribers were excluded from a specific campaign?

    On the Campaign overview page, expand Subscriber actions in the sidebar to view lists for Hard bounces, Soft bounces, Unsubscribes, and Spam reports.

    Why does the recipient count on the Recipients step differ from my group’s total subscribers?

    The recipient count on the Recipients step only reflects Active subscribers. Subscribers with any non-active status within that group are not counted.

    Can I change a subscriber’s status from Bounced back to Active?

    You can view the subscriber’s profile and status, but re-activating a bounced contact depends on whether the bounce was a hard bounce (permanent) or soft bounce (temporary). Hard-bounced addresses typically cannot be re-activated without correcting the underlying email address issue.

  • Suppression and unsubscribe status in campaign sending

    This guide shows how to identify, filter, and manage suppressed and unsubscribed subscribers in Sender. It covers how these statuses affect email campaign delivery and how to use segments and exclusions to control who receives your campaigns.

    Where to Find This Feature

    In the Sender dashboard, go to:

    Subscribers → Subscribers (to view and filter by status)

    subscriber-status

    Subscribers → Segments (to create segments based on subscription status)

    subscriber-segments

    Email campaigns → select a campaign → Recipients (to include or exclude groups and segments at send time)

    campaign-recipients

    Steps to Manage Suppression and Unsubscribe Status

    Step 1 — Identify Subscriber Statuses

    Go to Subscribers in the left sidebar. Each subscriber displays a Status column with color-coded icons. Click Email status at the top of the list to filter subscribers by their current state.

    subscriber-status

    The available statuses are Active, Bounced, Unsubscribed, Reported spam, and Non-subscribed. Select any status to narrow the list. Only subscribers with an Active status receive email campaigns.

    Step 2 — Create a Segment Based on Subscription Status

    Go to Subscribers → Segments and click Create new segment. Enter a name in the Segment name field and click Save.

    subscriber-segments

    The Advanced filter panel opens. Click the first dropdown and select Email under SUBSCRIPTION STATUS. Set the operator to Is, then choose a status such as Unsubscribed or Bounced.

    subscriber-segments

    Click Add condition or Add another set of conditions to combine multiple rules with AND/OR logic.

    Step 3 — Exclude Suppressed Subscribers During Campaign Sending

    Open your campaign and go to the Recipients step. Select the groups or segments you want to send to under Send to these groups/segments. Then click Exclude groups/segments at the bottom.

    exclude-segments-groups

    Check any segment or group you want to suppress. Subscribers in excluded selections will not receive the campaign, even if they belong to a selected sending group.

    Step 4 — Manually Unsubscribe or Resubscribe Subscribers

    To change a subscriber’s status, select one or more subscribers on the Subscribers page using the checkboxes.

    subscriber-status

    Click Actions and choose Unsubscribe or Resubscribe. You can also open an individual subscriber’s profile, click Actions in the top right, and select Unsubscribe. Status changes take effect immediately for future sends.

    Step 5 — Review Unsubscribe and Suppression Data After Sending

    Go to Email campaigns, find your sent campaign, and click the report icon.

    campaign-report

    On the Campaign overview page, the Statistics section shows counts for unsubscribed and spam reports.

    campaign-report-subscriber-actions

    Expand Subscriber actions in the left sidebar to view detailed lists under Unsubscribes, Spam reports, Hard bounces, and Soft bounces.

    What Happens After You Save

    After saving a segment based on subscription status, it appears on the Subscribers → Segments page with columns for Active subscribers and Total subscribers. You can apply this segment when selecting recipients for any campaign. Segment counts update dynamically as subscriber statuses change. You can also view group-level status breakdowns on the Subscribers → Groups page, which shows Active, Unsubscribed, and Bounced counts per group.

    Common Issues

    Campaign sent to fewer recipients than expected — Subscribers with a status of Unsubscribed, Bounced, Reported spam, or Non-subscribed are automatically excluded from campaign sends. Only Active subscribers receive emails.

    Excluded segment not reducing recipient count — The exclusion only applies to subscribers who overlap between the sending and excluded selections. If no overlap exists, the count stays the same.

    Subscriber status not updating after unsubscribe action — Status changes from the Actions menu apply to email campaign status. Check that you are viewing the correct status type under Email status, not Transactional Email or SMS status.

    FAQs

    Can I send campaigns to unsubscribed subscribers?

    No. Sender automatically prevents delivery to subscribers with any non-active email status, including Unsubscribed, Bounced, and Reported spam.

    What is the difference between Active subscribers and Total subscribers on the Segments page?

    Active subscribers counts only those with an Active email status. Total subscribers includes all subscribers matching the segment conditions regardless of status.

    Can I resubscribe a subscriber who previously unsubscribed?

    Yes. Select the subscriber on the Subscribers page, click Actions, and choose Resubscribe. Their status returns to Active.

    What does the Non-subscribed status mean?

    Non-subscribed indicates a subscriber who exists in your account but has not opted in to receive email campaigns.

    How do I exclude a specific group from receiving a campaign?

    On the Recipients step of campaign creation, click Exclude groups/segments and check the group or segment you want to suppress.

  • Handling Overlapping Segments During Campaign Sending

    This guide shows how to handle overlapping segments when sending an email campaign in Sender. It covers how to identify overlaps, use exclusions, and ensure each subscriber receives your campaign only once.


    Where to Find This Feature

    In the Sender dashboard, go to: Email campaigns → select a campaign → Recipients

    campaign-recipients

    To manage segments before applying them, go to: Subscribers → Segments

    subscriber-segments

    Steps to Handle Overlapping Segments

    Step 1 — Review Your Segments for Overlap

    Go to Subscribers → Segments to view your existing segments. Each segment shows its Active subscribers and Total subscribers count. Click View on any segment to see the matching subscribers and the filter conditions applied.

    subscriber-segments-conditions

    If subscribers appear across multiple segments (for example, a subscriber is both a “New subscriber” and an “Unengaged subscriber”), those segments overlap.


    Step 2 — Select Target Segments in the Campaign

    Open your campaign and navigate to the Recipients step. Under Send to these groups/segments, check the boxes next to each segment or group you want to include.

    campaign-recipients

    The Selected recipients counter at the top updates automatically and shows the deduplicated total. Even if the same subscriber exists in multiple selected segments, Sender counts them only once.


    Step 3 — Exclude Overlapping Segments You Want to Skip

    Below the inclusion list, click Exclude groups/segments to expand the exclusion panel.

    exclude-segments

    Check the box next to any segment or group whose subscribers should not receive the campaign. Excluded subscribers will be removed from the send list even if they belong to a selected group above. Use the Find by name search bar or Sort to locate specific segments quickly.


    Step 4 — Verify Recipients on Review and Send

    Click Save and continue to reach the Review and send step. The Recipients section lists every selected group and segment with its individual count, followed by a Total subscribers number.

    campaign-recipients

    This total reflects the deduplicated count after exclusions. If the number looks incorrect, click Edit next to Recipients to return and adjust your selections.


    What Happens After You Save

    After saving your recipient selections, the campaign displays the final audience on the Review and schedule page. You can still adjust included or excluded segments by clicking Edit next to the Recipients section. The Total subscribers count always reflects unique subscribers only — no one receives the same campaign twice regardless of how many selected segments they belong to.


    Common Issues

    Selected recipients count seems too low — Sender deduplicates subscribers across all selected segments and groups. The total reflects unique recipients, not the sum of each segment’s count.

    A segment is missing from the exclusion list — Segments already checked in the Send to these groups/segments section are automatically removed from the Exclude groups/segments list. Uncheck the segment from the inclusion list first if you need to exclude it instead.

    Excluded subscribers still received the campaign — Confirm the correct segment was checked in the Exclude groups/segments panel before sending. Exclusions only apply to segments selected at the time of the send.


    FAQs

    Does Sender send duplicate emails to subscribers in multiple segments?

    No. Sender automatically deduplicates recipients. Each subscriber receives the campaign only once, even if they appear in several selected segments or groups.

    Can I include one segment and exclude another at the same time?

    Yes. Use the Send to these groups/segments section to include and the Exclude groups/segments section to exclude. Exclusions override inclusions — any subscriber in an excluded segment is removed from the final send list.

    How do I check which subscribers overlap between segments?

    Go to Subscribers → Segments, click View on each segment, and compare the subscriber lists. You can also create a new segment using Add condition with multiple filter rules to isolate the overlapping group.

    Can I save a modified segment as a new one?

    Yes. When viewing a segment’s filters, click Save as new segment to create a separate segment based on the adjusted conditions without changing the original.

  • Contact selection logic for email campaigns

    This guide shows how to select contacts for email campaigns in Sender. It covers how to create, manage, and apply audience segments and groups for more targeted campaigns.


    Where to Find This Feature

    In the Sender dashboard, go to: Subscribers → Segments

    subscriber-segments

    To select recipients for a specific campaign, open any draft campaign and navigate to the Recipients step in the campaign workflow.

    campaign-recipients-groups-segments

    Steps to Select Contacts for an Email Campaign

    Step 1 — Create a Segment

    Go to Subscribers → Segments and click Create new segment. Enter a name in the Segment name field and click Save.

    Segment-conditions

    The Advanced filter panel opens on the Subscribers page, where you can define the rules that determine which contacts belong to this segment.

    Step 2 — Define Filter Conditions

    In the Advanced filter panel, build your segment rules using the condition dropdowns. Select a filter category from the first dropdown — options are grouped under Subscription Status, Subscriber Details, Campaign Activity, SMS Campaign Activity, and Fields. Then choose an operator and a value to complete the condition. Click Add condition to add more rules within the same group (AND logic), or click Add another set of conditions to create a separate rule group (OR logic). The subscriber list below updates to reflect matching contacts.

    Step 3 — Choose Recipients in the Campaign

    Open your email campaign and navigate to the Recipients step from the top navigation bar (Settings → Design → Recipients → Review and send).

    Campaign-recipients

    You will see All active subscribers at the top with a checkbox. Below that, the Send to these groups/segments section lists all your saved segments (tagged as Segment) and groups (tagged as Group) with subscriber counts. Check the ones you want to include. Use the Find by name search bar or Sort to locate specific entries.

    Step 4 — Exclude Groups or Segments

    On the same Recipients page, click Exclude groups/segments at the bottom. A second list appears with all available segments and groups. Check any you want to exclude from receiving the campaign. This is useful for suppressing contacts who appear in your selected audience but should not receive this particular send.

    Step 5 — Save and Review

    Click Save and continue to move to the Review and send step. This page displays a summary of your campaign settings, design preview, and recipients.

    campaign-review-schedule

    The Recipients section shows each selected group or segment, its type tag, and the recipient count. Confirm the Total subscribers count is correct, then proceed with Send now or Schedule.


    What Happens After You Save

    After saving your segment, it appears in the Subscribers → Segments list with columns for Active subscribers and Total subscribers. Segments are dynamic — subscriber counts update automatically as contacts meet or no longer meet the filter conditions. You can apply segments to any current or future email campaign from the Recipients step. To review or modify a segment’s rules, click View next to it on the Segments page to reopen the Advanced filter panel.


    Common Issues

    Segment shows 0 subscribers — The filter conditions are too narrow or no contacts match the defined rules. Adjust the conditions in the Advanced filter panel.

    A group or segment does not appear on the Recipients page — The group or segment may have been deleted. Check the Subscribers → Segments or Subscribers → Groups pages to confirm it still exists.

    Recipients count is lower than expected — Excluded groups or segments may be suppressing contacts. Review the Exclude groups/segments section on the Recipients step. Only active subscribers are counted — unsubscribed or bounced contacts are excluded automatically.

    Cannot edit a segment’s filter rules directly — Open the segment by clicking View, adjust the conditions in the Advanced filter panel, then click Save as new segment to create an updated version. Use the dropdown menu (arrow icon) next to a segment to Rename or Delete it.


    FAQs

    What is the difference between a group and a segment?

    Groups are static lists that contacts are manually added to or join through forms. Segments are dynamic and automatically include contacts who match the filter rules you define.

    Can I select multiple groups and segments for one campaign?

    Yes. On the Recipients step, check as many groups and segments as needed. Contacts appearing in more than one selection will only receive the campaign once.

    Can I send to all subscribers without selecting a group or segment?

    Yes. Check All active subscribers at the top of the Recipients page to include every active contact in your account.

    What filter types are available for segments?

    Filters include Subscription Status (Email, SMS), Subscriber Details (Group membership, Email address, Created date, Location), Campaign Activity (Sent, Opened, Clicked, Unsubscribed, Inactive), SMS Campaign Activity, and Fields (First name, Last name, Birthday).

    How do AND and OR logic work in segment conditions?

    Conditions added with Add condition within the same group use AND logic — all must be true. Conditions added with Add another set of conditions use OR logic — any group can be true for a contact to match.

  • Include/exclude groups and segments

    Overview

    To maximize your campaign performance, you should only contact those recipients that are engaged and are looking forward to your campaign.  You might want to avoid contacting some of your recipients:

    • Exclude recipients that are unengaged and that might damage your sender reputation. You should clean up your list regularly to maintain a truly engaged audience. Here is more on how to achieve that.

    • Avoid sending your campaign to people that might not be interested in specific content. Having a well-organized subscriber list with detailed custom fields and appropriate groups can help target specific subscribers that will be excited to receive.

    Including/excluding groups and segments

    After creating the campaign, in the Subscribers section, deselect “All active subscribers,” and you will be presented with two columns “Send to these groups/segments” and “Exclude groups/segments”. 

    The first column is for the subscribers that you want to send the campaign to and the second one is for the groups and segments that you want to exclude from the recipients’ list. 

    If a subscriber belongs to a group/segment that you choose to send the campaign to and the segment/group that you exclude from the recipients – the subscriber will NOT receive the campaign.

    The total number of selected recipients is presented at the very bottom. 

    That’s it!

    If you got stuck on a specific task or can’t find a way to execute a particular job, contact our support team via LiveChat or [email protected] – we’re here to help 24/7.