Category: Publishing and management

  • Deleting a landing page

    This guide explains how to permanently delete a landing page from your Sender account.

    Where to Find This Setting

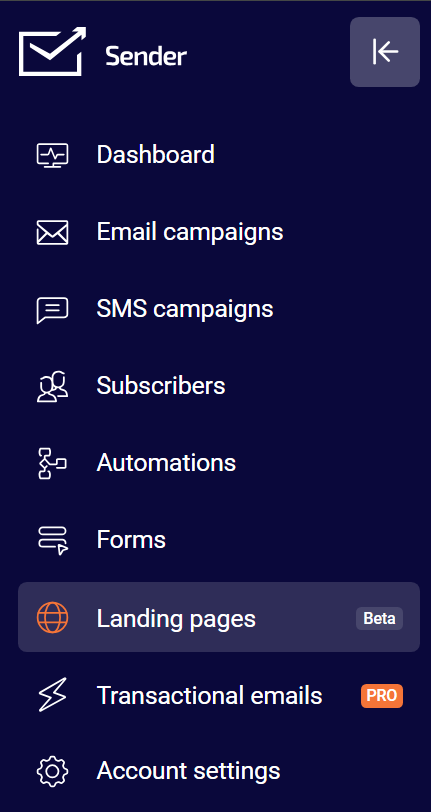
    In the Sender dashboard, go to Landing pages from the left sidebar menu. This opens the landing pages list, where all your existing pages are displayed with their name, subdomain, status, and last edited date. The delete option is located in the actions menu for each individual landing page.

    Steps to Delete a Landing Page

    Step 1 — Open the actions menu

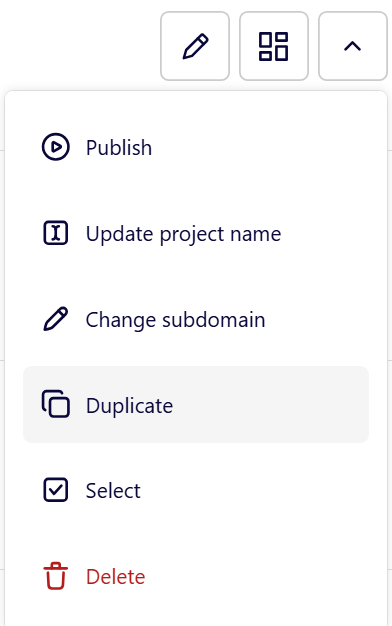
    In the Landing pages list, find the page you want to delete. On the right side of the page row, under the Actions column, click the dropdown arrow icon (next to the edit and grid icons). A menu appears with several options, including Publish, Update project name, Change subdomain, Duplicate, Select, and Delete.

    Step 2 — Select Delete

    Click Delete at the bottom of the actions menu. It is displayed in red text to indicate this is a destructive action. A confirmation dialog titled Delete Page appears, asking "Are you sure you want to delete your site [page name]?"

    Step 3 — Confirm the deletion

    In the Delete Page dialog, click Yes, I am sure to permanently delete the landing page. To cancel and keep the page, click No, let's keep it instead. Once confirmed, the page is removed from the landing pages list immediately.

    What Happens After the Change

    The landing page is permanently removed from your account. It no longer appears in the Landing pages list.

    If the page was published, its URL becomes inactive immediately. Visitors who try to access the old URL will see an error page.

    Any subscribers who signed up through forms on the deleted landing page remain in their assigned subscriber groups. Deleting the page does not remove subscriber data.

    This action cannot be undone. There is no way to restore a deleted landing page.

    Management Tips

    Duplicate before deleting — If you might need the page design later, use the Duplicate option from the actions menu to create a copy before you delete the original.

    Unpublish first if you're unsure — If you only want to take a page offline temporarily, consider unpublishing it instead of deleting it. This keeps the page in your list as a draft while making the URL inactive.

    Check for active traffic — Before deleting a published landing page, verify that no active campaigns, emails, or external links are directing visitors to its URL.

    Review subscriber groups — Subscriber data collected through the page remains intact after deletion, but the form and page are no longer available for new signups. Make sure you have alternative signup paths in place if needed.

    Common Issues

    Delete option is not visible → The Delete option is located at the bottom of the actions dropdown menu. Click the dropdown arrow icon in the Actions column for the landing page to reveal the menu.

    Accidentally deleted a page → Deletion is permanent and cannot be undone. If you need to recreate the page, you will need to build it again from scratch. To prevent this, always use the Duplicate option before deleting.

    Old URL still loads after deletion → Browser caching may temporarily display the old page. Clear your browser cache or try accessing the URL in a private/incognito window to confirm the page has been fully removed.

    FAQs

    Can I undo a landing page deletion?

    No. Once you click Yes, I am sure in the Delete Page confirmation dialog, the landing page is permanently removed. There is no trash folder or undo option.

    Does deleting a landing page remove its subscriber data?

    No. Subscribers who signed up through a form on the landing page remain in their assigned groups. Deleting the page only removes the page itself.

    Can I delete a published landing page?

    Yes. You can delete a landing page regardless of its status — Draft, Published, or Unpublished. If the page is published, the URL becomes inactive immediately upon deletion.

    Can I delete multiple landing pages at once?

    You can use the Select option from the actions menu to select pages individually. Check whether a bulk delete option is available from the selection toolbar once pages are selected.

    What happens to links pointing to a deleted page?

    Any links pointing to the deleted page's URL will stop working. Visitors who click those links will see an error page. Update or remove these links from your campaigns and external sources.

  • Landing page analytics and performance

    This guide explains how to view analytics and monitor the performance of your landing pages in Sender.

    Where to find this setting

    In the Sender dashboard, go to Landing pages. This opens the landing pages list showing all your pages with their status, subdomain URL, and last edited date.

    To access analytics for a specific page, click the view icon (grid icon) in the Actions column next to the landing page you want to review. This opens the landing page management screen, which has three tabs at the top: Overview, Analytics, and Double opt-in. Performance data is available on both the Overview and Analytics tabs.

    Steps to view and use landing page analytics

    Step 1 — Open the landing page Overview

    From the Landing pages list, click the view icon next to the page you want to review. The Overview tab loads by default. At the top, the Activity summary section displays three key metrics: Total signups, Total views, and Conversion rate. A chart below these metrics shows activity over the past week. To the right, the Subscribers section lists recent signups. Click View more next to either section to go directly to the Analytics tab for detailed data.

    Step 2 — Review detailed metrics on the Analytics tab

    Click the Analytics tab at the top of the page. Four metric cards appear: Views, Unique visitors, Subscribers, and Conversion rate. Each card shows the current value and a percentage change indicator so you can see whether performance is trending up or down. Below the cards, the Page visits / signups chart displays activity over time. Use the 7 days, 2 weeks, or 30 days buttons above the chart to change the reporting period. The chart and metric cards update to reflect the selected range.

    Step 3 — Review the Subscribers table

    Below the chart on the Analytics tab, the Subscribers section lists every person who signed up through your landing page. The table includes four columns: Email/Phone, Name, Date & Time, and IP address. This gives you a complete record of each signup with the exact timestamp and source IP. To download this data, click the Export CSV button in the top-right corner of the Subscribers section. The file contains all subscriber records for the selected landing page.

    Step 4 — Compare performance across time ranges

    Use the time range filters above the Page visits / signups chart to compare performance across different periods. Select 7 days for a short-term view of recent activity, 2 weeks for a mid-range snapshot, or 30 days for a broader trend. The percentage indicators on each metric card update based on the selected range, showing the rate of change for Views, Unique visitors, Subscribers, and Conversion rate relative to the prior equivalent period.

    What happens after the change

    Analytics data is read-only and does not affect your landing page content, status, or URL. The metrics update automatically as visitors interact with your published page.

    Changing the time range filter only adjusts the reporting window displayed on the Analytics tab. It does not alter any underlying data.

    Exporting subscribers to CSV creates a snapshot file of the current data. New signups after the export are not included in that file.

    If your page is in Draft status or has been unpublished, analytics still display historical data from when the page was live, but no new views or signups will be recorded until the page is published again.

    Management tips

    Check analytics regularly — Review the Analytics tab at least weekly after publishing to identify trends in visitor traffic and signups early.

    Use time range filters for context — Switch between 7 days, 2 weeks, and 30 days to distinguish short-term spikes from sustained trends. A single-day spike may look significant at 7 days but minor at 30 days.

    Export subscriber data for external use — Click Export CSV to download your landing page signups. Use this file to cross-reference subscriber data with other tools or to keep an offline backup.

    Monitor conversion rate closely — The Conversion rate metric shows the percentage of visitors who signed up. If views are high but conversions are low, consider revisiting your page content or form placement in the builder.

    Start from the Overview tab — Use the Overview tab for a quick snapshot of Total signups, Total views, and Conversion rate without navigating into full analytics. Click View more only when you need deeper detail.

    Common issues

    Analytics show zero values for a published page → This typically happens if the page was just published and has not yet received any traffic. Allow time for visitors to find the page, then check again. Confirm the page status is Published and the URL is accessible.

    Percentage change indicators show 0% → This occurs when there is no data in the comparison period. If your page is new, the prior period has no baseline to compare against. As data accumulates over time, percentage changes will begin to reflect actual trends.

    Export CSV button does not produce a file → This happens when there are no subscribers to export. The Subscribers table must contain at least one record for the export to generate a file. Verify that your landing page has a signup form and that it has received submissions.

    FAQs

    Where can I see how many people visited my landing page? Open your landing page from the Landing pages list, then click the Analytics tab. The Views and Unique visitors metric cards at the top show your traffic numbers.

    What is the difference between Views and Unique visitors? Views counts the total number of times your landing page was loaded, including repeat visits from the same person. Unique visitors counts individual visitors, so one person visiting three times counts as one unique visitor but three views.

    Can I see analytics for a landing page that is not published? Yes. Historical data from when the page was live remains visible on the Analytics tab. However, no new data is recorded while the page is in Draft or unpublished status.

    How do I export my landing page subscriber list? Go to the Analytics tab for the landing page and click the Export CSV button above the Subscribers table. This downloads a CSV file with all subscriber records including Email/Phone, Name, Date & Time, and IP address.

    How often does analytics data update? Analytics data updates automatically as visitors view the page and submit forms. There is no manual refresh needed. Reloading the Analytics tab shows the most current data.

    Can I change the date range for the analytics chart? Yes. Use the 7 days, 2 weeks, or 30 days buttons above the Page visits / signups chart to switch the reporting period. The metric cards and chart update to reflect the selected time range.

  • Publishing and unpublishing a landing page

    This guide explains how to publish a landing page to make it live, and how to unpublish it to take it offline in Sender.

    Where to find this setting

    In the Sender dashboard, go to Landing pages in the left sidebar. This opens the landing pages list, where each page displays its name, subdomain, status badge (Draft or Published), and last edited timestamp. You can publish or unpublish a page from two locations: the actions menu (dropdown arrow) in the landing pages list, or the Overview page for an individual landing page.

    To open the Overview page, click the page row or the grid icon next to the page name in the list. The Overview page shows the Publish, Re-Publish, or Unpublish buttons in the top-right corner, depending on the current page status.

    Steps to publish and unpublish a landing page

    Step 1 — Open the landing page Overview or actions menu

    From the Landing pages list, locate the page you want to publish or unpublish. Click the dropdown arrow in the Actions column to open the actions menu. For a page in Draft status, the menu includes a Publish option. For a page in Published status, the menu includes an Unpublish option.

    Alternatively, click the page row to open its Overview page, where the Publish or Unpublish button appears in the top-right corner.

    Step 2 — Publish the landing page

    Click Publish from the actions menu or from the Overview page. A green notification banner confirms "Page published." The page status changes from Draft to Published in the landing pages list. The page is now live and accessible at its subdomain URL.

    On the Overview page, the button area updates to show Re-Publish and Unpublish as separate buttons, replacing the single Publish button.

    Step 3 — Unpublish the landing page

    To take the page offline, click Unpublish from the actions menu in the landing pages list or from the Overview page. A notification confirms "Page unpublished." The page status returns to Draft, and the page URL becomes inactive. Visitors who try to access the URL will no longer see the page.

    The Publish button reappears on the Overview page, allowing you to republish at any time.

    Step 4 — Republish after making changes

    If you edit a previously published page in the builder, a yellow banner appears on the Overview page stating that the site has been updated with new changes and prompting you to re-publish. Click Save changes or Save and continue in the builder to save your edits first, then click Re-Publish on the Overview page to push the updated version live.

    What happens after the change

    When you publish a landing page, its status changes to Published and the page becomes accessible at its assigned subdomain URL (e.g., your-subdomain.sender.site).

    When you unpublish a landing page, the status returns to Draft and the URL becomes inactive immediately. Any visitors currently on the page can still see it until they refresh or navigate away, but new visits to the URL will fail.

    You can confirm the current status from the landing pages list, where the status badge next to each page shows either Draft or Published. Use the Filter button above the list and select Draft or Published to display only pages with a specific status.

    Management tips

    Preview before publishing — Click Preview in the builder toolbar to review your landing page before making it live. This lets you verify layout and content without affecting the published version.

    Use Re-Publish for updates — After editing a live page in the builder, return to the Overview page and click Re-Publish to apply changes. Edits saved in the builder are not reflected on the live page until you republish.

    Check the yellow update banner — If you see a yellow banner on the Overview page indicating new changes, your live page is out of date. Click Re-Publish to sync the published version with your latest edits.

    Filter your pages by status — Use the Filter button on the landing pages list to quickly show only Draft or Published pages. This helps you identify which pages are currently live and which are still in progress.

    Save your work frequently — Click Save changes in the builder toolbar to save progress without leaving the editor. Use Save and continue when you are ready to move to the Overview page and proceed with publishing.

    Common issues

    Page still shows old content after editing → Changes saved in the builder are not automatically applied to the live page. Click Re-Publish on the Overview page to push your updates live.

    Page URL returns an error after unpublishing → This is expected. Unpublishing a page deactivates the URL immediately. Republish the page to restore access.

    Publish button is missing from the actions menu → The Publish option only appears for pages in Draft status. If the page is already published, the menu shows Unpublish instead. Check the status badge next to the page name.

    Yellow banner appears on the Overview page → This means the page has been edited since it was last published. Click Re-Publish to apply the pending changes to the live version.

    FAQs

    Can I edit a landing page after it is published? Yes. Click Edit from the actions menu or click the edit (pencil) icon in the landing pages list to open the page in the builder. Make your changes, click Save changes, then click Re-Publish on the Overview page to apply the updates. The page URL remains the same.

    What happens when I unpublish a landing page? The page is taken offline and the URL becomes inactive. Visitors who try to access the URL will see an error or blank page. The page status returns to Draft. You can republish at any time to make it live again.

    Can I publish a landing page directly from the builder? Not directly. The builder toolbar includes Save changes, Preview, and Save and continue buttons. To publish, click Save and continue to go to the Overview page, then click Publish or Re-Publish from there.

    Does unpublishing a landing page delete it? No. Unpublishing only takes the page offline and changes its status to Draft. The page design, settings, and any collected subscriber data are preserved. You can edit and republish the page at any time.

    Can I change the subdomain of my landing page? Yes. From the Overview page, expand Domain settings and click Edit next to the temporary domain. Enter a new subdomain in the Change subdomain dialog and click Save. You can also add a custom domain by clicking Add domain under Domain settings.

  • Custom domains for landing pages

    This guide explains how to connect a custom domain to your landing page in Sender, configure the required DNS record, and verify the connection.

    Where to find this setting

    In the Sender dashboard, go to Landing pages in the left sidebar. Click the landing page you want to configure, or click the edit icon to open the page, then click Save and continue to reach the Overview page. Scroll down to the Domain settings section under the page name. This is where you manage the temporary Sender subdomain and add or verify a custom domain.

    You can also access the subdomain setting from the landing pages list by clicking the actions dropdown (arrow icon) next to a page and selecting Change subdomain.

    Steps to connect a custom domain

    Step 1 — Add your custom domain

    On the landing page Overview page, expand the Domain settings section. Click the Add domain button. In the Add a custom domain dialog, enter your domain in the Domain URL field (for example, landing.yourdomain.com). Click Save. Sender adds the domain and immediately opens the CNAME record settings dialog with the DNS values you need to configure.

    Step 2 — Configure the CNAME record with your DNS provider

    In the CNAME record settings dialog, you will see two values: a CNAME record name (displayed as @) and a Value (displayed as my.sender.site). Both fields have a copy icon next to them. Copy these values, then log in to your domain registrar or hosting provider's DNS settings panel. Create a new CNAME record using the CNAME record name as the host and my.sender.site as the target value. Save the DNS record. DNS changes can take up to 24–48 hours to propagate.

    Step 3 — Verify the CNAME record

    Return to the Domain settings section on your landing page Overview page. Your custom domain now appears in the domain table with a Status column. If the DNS record has not yet propagated, the status shows a red indicator. Click Recheck records next to the domain, or click the domain row to reopen the CNAME record settings dialog and click Check CNAME record. Once verified, the status changes to a green indicator and your landing page becomes accessible at the custom domain.

    Step 4 — Edit or change the Sender subdomain (optional)

    If you want to change the default Sender subdomain (the yourname.sender.site address), click the Edit button next to the Temporary domain URL in the Domain settings section. In the Change subdomain dialog, enter a new value in the New subdomain field and click Update. The temporary domain URL updates immediately. You can also access this from the landing pages list by clicking the actions dropdown and selecting Change subdomain.

    What happens after the change

    Once the CNAME record is verified, your landing page is accessible at both the custom domain and the temporary Sender subdomain. Visitors can reach the page using either address.

    If the CNAME record is not yet verified, the custom domain remains inactive and the page continues to be served only at the temporary Sender subdomain.

    Changing the Sender subdomain updates the temporary domain URL immediately. Any previously shared links using the old subdomain will stop working.

    You can confirm the domain status at any time by checking the Status column in the Domain settings section on the landing page Overview page.

    Management tips

    Use a subdomain for your custom domain — Connect a subdomain like landing.yourdomain.com or promo.yourdomain.com rather than a root domain. Subdomains are simpler to configure with CNAME records and avoid conflicts with your main website.

    Verify DNS before publishing — Add and verify your custom domain before clicking Publish. This ensures visitors reach your page on the custom domain as soon as it goes live rather than seeing an error.

    Keep track of domain status — Check the Status indicator in the Domain settings table regularly. A red indicator means the CNAME record is missing or misconfigured. Click Recheck records after making DNS changes.

    Do not delete a verified domain on a published page — Removing a custom domain from a live landing page will make the page unreachable at that address. Visitors using saved bookmarks or shared links to the custom domain will get an error.

    Copy DNS values directly from the dialog — Use the copy icons next to the CNAME record name and Value fields in the CNAME record settings dialog to avoid typos when entering values at your DNS provider.

    Common issues

    Custom domain shows a red status after adding → The CNAME record has not been configured or has not propagated yet. Add the CNAME record at your DNS provider pointing to my.sender.site, wait up to 48 hours, then click Recheck records.

    CNAME record is configured but verification still fails → The DNS record may have a typo, or propagation is still in progress. Double-check that the host and target values match the values shown in the CNAME record settings dialog and try again after a few hours.

    Old subdomain links stopped working after changing the subdomain → Changing the value in the Change subdomain dialog replaces the temporary domain. Previous links using the old subdomain will no longer resolve. Update any shared links or bookmarks to the new subdomain.

    Custom domain works but shows a security warning → SSL certificates may take a few minutes to provision after the CNAME record is verified. Wait briefly and reload the page. If the warning persists, verify the CNAME record is correctly pointed to my.sender.site.

    FAQs

    Can I connect more than one custom domain to a single landing page? Yes. Click Add domain in the Domain settings section to add additional domains. Each domain requires its own CNAME record pointing to my.sender.site.

    Does adding a custom domain remove the temporary Sender subdomain? No. The temporary subdomain (e.g., yourname.sender.site) remains active alongside the custom domain. Your landing page is accessible at both addresses.

    Can I change my custom domain after it has been verified? There is no edit option for an existing custom domain. Remove the current domain by clicking the delete icon in the Domain settings table, then add the new domain using the Add domain button.

    Do I need to republish my landing page after adding a custom domain? If the page is already published, the custom domain becomes active once the CNAME record is verified. You do not need to republish.

    What happens to my custom domain if I unpublish the landing page? The custom domain remains configured in the Domain settings section, but visitors will not be able to access the page at that address while it is unpublished. Republishing the page makes the custom domain active again.

    Can I use a root domain instead of a subdomain? Sender provides a CNAME record for domain configuration. Some DNS providers do not support CNAME records on root domains. Use a subdomain like landing.yourdomain.com for reliable setup, or check with your DNS provider for root domain CNAME support (sometimes called CNAME flattening or ALIAS records).

  • Duplicate a landing page

    Need to create a new landing page similar to one you already have? Duplicating saves time and lets you build on what’s already working. Instead of starting from scratch, copy your best-performing page and modify it for new campaigns.

    Why Duplicate Landing Pages?


    • Save time – No need to rebuild layouts and designs from scratch.


    • Keep consistency – Maintain your brand look across campaigns.


    • Build on success – Start with pages that already convert.


    • Easy A/B testing – Create variations to test different elements.


    • Scale campaigns – Quickly launch multiple similar campaigns.


    How to Duplicate a Landing Page

    Step 1: Access Your Landing Pages


    • Log into your Sender account


    • Go to Landing pages in the left sidebar


    • Find the page you want to duplicate


    Step 2: Duplicate the Page


    • Click the Little Arrow (^) next to your chosen page


    • Select “Duplicate” from the dropdown


    • Your page is copied instantly


    Step 3: Customize Your Copy and Update: 

    • Page name and subdomain
    • Headlines and offers
    • Images and graphics
    • Call-to-action button text
    • Form fields if needed

    Best Practices

    Choose the Right Page to Copy


    • Start with your highest-converting pages


    • Pick pages with similar goals to your new campaign


    • Consider your target audience


    What to Always Change

    • Page title and headlines
    • Offer details and pricing
    • Images and graphics
    • Call-to-action button text

    Smart Organization


    • Use clear names: “Summer Sale – Facebook Ads”


    • Update subdomains for different campaigns


    • Keep track of which page came from which


    Common Use Cases

    • Seasonal campaigns – Copy holiday pages for new seasons
    • Different traffic sources – Adapt the same offer for Facebook vs Google ads
    • A/B testing – Test different headlines while keeping everything else the same 
    • Product launches – Use successful product pages as templates
    • Audience targeting – Create versions for different customer segments

    After Duplication: 

    Test Everything:

    • Check all links and buttons work
    • Verify forms submit properly
    • Test on mobile and desktop
    • Make sure images load correctly
    • Check that conversion tracking works
    • Monitor performance vs the original

    Troubleshooting

    • Page won’t load? Check for broken links or missing images.
    • Changes not saving? Make sure you’re in edit mode and try refreshing.
    • Looks different? Some elements might need to be reconfigured after copying.

    The Bottom Line

    Duplicating landing pages is the fastest way to scale your marketing. Start with what works, customize for new campaigns, and launch faster than building from scratch.

    That’s it!

    If you got stuck on a specific task or can’t find a way to execute a particular job, contact our support team via LiveChat or [email protected] – we’re here to help 24/7.

  • Share landing page on social

    Want to get more eyes on your landing page? Social media is one of the best ways to drive traffic to your carefully crafted conversion pages. But here’s the thing—you can’t just slap a link up there and hope for the best.

    Let’s dive into how to do it properly so you actually get people clicking, visiting, and converting.

    Why Use Landing Pages Instead of Your Homepage

    Here’s the deal: customers who engage with us via our social media outlets generally spend approximately 2x more than the average customer. But only if you treat them right when they click through.

    When you send social media traffic to your homepage:

    • People get confused about what to do next

    • They explore other parts of your site and forget why they came

    • You miss out on conversions

    When you send them to a dedicated landing page:

    • They know exactly what you want them to do

    • The message matches what they saw on social media

    • An effective landing page can yield as much as a 27.4%increase in conversions

    Platform-Specific Tips

    Facebook & Instagram

    • Use eye-catching visuals (videos perform especially well)

    • Use your Instagram to highlight your latest offer through compelling imagery

    • Update your bio link strategically for new campaigns

    • Test both organic posts and paid ads

    X (Formally known as Twitter)

    • Match that Twitter mindset – quick, clever, and to the point
    • Use threads to tell a story that leads to your landing page
    • Include relevant hashtags for discoverability

    LinkedIn

    • Share valuable insights that lead naturally to your offer

    • Target specific professional audiences with LinkedIn ads

    • Share case studies and success stories

    TikTok

    • Create entertaining content that showcases your product

    • Use a descriptive headline “As seen on TikTok” on your landing page

    • Partner with creators who align with your brand

    Make Your Pages Look Great When Shared

    Open Graph (OG) image is a website thumbnail that displays when the page is shared on a social media platform and make sure to optimize these elements:

    • Title: Keep it under 60 characters and compelling

    • Description: Write 1-2 sentences that make people want to click

    • Image: Use high-quality visuals (1200×630 pixelsworks best)

    Pro tip: Make sure your social media post visuals match your landing page design for a seamless experience.

    Best Practices That Actually Work

    1. Match Your Message

    You should view your social media landing page as an extension of the social media post that led to it. If your Facebook ad promises “5 Ways to Double Your Email List,” your landing page better deliver exactly that.

    2. Keep It Simple

    Social media is busy and overwhelming. Your landing page should be the opposite. That is, Essential elements only:

    • Clear headline that matches your social media post

    • Brief explanation of your offer

    • Simple form or call-to-action button

    • One piece of social proof

    Declutter the page by getting rid of clashing colors, lengthy copy, website menus, social share buttons, and other things that might bombard your visitors.

    3. Mobile-First Design

    Around 50% of all web traffic globally comes from mobile devices, and most social media traffic comes from phones. Your landing page better look amazing on mobile.

    4. Remove Navigation

    Don’t you dare just send your social fans to the homepage. Remove navigation menus and keep people focused on your main call-to-action.

    5. Use Social Proof Smartly

    Since people are coming from social media, they’re in a “social” mindset. Use testimonials and reviews strategically.

    But remember: No social media tally is better than low social media tally. If you don’t have good numbers, don’t show them.

    Common Mistakes to Avoid

    • Sending everyone to your homepage – Too many distractions
    • Mismatched messaging – If your post says “free trial” but your page says “getting started,” you’ll confuse people
    • Ignoring mobile – 79% of customers now buy products online using their smartphones
    • Too many options – When faced with too many choices, website visitors may end up taking no action at all

    Measuring Success

    Track these key metrics:

    • Click-through rate from social media to your landing page

    • Conversion rate once people reach your page

    • Cost per conversion (for paid social ads)

    • Social shares of your content

    The Bottom Line

    Sharing landing pages on social media isn’t about posting a link and hoping for the best. It’s about creating a seamless experience from social media curiosity to taking action.

    Start with one platform where your audience is most active, create a landing page specifically for that audience, and test different approaches. Remember: every platform has its own personality, so adapt your approach accordingly.

    New-school marketing is about leveraging the multiplicative network effects of social media – where people market on your behalf. When you nail the combination of compelling social content and focused landing pages, you create a powerful conversion machine.

    Ready to create landing pages that convert social media traffic? Try Sender’s landing page builder and start turning your social media followers into customers today.

    That’s it!

    If you got stuck on a specific task or can’t find a way to execute a particular job, contact our support team via LiveChat or [email protected] – we’re here to help 24/7.

  • Landing page SEO basics

    Absolutely! Landing pages can be incredibly SEO-friendly, and here’s the thing most marketers miss: they’re actually some of the best pages to optimize for search engines. Why? Because they’re laser-focused on getting people to take action, which is exactly what search engines want to deliver to their users.

    Why Should You Care about Landing Page SEO?

    Think about it this way: you’re already putting effort into creating amazing landing pages that convert. So why not make them work double-duty by getting them found organically too?

    Here’s what happens when you nail landing page SEO:

    • You stop paying for every single click and start getting free traffic

    • You attract visitors who are actually ready to buy or sign up (not just browsing)

    • Your cost per acquisition dropssignificantly

    • You get both visibility AND conversions from the same page

    How to Make Your Landing Pages SEO Gold

    1. Pick Keyword That Actually Convert

    This isn’t about ranking for “marketing tips” when you’re selling software. You want people who are ready to whip out their credit card. Look for keywords like:

    • “Buy project management software”

    • “Email marketing tool free trial”

    • “Download lead magnet template”

    • “Sign up for CRM demo”

    These phrases tell you someone’s past the “just looking” phase and ready to take action.

    2. Get Your Technical Stuff Right

    • Your Tittle Tag is Your First Impression.  Put your main keyword up front and make it irresistible. Instead of “Marketing Software | Company Name,” try “Get More Leads with Our Marketing Automation Tool.”

    • Meta Descriptions Matter. You’ve got about 160 characters to convince someone to click. Use them wisely! Tell people exactly what they’ll get and why they should care.

    • Clean Up Your URLs. Nobody wants to see messy URLs filled with random numbers and tracking codes. Keep it simple and descriptive – use clean, readable URLs that actually tell people what the page is about.

    3. Write Like a Human (Because You Are One) 

    Here’s where a lot of people mess up: they stuff keywords everywhere and forget they’re talking to real people. Don’t do that. Instead:

    • Write headlines that grab attention AND include your keyword
    • Answer the question your visitor actually has
    • Guide them smoothly toward your call-to-action
    • Use your keyword naturally throughout (if it feels forced, it probably is)

    Pro tip: Read your content out loud. If it sounds weird, rewrite it.

    4. Make It Work on Every Device

    More than half your visitors are probably on their phones. If your landing page looks broken on mobile or takes forever to load, they’re gone. And so are your rankings. Quick mobile checklist:

    • Does everything load in under 3 seconds?

    • Can you easily tap buttons without zooming in?

    • Is the text readable without squinting?

    • Does the page look good in both portrait and landscape?

    5. Speed Really, Really Matters

    Google cares about page speed, but more importantly, your visitors do. If your page takes more than a few seconds to load, people will bounce faster than you can say “conversion rate.” Easy wins for faster pages:

    • Compress your images (seriously, that hero image doesn’t need to be 5MB)

    • Choose a hosting provider that doesn’t cut corners

    • Remove anything that doesn’t help with conversions

    6. Don’t Forget the Details

    Images need love too:

    • Name your files something descriptive (not “IMG_1234.jpg”)

    • Add alt text that describes what’s in the image

    • Keep file sizes reasonable

    Your call-to-action button: Make it impossible to miss and crystal clear what happens when someone clicks it. “Submit” is boring. “Start My Free Trial” tells a story.

    What Not to Do (Learn from Others’ Mistakes)

    • Trying to rank for everything – Pick one main keyword per page and stick with it
    • Forgetting mobile exists – Test your pages on actual phones, not just browser dev tools
    • Making people wait – If it takes more than 3 seconds to load, you’re losing money
    • Writing for robots – Google’s smart enough to understand natural language now
    • Weak calls-to-action – “Click here” tells people nothing. “Get my personalized quote” tells them everything.

    How to Know If It’s Working

    Keep an eye on these numbers:

    • Where you rank for your target keywords (obviously)
    • How much organic traffic you’re getting
    • Whether people stick around or bounce immediately
    • Most importantly: how many of those organic visitors actually convert

    The magic happens when all these numbers move in the right direction together.

    The Bottom Line

    SEO-friendly landing pages aren’t just possible—they’re one of the smartest moves you can make. You’re creating pages that both search engines and humans love, which means more traffic AND more conversions.

    The best part? You don’t have to choose between ranking well and converting well. With the right approach, you get both.

    Start with one landing page, apply these principles, and see what happens. Once you see the results, you’ll want to optimize every landing page you’ve got.

    Ready to create landing pages that actually get found? Try Sender’s landing page builder and start turning your SEO traffic into customers today.

    That’s it!

    If you got stuck on a specific task or can’t find a way to execute a particular job, contact our support team via LiveChat or [email protected] – we’re here to help 24/7.