Category: Form setup and fundamentals

  • Form field types and configuration

    This guide walks you through the available form field types in Sender and how to configure them when building a signup form or popup.

    Where to Find This Feature

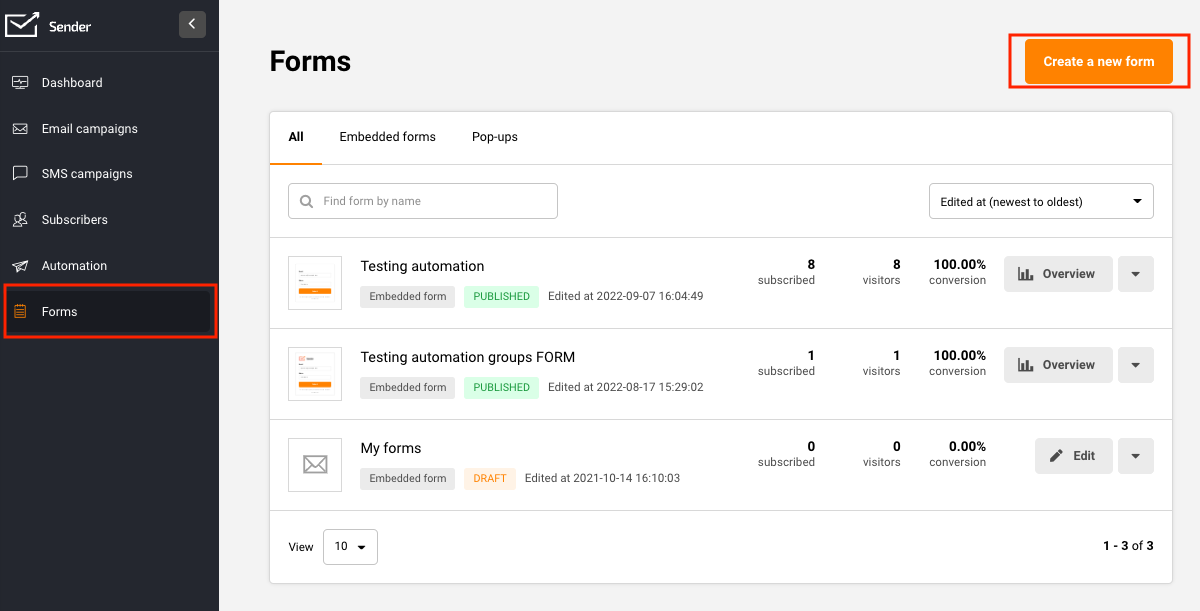
    In the Sender dashboard, go to: Forms

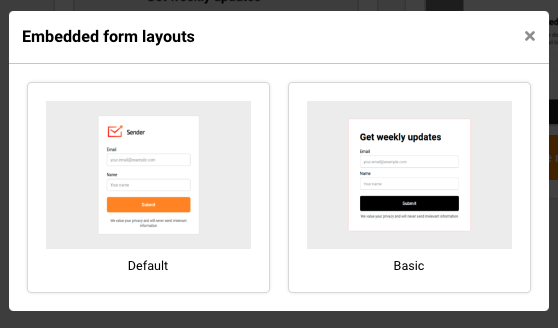
    Click Forms in the left sidebar to open the forms list. You will see all your existing forms with their type, status, stats, and action icons. To configure fields, click the pencil (edit) icon on any form, or click Create a new form to start fresh. Field configuration is located under the Settings tab in the form builder.

    Steps to Configure Form Fields

    Step 1 — Open the form builder and go to Settings

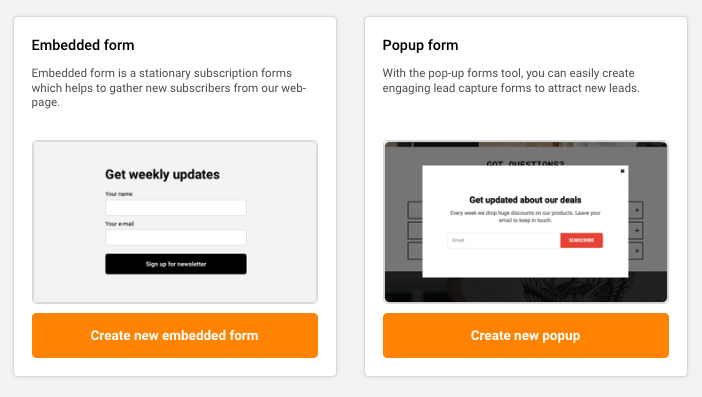
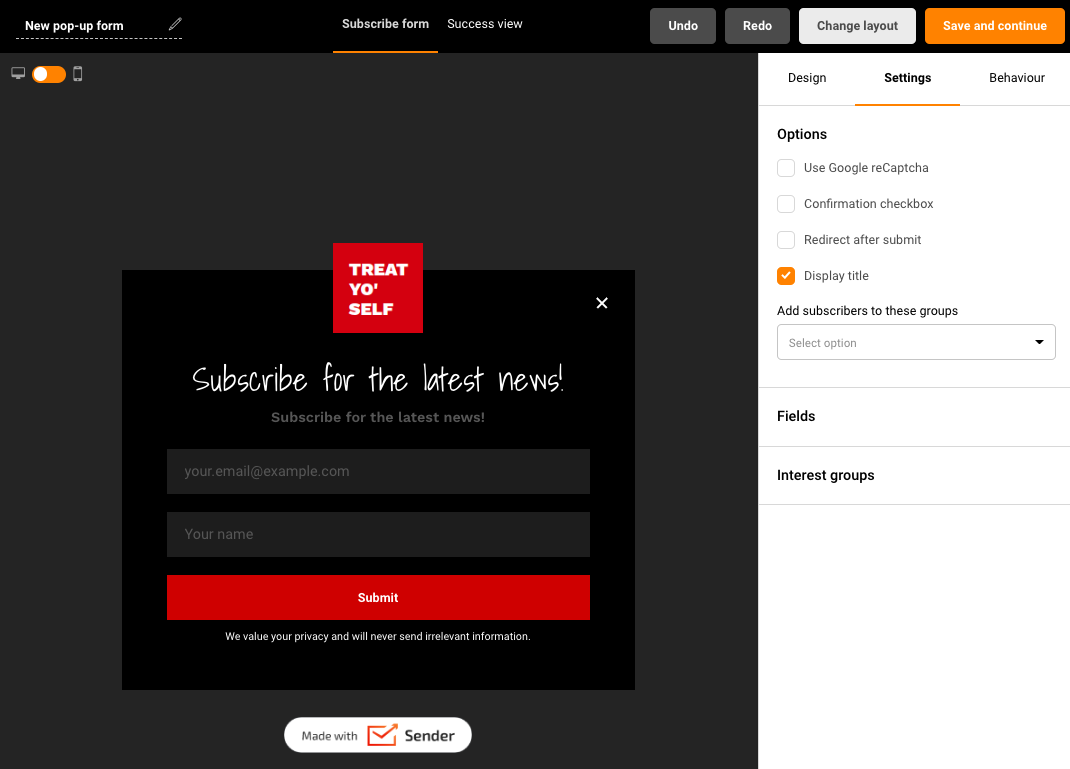
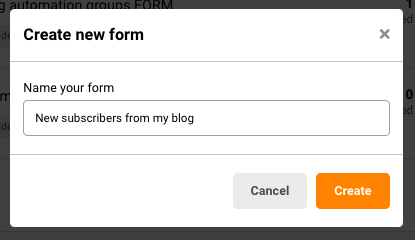
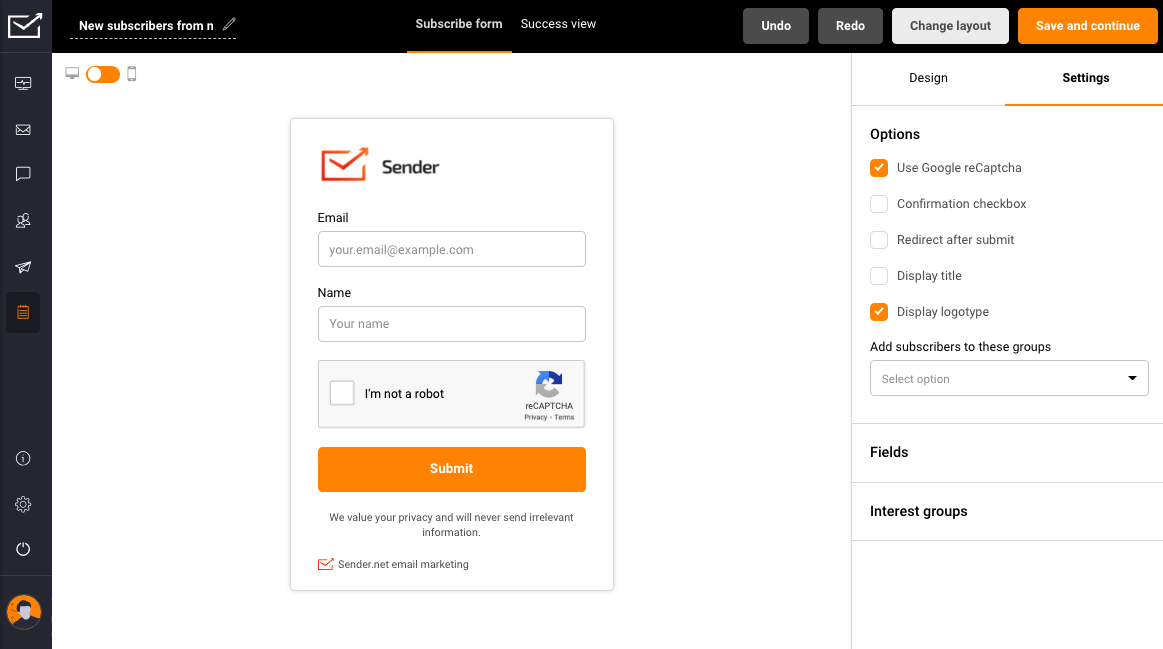
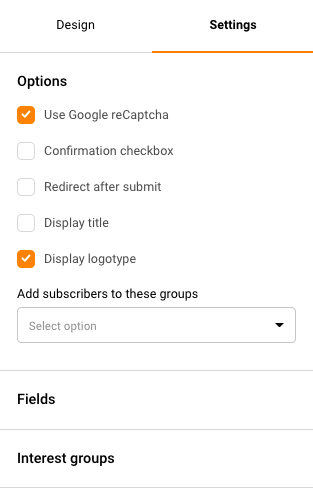
    From the Forms page, either click Create a new form to build a new form, or click the pencil icon next to an existing form. In the form builder, click the Settings tab in the right-side panel. You will see three collapsible sections: Options, Fields, and Groups. Click Fields to expand it. The fields currently on your form are listed here, each with its own configuration controls.

    Step 2 — Review and configure default fields

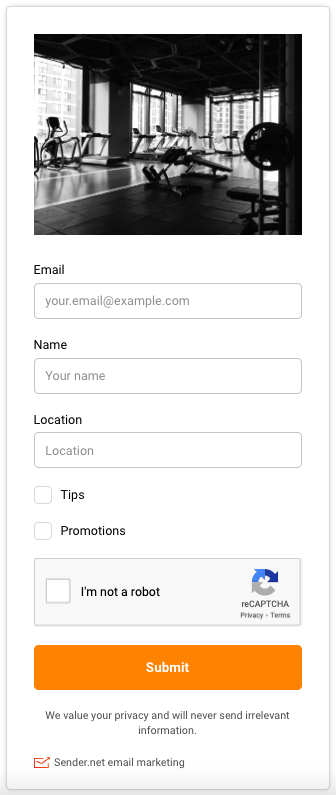
    Every form includes an Email field by default. This field is always required and cannot be removed. Most templates also include a Name field. For each field, you can edit two settings: Field Label (the label text shown above the input) and Input Placeholder (the hint text shown inside the input before the user types). For the Name field and other non-email fields, you will also see a Required checkbox — enable it to make the field mandatory.

    Step 3 — Add more fields to your form

    Click the Add field dropdown below the existing fields. A list appears with available built-in fields: Last name, Phone number, and Birthday. Select any field to add it to your form. Each newly added field appears in the Fields panel with the same configuration options: Field Label, Input Placeholder, and a Required checkbox. If you need a field that isn't listed, click Create a new field at the bottom of the dropdown to open the custom field dialog.

    Step 4 — Create a custom field

    In the Create new field dialog, enter a Field name to identify the field. Open the Field type dropdown to choose from five types: Text (a standard single-line input), Date (a date picker), Datetime (a date and time picker), Number (numeric input only), and Drop-down (a selectable list of options). You can also set a Default value if needed. Click Create to add the custom field to your form. It will now appear in the Add field dropdown and can be added like any other field.

    Step 5 — Edit validation messages

    Each field has an Edit validation messages button. Click it to open the validation messages dialog for that field. Here you can customize the messages visitors see when they submit the form incorrectly. The available settings are: Required field (message when a required field is left blank), Invalid input (message when the input format is wrong), Min length and Length under (minimum character count and its error message), and Max length and Length over (maximum character count and its error message). Click Save to apply changes.

    What Happens Next

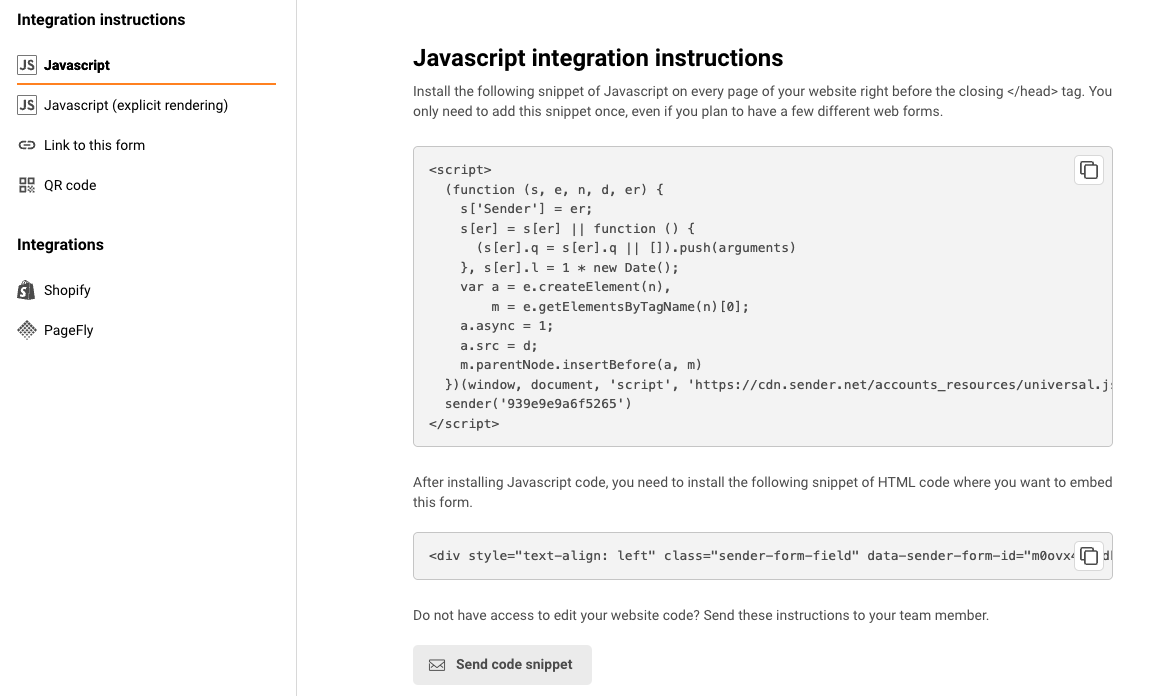
    After configuring your fields, click Save and continue in the top-right corner of the form builder to save your progress. The form returns to the Publishing settings page, where you can publish it or copy the embed code.

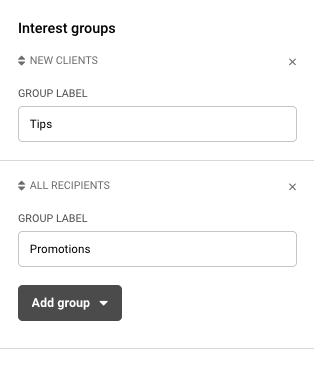
    New signups collected through your form are stored in whichever subscriber group you selected under the Groups section in Settings. If no group is selected, signups go to your default subscriber list.

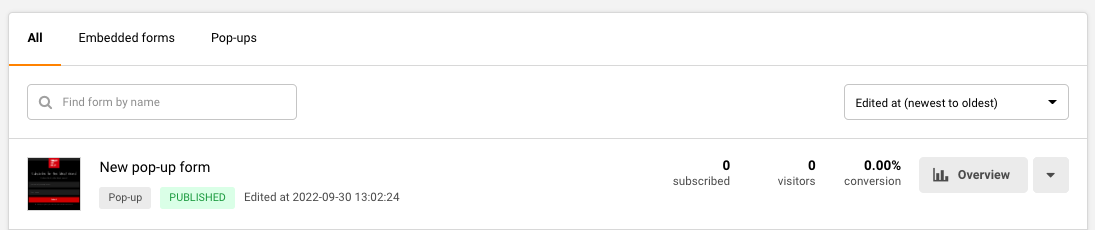
    Your form appears on the Forms list page with its current status shown as a badge — DRAFT before publishing or Active once published. You can return to edit fields at any time by clicking the pencil icon next to the form.

    Common Issues

    Fields not appearing on the form → This happens when a field is created but not added to the form. Open the Add field dropdown in the Fields section and select the field you want to include.

    Email field cannot be removed or made optional → The Email field is required by default on every form and cannot be deleted or set to optional. This is by design, as an email address is needed to create a subscriber record.

    Custom field not showing in the Add field dropdown → The custom field may not have been saved. Open the Add field dropdown, click Create a new field, and make sure you click Create after filling in the field name and type.

    Validation messages not updating → Changes to validation messages must be saved using the Save button inside the validation dialog. If you closed the dialog without saving, reopen it via Edit validation messages and save again.

    FAQs

    What field types can I add to a signup form in Sender?

    Sender provides several built-in fields you can add: Email (included by default), Name, Last name, Phone number, and Birthday. You can also create custom fields with the following types: Text, Date, Datetime, Number, and Drop-down.

    Can I make a field required?

    Yes. In the Fields section under Settings, enable the Required checkbox next to any field. The Email field is always required and does not have this toggle because it cannot be made optional.

    What are validation messages and how do I change them?

    Validation messages are the error texts shown to visitors when they submit a form with missing or incorrect input. Click Edit validation messages on any field to customize the messages for required fields, invalid input, minimum length, and maximum length.

    Can I reorder fields on the form?

    Fields appear on the form in the order they are listed in the Fields panel. You can rearrange them by dragging the handle icon next to each field name in the Settings tab.

    Is the field configuration the same for all form types?

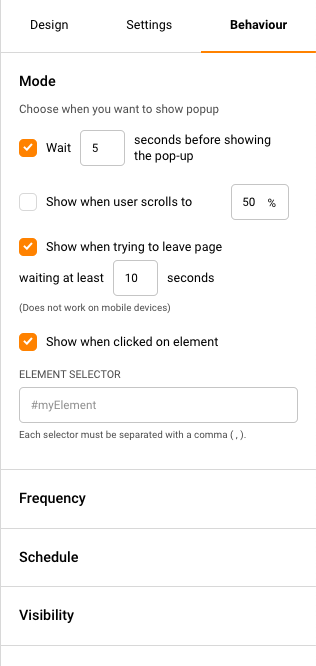
    Yes. Whether you are building an Embedded form, Popup form, or Spin-to-win wheel, the field types and configuration options under the Settings tab work the same way. The only difference is that popup forms have an additional Behaviour tab for display rules, which does not affect field configuration.

  • Creating Signup Forms

    This guide walks you through how to create and publish a signup form in Sender for the first time — from naming your form to embedding it on your website.

    Where to Find This Feature

    In the Sender dashboard, go to Forms in the left sidebar.

    On this page, you'll see a list of any existing forms with their type, status, and performance stats. If you haven't created a form yet, you'll see a welcome screen with a Create your first form button. If you already have forms, click Create a new form in the upper-right corner.

    Steps to Create a Signup Form

    Step 1 — Start a New Form

    Click Create your first form on the welcome screen, or click Create a new form in the upper-right corner of the Forms page. You'll be taken to the New form page where you'll see a Form name field and three form type options below it.

    Step 2 — Name Your Form and Choose a Form Type

    Enter a name in the Form name field. This is an internal name to help you identify the form later.

    Below the name field, choose one of the three available form types: Embedded form — a static form that sits directly within your webpage content. Popup form — an overlay that appears on top of your page based on display rules you define. Spin-to-win wheel — an interactive wheel that visitors spin to reveal an offer or incentive.

    Click the orange button below your chosen type (for example, Create new popup) to continue.

    Step 3 — Select a Template

    A template gallery opens with pre-designed layouts for your chosen form type. Browse the available templates or use the Find template by name search bar at the top to locate a specific one. You can also switch between All templates and Themed templates using the filter on the left side.

    Click a template to select it. The form builder opens with your chosen template loaded and ready to customize.

    Step 4 — Customize the Form Design

    In the form builder, click the Design tab on the right-side panel. This is where you adjust the visual appearance of your form. You can expand each section to configure it:

    Box settings — padding, border, background color, and background image. Logo settings — add or change a logo. Text settings — heading and body text styles. Inputs and Input placeholders — style the form fields. Submit button — change the button color, text, and shape. Close button, Overlay, and Shadow — control the popup's surrounding appearance.

    The form preview in the center updates in real time as you make changes.

    Step 5 — Configure Form Fields

    Click the Settings tab, then expand the Fields section. By default, your form includes an Email field and a Name field. Each field has a Field Label and an Input Placeholder you can edit. You can also mark fields as Required using the checkbox.

    To add more fields, click Add field and select from the available options such as Last name, Phone number, or Birthday. You can also click Create a new field to define a custom field.

    Step 6 — Connect to a Subscriber Group

    Still under the Settings tab, expand the Groups section. Under Add subscribers to these groups, click the Select option dropdown and choose a subscriber group. A subscriber group is the list where new signups from this form will be stored.

    You can also use the Add group button under Allow subscribers to choose their interest groups to let visitors pick which groups they want to join.

    Step 7 — Set Display Behaviour

    Click the Behaviour tab to control when and where your form appears. This tab includes four sections:

    When to show popup? — Choose triggers such as showing the form after a set number of seconds on the page, when the user scrolls to a certain percentage, when they try to leave the page, or when they click a specific element. Frequency — Set how often the popup reappears for visitors who haven't subscribed (for example, every 30 days). Check Always show to display it on every visit. Schedule — Choose Instant to activate the form immediately, or Specific time to set a start and end date. Visibility — Choose Always show, Hide on specific pages, or Show on specific pages. You can also hide the form on specific device types using the Hide on desktop, Hide on mobile devices, or Hide on tablet devices checkboxes.

    Step 8 — Save and Publish

    Click Save and continue in the upper-right corner of the form builder. This saves your form and takes you to the Publishing settings page.

    On this page, you'll see your form's status displayed as DRAFT. Review the Double opt-in settings toggle if you want to send confirmation emails to new subscribers. When you're ready, click the Publish button to make your form live. The page also displays your form URL, a QR code, and a JavaScript snippet you can copy and paste into your website's HTML to embed the form.

    What Happens Next

    After publishing, your form becomes active and will appear on your website according to the display rules you configured in the Behaviour tab. You can also share it directly using the form URL shown on the Publishing settings page.

    New signups are automatically added to the subscriber group you selected during setup. You can view your subscribers under the Subscribers section in the dashboard.

    Your form's status updates from DRAFT to active once published. To find and manage your forms at any time, go to Forms in the left sidebar. From the forms list, you can view stats, edit the form, open its settings, or duplicate and rename it using the action menu.

    Common Issues

    Form stays in DRAFT status after saving → Clicking Save and continue saves your form but does not publish it. You must click the Publish button on the Publishing settings page to make your form live.

    Popup does not appear on the website → Verify that the JavaScript snippet from the Publishing settings page is installed on your site before the closing </head> tag. Also check that the form's Visibility settings in the Behaviour tab are not hiding it on the device or page you're testing.

    New signups are not appearing in the expected group → Open the form builder, go to the Settings tab, and expand the Groups section. Confirm that the correct subscriber group is selected under Add subscribers to these groups.

    Form fields are not showing on the live form → Make sure the fields you added under Settings → Fields are saved. Click Save and continue again and republish the form to apply changes.

    FAQs

    What form types are available in Sender?

    Sender offers three form types: Embedded form, Popup form, and Spin-to-win wheel. Embedded forms sit within your page content, popups overlay the page based on trigger rules, and spin-to-win wheels display an interactive wheel visitors can spin to receive an offer.

    Can I add custom fields to my signup form?

    Yes. In the form builder, go to the Settings tab and expand the Fields section. Click Add field, then select an existing field like Last name, Phone number, or Birthday — or click Create a new field to define your own.

    How do I connect my form to a specific subscriber group?

    In the form builder under the Settings tab, expand the Groups section. Use the Select option dropdown under Add subscribers to these groups to choose the group where new signups will be stored.

    Can I embed the form on my website?

    Yes. After saving your form, the Publishing settings page provides a JavaScript snippet you can copy and paste into your website's HTML before the closing </head> tag. You can also use the JavaScript explicit rendering option for more control over where the form appears.

    Can I preview my form on different devices?

    Yes. The form builder toolbar at the top includes device preview icons that let you switch between desktop and mobile views to see how your form will look on different screen sizes.

    How do I edit a form after publishing?

    Go to Forms in the left sidebar. Find your form in the list and click the edit (pencil) icon, or click the settings (gear) icon to go directly to Publishing settings. You can also click Edit on the Publishing settings page to reopen the form builder.

  • Create a popup form

    In order to create a popup form click “Forms” in the main menu bar. Then click “Create a new form” and you will be presented with different form options:

    • Embedded form
    • Popup form

    In this case, choose the Popup form.

    Popup forms

    Creating a popup form is an easy process. Once you click on “Create new popup”, you will have a few templates to choose from. Pick one and click on it. You will have an option to change the layout at the design editor if you change your mind.

    In this case, we picked “treat yo self” template – editing the popup form is practically the same process as creating an embedded form. It has the same design options and general settings. Click here for a tutorial on these options.

    In the Behaviour section, you can set up when you want your pop-up to appear on your website.

    Behavior settings lets you:

    • Set a timer when the popup will appear
    • Show form only when a user scrolls through a specific percentage of the page.
    • Enable the popup when a user is trying to leave the page.
    • Choose the popup to appear when a customer clicks on a particular web element.


    Frequency:

    • Set the period when you want to show the popup to the same user again if he or she didn`t subscribe.

    Schedule:

    • Set the timing of your pop-up in advance (set a particular date frame).

    Visibility:

    • Set pages and/or devices on which to show the pop-up form.

    After the subscription form is fully designed – click the “Save and continue” button on the top right side. After that, you will be taken to the final tab. Here you will find the form’s script, which must be embedded into your web page.

    You can access the form’s activity panel by clicking on the “Overview” button in the “Forms” section.

    Note – the form’s modifications will not change the script code. Therefore, you don’t need to re-implement the subscription form’s code after editing. Simply save the latest progress on our platform, and changes will be reflected on your web page.

    WordPress website owners can implement popups using plugin integration. Click here to learn more.

    That’s it!

    If you are stuck on a specific task or can’t find a way to execute a particular job, contact our support team via LiveChat or [email protected] – we’re here to help 24/7.

  • Create an Embedded Form

    In order to create a form, click ‘Forms’ in the main menu bar. Then click “Create a new form”. After the last step, you will be presented with different form options:

    • Embedded form
    • Popup form

    Then name your form and click “Create”.

    In this particular case, choose the Embedded form.

    Choose between Default and Basic layout.

    Embedded form

    Creating an embedded form is a simple process. Firstly, you will need to set up the design. The subscription form is fully customizable – each element can be changed and modified according to your needs. Furthermore, the subscription form can have additional pieces like reCaptcha for security, a confirmation checkbox for GDRP requirements, and other options.

    Design settings offer a variety of different options. Each element is completely customizable:

    • Box settings
    • Text settings
    • Input labels
    • Inputs (fields, e.g. name, surname)
    • Checkbox
    • Button
    • Overlay
    • Shadow
    • Image

    Second tab is responsible for additional form’s features, like:

    • ReCaptcha – Spam prevention.
    • Confirmation checkbox – usually used for GDPR compliance.
    • Redirection – custom redirection after subscription.
    • Choose whether you want to display the title and logo.

    The fields section is used for adding custom fields. These fields are imported from the general fields section (Subscribers -> Fields), although light edits can be done here.

    Interest groups are used let subscribers decide what type of content they might be interested in. They can do so by ticking a box in the form.

    In the image below, you will see what the basic subscription form with a few additional changes looks like.

    New recipients will be assigned to a group/groups which they selected upon signup.

    Furthermore – the thank you page can be customized. Click on the “Success message” button at the top and start editing text by clicking on it. This banner will be shown to new subscribers after submitting the information.

    After the subscription form is fully designed – click the “Save and continue” button at the top right side. After that, you will reach the final tab. There you will find the form’s script (the embedded forms have two script parts), which must be embedded into your web page.

    The activity window can be accessed by clicking on “Overview” button in the forms section.

    Note – you don’t need to re-implement the subscription form after any applied modifications. It will be automatically updated after being saved.

    WordPress website owners can implement subscription forms and popups using plugin integration. Click here to learn more.

    That’s it!

    If you are stuck on a specific task or can’t find a way to execute a particular job, contact our support team via LiveChat or [email protected] – we’re here to help 24/7.