Category: Segmentation

  • Use segments in Sender

    Segments help you target specific groups of subscribers across your campaigns and workflows. Here’s how you can use segments in different areas of your platform.

    Contact management

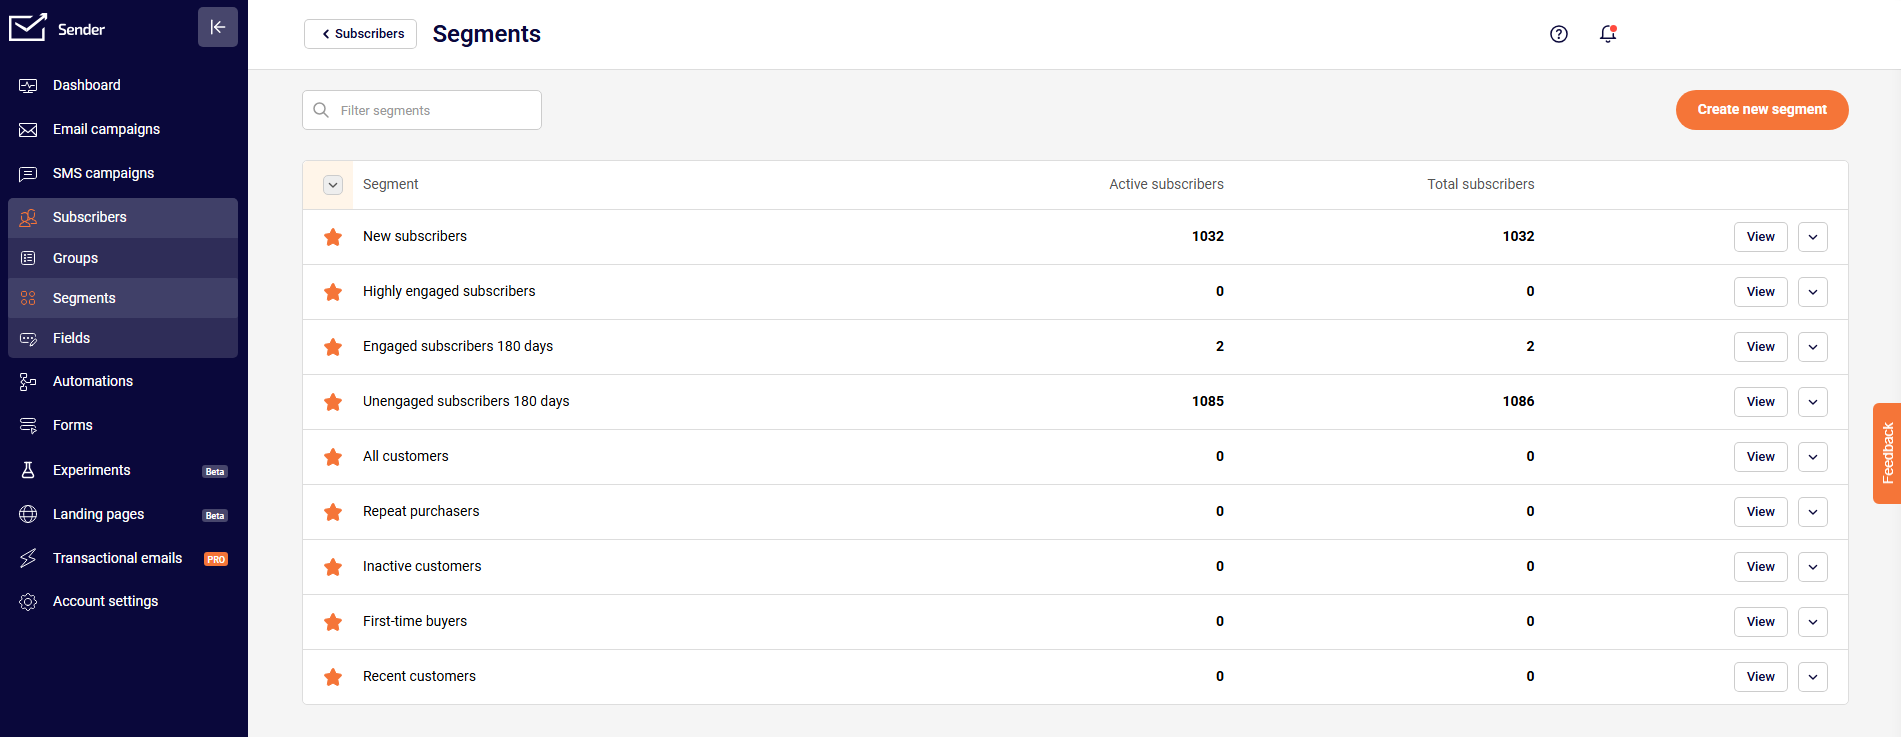
    Use segments to organize and manage your subscribers more effectively.

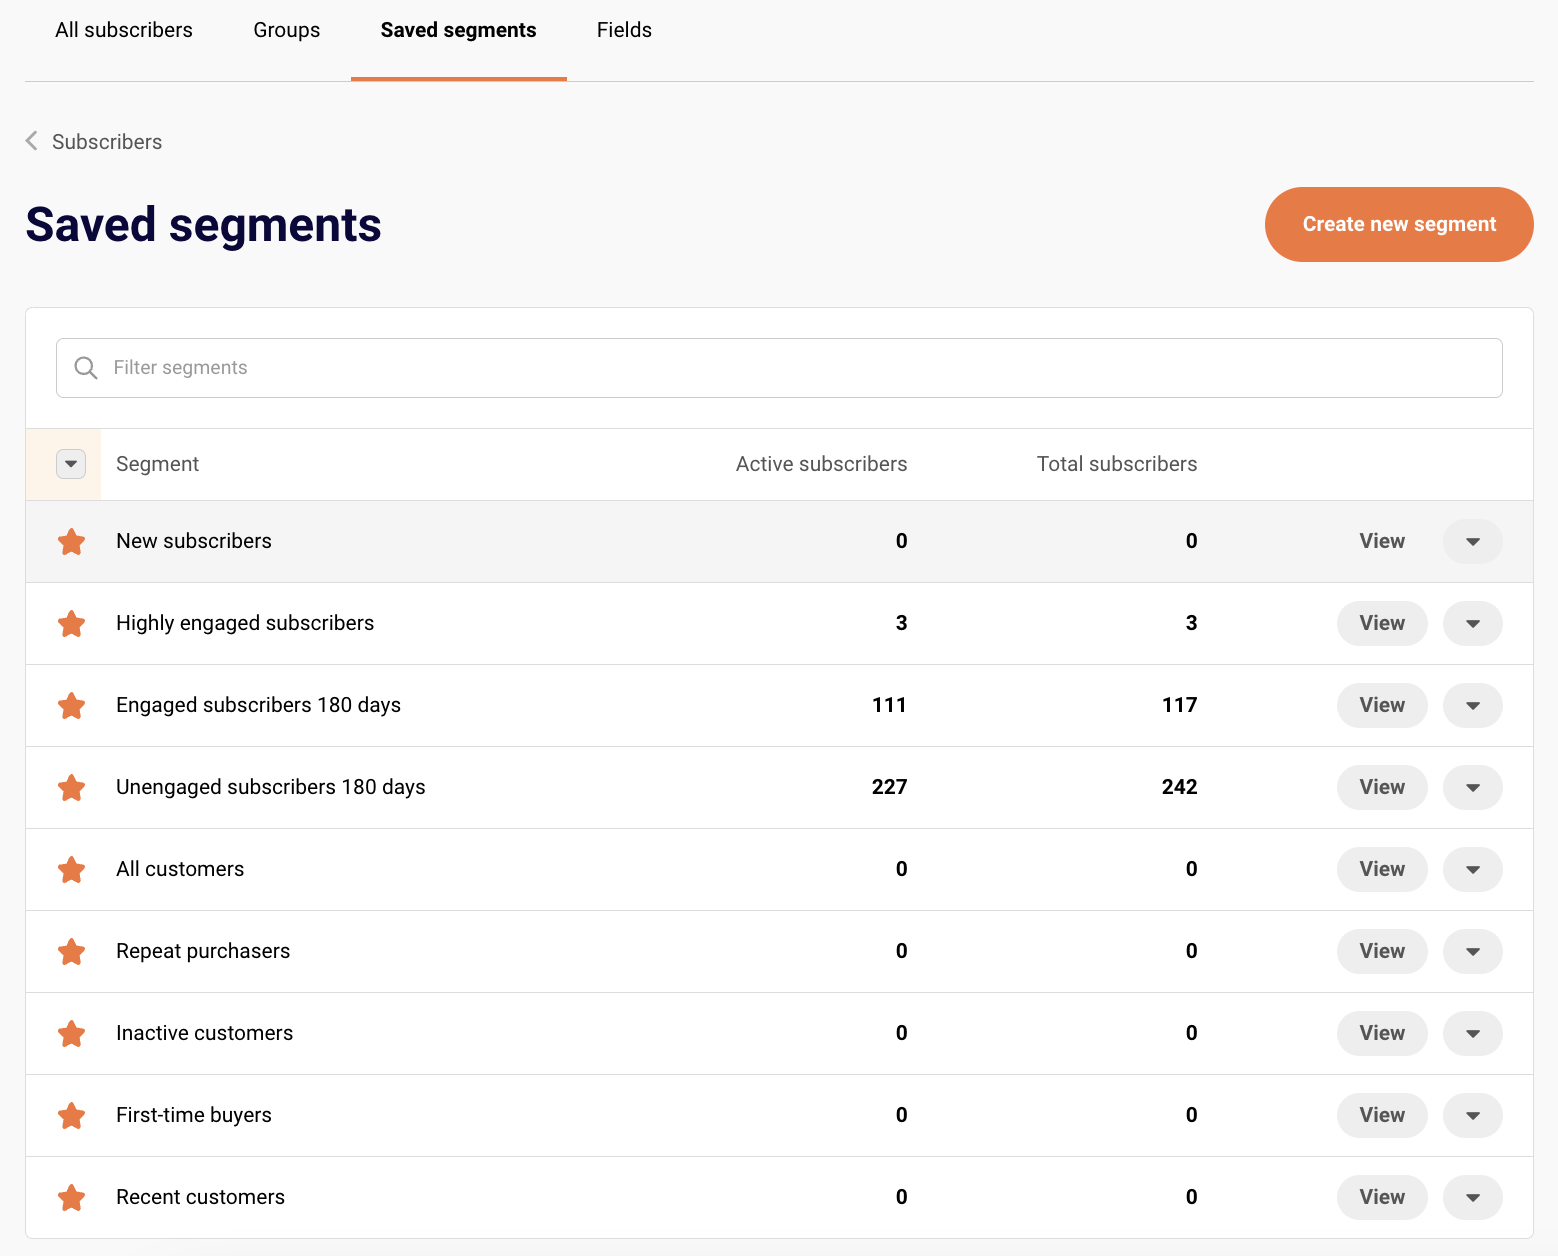
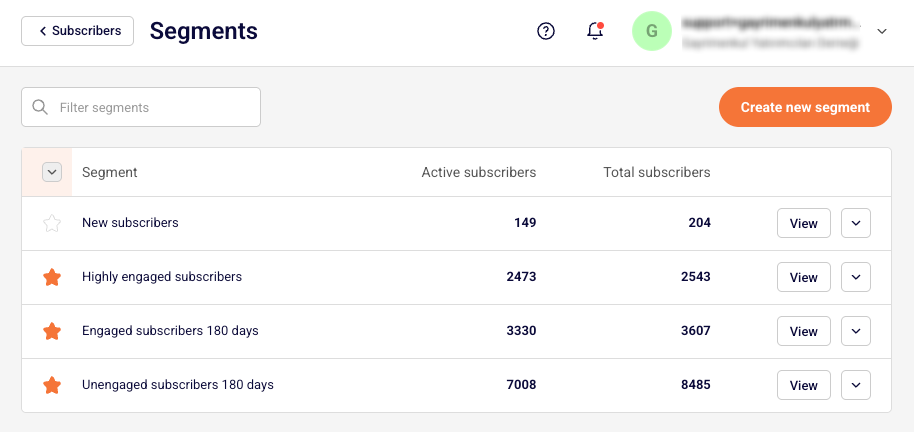
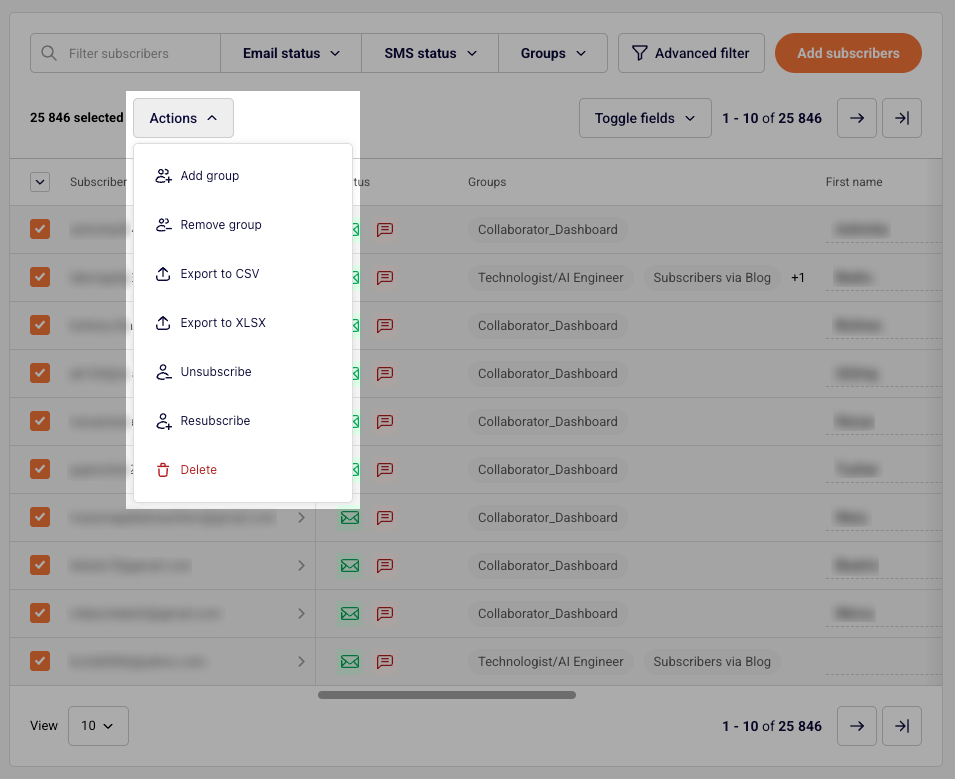
    • View segment members – Click “View” next to any segment to see all subscribers who currently match the segment criteria. This gives you a real-time list of everyone in that segment.
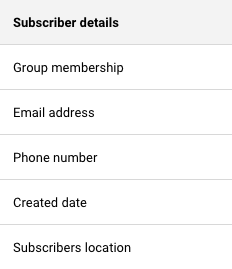
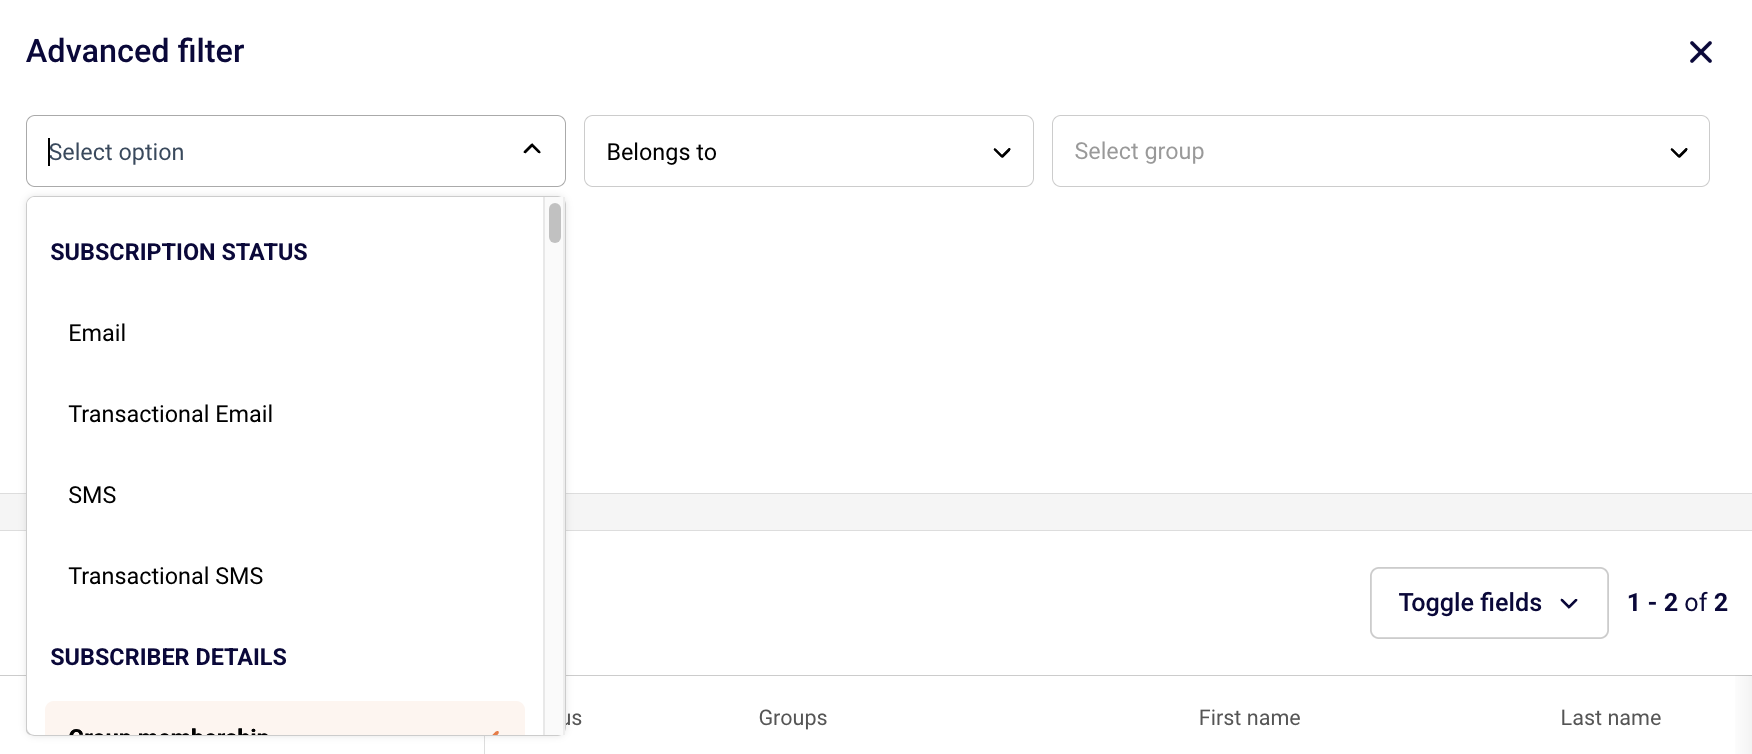
    • Filter subscribers – Use segments to quickly filter your subscriber list and find specific groups of contacts without manually searching through all your data.
    • Analyze subscriber groups – Compare active and total subscriber counts across segments to understand your audience composition and engagement levels.
    • Export segment data – Export subscribers from a specific segment when you need to use that data outside the platform or share it with your team.

    Email campaigns

    Segments are essential for targeting the right audience with your email campaigns.

    • Target specific audiences – When creating an email campaign, select a segment as your audience to ensure your message reaches only the subscribers who meet your criteria.
    • Personalize messaging – Use different segments to send tailored messages. For example, send one message to “Highly engaged subscribers” and a different re-engagement campaign to “Inactive users.”
    • Improve deliverability – By targeting engaged segments, you can improve your email open rates and overall campaign performance.
    • A/B test audiences – Create similar segments with slight variations to test which audience definition performs best for specific campaign types.

    SMS campaigns

    Just like email campaigns, segments help you target the right subscribers for SMS.

    • Target SMS subscribers – Use segments based on SMS subscription status to ensure you’re only messaging subscribers who have opted in to receive text messages.
    • Location-based messaging – Create segments based on subscriber location to send region-specific SMS campaigns.
    • Behavior-based SMS – Target segments like “SMS responders” or subscribers who have clicked in previous SMS campaigns to reach your most engaged mobile audience.
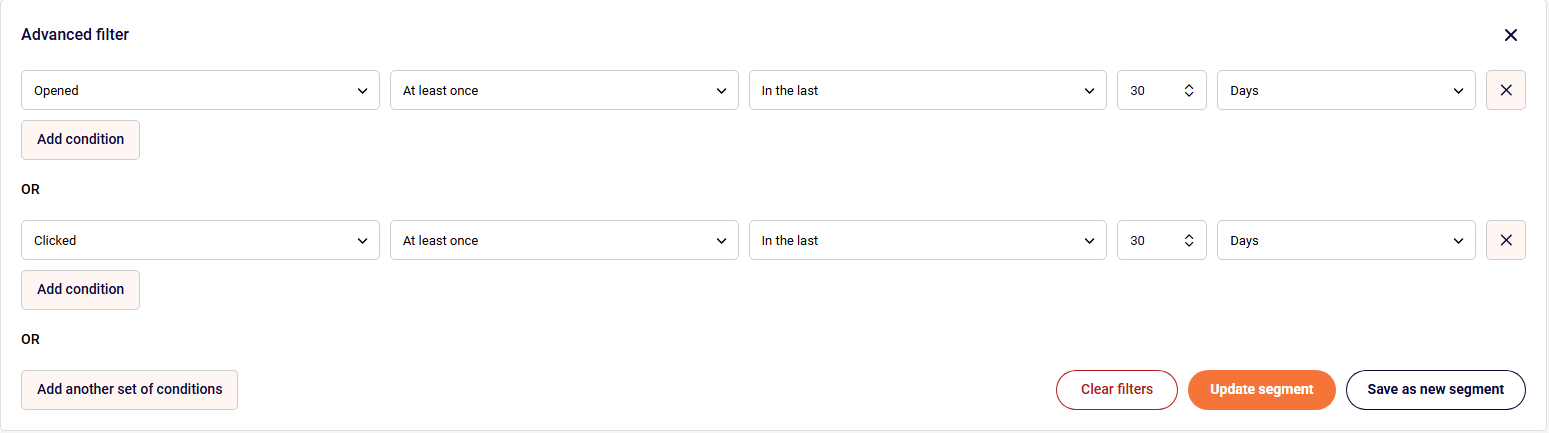
    Automations

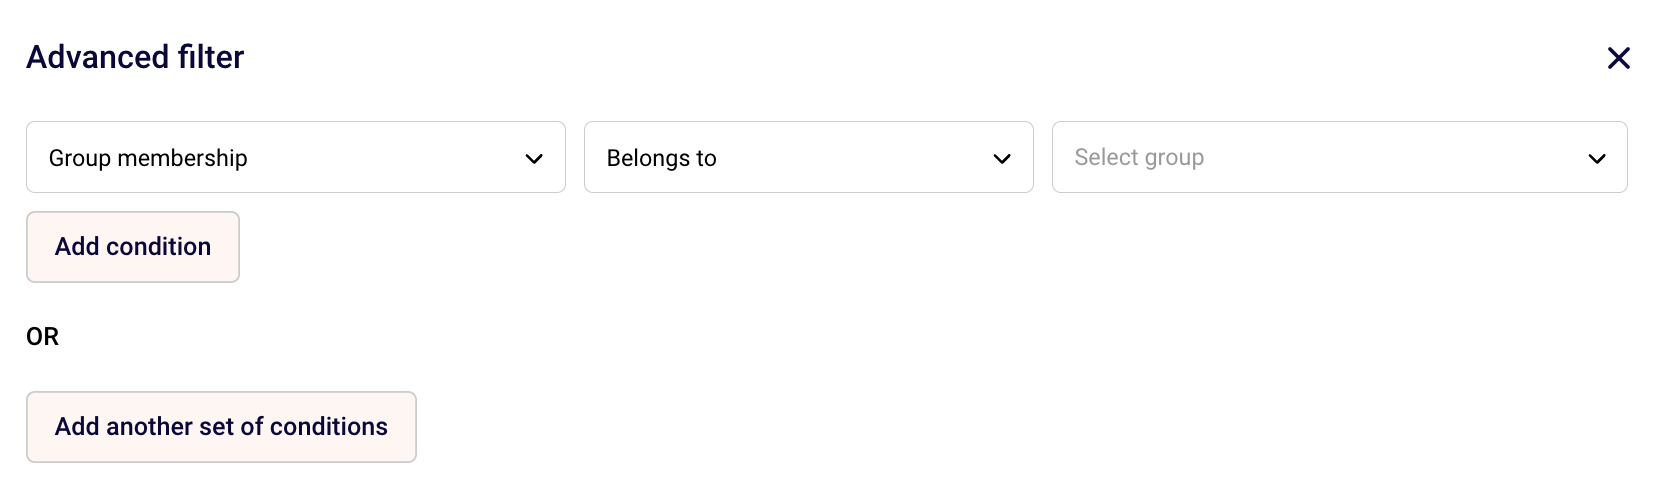
    In automations, segments work as conditions to control your workflow.

    • Add segment conditions – After your automation triggers, you can add a condition to check whether the subscriber is part of a specific segment before continuing the workflow.
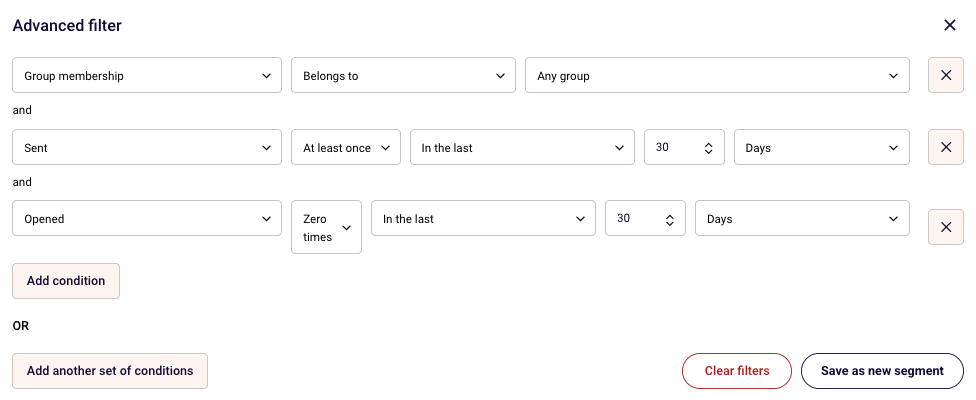
    • Filter automation paths – Use segment membership to create different paths in your automation. For example, send different follow-up messages based on whether someone is in your “Highly engaged users” segment.
    • Prevent over-messaging – Add conditions to check if subscribers are in exclusion segments like “Recently contacted” to avoid sending too many messages.
    • Dynamic workflow routing – Since segments update automatically, your automation conditions will reflect real-time segment membership, ensuring subscribers follow the most appropriate path.

    Example automation use case

    You might create an automation that:

    • Triggers when a subscriber fulfills an order
    • Checks if the subscriber is part of the “New subscribers” segment
    • If yes, sends a welcome series message
    • If no, sends a different message for existing subscribers

    Best practices

    • Match segments to goals – Choose segments that align with the objective of your campaign or automation.
    • Keep segments updated – Since segments update automatically, review your segment criteria periodically to ensure they still match your targeting needs.
    • Test before sending – Preview your segment size before launching campaigns to ensure you’re reaching the intended audience.
    • Use descriptive names – Clear segment names make it easier to select the right audience when creating campaigns and automations.
    • Combine with other targeting – Use segments alongside other conditions in automations to create sophisticated, personalized workflows.

    If you got stuck on a specific task or can’t find a way to execute a particular job, contact our support team via LiveChat or [email protected] – we’re here to help 24/7.

  • Manage your segments

    Once you’ve created segments, you’ll need to manage them effectively to keep your targeting accurate and organized. This guide covers how to view, edit, duplicate, and delete your segments.

    Viewing your segments

    Access all your segments from the segments dashboard. Here you can see:

    • Segment name – The label you assigned to each segment
    • Active subscribers – The number of active subscribers in the segment
    • Total subscribers – The total number of subscribers (active and inactive) in the segment

    Segments update automatically as subscribers meet or no longer meet your criteria, so the counts reflect real-time data.

    Editing a segment

    To modify an existing segment:

    • Navigate to your segments list
    • Click on the segment you want to edit
    • Update the conditions using the advanced filter options
    • Add or remove conditions using the “Add condition” button
    • Save your changes

    When you edit a segment, the changes apply immediately. Subscribers who no longer match the updated criteria will be removed, and new subscribers who now match will be added automatically.

    Creating similar segments

    To save time when building related segments:

    • Open an existing segment that’s similar to what you need
    • Modify the conditions to match your new requirements
    • Click “Save as new segment”
    • Give your new segment a descriptive name

    This is especially useful when you want to create variations of the same audience, such as “Active users – Last 30 days” and “Active users – Last 7 days.”

    Deleting segments

    To remove a segment you no longer need:

    • Navigate to your segments list
    • Select the segment you want to delete
    • Click the delete option after opening the dropdown menu by clicking the arrow
    • Confirm the deletion

    Important: Deleting a segment does not delete the subscribers in it. It only removes the segment definition.

    Best practices for segment management

    • Archive unused segments – If you’re not actively using a segment but want to keep it for reference, consider marking it clearly or organizing it separately.
    • Use consistent naming – Develop a naming convention for your segments to make them easy to find and understand at a glance.
    • Document complex segments – For segments with multiple conditions, add notes about their purpose and intended use.
    • Monitor segment size – Keep an eye on how your segment sizes change over time. Sudden changes might indicate an issue with your conditions or subscriber data.
    • Clean up outdated segments – Delete segments that are no longer relevant to keep your workspace organized.

    If you got stuck on a specific task or can’t find a way to execute a particular job, contact our support team via LiveChat or [email protected] – we’re here to help 24/7.

  • Segment examples

    Segments help you target the right users at the right time. Here are practical examples you can use as inspiration for creating your own segments.

    Engagement segments

    Active users Users who have engaged with your campaigns recently.

    • Opened at least once in the last 30 days, OR
    • Clicked at least once in the last 30 days

    Highly engaged users Your most active users who interact frequently with your campaigns.

    • Opened at least 5 times in the last 30 days, AND
    • Clicked at least 3 times in the last 30 days

    Inactive users Users who haven’t engaged recently and may need re-engagement.

    • Was sent to at least once in the last 90 days, AND
    • Has not opened in the last 60 days

    Subscription segments

    Email subscribers Users who are subscribed to receive email communications.

    • Subscription status for Email is “Subscribed”

    Multi-channel subscribers Users who are opted in to multiple communication channels.

    • Subscription status for Email is “Subscribed”, AND
    • Subscription status for SMS is “Subscribed”

    SMS subscribers only Users who prefer SMS communications.

    • Subscription status for SMS is “Subscribed”, AND
    • Subscription status for Email is “Unsubscribed”

    Behavioral segments

    Campaign engagers Users who have interacted with your recent campaigns.

    • Campaign activity: Clicked at least once in the last 14 days

    Non-openers Users who receive campaigns but don’t open them.

    • Campaign activity: Was sent to at least 3 times in the last 30 days, AND
    • Campaign activity: Opened 0 times in the last 30 days

    SMS responders Users who have engaged with SMS campaigns.

    • SMS campaign activity: Clicked at least once in the last 30 days

    Subscriber detail segments

    New subscribers Recently added contacts.

    • Created date is in the last 7 days

    Specific location Target users in a particular geographic area.

    • Subscribers is from “European Union / UK”

    Group members Users who belong to a specific group.

    • Group membership includes “VIP Customers”

    Tips for creating segments

    • Start simple – Begin with one or two conditions and add more as needed.
    • Use meaningful names – Name segments clearly so anyone on your team understands who’s included.
    • Monitor segment size – If a segment is too small or too large, adjust your conditions.
    • Combine conditions strategically – Use AND for more specific segments and OR for broader reach.

    That’s it!

    If you got stuck on a specific task or can’t find a way to execute a particular job, contact our support team via LiveChat or [email protected] – we’re here to help 24/7.

  • Understand segments and rules

    Segments are dynamic groups of users or customers that are automatically updated based on specific criteria you define. They allow you to organize and target your audience based on shared characteristics, behaviors, or attributes.

    Unlike static lists, segments update in real-time as users meet or no longer meet your criteria, ensuring your targeting is always current and accurate.

    Why use segments?

    Segments help you:

    • Personalize communication – Send targeted messages to specific groups based on their interests or behavior
    • Improve engagement – Reach the right people with relevant content at the right time
    • Analyze user groups – Understand how different segments behave and perform
    • Automate workflows – Trigger actions when users enter or exit specific segments
    • Optimize campaigns – Test and refine your approach with different audience groups

    Common segment types

    • Demographic segments Group users by characteristics like location, age, language, or company size.
    • Behavioral segments Target users based on actions they’ve taken, such as pages visited, features used, or purchases made.
    • Engagement segments Identify active, inactive, or at-risk users based on their level of engagement with your product or service.
    • Lifecycle segments Organize users by where they are in the customer journey, from new signups to loyal customers.

    How segments work

    Segments are built using conditions and filters. When a user matches all the conditions you’ve set, they’re automatically added to the segment. If they stop matching the conditions, they’re removed.

    For example, you might create a segment for “Active Users” that includes anyone who:

    • Opened at least once in the last 30 days
    • Clicked at least once in the last 30 days

    As soon as someone meets these criteria, they join the segment. If they stop meeting the conditions, they’re automatically removed. You may see an example here:

    Best practices

    • Start simple – Begin with broad segments and refine them as you learn more about your audience
    • Name clearly – Use descriptive names that make it obvious who’s in the segment
    • Review regularly – Check that your segment criteria still align with your goals
    • Avoid over-segmentation – Too many small segments can be difficult to manage
    • Test and iterate – Experiment with different criteria to find what works best

    That’s it!

    If you got stuck on a specific task or can’t find a way to execute a particular job, contact our support team via LiveChat or [email protected] – we’re here to help 24/7.

  • Understand segments page

    Learn about the Segments page in Sender and how to navigate its features for creating and managing contact segments.

    What is the Segments Page?

    The Segments page is your central hub for creating, viewing, and managing all your contact segments. It allows you to build dynamic filtered lists based on specific criteria like engagement, behavior, demographics, and custom attributes.

    Accessing the Segments Page

    To access the Segments page:

    • Click on Subscribers in the left navigation menu
    • Select Segments from the submenu
    • You’ll see your segments overview

    The Segments Page Interface

    Main Components of the Segments Page

    Page Header

    At the top of the page, you’ll find:

    • Back to Subscribers button – Returns you to the main subscribers list
    • Segments title – Confirms you’re on the segments page
    • Help icon – Access documentation and support
    • Notifications – View system notifications
    • Account menu – Access your account settings

    Search and Filter Bar

    Located below the header:

    • Filter segments search box – Quickly find specific segments by name
    • Search through your existing segments to locate the one you need

    Create New Segment Button

    On the right side of the page:

    • “Create new segment” button – Click to start building a new segment
    • Opens the segment creation interface with advanced filtering options

    Segments List

    The main area displays all your existing segments:

    • Segment names and descriptions
    • Contact count for each segment
    • Creation date and last modified information
    • Quick access to edit or view each segment

    Creating a New Segment

    When you click “Create new segment”, you’ll access:

    Advanced Filter Interface

    The filtering system where you can:

    • Select condition categories (Subscription Status, Subscriber Details, Campaign Activity, etc.)
    • Choose specific conditions within each category
    • Set parameters for each condition
    • Add multiple conditions using “Add condition”
    • Create alternative condition sets using “Add another set of conditions”

    Filter Preview

    As you build your segment:

    • View the number of contacts matching your criteria in real-time
    • See a preview of contacts who meet the conditions
    • Verify your segment before saving

    Segment Actions

    After creating your segment:

    • Save the segment with a descriptive name
    • Edit segment conditions at any time
    • Delete segments you no longer need

    Navigation Tips

    Finding Segments Quickly

    Use the filter search box to locate segments by:

    • Segment name
    • Keywords in the description
    • Partial name matches

    Organizing Your Segments

    Keep your segments page organized by:

    • Using clear, descriptive names
    • Including dates or version numbers when relevant
    • Archiving or deleting unused segments
    • Grouping similar segments with consistent naming conventions

    That’s it!

    If you got stuck on a specific task or can’t find a way to execute a particular job, contact our support team via LiveChat or [email protected] – we’re here to help 24/7.

  • Segmentation conditions list

    Explore all the filtering options available in Sender to create precise contact segments for targeted campaigns.

    What Are Segmentation Conditions?

    Segmentation conditions are the criteria you use to filter and organize your contacts. By combining different conditions, you can create highly specific segments that match your campaign targeting needs.

    Accessing Segmentation Filters

    To use segmentation conditions:

    • Go to Subscribers > Segments
    • Click “Create new segment”
    • Open the Advanced filter dropdown
    • Select from available condition categories

    Available Condition Categories

    Subscription Status

    Filter contacts based on their subscription type and status:

    • Email – Subscribed to email communications
    • Transactional Email – Can receive transactional emails
    • SMS – Subscribed to SMS messages
    • Transactional SMS – Can receive transactional SMS

    Subscriber Details

    Create segments using contact information and profile data:

    • Group membership – Belongs to or doesn’t belong to specific groups
    • Email address – Filter by email patterns or domains
    • Phone number – Contacts with or without phone numbers
    • Created date – When contacts joined your list
    • Subscribers location – Geographic targeting by country, region, or city

    Campaign Activity

    Segment based on email engagement and behavior:

    • Sent – Received specific campaigns
    • Opened – Opened one or more campaigns
    • Clicked – Clicked links in campaigns
    • Unsubscribed from emails – Opted out of communications
    • Was inactive – No engagement for a specified period

    SMS Campaign Activity

    • Was sent to – Received SMS campaigns
    • Clicked – Clicked links in SMS message

    E-commerce Metrics

    Create segments based on purchase behavior and customer value:

    • Placed an order – Made a purchase
    • Total lifetime spend – Customer lifetime value ranges
    • Quantity of products per basket – Average order size
    • Ordered specific product – Purchased particular items
    • Order refunded – Returned orders
    • Order value – Purchase amount filters

    Abandoned Cart

    Target potential customers based on cart behavior:

    • Checkout started – Began but didn’t complete purchase
    • Returned through email – Came back via email link

    Custom Fields

    Filter by any custom attributes you’ve created:

    • Any custom field you’ve added to your contacts
    • Filter by field values, presence, or absence

    If you got stuck on a specific task or can’t find a way to execute a particular job, contact our support team via LiveChat or [email protected] – we’re here to help 24/7.

  • Groups vs segments

    In Sender, you can organize subscribers with Groups or Segments. Each has a different purpose, and knowing the difference helps you manage your audience effectively.

    What Are Groups?

    Groups are static lists of subscribers that you create manually.

    • Manual membership: You add subscribers to a group during import or later by editing their profile.

    • Doesn’t change automatically: Subscribers remain in the group until you remove them.

    • Multiple groups allowed: One subscriber can belong to more than one group.

    What Are Segments?

    Segments are dynamic subscriber lists created with rules and conditions.

    • Automatic membership: Subscribers join or leave a segment based on whether they meet the conditions you set.

    • Updates daily: The system refreshes segments so they always reflect the latest subscriber data.

    • Flexible rules: You can combine multiple filters, such as location, activity, or custom fields

    When to Use Each

    • Use Groups when you want full manual control over who belongs to a list (e.g., tagging event attendees).

    • Use Segments when you want your list to update automatically (e.g., targeting active buyers or re‑engaging inactive subscribers).

    By combining both, you can keep your subscriber management simple and powerful: use groups for organization, and segments for smart targeting.

    That’s it!

    If you got stuck on a specific task or can’t find a way to execute a particular job, contact our support team via LiveChat or [email protected] – we’re here to help 24/7.

  • Use premade segments

    Paid customers can now use premade segments based on subscriber activity, engagement, and e-commerce behavior. These ready-to-use segments save time and enhance your campaign targeting.

    • New subscribers – subscribers that have been added to your account in the last 30 days.
    • Highly engaged subscribers – subscribers that have opened an email campaign at least once in the last 30 days OR clicked on a link in a sent email or SMS campaign at least once in the last 30 days.
    • Engaged subscribers 180 days – subscribers that have opened an email campaign at least once in the last 180 days OR clicked on a link in a sent email or SMS campaign at least once in the last 180 days.
    • Unengaged subscribers 180 days – subscribers that have not opened any campaigns or clicked any links in the last 180 days OR who’s email address status is bounced.
    • All customers – subscribers that have ever placed an order at least once.
    • Repeat purchasers – subscribers who have placed an order at least 2 times.
    • Inactive customers – subscribers who have placed at least one order in the past but have not made any purchases in the last 3 months.
    • First-time buyers – subscribers that have placed an order at exactly once at any point.
    • Recent customers – subscribers that have placed at least one order in the last 30 days.

    These segments get updated in real time and can edited if needed.

    That’s it!

    If you got stuck on a specific task or can’t find a way to execute a particular job, contact our support team via LiveChat or [email protected] – we’re here to help 24/7.

  • Create dynamic segments

    Dynamic segmentation allows you to create highly tailored subscriber segments based on specific user actions, such as placing orders, clicking links, or opening campaigns.

    By applying precise conditions and timeframes, you can filter your audience dynamically, ensuring your campaigns are targeted and engaging.

    This powerful feature helps you deliver the right message to the right people at the right time, maximizing the impact of your marketing efforts.

    How segments are different from groups

    While groups are static and require manual updates to reflect any changes, segments are dynamic and automatically update over time. As new subscribers meet the defined conditions or perform specific actions outlined in the segment setup, they are automatically added to the segment.

    Segments can include multiple conditions or alternative criteria, allowing for limitless configurations to precisely filter the subscribers you need.

    Please note that when sending a scheduled campaign to a dynamic segment, the campaign will be sent to the subscribers who match the segment’s criteria on the day it is sent, not the list as it existed when the segment was originally created.

    You can create segments based on these settings:

    Subscription status

    You can filter out the subscribers that have specific status for one or multiple channels.

    You can choose between:

    • Active
    • Bounced
    • Unsubscribed
    • Reported Spam
    • Non-subscribed

    Saving a segment with subscribers having a specific status can help you quickly move them to another group, export or delete them from your list. As the segment is dynamic, it will renew every time a new subscriber abides by the set conditions.

    Subscriber details

    You can also filter out subscribers by their main details, such as their contact details (email address and phone number), the groups they belong and whether they are from EU/UK or not.

    • Emails and phone numbers can be filtered out on whether they begin, include, end, or do not include specific characters.
    • Group membership and subscriber location can be filtered on the bases that the subscriber belongs or does not belong to specific group or to EU/UK area.
    • Created date allows you to filter the subscribers out by specific periods after, before or in between particular dates.
    • You can filter out subscribers that have or have not provided their phone number too.

    Campaign activity

    Campaign activity refers to the email campaign activity of your subscribers.

    This section allows you to filter out your most engaged and least interested subscribers to make your email campaigns more targeted and bring you better results.

    • You can filter out subscribers that were sent a specific campaign or any campaign in a particular time period.
    • This allows you to filter subscribers that opened or clicked a specific number of times in a specific number of hours, days, or months.
    • Inactive subscribers in this case mean those that have not opened an email/transactional email campaign and have not clicked any of the included links for the set period of time.

    SMS campaign activity

    These settings allow you to filter out subscribers according to their activity within the SMS campaigns.

    • You can segment subscribers according to the number of times you have sent them SMS in a set period of time.
    • Link clicks in the SMS can also be chosen to filter out the most engaged subscribers in a set number of hours, days or months.

    Ecommerce metrics

    If you have an active integration with one of our supported e-commerce stores, this section allows you to filter out subscribers according to their activity within your online store.

    • You can filter out whether a subscriber has ever placed an order with you and if so, you can specify the time period and the number of orders.
    • This also allows you to filter out the number of purchased products per basket and the total spend of subscribers.
    • You can filter subscribers by specifying a product they have purchased.
    • Subscribers can also be segmented by the period of time when their order was refunded.

    Abandoned cart

    This set of settings also requires an integration with supported e-commerce stores.

    • You can filter out the specific period that checkout has started.
    • You can also segment the specific subscribers that returned to their cart through the abandoned email campaign that has been sent.

    Custom fields

    Each user’s set of settings will differ in this section, as custom fields can be created.

    Custom field settings will differ according to the type of custom field that is created: text, number, or date.

    • Text type custom fields can be filtered by whether the information begins, ends, includes, or does not include specific characters. You can also filter out whether any data is provided in the field.
    • Number type custom fields can be filtered by whether the number is equal to, does not equal to, is less/more than, or between a specified number.
    • Date type custom fields can be filtered out by whether this date is before/after/on a specified date or between certain dates.

    That’s it!

    If you got stuck on a specific task or can’t find a way to execute a particular job, contact our support team via LiveChat or [email protected] – we’re here to help 24/7.

  • Manage segments

    Segments

    Segment feature is usually used to build targeted audiences based on various conditions. To create a subscribers segment, conditions must be set according to one’s wishes.

    Let’s continue by clicking the “Create new segment” button. Next, you will be asked to name the segment. Now we need to choose a set of conditions.

    Here you are presented with different filtration options. Subscribers can be segmented by various conditions, including subscription status, subscriber details, campaign activity, SMS campaign activity, ecommerce metrics, abandoned cart, and fields. 

    Furthermore, if you’re looking for a precise segmentation, you can add multiple sets of conditions. Subscribers that match all conditions/rules will be presented below.

    After subscribers are filtered out – you can execute different actions. Divided recipients can be attached or removed from a particular group, marked as unsubscribed, deleted, exported, and saved as a segment.

    The key difference between segments and groups is that segments update automatically whenever new subscribers are added to the list, as long as they meet the defined conditions. If a segment is based on a specific date or time period, it will refresh daily to stay up to date.

    This ensures that you’re always reaching the most recent and relevant subscribers.


    If you got stuck on a specific task or can’t find a way to execute a particular job, contact our support team via LiveChat or [email protected] – we’re here to help 24/7.