This guide explains the difference between transactional emails and campaign emails in Sender, and shows you how to identify when to use each type.
Where to Find This Feature
In the Sender dashboard, go to: Transactional emails
Click Transactional emails in the left sidebar to open the transactional email section. You will see a submenu with four pages: Metrics, Logs, Templates, and Setup instructions. This is where you create, manage, and monitor all transactional emails.
For comparison, campaign emails are located under Email campaigns in the main sidebar.
Steps to Understand the Difference
Step 1 — Learn What Transactional Emails Are
Transactional emails are automated messages triggered by a specific user action or system event. Examples include order confirmations, password resets, shipping notifications, and account verification emails. Each transactional email is sent to one recipient at a time, in direct response to something that person did.
In Sender, transactional emails are sent through the API (a way for your application to communicate with Sender's servers) or SMTP (a standard email-sending protocol). You will find both options under Transactional emails → Setup instructions.
Step 2 — Learn What Campaign Emails Are
Campaign emails are bulk messages sent to a group of subscribers at a scheduled time. Examples include newsletters, promotional offers, product announcements, and weekly digests. You choose the audience and decide when to send.
In Sender, campaign emails are created under Email campaigns in the left sidebar. You click New campaign, select subscriber groups, design your email, and schedule or send it immediately.
Step 3 — Compare How Each Type Is Created
Transactional emails follow a three-stage workflow: Settings → Design → API. You define the email details, build the template, and then connect it to your application using an API token or SMTP credentials. Your application triggers each send automatically.
Campaign emails follow a different flow. You click New campaign, configure your content, select a subscriber group, and either schedule or send the email manually. There is no API step because Sender handles delivery to your chosen audience directly.
Step 4 — Compare How Each Type Is Sent
Transactional emails are sent programmatically. Your application calls the Sender API or connects via SMTP to send an email whenever a triggering event occurs. You generate an API token under Account settings → API access tokens by clicking Create API token, or you set up SMTP credentials under Transactional emails → Setup instructions → SMTP.
Campaign emails are sent from the Sender dashboard. You click a send or schedule button, and Sender delivers the email to all recipients in the selected subscriber group at once.
Step 5 — Compare How Each Type Is Tracked
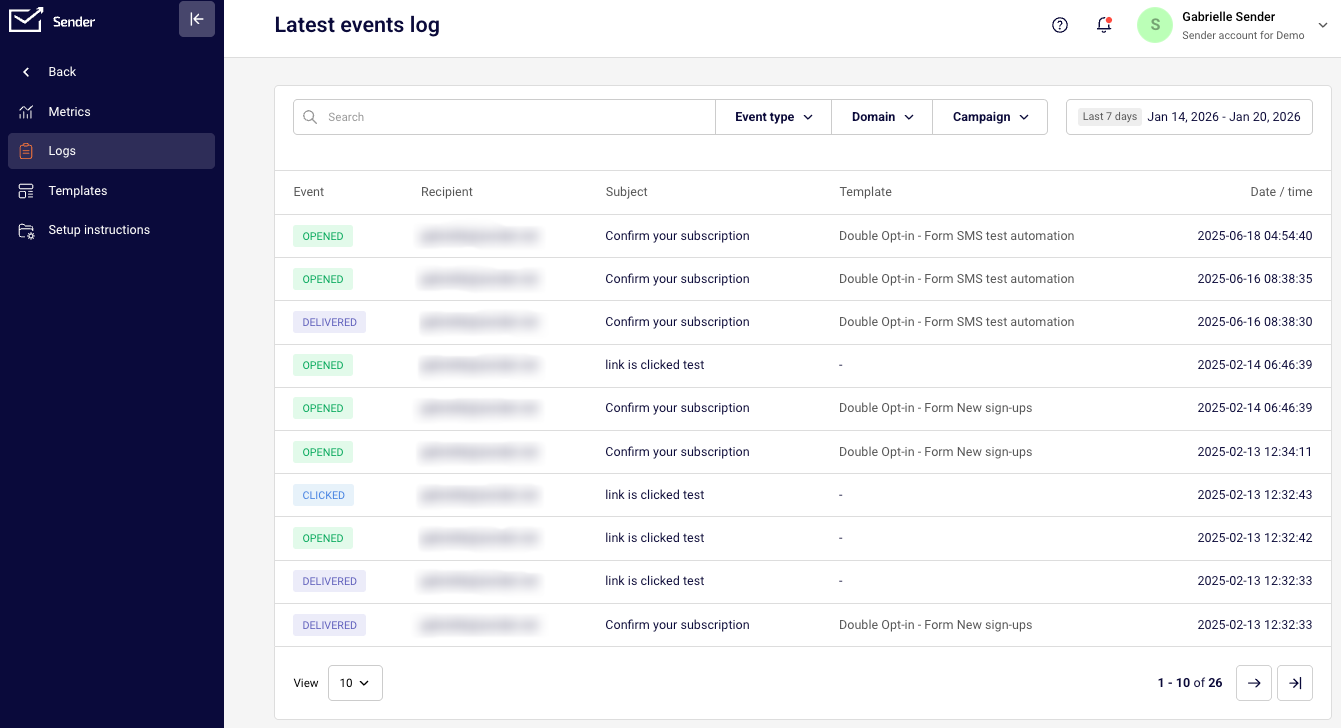
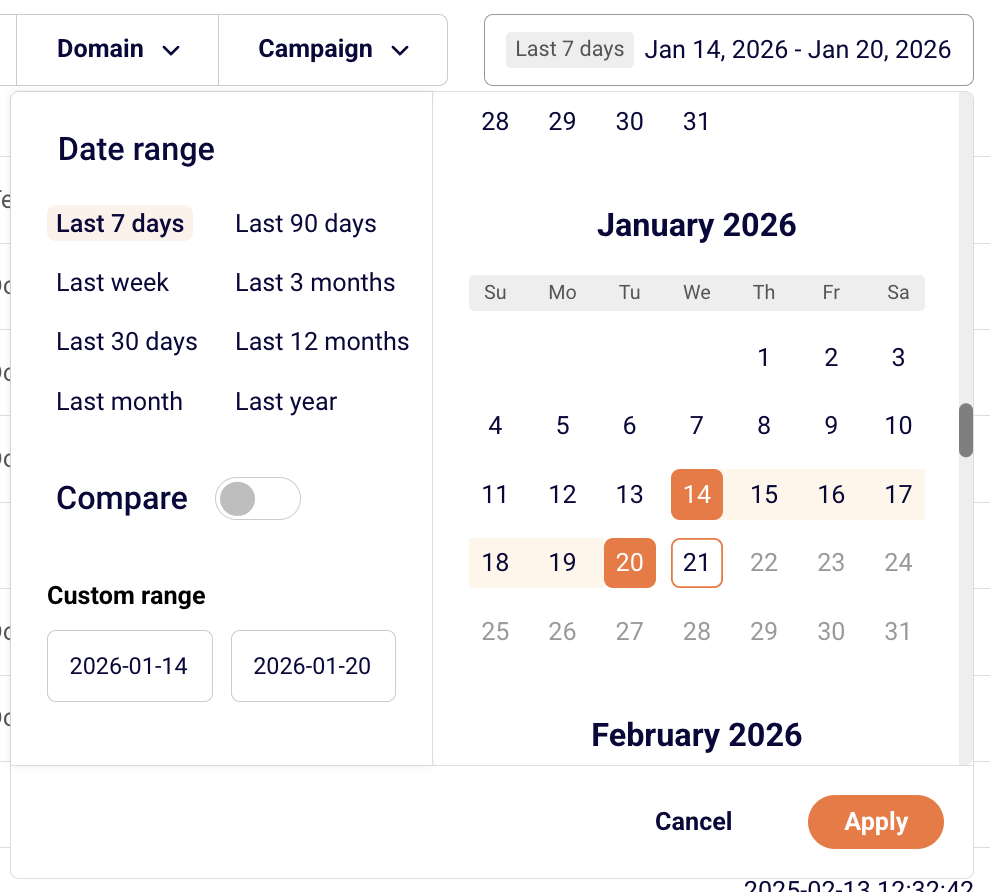
Transactional email activity appears under Transactional emails → Metrics, which shows the Transactional overview with stats for total emails sent, total delivered, total opens, and total clicks. Detailed delivery events appear under Transactional emails → Logs, called the Latest events log, where each row shows the event type, recipient, subject, template, and date/time.
Campaign email performance is displayed on the main Dashboard and within each campaign's individual report. Campaign stats include delivered, opened, and clicks per campaign.
Step 6 — Decide Which Type to Use
Use transactional emails when the message is triggered by a user action and is expected by the recipient. The content is specific to that individual and that event. Password resets, receipts, and shipping updates are transactional.
Use campaign emails when you want to send the same message to many people at once. The content is promotional, informational, or editorial. Newsletters, sale announcements, and product launches are campaign emails.
What Happens Next
If you need to send transactional emails, go to Transactional emails → Templates and click New email to create your first transactional email template.
If you need to send campaign emails, go to Email campaigns and click New campaign to build and schedule a campaign.
To verify that transactional emails are working after setup, check the Latest events log under Transactional emails → Logs for delivery confirmation events.
Common Issues
Unsure which type to choose for a specific email → If the email is triggered by a user action (such as a purchase or sign-up) and contains information unique to that user, it is transactional. If you are sending the same content to multiple subscribers on a schedule, it is a campaign email.
Transactional email not appearing in campaign reports → Transactional emails and campaign emails are tracked separately. Transactional email stats are under Transactional emails → Metrics and Logs, not on the main Dashboard or in campaign reports.
Trying to send a transactional email without API or SMTP setup → Transactional emails require either an API token or SMTP credentials to send. Go to Account settings → API access tokens to create a token, or go to Transactional emails → Setup instructions → SMTP to configure SMTP.
FAQs
What is the difference between transactional and marketing emails?
Transactional emails are triggered by a user action, such as a purchase or password reset, and contain information specific to that individual event. Marketing (campaign) emails are sent to a list of subscribers to promote content, offers, or updates. In Sender, these are managed in separate sections of the dashboard.
Can I use the same template for both transactional and campaign emails?
No. Transactional email templates are created under Transactional emails → Templates, and campaign email templates are created under Email campaigns. Each type has its own creation workflow and delivery method.
Do transactional emails require an API token?
Yes, if you are sending via the API. You can create one under Account settings → API access tokens by clicking Create API token. Alternatively, you can send transactional emails using SMTP credentials, which you configure under Transactional emails → Setup instructions → SMTP.
Do campaign emails use the API to send?
No. Campaign emails are sent directly from the Sender dashboard. You select your subscriber group, schedule or send the campaign, and Sender handles delivery. No API integration or SMTP setup is required.
Where do I monitor transactional email delivery?
Go to Transactional emails → Logs to view the Latest events log. This page shows every delivery event including the event type, recipient, subject, template name, and timestamp. For high-level stats, check Transactional emails → Metrics.
This guide walks you through how to set up transactional emails in Sender for the first time. Transactional emails are automated messages triggered by a user action — such as a purchase confirmation, password reset, or account notification — and are sent to one recipient at a time through the API or SMTP.
Where to Find This Feature
In the Sender dashboard, click Transactional emails in the left sidebar. This opens the transactional emails section with four pages in the submenu: Metrics — the Transactional overview page, which displays delivery stats such as Total emails sent, Total delivered, Total opens, and Total clicks. Logs — the Latest events log, where you can view individual email events filtered by Event type, Domain, and Campaign. Templates — where you create and manage reusable transactional email templates. Setup instructions — where you find integration code snippets and SMTP server credentials for connecting your application to Sender. To begin setup, you will also need the API access tokens page, located under Account settings → API access tokens in the main sidebar.
Steps to Set Up Transactional Emails
Step 1 — Generate an API Token
Go to Account settings → API access tokens in the main sidebar. Click Create API token. A dialog will appear asking you to select a token validity time — choose from Forever, 30 days, 7 days, or 1 day using the dropdown. Click Create to generate your token. Copy the token immediately and store it securely. You will need this token to authenticate API requests or configure your integration. The token appears only once, so save it before closing the dialog.
Step 2 — Choose Your Integration Method
Navigate to Transactional emails → Setup instructions in the sidebar. You will see a panel with five integration tabs: curl://, Laravel, php, node, and SMTP. If using the API: Select the tab that matches your application (e.g., curl://, Laravel, php, or node). Copy the provided code snippet and paste it into your application. Replace YOUR_TOKEN_HERE in the authorization header with the API token you generated in Step 1. If using SMTP: Click the SMTP tab. Note the server settings displayed — Server:smtp.sender.net, Ports:25, 2525, or 587, Authentication:PLAIN or LOGIN over TLS. Click Add SMTP user, enter a Username in the dialog, and click Create. Use the generated SMTP username, password, and server settings to configure your application’s mail settings.
Step 3 — Send a Test Email
Use your chosen integration to send a test email to an address you can check. If you are using the API, run the code snippet from the Setup instructions page with a valid recipient address filled in. If you are using SMTP, configure your application with the credentials from Step 2 and trigger a test send. After sending, go to Transactional emails → Logs in the sidebar and confirm that your test email appears in the Latest events log with the correct Event, Recipient, and Subject.
What Happens Next
Once your test email appears in the Logs page and shows a delivered status, your transactional email setup is complete. You can now integrate transactional email sends into your application’s workflows — such as order confirmations, password resets, or account notifications. To monitor ongoing performance, visit the Metrics page under Transactional emails to track delivery rates, opens, clicks, bounces, and spam reports.
Common Issues
API token not working → The token may have expired if you selected a limited validity time, or it may have been copied incorrectly. Go to Account settings → API access tokens and create a new token. Make sure to copy the full token string without extra spaces.
SMTP connection refused → Your application may be using an unsupported port or missing TLS. Verify that you are connecting to smtp.sender.net on port 25, 2525, or 587, and that authentication is set to PLAIN or LOGIN over TLS. Test email not showing in Logs → The email may not have been sent successfully. Double-check that your API token or SMTP credentials are entered correctly in your application. Also confirm that the recipient email address in your test request is valid and properly formatted.
“Unauthorized” error on API request → The Authorization header is missing or malformed. Ensure the header reads Bearer YOUR_TOKEN_HERE with your actual token replacing the placeholder. The token must be preceded by the word Bearer and a single space.
FAQs
What is the difference between transactional and marketing emails?
Transactional emails are triggered by a specific user action, such as a purchase or password reset, and are sent to a single recipient. Marketing emails are sent in bulk to promote content, offers, or updates to a subscriber list.
Can I send transactional emails without using the API?
Yes. You can use SMTP instead. Go to Transactional emails → Setup instructions, click the SMTP tab, and create an SMTP user. Then configure your application with the provided server address, port, and credentials.
Where do I find my API token after creating it?
API tokens are shown only once at the time of creation. If you did not copy it, you will need to generate a new one from Account settings → API access tokens by clicking Create API token.
How do I know if my transactional email was delivered?
Go to Transactional emails → Logs. The Latest events log displays each email event with its delivery status, recipient, subject, and timestamp. You can also check the Metrics page for an overview of total deliveries and bounces.
Which port should I use for SMTP?
Sender supports ports 25, 2525, and 587. Port 587 with TLS is recommended for most applications, as it is widely supported and secure.
This guide explains what transactional emails are and walks you through how to access and understand the transactional email feature in Sender for the first time.
Where to Find This Feature
In the Sender dashboard, click Transactional emails in the left sidebar. This opens the transactional emails section, which contains four subpages accessible from the inner sidebar: Metrics, Logs, Templates, and Setup instructions. Together, these pages let you monitor delivery performance, review individual email events, manage email templates, and configure your sending method.
Steps to Understand and Access Transactional Emails
Step 1 — Learn What Transactional Emails Are
Transactional emails are automated messages triggered by a specific user action or system event. Common examples include order confirmations, password reset links, account verification emails, and shipping notifications. Unlike marketing emails, which are sent in bulk to promote content or offers, transactional emails are sent to a single recipient in response to something they did. In Sender, transactional emails are managed separately from campaigns and automations, with their own dedicated section, API, and SMTP sending options.
Step 2 — Open the Transactional Emails Section
Click Transactional emails in the main left sidebar. You will land on the Transactional overview page, labeled Metrics. This page displays delivery statistics including Total emails sent, Total delivered, Total opens, and Total clicks, along with Unsubscribes, Hard bounces, Soft bounces, and Spam reports. You can filter results by Event type, Domain, and Campaign, and switch between Hourly, Daily, Weekly, or Monthly views.
Step 3 — Explore the Subpages
Use the inner sidebar icons to navigate between the four transactional email subpages: Metrics shows an overview chart and delivery statistics for your transactional emails. Logs opens the Latest events log, which lists individual email events with columns for Event, Recipient, Subject, Template, and Date / time. Templates displays your saved transactional email templates and includes a New email button to create one. Setup instructions provides ready-to-use code examples for integrating with Sender’s API or SMTP server.
Step 4 — Review Available Sending Methods
Click Setup instructions in the inner sidebar. This page offers integration guides for multiple platforms: curl, Laravel, PHP, Node.js, and SMTP. Select any tab to view the corresponding code sample or configuration details. For API-based sending, the code samples reference the endpoint and include a placeholder for your API token. For SMTP-based sending, the page displays the server credentials: Server is smtp.sender.net, Ports are 25, 2525, or 587, and Authentication is PLAIN or LOGIN over TLS. You can also click Add SMTP user to create SMTP login credentials.
Step 5 — Locate Your API Access Token
To send transactional emails through the API, you need an API token. Navigate to Account settings → API access tokens from the main sidebar. If you have not created a token yet, you will see Create your first API token on the page. Click Create API token to generate one. Copy the token and use it in the Authorization: Bearer YOUR_TOKEN_HERE header shown in the setup instructions.
What Happens Next
After reviewing the transactional emails section, you are ready to configure your first sending method — either by generating an API token or creating SMTP credentials. Once you send your first transactional email, visit the Logs page to confirm delivery. Each email event will appear with its status, recipient, subject, and timestamp. Check the Metrics page to monitor overall delivery performance over time.
Common Issues
Transactional emails section is empty → No transactional emails have been sent yet. Follow the code examples on the Setup instructions page to send your first email, and data will begin appearing in Metrics and Logs.
API token not working → The token may not have been copied correctly, or it may have been deleted. Go to Account settings → API access tokens and verify that an active token exists. If needed, create a new one and update your integration code.
SMTP connection fails → Confirm you are using the correct server (smtp.sender.net), one of the supported ports (25, 2525, or 587), and that you have created an SMTP user on the Setup instructions → SMTP tab. Check that your authentication method is set to PLAIN or LOGIN over TLS.
Emails not appearing in Logs → There may be a short delay before events are recorded. Refresh the Latest events log page and verify that the date range filter includes the current date. Also check that your API call or SMTP request returned a successful response.
FAQs
What is the difference between transactional and marketing emails? Transactional emails are triggered by a user action, such as a purchase or password reset. They are sent to one recipient at a time. Marketing emails are sent in bulk to promote content, offers, or updates. In Sender, each type has its own dedicated section and sending tools. Can I send transactional emails without using the API? Yes. You can use SMTP credentials instead. Go to Transactional emails → Setup instructions, select the SMTP tab, and click Add SMTP user to generate your login credentials. Then configure your application to send through Sender’s SMTP server. Do I need to verify a domain before sending transactional emails? A verified domain improves deliverability and ensures your emails are authenticated. You can manage domains under Account settings → Domains. Adding and verifying your sending domain is recommended before you begin sending. Where can I find the API documentation? On the API access tokens page under Account settings, click View API docs. You can also reference the code samples on the Setup instructions page inside the Transactional emails section. Can I create reusable templates for transactional emails? Yes. Go to Transactional emails → Templates and click New email to create a template. You can then reference that template when sending emails through the API.
Transactional emails are automated messages sent to individual users in response to specific actions, such as password resets, order confirmations, welcome emails, and account notifications. This guide will walk you through setting up transactional email sending in Sender.
Before you begin, make sure you have verified your domain and its DNS parameters (SPF, DKIM and DMARC) in your Sender account. Click here for detailed instructions on how to do that.
Once your domain is verified, you can start sending transactional emails using either the API or SMTP relay.
Sending Emails with API
API allows you to send transactional emails programmatically. We support multiple programming languages and provide ready-to-use code examples.
Important: Replace YOUR_TOKEN_HERE with your actual API token, and update the FROM and TO email addresses. The FROM email address must match your verified domain.
Once you send your email, you can check the status of your message in Logs.
Logs can be filtered by event types:
Emails sent
Opens
Clicks
Bounces
Unsubscribes
Spam reports
You can also search for a log by email address, the sender’s domain and campaign name.
You can choose the date range for the logs that you are interested in.
Laravel Integration
Sender provides a Laravel mail transport package for seamless integration with Laravel’s Mail facade:
1. Install the SDK (auto-discovery registers SenderServiceProvider):
4. Use Laravel’s mailing features as usual. Any SenderNetRequestException raised by the SDK is converted into Symfony\Component\Mailer\Exception\TransportException with the original message preserved.
PHP Integration
For standard PHP applications, install the recommended HTTP client and SDK:
use SenderNet\SenderNet;
use SenderNet\Helpers\Builder\EmailParams;
use SenderNet\Helpers\Builder\Recipient;

$sender = new SenderNet(['api_key' => getenv('SENDER_API_KEY')]);

$emailParams = (new EmailParams())
    ->setFrom('[email protected]')
    ->setFromName('Gabrielle')
    ->setRecipients([new Recipient('[email protected]', 'User')])
    ->setSubject('Welcome')
    ->setText('Thanks for signing up\!');

$response = $sender->email->send($emailParams);
Sending Emails with SMTP
SMTP (Simple Mail Transfer Protocol) is a standard protocol for sending emails. Many applications and content management systems support SMTP configuration.
Setting Up SMTP
Navigate to your Setup instructions page in Sender
Select the SMTP tab
Click Create SMTP user to generate your credentials
Password: (provided when creating the user; safe it as it will only be shown once)
Configuring SMTP in Your Application
Enter the following settings in your application or CMS:
SMTP Host/Server: smtp.sender.net
Port: 25, 2525, or 587 (choose based on your server configuration)
Encryption: TLS or STARTTLS
Username: Your generated SMTP username
Password: Your SMTP password
Important: The from email address must match your verified domain.
Managing SMTP Users
From the SMTP Users section, you can:
Edit user settings
Regenerate password if credentials are compromised or you lost the password
Delete users you no longer need
JavaScript/Node.js Integration
Here’s a complete example of sending a transactional email:
var axios = require('axios');
Configuration Parameters
URL Structure: Replace CAMPAIGN_ID with your actual campaign ID from your Sender account.
Authentication: Replace PLACE_YOUR_API_TOKEN_HERE with your API token, which you can find in your Sender account settings.
Request Body:
to: Recipient information including email address and name
variables: Custom variables that can be used in your email template (like firstname, lastname)
text: The email content or a trigger for your template
All other available parameters can be found at api.sender.net.
API Features and Capabilities
Sending to Multiple Recipients
For individual personalized emails: Make separate API calls for each recipient to ensure personalization and privacy.
For bulk sending: Use Sender’s bulk endpoint to send to multiple recipients efficiently. Note that when multiple recipients are added to the same “to” field, they will be able to see each other’s email addresses.
Adding Attachments
You can attach files to your transactional emails by including file URLs in your API request:
Supported formats: PDF, Office documents, images, ZIP files, and more
Send Transactional Emails with SMTP via Python
1. Generate your Credentials
Navigate to the Transactional Emails section in your Sender dashboard and click on Setup instructions.
Select the SMTP tab.
Click Add SMTP User to generate a dedicated alphanumeric username (e.g., USER_elRMvr) and password.
2. Input Parameters in Your Application
Enter the following settings exactly within your application framework or environment config:
SMTP Host/Server:smtp.sender.net
Port:587 (Recommended for modern web frameworks with STARTTLS) or 25 / 2525.
Encryption:TLS / STARTTLS
Username: Your generated Sender SMTP username.
Password: Your generated SMTP password.
3. Python Integration Example
4. Common Pitfalls for Python SMTP Users
The send_message() Header Wrap: Python’s high-level server.send_message() helper automatically formats email headers. If the generated multi-part boundary line is long, Python splits it across multiple lines but often drops the required leading whitespace tab. This triggers a 550 Unable to parse msg. rejection from our inbound servers. Solution: Use outer_msg.as_bytes(policy=email.policy.SMTP) and pass the resulting bytes into server.sendmail() instead.
Using the SMTP Username as the Sender Address: The alphanumeric SMTP username generated in your dashboard (e.g., USER_elRMvr) is an API credential, not an email address. Placing a bare username string inside your From: or Message-ID fields will break protocol parser validation. Solution: Always formulate fully qualified addresses ([email protected]) inside your message header blocks.
Flawed MIME Hierarchy Nesting: When sending text alongside attachments, failing to nest your objects correctly causes modern email clients to display raw payload code or drop files entirely. Solution: Maintain an outer multipart/mixed structure for the attachment layout and embed an inner multipart/alternative structure for your plaintext and HTML body options.
5. Method 1 Frequently Asked Questions (FAQs)
Q: Why does my Python script hang or experience socket connection timeouts? A: Most cloud computing providers (such as AWS EC2, DigitalOcean, or Linode) and consumer ISPs block outbound traffic on Port 25 to mitigate spam. Ensure your application configuration targets Port 587 with STARTTLS enabled.
Q: Can I use Port 465 with the provided code snippet? A: No. Port 465 is not supported, as it’s not RFC compliant. The provided code snippet uses Port 587, which initializes an unencrypted connection and upgrades it safely via opportunistic TLS.
Q: How do I handle file attachments that contain international characters or non-ASCII names? A: Standard ASCII strings cannot natively support international character variants in email headers. If you attempt to pass a filename with special characters directly into add_header, it will corrupt your message formatting. To fix this, explicitly encode the filename parameters using a UTF-8 tuple inside the attachment block:
Sender allows you to create and use email templates with your transactional emails for consistent branding and easier management.
API documentation for sending a transactional email with a template can be found here.
Creating a Template
Navigate to the Transactional email overview page
Create or select an existing template
Complete the Settings, Design, and API steps
In the API step, select your preferred programming language (JavaScript, PHP, or Python)
Template API Examples
Each template has a unique campaign ID that you’ll use in your API calls. You can find this ID in the API example section of your template.
The API example section provides language-specific code examples with your template ID already included:
JavaScript – Using axios
PHP – Native PHP implementation
Python – Using requests library
Important: Replace PLACE_YOUR_API_TOKEN_HERE with your actual API token in the code examples.
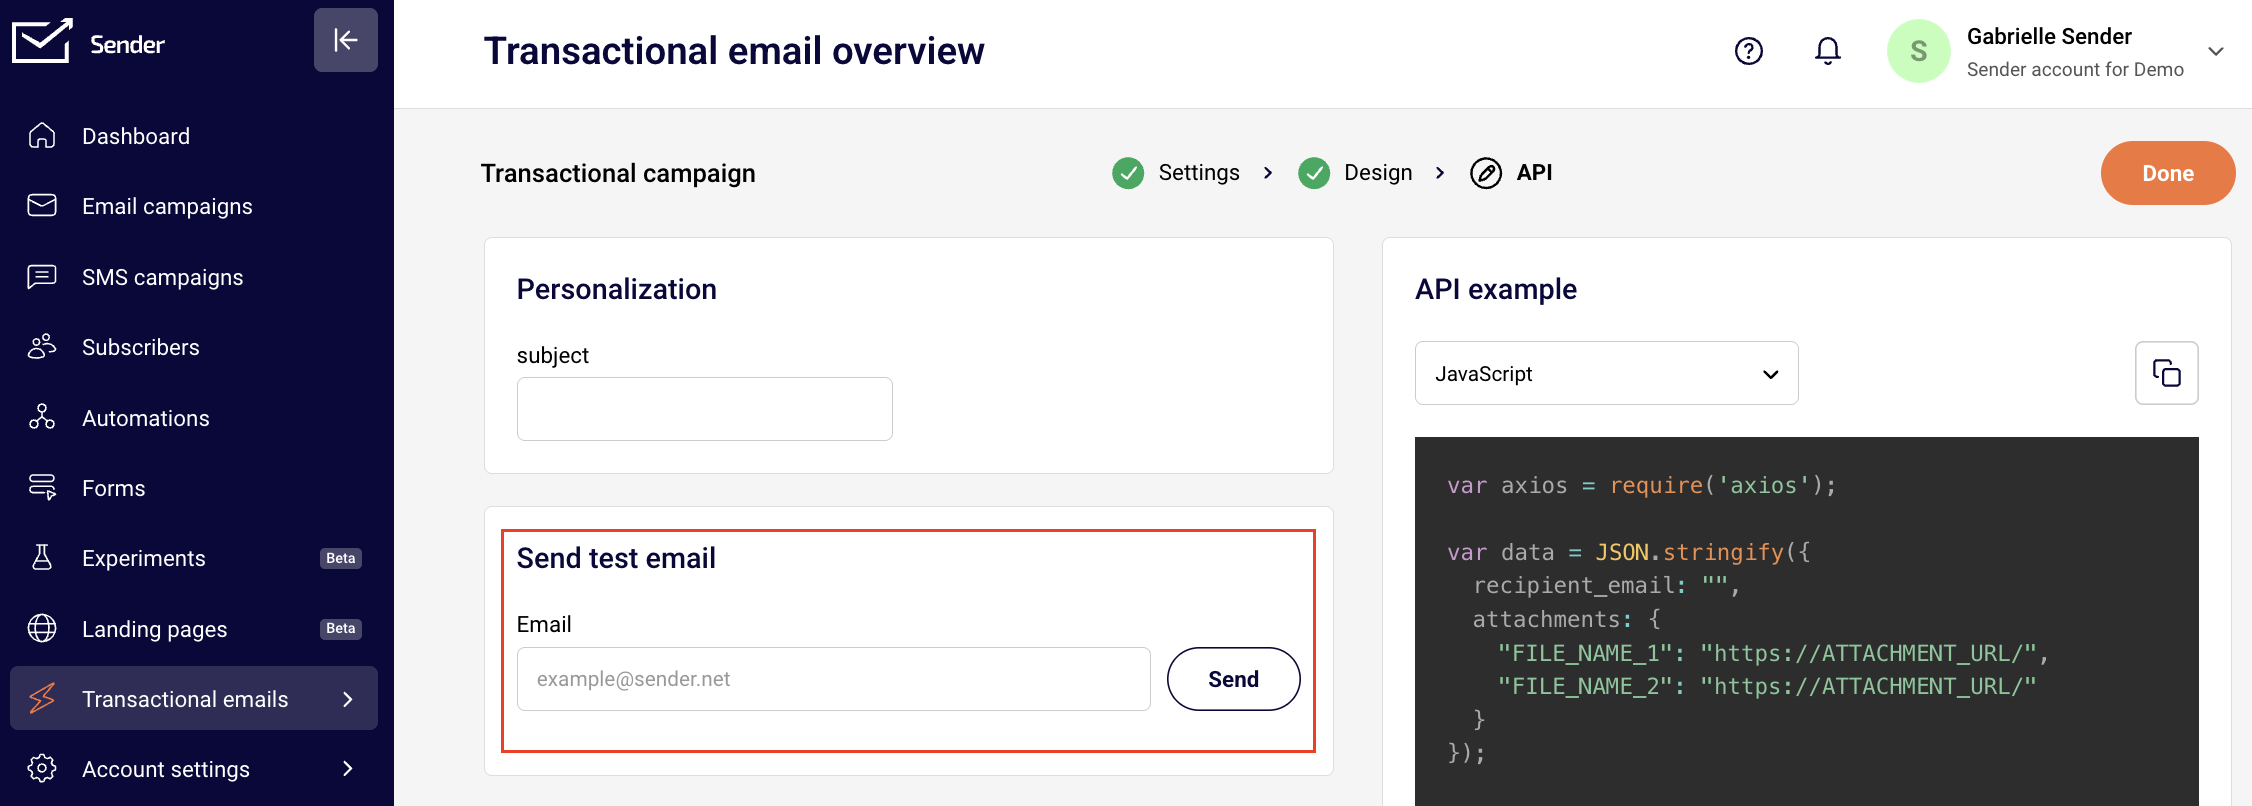
Sending a Test Email
Before going live, you can test your template:
Go to the Transactional email overview page
Enter your email address
Click Send to receive a test email
Variables
Personalize your transactional emails using variables and dynamic content to create unique experiences for each recipient.
Using Liquid Tags
Liquid tags allow you to insert dynamic content into your emails. Liquid tags should be enclosed in double curly brackets:
Hello {{firstname}}, Your order {{order_id}} has been confirmed.
When sending via API, pass the personalization data:
{
  "to": {
    "email": "[email protected]",
    "name": "John"
  },
  "subject": "Order Confirmation",
  "html": "Hello {{firstname}}, your order {{order_id}} is confirmed.",
  "variables": {
    "firstname": "John",
    "order_id": "12345"
  }
}
Liquid tag rules:
Must be enclosed in double curly brackets: {{variable}}
May contain alphanumeric characters and underscores
Must not start with a number or underscore
Are case-sensitive: {{VAR}} is different from {{var}}
Conditional Content
Show different content based on conditions, e.g.:
{% if subscription_level == 'premium' %} You’re enjoying all premium features 🎉 {% else %} Upgrade your subscription to access premium features. {% endif %}
Common Issues and Solutions
Email not sending:
Verify that your from email address matches your verified domain,
Check that your API token or SMTP credentials are valid and active,
Ensure you’re providing either HTML content, text content, or a template ID,
Confirm your request format follows the API documentation exactly,
Check that all required fields are included in your request.
Authentication errors:
Confirm your API token is correct and hasn’t been regenerated
Esure the API token has not expired (use “Forever” for transactional emails)
For SMTP, verify your username and password are entered correctly and without extra spaces
Check that your account has sending permissions and is not suspended
Recipient not receiving emails:
Check if the subscriber status is active (not bounced, unsubscribed, or reported spam)
Verify the recipient’s email address is valid and has no typos
Look for bounce or spam complaint notifications in your activity log
Check if your domain’s sending reputation is healthy
Ensure SPF, DKIM, and DMARC records for your domain are properly configured and verified
Template issues:
Verify your Campaign ID is correct in the API call
Check that all liquid tags are properly closed with matching brackets
Test liquid tag syntax with sample data before sending live
Ensure custom fields referenced in liquid tags exist in your subscriber data, if not – set up default values.
API Error Codes
Understanding error codes helps you quickly identify and fix issues:
Code
Meaning
Common Solution
400
Bad request
Review your request format and ensure all JSON is valid
401
Unauthorized
Verify your API token is correct and properly formatted
403
Forbidden
Check your account permissions and sending limits
404
Not found
Verify the endpoint URL and Campaign ID are correct
422
Validation error
Review the error message for specific field issues
429
Too many requests
Reduce your request rate or implement exponential backoff
500
Server error
Retry your request after a brief delay
Common 422 Validation Errors
Error Message
What It Means
Solution
“From email must be verified”
The sender address doesn’t match your verified domain
Include either “html” or “text” field in your request
“Campaign not found”
Invalid Campaign ID
Verify the Campaign ID from your template settings
“Rate limit exceeded”
Too many requests sent
Implement rate limiting in your application
Email status meaning
Track your email delivery with these status indicators:
If you got stuck on a specific task or can’t find a way to execute a particular job, contact our support team via LiveChat or [email protected] – we’re here to help 24/7.
We are excited to announce that Transactional Emails are now available across all Sender plans—from Free to Enterprise.
Whether you need to send password resets, order confirmations, or shipping notifications, you can now manage everything within the same ecosystem you use for your marketing campaigns. We’ve designed our transactional infrastructure to ensure high-speed delivery, robust security, and developer-friendly integration.
Here is an overview of the features available and a breakdown of plan-specific limits.
What features are included?
Our transactional email suite is built to make your life easier, whether you are a developer setting up the API or a marketer analyzing delivery reports.
API & SMTP: Choose the setup that fits your workflow. Hit our REST endpoint or use standard SMTP relay.
Libraries & Documentation: We provide setup guides to help you get up and running quickly.
Powerful Content & Personalization
Dynamic Templates: Manage your transactional templates (like invoices or welcome emails) directly in Sender. You can update copy or design without touching your codebase.
Liquid Syntax: easily drop in variables like customer names, order totals, or conditional content based on user data.
Attachments: Send PDFs, invoices, or documents up to 10MB. All files are virus-scanned and transferred securely.
Analytics & Tracking
Real-time Analytics: Track every step from “send” to “inbox.”
Detailed Logs: Search and filter records of every email sent to troubleshoot delivery issues.
Webhooks: Get instant notifications when emails are delivered, opened, or clicked to trigger follow-up actions in your own systems.
Security & Deliverability
High-Priority Sending: We utilize a low-latency send path and smart queuing to ensure time-sensitive emails (like OTPs) land instantly.
Built-in Authentication: We handle SPF, DKIM, and DMARC support to protect your domain reputation.
Suppression Management: Automatic handling of bounces and complaints to keep your list clean.
Feature Availability by Plan
While transactional email capability is unlocked for all users, specific limits regarding data retention, team access, and infrastructure vary by plan tier.
Features Available on ALL Plans
Every plan (Free, Standard, Professional, Enterprise, and Prepaid credits) includes:
Full access to API and SMTP.
Dynamic Templates and Liquid syntax.
Real-time analytics and engagement tracking.
Standard Domain Authentication (SPF/DKIM/DMARC).
Unlimited Custom Sending Domains.
TLS Encryption and GDPR Compliance.
Plan-Specific Limits
Below is a breakdown of how the plans differ regarding advanced features and retention limits:
Free Plan
Webhooks: 1 Event Webhook.
Teammate Permissions: 1 User.
Log & Bounce Retention: 1 Day.
Support: Standard knowledge center access.
Standard & Prepaid Credit Plans
Webhooks: 5 Event Webhooks.
Teammate Permissions: 3 Users.
Log & Bounce Retention: 1 Day.
Support: Access to deliverability support.
Professional Plan
Webhooks: Unlimited.
Dedicated IP: 1 Included (Pooled IP also available).
Teammate Permissions: 10 Users.
Log & Bounce Retention: 5 Days.
Support: Priority deliverability support.
Enterprise Plan
Webhooks: Unlimited.
Dedicated IP: 1 Included.
Teammate Permissions: Unlimited.
Log & Bounce Retention: 30 Days.
Security: Single Sign-On (SSO) included.
Ready to get started?
To begin sending transactional emails, navigate to the Transactional emails section in your dashboard to generate your API keys or configure your SMTP settings.
That’s it!
If you got stuck on a specific task or can’t find a way to execute a particular job, contact our support team via LiveChat or [email protected] we’re here to help 24/7.