Category: Authentication and technical setup

  • Warming Up Your Domain

    This guide explains how to warm up a new or inactive sending domain in Sender by gradually increasing email volume and building a positive sender reputation with mailbox providers.

    Prerequisites

    • An active Sender account
    • A domain you own or manage, added and verified in Sender
    • SPF, DKIM, and DMARC authentication fully configured and showing green checkmarks in the Authentication column
    • Access to your domain's DNS settings (through your domain registrar or DNS provider)
    • A subscriber list with identifiable engaged contacts (recent opens or clicks)

    Where to Find This Setting

    Domain warming is not a single toggle in Sender — it is a sending strategy you execute across multiple areas of the dashboard. The key locations are:

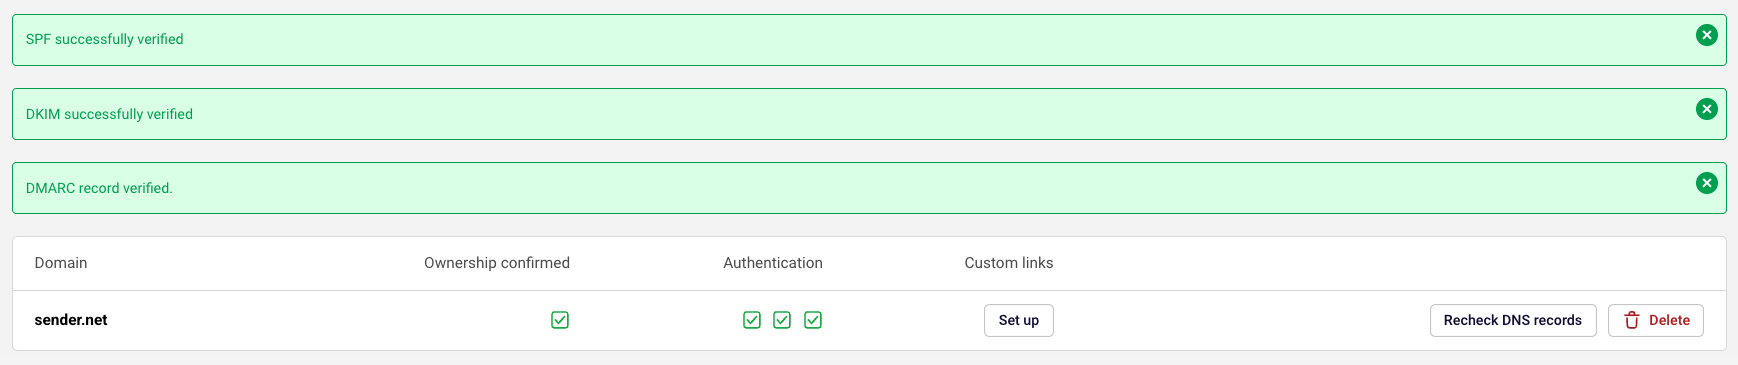
    Account settings → Domains — confirm your domain is authenticated before you begin warming. You will see a table listing each domain with its Ownership confirmed status, Authentication checkmarks (SPF, DKIM, DMARC), and Custom links column. Use the Recheck DNS records button to verify your records are current.

    Subscribers → Segments — use the premade segments such as Highly engaged subscribers, Engaged subscribers 180 days, and New subscribers to target your warmup sends.

    Dashboard — monitor the Traffic and reach report for Total emails sent, Total delivered, Total opens, Total clicks, Bounce rate, Total spams, and Average spam rate throughout the warming period.

    Steps to Warm Up Your Domain

    Step 1 — Verify domain authentication is complete

    Go to Account settings → Domains. Confirm that your sending domain shows a green checkmark under Ownership confirmed and three green checkmarks under Authentication (one each for SPF, DKIM, and DMARC). If any checkmark is missing or shows a warning, resolve the DNS issue before starting the warmup. Click Recheck DNS records if you recently updated your DNS configuration. Do not begin sending volume until all three protocols pass verification.

    Step 2 — Set up engagement-based automations

    Go to Automations and click Create new workflow. Build high-engagement automation flows such as Welcome series or Abandoned cart sequences. These automations generate one-to-one, subscriber-triggered emails that produce strong open and click signals. Activate these automations and let them run for at least 3–10 days before sending any bulk campaigns. This initial automated sending establishes positive engagement patterns with mailbox providers and lays the foundation for your domain's reputation.

    Step 3 — Segment your most engaged subscribers

    Go to Subscribers → Segments. Use the premade Highly engaged subscribers or Engaged subscribers 180 days segment to identify contacts who have recently opened or clicked your emails. If you are migrating from another email platform, create a custom segment of contacts who engaged within the last 180 days. Your first manual campaigns should target only these engaged subscribers and any new subscribers from the last 45 days.

    Step 4 — Send campaigns with gradually increasing volume

    Go to Email campaigns and click New campaign. Send your first campaign to the engaged segment you created in Step 3. Start with a small portion of your list — a few hundred to a few thousand recipients depending on your total list size. Over the following 2–4 weeks, gradually increase the number of recipients per campaign. Add less-engaged segments only after your engagement metrics remain healthy. Avoid sending to your full list until the warmup period is complete.

    Step 5 — Monitor metrics and adjust

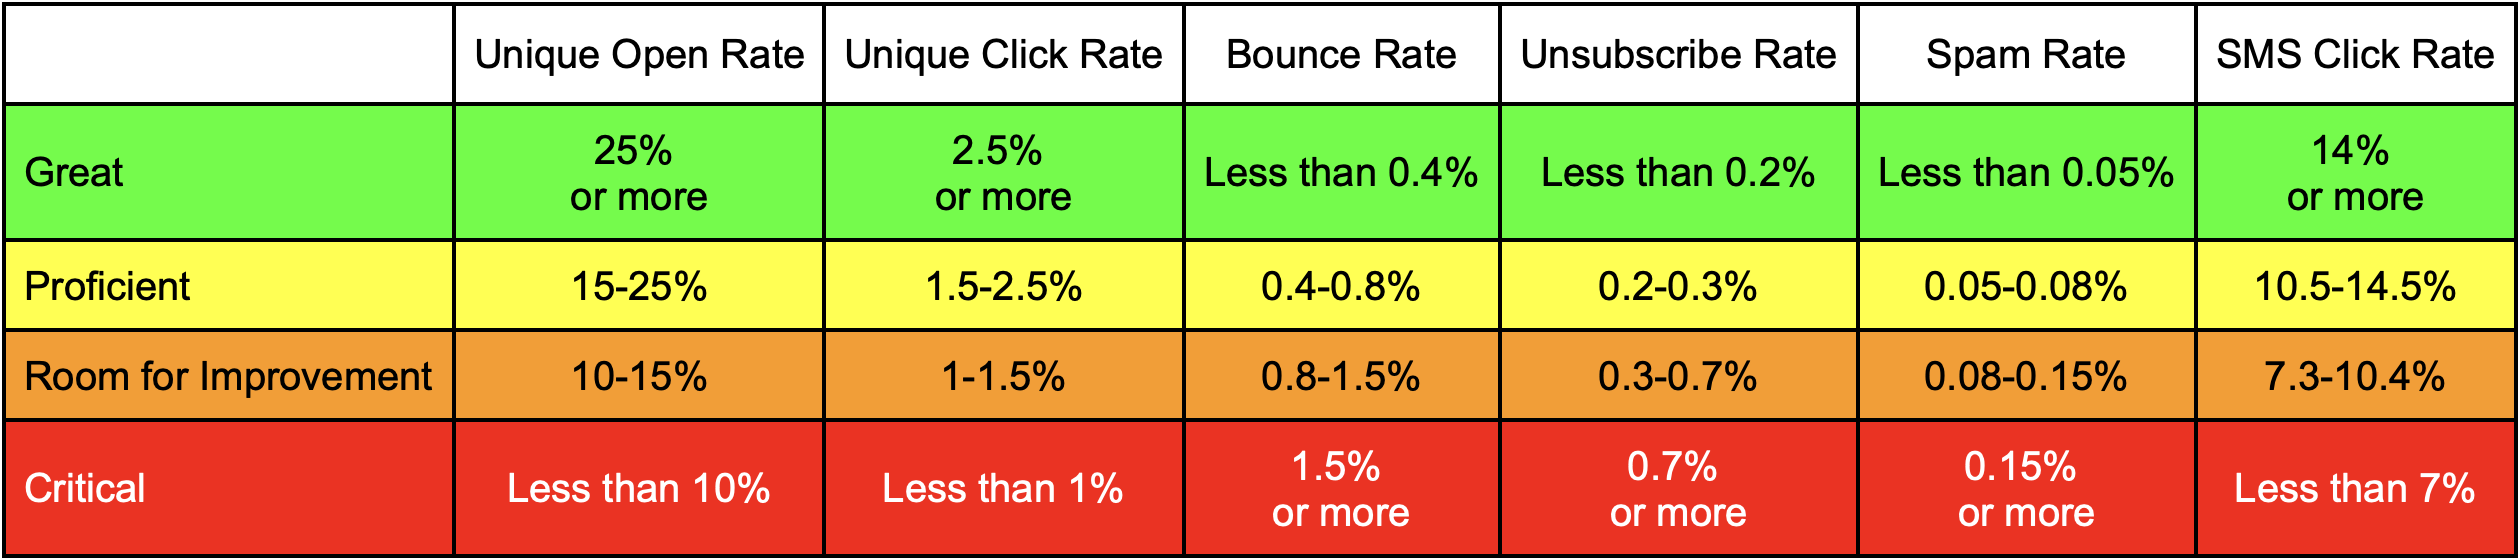
    Return to the Dashboard after each campaign send. Review the Traffic and reach report for the following key indicators: Total opens, Total clicks, Bounce rate, Total spams, and Average spam rate. Aim for open rates above 20%, bounce rates below 2%, and spam complaint rates below 0.1%. If metrics trend downward, reduce volume, clean your list, or re-check your authentication. Continue monitoring for the full warmup duration of 2–4 weeks.

    How to Verify

    Go to Account settings → Domains and confirm all three green checkmarks remain visible in the Authentication column throughout the warming period. On the Dashboard, check the Traffic and reach report — healthy warming shows steady or increasing open rates, low bounce rates, and minimal spam complaints across sends. If authentication checkmarks disappear or metrics degrade significantly, pause sending, review your DNS records, and click Recheck DNS records. Consistent positive engagement metrics across 2–4 weeks of gradual volume increases indicate a successfully warmed domain.

    How It Works

    Domain reputation — Mailbox providers such as Gmail, Outlook, and Yahoo assign a reputation score to every sending domain. This score is built over time based on recipient engagement, bounce rates, and spam complaints. A new or inactive domain has no established reputation, so mailbox providers treat its emails with caution and may throttle or filter them.

    Gradual volume increase — Sending a large volume of email from a domain with no history triggers spam filters and rate limits. By starting with small sends to engaged recipients and slowly increasing volume, you signal to mailbox providers that your domain sends wanted email. Each successful send with positive engagement improves the domain's reputation incrementally.

    Authentication as a foundation — SPF, DKIM, and DMARC records do not warm a domain on their own, but they are required for warming to succeed. SPF tells mailbox providers which servers are authorized to send on your domain's behalf. DKIM cryptographically signs each message to prove it was not altered in transit. DMARC instructs mailbox providers how to handle messages that fail SPF or DKIM checks. Without all three in place, warming efforts will produce inconsistent results.

    Engagement signals — Mailbox providers weight recipient actions such as opens, clicks, and replies heavily when evaluating sender reputation. Sending to engaged subscribers during the warming period generates the positive signals that build trust. Sending to unengaged or invalid addresses generates bounces and spam complaints that damage reputation and can undo warming progress.

    Common Issues

    High bounce rate during early sends → Your subscriber list may contain outdated or invalid email addresses. Clean your list before starting the warmup by removing hard bounces and long-inactive subscribers. Use the Subscribers page to filter by Email status and remove invalid contacts.

    Emails landing in spam despite authentication passing → Authentication alone does not guarantee inbox placement. Mailbox providers also evaluate domain age, sending history, content quality, and engagement metrics. Reduce your send volume, target only highly engaged subscribers, and check that your email content does not trigger spam filters.

    Sudden drop in open rates after increasing volume → You likely increased volume too quickly or added less-engaged segments too early. Scale back to the volume and audience of your last successful send, wait several days, then increase more gradually.

    Authentication checkmarks disappear after domain was verified → Your DNS records may have been modified or removed by your DNS provider or another administrator. Go to Account settings → Domains and click Recheck DNS records. Compare the records shown in Sender with your current DNS configuration and restore any missing TXT or CNAME entries.

    Mailbox provider throttling or deferring messages → Some providers impose per-sender limits for domains with no reputation. This is expected behavior during warming. Continue sending at moderate volumes and the throttling will ease as your reputation improves. Do not attempt to bypass throttling by sending large bursts.

    FAQs

    How long does domain warming take?

    Most domains require 2–4 weeks of consistent, gradually increasing sends to build a stable reputation. The exact timeline depends on your total list size, engagement quality, and how aggressively you scale volume. Domains with very large lists or lower engagement may need longer.

    Is domain warming the same as IP warming?

    No. Domain warming builds reputation for your sending domain (the address in the From field), while IP warming builds reputation for the specific IP address your emails are sent from. On Sender's shared infrastructure, IP reputation is managed for you. If you have a dedicated IP through the Enterprise plan, you need to warm both the IP and the domain separately.

    Can I skip warming if my domain is already authenticated?

    Authentication (SPF, DKIM, DMARC) is a prerequisite for warming, not a substitute for it. A fully authenticated domain with no sending history still has no reputation. Mailbox providers will throttle or filter emails from an authenticated but unwarmed domain.

    What volume should I start with?

    Start with your most engaged subscribers — typically a few hundred to a few thousand recipients. Increase volume by roughly 25–50% with each subsequent send, provided engagement metrics remain healthy. There is no universal number because list size and engagement vary.

    Do I need to warm my domain if I am migrating from another email platform?

    Yes. Even if your domain had a strong reputation on your previous platform, switching to Sender changes the sending infrastructure. Create a segment of contacts who engaged in the last 180 days and follow the warming steps starting with that segment. Your existing domain reputation will help, but a gradual ramp-up is still necessary.

    What metrics should I watch during warming?

    Monitor Total opens, Total clicks, Bounce rate, Total spams, and Average spam rate on the Dashboard. Open rates above 20%, bounce rates below 2%, and spam complaint rates below 0.1% indicate healthy warming. If any metric trends into a warning zone, reduce volume and review your list quality.

    Can I send to my full list on day one?

    No. Sending to your entire list before building reputation is the most common cause of deliverability problems with a new domain. Always start with engaged subscribers and scale gradually over 2–4 weeks.

  • How to Set Up SPF, DKIM, and DMARC for Your Sending Domain

    This guide explains how to configure SPF, DKIM, and DMARC authentication records for your sending domain in Sender. Completing all three ensures mailbox providers can verify emails sent through your account.

    Prerequisites

    • An active Sender account
    • A domain you own or manage (e.g., yourdomain.com)
    • Access to your domain's DNS settings through your domain registrar or DNS provider
    • A working email address on the domain you want to authenticate (used to verify domain ownership)

    Where to Find This Setting

    In the Sender dashboard, go to: Account settings → Domains

    On this page, you will see a table listing your sending domains. Each domain row shows four columns: Domain, Ownership confirmed, Authentication, and Custom links. The Authentication column displays three status indicators — one each for SPF, DKIM, and DMARC. A green checkmark means the record is verified. An Add domain button appears in the top-right corner, and each domain row includes a Recheck DNS records button.

    Steps to Set Up SPF, DKIM, and DMARC

    Step 1 — Add your domain and verify ownership

    Click Add domain in the top-right corner of the Domains page. In the dialog that appears, enter your domain name (e.g., yourdomain.com) in the Domain field and click Next.

    On the following screen, enter an email address associated with that domain in the Email field and click Verify ownership. Sender will send a verification email to that address. Open the email and click the verification link to confirm domain ownership. Once verified, a green checkmark appears in the Ownership confirmed column.

    Step 2 — Add DNS records to your domain

    After ownership is verified, click the domain row to open the DNS records dialog titled Authenticate your SPF, DKIM and DMARC records. Sender displays three records you need to add at your DNS provider. Each record shows a Type, Name, and Value.

    DKIM record:

    Field

    Value

    Type

    CNAME

    Name

    sender._domainkey

    Value

    dkim.sendersrv.com

    SPF record:

    Field

    Value

    Type

    TXT

    Name

    @

    Value

    v=spf1 include:sendersrv.com ?all

    DMARC record:

    Field

    Value

    Type

    TXT

    Name

    _dmarc

    Value

    v=DMARC1; p=none;

    Log in to your DNS provider and create each record using the values above. Exact steps vary by provider — if you are unsure how to add DNS records, contact your domain registrar's support team with these values.

    Note: If your domain already has an existing SPF TXT record, do not create a second one. Instead, merge the Sender include into your existing record by adding include:sendersrv.com before the all mechanism. A domain must have only one SPF TXT record to pass validation.

    Step 3 — Verify your DNS records in Sender

    Return to the DNS records dialog in Sender and click Check SPF, DKIM and DMARC records. Sender will query your domain's DNS to verify that all three records are correctly configured.

    If verification succeeds, the dialog closes and three green checkmarks appear in the Authentication column on the Domains page. If one or more records fail, review the values at your DNS provider, correct any mismatches, and click Recheck DNS records to try again. DNS changes can take up to 24–48 hours to propagate, though most complete within minutes.

    How to Verify

    Go to Account settings → Domains and locate your domain in the table. The Authentication column should display three green checkmarks — one each for SPF, DKIM, and DMARC. If any checkmark is missing or shows a warning, click Recheck DNS records to re-query your DNS. DNS propagation typically completes within minutes but can take up to 24–48 hours depending on your DNS provider and TTL (time-to-live) settings. If records still fail after 48 hours, verify the exact values at your DNS provider match those shown in Sender.

    How It Works

    SPF (Sender Policy Framework) — SPF is a TXT DNS record that specifies which mail servers are authorized to send email on behalf of your domain. When a receiving server gets an email from your domain, it checks the SPF record to confirm the sending server's IP address is permitted. Adding include:sendersrv.com authorizes Sender's servers to send on your behalf.

    DKIM (DomainKeys Identified Mail) — DKIM adds a cryptographic signature to outgoing emails using a public-private key pair. The CNAME record you add at sender._domainkey points to Sender's DKIM key. Receiving servers retrieve this public key from DNS and use it to verify that the message was not altered in transit and was authorized by the domain owner.

    DMARC (Domain-based Message Authentication, Reporting and Conformance) — DMARC builds on SPF and DKIM by telling receiving servers what to do when an email fails authentication. The p=none; policy in the default Sender record instructs receivers to deliver messages even if they fail checks, while still generating reports. You can later strengthen this to p=quarantine; or p=reject; as you gain confidence in your authentication setup.

    Common Issues

    SPF record not verifying → Your domain may already have an existing SPF TXT record. DNS allows only one SPF record per domain. Merge Sender's include:sendersrv.com into your existing SPF record rather than creating a second one.

    DKIM record not verifying → The CNAME record may have been created with an incorrect name or value. Confirm the name is exactly sender._domainkey (some DNS providers automatically append your domain, so you may not need to include the full sender._domainkey.yourdomain.com). The value must point to dkim.sendersrv.com.

    DMARC record not verifying → Ensure the TXT record is created with the name _dmarc (not _dmarc.yourdomain.com if your provider appends the domain automatically). The value must begin with v=DMARC1; — this tag is case-sensitive.

    DNS changes not appearing after several hours → DNS propagation depends on the TTL value set on your records and your DNS provider's infrastructure. Wait up to 48 hours, then click Recheck DNS records in Sender. If records still fail, use a third-party DNS lookup tool to confirm the records are publicly visible.

    Warning icon instead of a green checkmark → A warning indicates the DNS record exists but may be misconfigured or contain an incorrect value. Compare the record value shown in Sender's DNS setup dialog with what is configured at your DNS provider. Correct any mismatches and click Recheck DNS records.

    FAQs

    How long does DNS verification take?

    Most DNS changes propagate within minutes to a few hours. In some cases, propagation can take up to 24–48 hours depending on your DNS provider and TTL settings. Click Recheck DNS records in Sender after waiting to verify.

    Do I need all three — SPF, DKIM, and DMARC?

    Yes. All three authentication protocols work together to verify your identity as a sender. SPF validates which servers can send on your behalf, DKIM ensures message integrity, and DMARC tells receiving servers what to do with unauthenticated messages. All three should show green checkmarks in the Authentication column.

    Can I use Sender with a free email address like Gmail or Yahoo?

    Using a free email address as your sender address is not recommended. Most mailbox providers enforce strict DMARC policies on free email domains, which will cause your emails to fail authentication and land in spam or be rejected.

    What happens if I change my DNS records after verification?

    If you modify or remove the DNS records Sender relies on, authentication will fail. Mailbox providers may begin rejecting or spam-filtering your emails. Go to Account settings → Domains and click Recheck DNS records to confirm your records are still valid.

    My domain shows a warning instead of a green checkmark. What does this mean?

    A warning indicates that the DNS record exists but may be misconfigured or incomplete. Review the record value shown in Sender and compare it to what is configured in your DNS provider. Correct any mismatches and click Recheck DNS records.

    What does the p=none DMARC policy mean?

    The p=none policy instructs receiving mail servers to take no enforcement action on emails that fail SPF or DKIM checks. It is a monitoring-only policy that allows you to receive DMARC reports without affecting delivery. Once you confirm all legitimate email passes authentication, you can update the policy to p=quarantine or p=reject for stronger protection.

    My DNS provider only allows one TXT record for SPF. What should I do?

    DNS requires exactly one SPF TXT record per domain. If you already have an existing SPF record, add include:sendersrv.com to it rather than creating a separate record. For example, if your existing record is v=spf1 include:otherprovider.com ~all, update it to v=spf1 include:otherprovider.com include:sendersrv.com ~all. Contact your DNS provider if you need help merging records.

  • Merge SPF records

    If your domain is used by multiple services to send emails e.g. Sender, Gmail, or your web host, you need to merge SPF records into one. 

    Having multiple SPF records for a domain causes validation errors, which can lead to email delivery issues.

    What Is an SPF Record?

    An SPF (Sender Policy Framework) record is a type of DNS TXT record that tells mail servers which services are allowed to send emails on your domain’s behalf.

    Example of a simple SPF record:

    v=spf1 include:sendersrv.com ~all

    Why You Should Merge SPF Records?

    You can only have one SPF record per domain.

    If you add a new email-sending service and create another TXT record (for example, one for Google Workspace and one for Sender), your SPF setup becomes invalid.

    Incorrect setup:

    v=spf1 include:_spf.google.com ~all
    v=spf1 include:sendersrv.com ~all

    Correct setup (merged):

    v=spf1 include:_spf.google.com include:sendersrv.com ~all

    How to Merge SPF Records

    1. Find all your existing SPF records

    Check your DNS settings for TXT records starting with v=spf1

    Common examples:

    • Google Workspace → v=spf1 include:_spf.google.com ~all
    • Microsoft 365 → v=spf1 include:spf.protection.outlook.com ~all
    • Sender → v=spf1 include:sendersrv.com ~all

    2. Combine all “include” mechanisms into one record

    • Keep only one v=spf1 at the start.
    • Add all include: entries you need (separated by spaces).
    • End with ~all or -all.

    3. Save your final merged record

    Example:

    v=spf1 include:_spf.google.com include:sendersrv.com ~all

    4. Wait for DNS propagation

    Changes may take up to 48 hours to take effect.

    Examples of Common Merged SPF Records:

    Scenario

    Correct SPF Record

    Sender + Google Workspace

    v=spf1 include:_spf.google.com include:sendersrv.com ~all

    Sender + Microsoft 365

    v=spf1 include:spf.protection.outlook.com include:sendersrv.com ~all

    Sender + Web Host (Hostinger)

    v=spf1 include:_spf.hostinger.com include:sendersrv.com ~all

    Sender + Gmail + Zoho

    v=spf1 include:_spf.google.com include:zoho.eu include:sendersrv.com ~all

    Sender + Domain’s Own Mail Server

    (MX allowed)

    v=spf1 mx include:sendersrv.com ~all

    Sender + Custom Web Server

    (A record allowed)

    v=spf1 a include:sendersrv.com ~all

    Sender + Dedicated IP

    v=spf1 ip4:206.0.114.42 include:sendersrv.com ~all

    If unsure, contact your DNS provider or Sender’s support for help verifying that you merged the record correctly.

    Once you are done, head to your Sender account, go to Account Settings -> Domains and click “Recheck DNS records” next to the domain that you were merging records for.

    If everything is merged correctly, you will receive a green verification mark. 

    Please note that it may take up to 48 hours for the records to propagate.

    That’s it!

    If you got stuck on a specific task or can’t find a way to execute a particular job, contact our support team via LiveChat or [email protected] – we’re here to help 24/7.

  • Set up SPF/DKIM/DMARC (IONOS)

    That’s it!

    If you got stuck on a specific task or can’t find a way to execute a particular job, contact our support team via LiveChat or [email protected] – we’re here to help 24/7.

  • Set up SPF/DKIM/DMARC (Namecheap)

    That’s it!

    If you got stuck on a specific task or can’t find a way to execute a particular job, contact our support team via LiveChat or [email protected] – we’re here to help 24/7.

  • Set up SPF/DKIM/DMARC (GoDaddy)


    If you got stuck on a specific task or can’t find a way to execute a particular job, contact our support team via LiveChat or [email protected] – we’re here to help 24/7.

  • Set up SPF/DKIM/DMARC (Hostinger)


    If you got stuck on a specific task or can’t find a way to execute a particular job, contact our support team via LiveChat or [email protected] – we’re here to help 24/7.

  • Set up SPF/DKIM/DMARC (Cloudflare)

    That’s it!

    If you got stuck on a specific task or can’t find a way to execute a particular job, contact our support team via LiveChat or [email protected] – we’re here to help 24/7.

  • Warm up a dedicated IP

    When you get a dedicated IP address with our Enterprise plan, our system automatically initiates the warming-up process on your behalf, utilizing a portion of your most engaged subscribers. It typically takes 4-8 weeks to achieve maximum deliverability (depending on volume and engagement).

    The warming-up period may extend if mailbox providers perceive that the emails are not explicitly desired by the recipients, such as when recipients have not explicitly signed up. Certain mailbox providers impose sender thresholds, restricting the number of messages delivered per day until a sender establishes a reputation.

    If you prefer to manage the warming-up of dedicated IP addresses yourself, you can request to disable this automatic process. 

    However, it is crucial to avoid sending large volumes of emails immediately after the warm-up process ends. Instead, gradually increase the number of emails sent until you reach your intended volume. A sudden and substantial surge in the number of emails from an IP address may lead email providers to block or throttle message delivery from that address.

    Important note: If you choose to disable the automatic warm-up feature, the responsibility of warming up your dedicated IP addresses falls on you. Sending emails from addresses that haven’t undergone proper warm-up may result in poor delivery rates or delays.

    Automated IP warmup hourly send schedule

    Warmup Age (Days) Hourly Email Limit
    0 20
    1 28
    2 39
    3 55
    4 77
    5 108
    6 151
    7 211
    8 295
    9 413
    10 579
    11 810
    12 1,000
    13 1,587
    14 2,222
    15 3,111
    16 4,356
    17 6,098
    18 8,583
    19 11,953
    20 16,734
    21 23,427
    22 32,798
    23 45,917
    24 64,284
    25 89,998
    26 125,997
    27 176,395
    28 246,953
    29 345,735
    30 484,029
    31 677,640
    32 948,696
    33 1,328,175
    34 1,859,444
    35 2,603,222

    That’s it!

    If you got stuck on a specific task or can’t find a way to execute a particular job, contact our support team via LiveChat or [email protected] – we’re here to help 24/7.

  • Warm up sending IP address

    Warming up your sending IP address and sender reputation is a crucial first step towards ensuring higher email deliverability. 

    This is how you can get started, even if you have never done something like this before:

    • Design high-engagement automation flows for both emails and SMS such as Welcome, Abandoned Cart, etc., and let these run for at at least 3-10 days;
    • Migrating from another email marketing tool? Follow the steps below:
      • Create a segment of contacts who engaged (opens and clicks) with your emails and SMS over the last 180 days;
      • Send your first email and SMS campaigns to the above segment and new subscribers from over the last 45 days only;
      • Actively track key engagement metrics for each campaign. The following chart can help you understand where your campaign performance stands:

    If your campaigns consistently trend towards the orange or red zones indicated in the above chart, we’d recommend you to verify if you are indeed following the best deliverability practices described here.

    That’s it!

    If you got stuck on a specific task or can’t find a way to execute a particular job, contact our support team via LiveChat or [email protected] we’re here to help 24/7.