Category: Contact import and data management

  • Import contacts from CSV/Excel

    Quickly add multiple contacts to your Sender account by uploading CSV or Excel files.

    Supported File Types

    • CSV (.csv)
    • Excel (.xlsx)
    • TXT (.txt)

    Maximum file size: 64MB

    How to Import

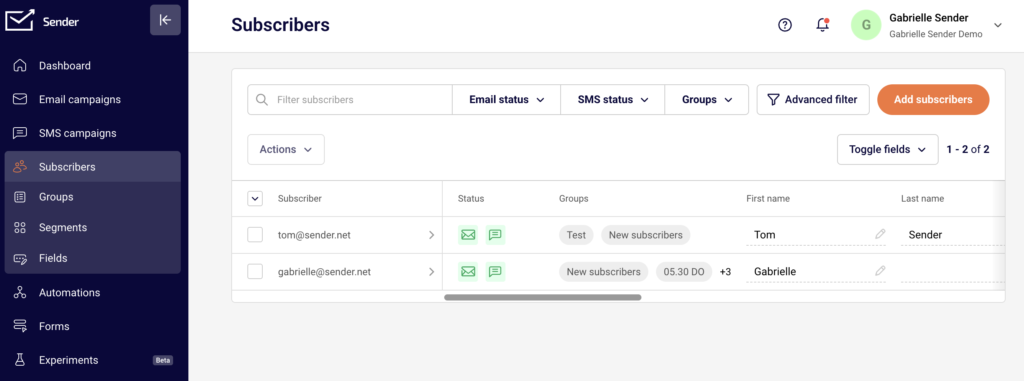
    • Go to your subscribers section
    • Click on “Import from a file”
    • Drag and drop your file or click “Import file”
    • Wait for the upload to complete
    • Your contacts will be added to your account

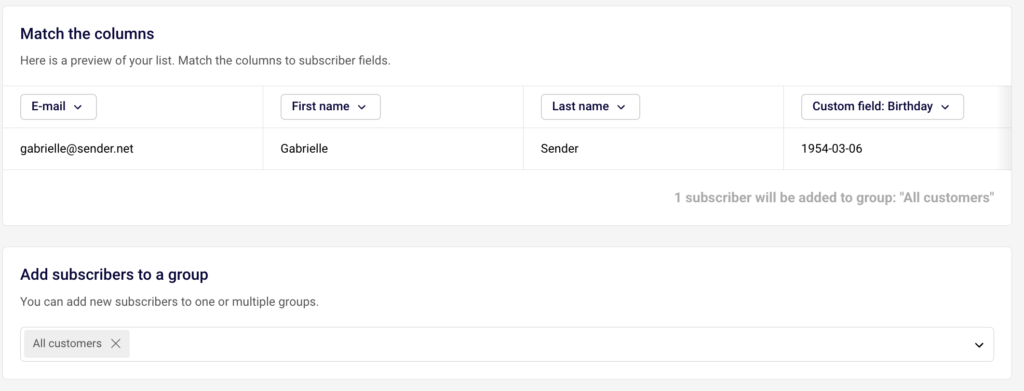
    Proper File Structure

    Your import file must include:

    • Headers in the first row – Email address, First name, Last name
    • One subscriber per row – Each contact on a separate line
    • Data in separate columns – Each field in its own column
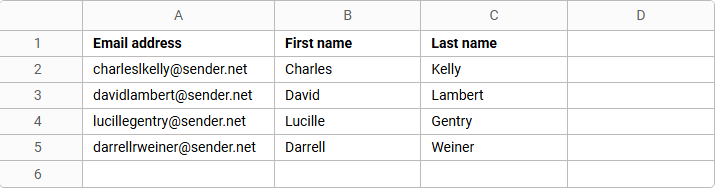
    Example Structure

    Using Templates

    Not sure how to format your file? Download our ready-made templates:

    Simply fill in your contact information following the template format.

    Best Practices

    • Clean your data – Remove empty rows and duplicate entries before importing
    • Check email formats – Ensure all email addresses are valid
    • Use standard headers – Stick to “Email address”, “First name”, “Last name”
    • Add custom fields – Include additional columns for phone numbers or other data
    • Save in the correct format – Make sure your file is saved as .csv or .xlsx

    File Size Limitations

    If your file exceeds 64MB:

    • Split your contacts into multiple smaller files
    • Remove unnecessary columns
    • Import in batches

    That’s it!

    If you got stuck on a specific task or can’t find a way to execute a particular job, contact our support team via LiveChat or [email protected] – we’re here to help 24/7.

  • Map fields during import

    Learn how to correctly map your contact information to the right fields in Sender for accurate data import.

    What is Field Mapping?

    Field mapping ensures that the data from your import file is placed in the correct fields in your Sender account. This process matches your file’s column headers with Sender’s contact fields.

    Standard Contact Fields

    Sender recognizes these standard fields automatically:

    • Email address (required if phone number is not present)
    • Phone number (required if email address is not present)

    How Field Mapping Works

    When you upload a file, Sender automatically detects and maps standard field names. Your first row should contain clear header names that match these fields.

    Example of Proper Headers:

    Adding Custom Fields

    You can include additional information beyond standard fields:

    • Phone numbers
    • Company names
    • Job titles
    • Locations
    • Any other relevant data

    Custom Field Format Example:

    Tips for Successful Mapping

    • Use clear header names – Make column headers descriptive and easy to understand
    • Keep headers in the first row – Always place field names in row 1 of your file
    • Match standard field names – Use “Email address”, “First name”, and “Last name” exactly as shown
    • One header per column – Each column should have only one header name
    • No special characters in headers – Stick to letters, numbers, and spaces

    Common Mapping Mistakes

    Incorrect Header Names:

    Incorrect: Email, E-mail, Mail
    Correct: Email address

    Incorrect: Name, Full name
    Correct: First name, Last name

    Missing Headers

    Make sure your first row contains headers, not contact data, as shown in the examples in previous pointers.

    Headers in Wrong Row

    Headers must be in the first row of your file; otherwise, the file won’t be up to standards for our system to recognize all of your contacts.

    Verifying Your Mapping

    Before importing:

    • Open your file and check the first row
    • Confirm headers match Sender’s field names
    • Ensure all data aligns under the correct headers
    • Save your file and proceed with import

    If you got stuck on a specific task or can’t find a way to execute a particular job, contact our support team via LiveChat or [email protected] – we’re here to help 24/7.

  • Fix contact import issues

    Having trouble importing your contacts? Here are common issues and how to fix them.

    Common Import Problems

    File Format Issues

    Problem: File won’t upload or shows an error

    Solution:

    • Verify your file is in a supported format: CSV, TXT, or XLSX
    • Check that your file size is under 64MB
    • Try converting your file to a different supported format and importing again

    Missing or Incorrect Headers

    Problem: Contacts import without names or data appears in wrong fields

    Solution:

    • Ensure the first row contains column headers
    • Use standard header names: Email address, First name, Last name
    • Check that headers match your data columns

    Email Address Errors

    Problem: Some contacts fail to import

    Solution:

    • Verify all email addresses are properly formatted ([email protected])
    • Remove any spaces before or after email addresses
    • Check for missing @ symbols or domain extensions

    Empty Rows or Columns

    Problem: Import fails or shows unexpected results

    Solution:

    • Delete any empty rows between contacts
    • Remove blank columns from your file
    • Ensure data starts from row 2 (row 1 being headers)

    Still Having Issues?

    If you continue experiencing problems:


    If you got stuck on a specific task or can’t find a way to execute a particular job, contact our support team via LiveChat or [email protected] – we’re here to help 24/7.

  • Create import file format

    Learn how to properly format your contact files for a smooth import into Sender.

    Supported File Formats

    Sender accepts the following file types:

    • CSV (.csv)
    • TXT (.txt)
    • MS Excel (.xlsx)

    Maximum file size: 64MB

    File Structure Requirements

    Column Headers (First Row)

    Your file must include headers in the first row to identify each field:

    • Email address (required)
    • First name (optional)
    • Last name (optional)
    • Custom fields (optional)

    Data Rows

    • Each subscriber must be on a separate row
    • All subscriber information should be in separate columns
    • No empty rows between contacts

    File Example

    Download Templates

    Not sure how to format your file? Download our ready-to-use templates:

    Simply fill in your contact information following the template structure.

    Tips for Success

    • Ensure email addresses are valid and properly formatted
    • Remove any duplicate entries before importing (Our system does catch duplicates whether you remove them or not, but this helps the import itself)
    • Double-check that all data is in the correct columns
    • Save your file in one of the supported formats

    That’s it!

    If you got stuck on a specific task or can’t find a way to execute a particular job, contact our support team via LiveChat or [email protected] – we’re here to help 24/7.

  • Export contacts

    Exporting your contact database allows you to back up your data, analyze subscriber information, or migrate to other platforms.

    How to Export Contacts

    Step 1: Filter Your Contacts (Optional)

    • Use the search bar to find contacts by email address
    • Apply Email status filters (Active, Bounced, Unsubscribed, etc.)
    • Apply SMS status filters for SMS subscribers
    • Filter by Groups or Segments to export specific subscribers
    • Use Advanced filter for more detailed criteria

    Step 2: Select Export Option

    • Once you have your desired contacts displayed (either all contacts or filtered results)
    • Select all of the contacts via the arrow in the top-left corner and proceed to go to the “Actions”

    Step 3: Choose Export Format

    • CSV – Most common, works with Excel and other spreadsheet programs
    • Excel (.xlsx) – Direct Excel format

    Step 4: Download Your File

    • The system will prepare your export file
    • Download the file to your computer
    • The file will contain all subscriber information including:
      • Email addresses and names
      • Phone numbers
      • Group memberships
      • Custom fields
      • Subscription status
      • Registration dates

    What Gets Exported

    • Basic contact information (email, name, phone)
    • Subscription status for email and SMS
    • Group assignments
    • Custom field data
    • Registration and activity dates

    Tips

    • Filter first if you only need specific contacts
    • Regular backups – Export your full contact list regularly
    • Secure storage – Keep exported files in secure locations
    • Check file size – Large lists may take longer to process

    If you got stuck on a specific task or can’t find a way to execute a particular job, contact our support team via LiveChat or [email protected] – we’re here to help 24/7.

  • Export subscriber data

    Subscribers’ export

    If you want to export all of your subscribers, go to your main subscriber list, click the arrow at the top of the list and choose “Select all”.

    Then click “Actions” and choose between the two possible export options: “Export to CSV” or “Export to XLSX”.

    If you want to export a particular set of subscribers, you must filter them according to your needs, such as their email/sms status, group membership, campaign activity, etc. You can accomplish that by using the Advanced filter—more on that here.

    Once you select all the conditions, the system will filter the subscribers that match them. Then select all the filtered subscribers as described above and download them with the preferred file type.

    How to export recipients from the campaign report section?

    Go to “Email campaigns” and click “View Report” next to the required campaign. Then click “Subscriber actions”.

    Now pick the tab that you want to export the subscribers from (e.g. opens, clicks, unsubscribe and etc.) and click “Export”.


    If you got stuck on a specific task or can’t find a way to execute a particular job, contact our support team via LiveChat or [email protected] – we’re here to help 24/7.

  • Import subscribers and supported files

    Subscribers can be imported via file import, copy/paste method, API call. Let’s start by opening the Subscribers’ section and clicking the “Add subscribers” button.

    After the button is clicked, the import section will appear. Here we must choose how we’re going to do that:

    • Via file (xlsx, txt, csv)
    • Import manually (Copy & Paste)
    • Import from MailChimp
    • Import from GetResponse

    Next, when the subscriber’s list is imported, you will be asked to attach custom fields; for example, recipients’ names must be assigned to the “First name” column, last name to “Last name”,  phone number to “Phone” and so on.

    After the columns are marked and selected click on start import button and subscribers will be imported.


    If you are stuck on a specific task or can’t find a way to execute a particular job, contact our support team via LiveChat or [email protected] – we’re here to help 24/7.