We are excited to announce that Transactional Emails are now available across all Sender plans—from Free to Enterprise.
Whether you need to send password resets, order confirmations, or shipping notifications, you can now manage everything within the same ecosystem you use for your marketing campaigns. We’ve designed our transactional infrastructure to ensure high-speed delivery, robust security, and developer-friendly integration.
Here is an overview of the features available and a breakdown of plan-specific limits.
What features are included?
Our transactional email suite is built to make your life easier, whether you are a developer setting up the API or a marketer analyzing delivery reports.
API & SMTP: Choose the setup that fits your workflow. Hit our REST endpoint or use standard SMTP relay.
Libraries & Documentation: We provide setup guides to help you get up and running quickly.
Powerful Content & Personalization
Dynamic Templates: Manage your transactional templates (like invoices or welcome emails) directly in Sender. You can update copy or design without touching your codebase.
Liquid Syntax: easily drop in variables like customer names, order totals, or conditional content based on user data.
Attachments: Send PDFs, invoices, or documents up to 10MB. All files are virus-scanned and transferred securely.
Analytics & Tracking
Real-time Analytics: Track every step from “send” to “inbox.”
Detailed Logs: Search and filter records of every email sent to troubleshoot delivery issues.
Webhooks: Get instant notifications when emails are delivered, opened, or clicked to trigger follow-up actions in your own systems.
Security & Deliverability
High-Priority Sending: We utilize a low-latency send path and smart queuing to ensure time-sensitive emails (like OTPs) land instantly.
Built-in Authentication: We handle SPF, DKIM, and DMARC support to protect your domain reputation.
Suppression Management: Automatic handling of bounces and complaints to keep your list clean.
Feature Availability by Plan
While transactional email capability is unlocked for all users, specific limits regarding data retention, team access, and infrastructure vary by plan tier.
Features Available on ALL Plans
Every plan (Free, Standard, Professional, Enterprise, and Prepaid credits) includes:
Full access to API and SMTP.
Dynamic Templates and Liquid syntax.
Real-time analytics and engagement tracking.
Standard Domain Authentication (SPF/DKIM/DMARC).
Unlimited Custom Sending Domains.
TLS Encryption and GDPR Compliance.
Plan-Specific Limits
Below is a breakdown of how the plans differ regarding advanced features and retention limits:
Free Plan
Webhooks: 1 Event Webhook.
Teammate Permissions: 1 User.
Log & Bounce Retention: 1 Day.
Support: Standard knowledge center access.
Standard & Prepaid Credit Plans
Webhooks: 5 Event Webhooks.
Teammate Permissions: 3 Users.
Log & Bounce Retention: 1 Day.
Support: Access to deliverability support.
Professional Plan
Webhooks: Unlimited.
Dedicated IP: 1 Included (Pooled IP also available).
Teammate Permissions: 10 Users.
Log & Bounce Retention: 5 Days.
Support: Priority deliverability support.
Enterprise Plan
Webhooks: Unlimited.
Dedicated IP: 1 Included.
Teammate Permissions: Unlimited.
Log & Bounce Retention: 30 Days.
Security: Single Sign-On (SSO) included.
Ready to get started?
To begin sending transactional emails, navigate to the Transactional emails section in your dashboard to generate your API keys or configure your SMTP settings.
That’s it!
If you got stuck on a specific task or can’t find a way to execute a particular job, contact our support team via LiveChat or [email protected] we’re here to help 24/7.
The new dashboard provides a comprehensive view of all your marketing performance in one place.
Key features
All-in-one performance view for emails and SMS
Sales performance tracking with revenue breakdown
Traffic and reach analytics
Best-performing email campaigns overview
Subscriber growth monitoring with detailed insights
Personalized marketing recommendations
Integrated marketing calendar
Export functionality for all reports
Dashboard components
At the top of your dashboard, you’ll find controls to customize your view:
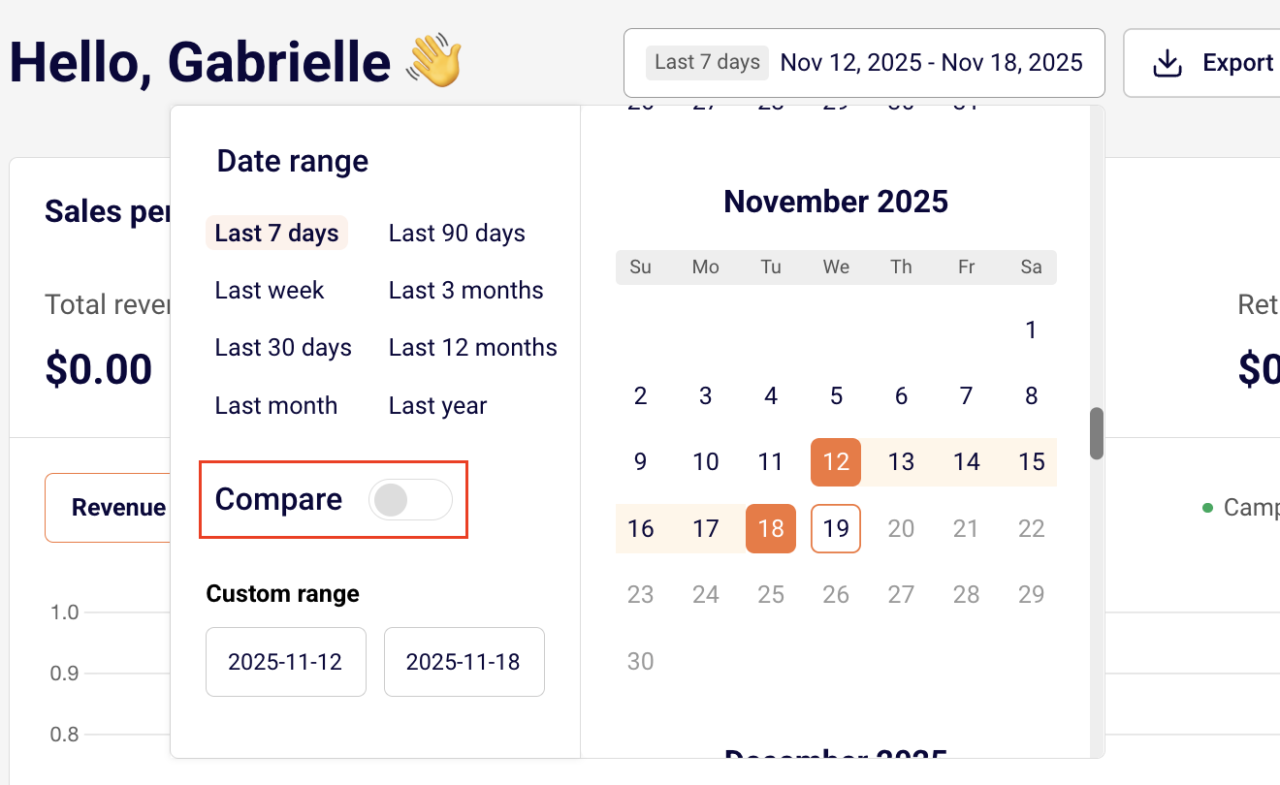
Report timeframe selector – Choose the date range you want to analyze
Export action – Download your reports as PDF files for external analysis or sharing with your team.
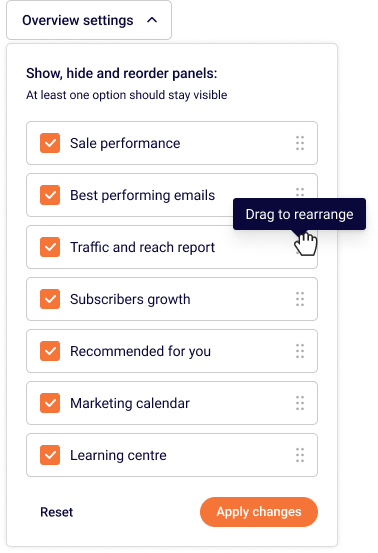
Overview settings – you can customize the layout of your dashboard by dragging and dropping sections to organize it exactly how you want. You can also exclude sections from the dashboard that you feel are irrelevant to you by unticking the boxes.
Sales performance section
Sales performance tracking requires integration with Shopify, WooCommerce, PrestaShop, or another supported e-commerce platform. If you haven’t connected your store yet, click here to learn how.
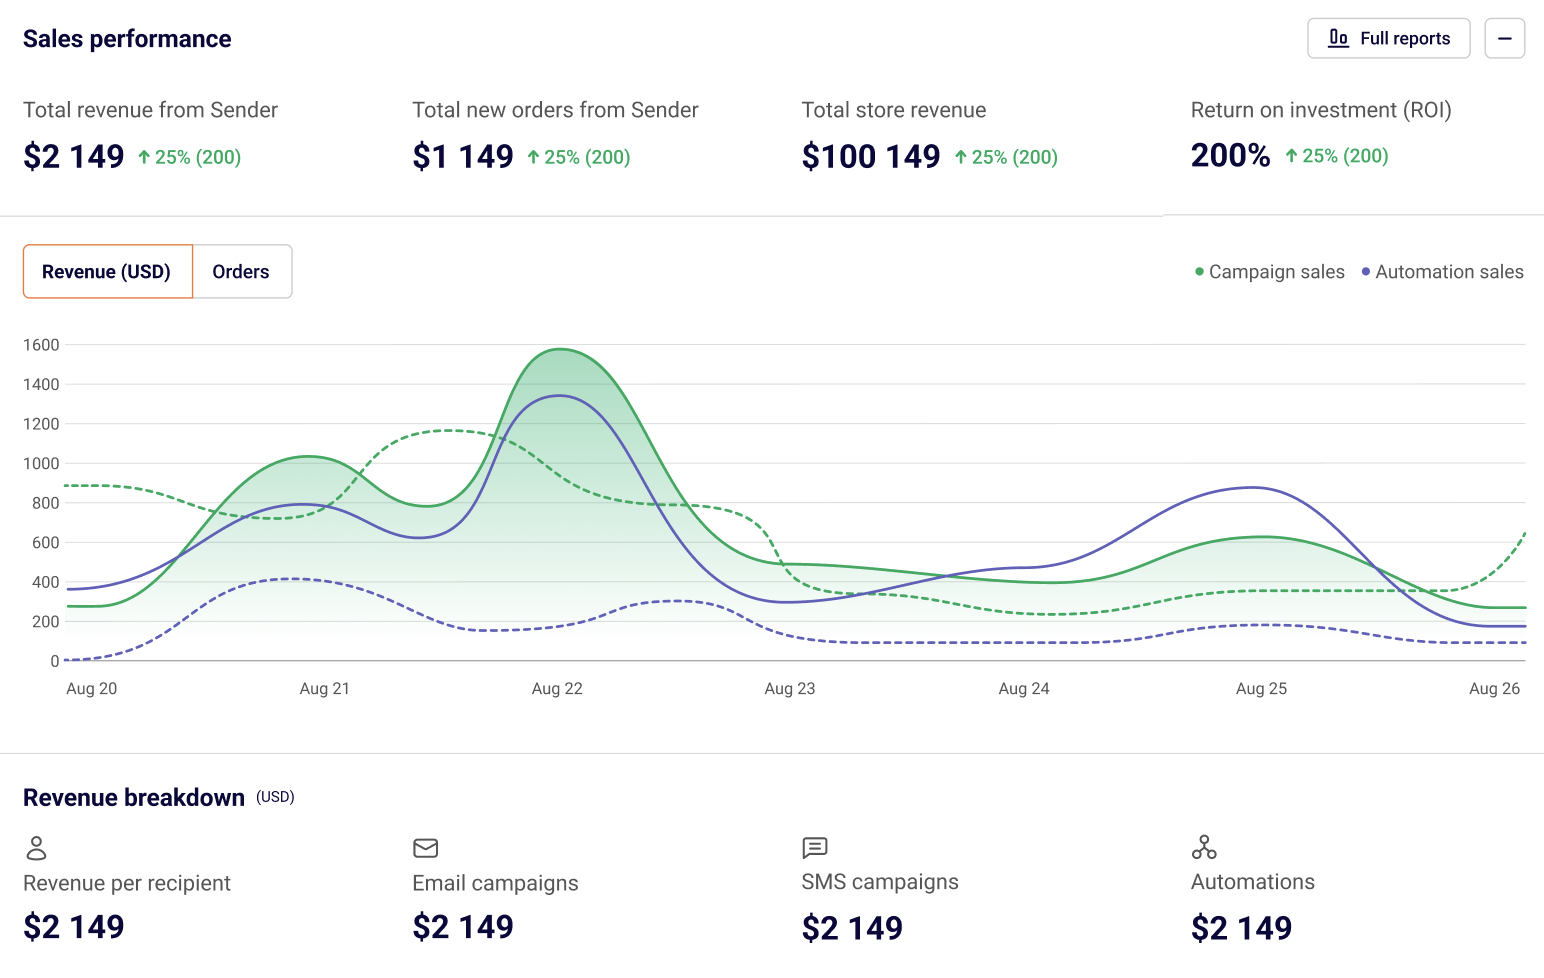
The sales performance section displays four critical metrics at the top:
Total revenue from Sender – Revenue generated through your Sender campaigns and automations
Total new orders from Sender – Number of orders attributed to your campaigns and automations
Total store revenue – Your complete store revenue for comparison
ROI (Return on Investment) – Percentage return showing how much revenue you’re generating per dollar spent
The main chart displays your revenue trends over time with two visualization options:
Revenue (USD) tab – Shows dollar amounts
Orders tab – Shows number of orders
The chart uses color-coding to distinguish between campaign sales and automation sales, making it easy to see which type of messaging drives more revenue.
Hover your mouse over any specific day on the chart to see:
Total revenue for that day
How much revenue came from campaigns
How much revenue came from automations
This daily breakdown helps you identify which days perform best and understand the contribution of each channel.
Revenue Breakdown
Below the main metrics, you’ll find a detailed breakdown showing exactly where your revenue is coming from:
Revenue per recipient – Average revenue generated per contact
Email campaigns – Revenue from your scheduled email campaigns
SMS campaigns – Revenue from your text message campaigns
Automations – Revenue from automated workflows
This breakdown helps you identify which channel is performing best and where to focus your efforts.
Enable comparison mode to analyze how your current performance stacks up against previous periods. For example, compare the last 30 days with the previous 30 days to identify growth trends or areas needing improvement.
Best performing emails section
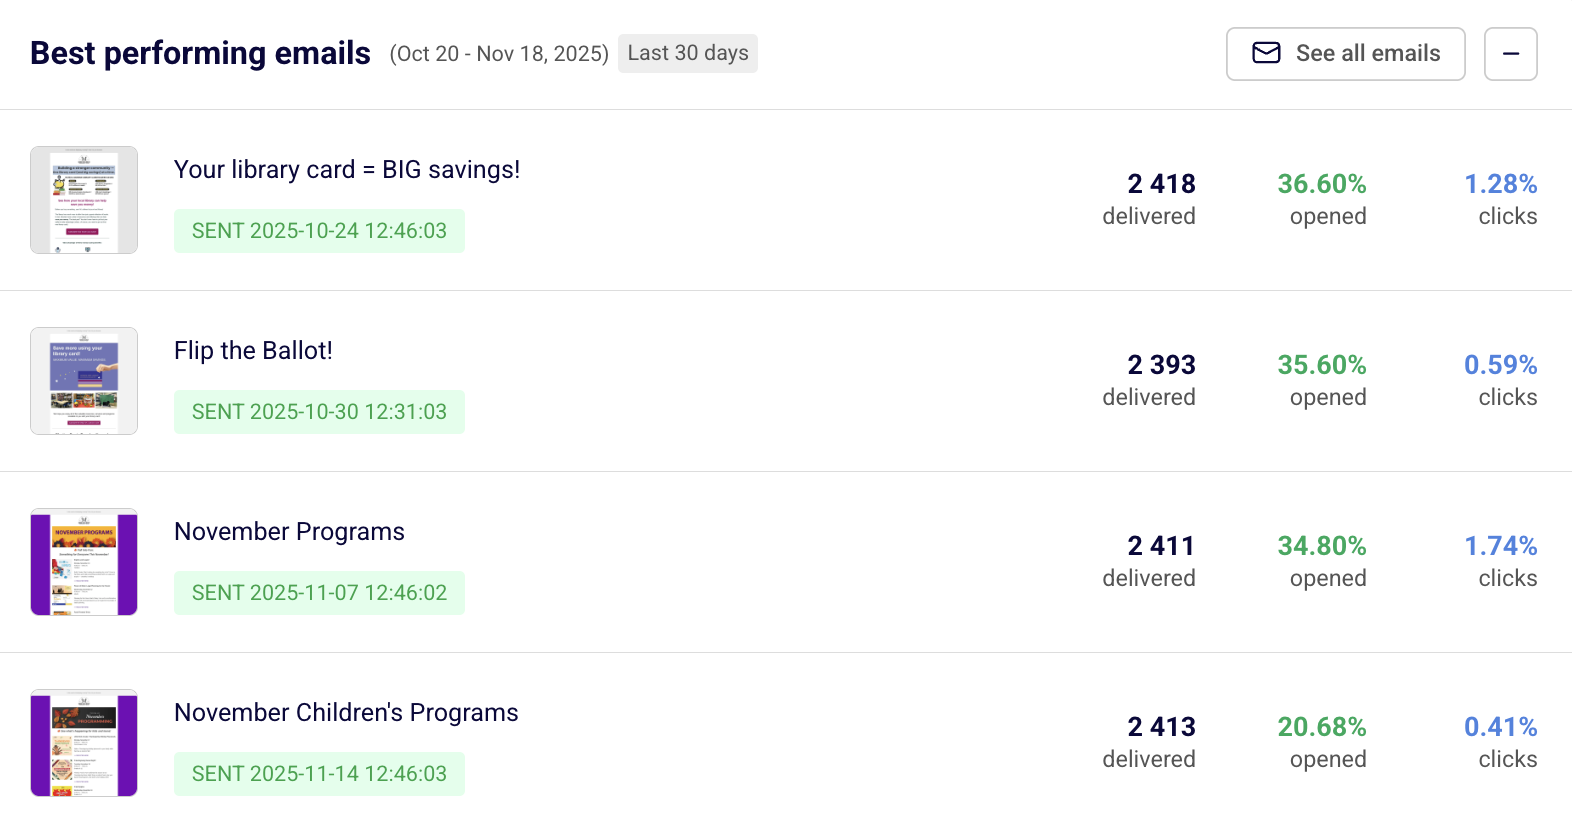
This section highlights your top-performing email campaigns during the selected timeframe.
NOTE: If you have an e-commerce store connected, campaigns are ranked by sales generated. If you haven’t integrated an e-commerce platform, campaigns are ranked by clicks.
Each campaign entry displays:
Campaign thumbnail – Visual preview of the email
Campaign subject line – The subject line used
Send date and time – When the campaign was sent, shown with a green “SENT” label
Sales – Total revenue generated
Orders – Number of orders placed
Delivered – Number of emails successfully delivered
Opened – Open rate percentage
Clicks – Click rate percentage
Click “See all emails” in the top right corner to view your complete campaign list and dive deeper into individual campaign performance.
Use this insight to identify what content resonates most with your audience and replicate successful strategies.
Traffic and reach report
This report applies to email campaigns only.
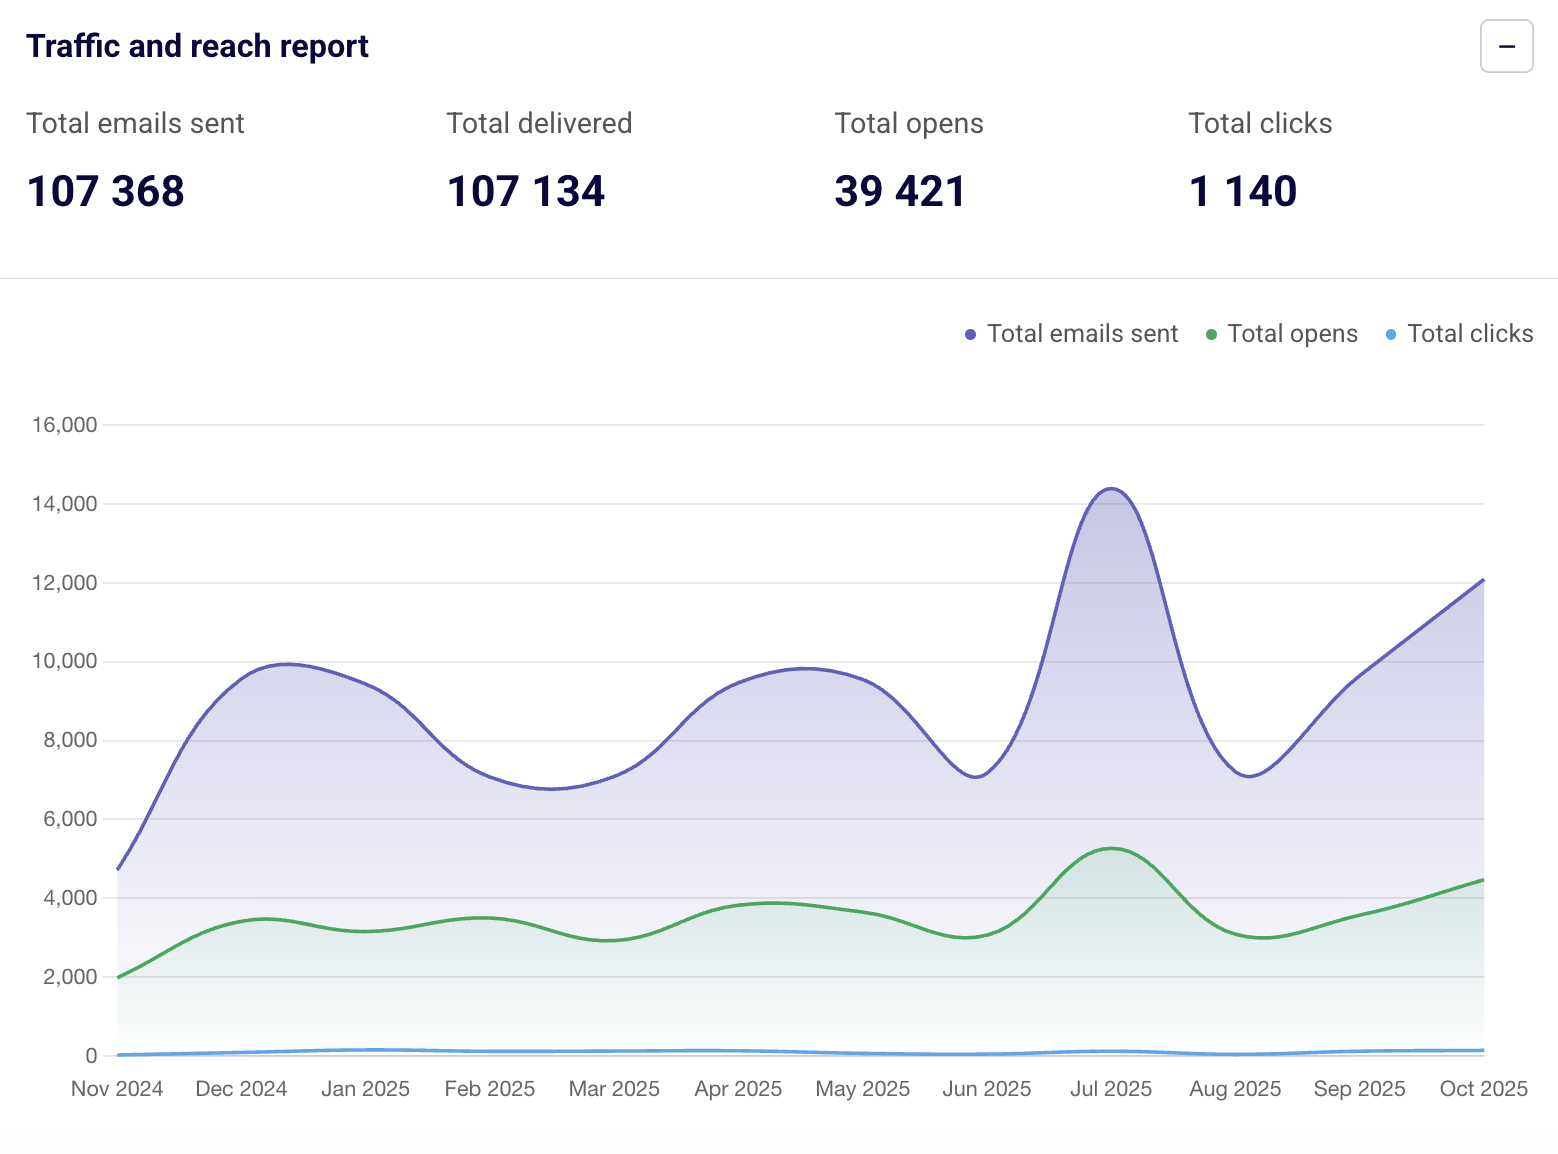
The traffic and reach section shows engagement metrics for all emails sent during your selected period. Track how many people are clicking through your campaigns and opening your messages.
At the top of this section, you’ll see four primary metrics:
Total emails sent – All emails sent during the period
Total delivered – Successfully delivered emails
Total opens – Number of times emails were opened
Total clicks – Number of clicks on links in your emails
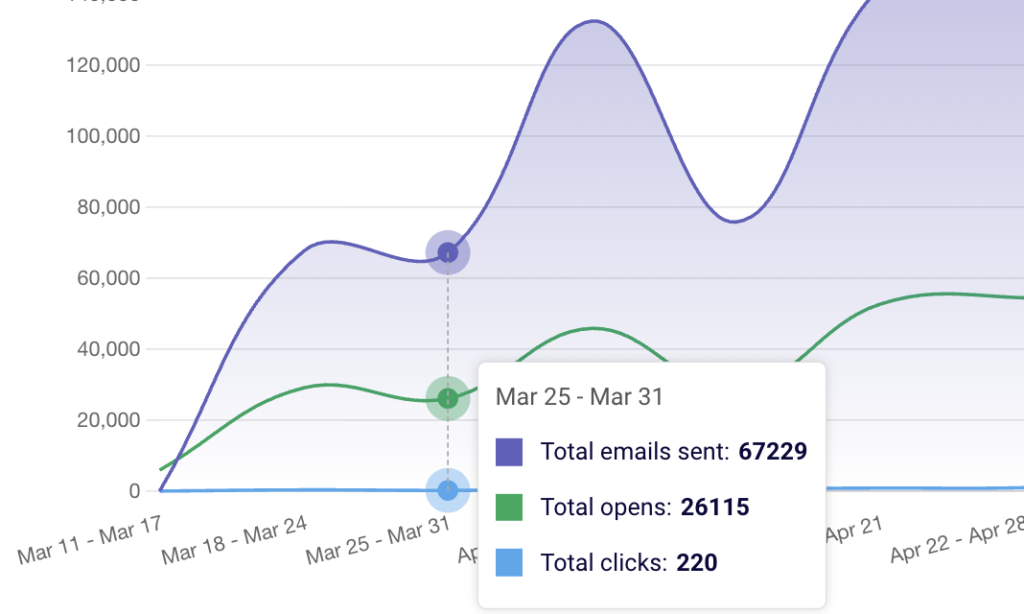
The main chart displays three trend lines over time showing total emails sent, total opens, and total clicks. This visualization helps you understand engagement patterns and identify peaks in your email activity.
Hover over any day/week/month (depending on your selected period length) on the chart to see detailed insights showing opens generated by campaigns versus opens generated by automation emails.
This helps you understand whether your scheduled campaigns or automated workflows are driving more engagement.
Just like the sales performance section, you can compare your current traffic stats with previous time periods to measure improvement.
Below the chart, you’ll find important email health metrics that help you monitor the health of your email list and identify potential deliverability issues:
Total unsubscribers – People who opted out
Total bounces – Emails that couldn’t be delivered
Bounce rate – Percentage of bounced emails
Total spams – Spam complaints received
Unsubscribe rate – Percentage of people who unsubscribed
Hard bounce rate – Permanent delivery failures
Soft bounce rate – Temporary delivery issues
Average spam rate – Average spam complaint rate
Subscribers growth section
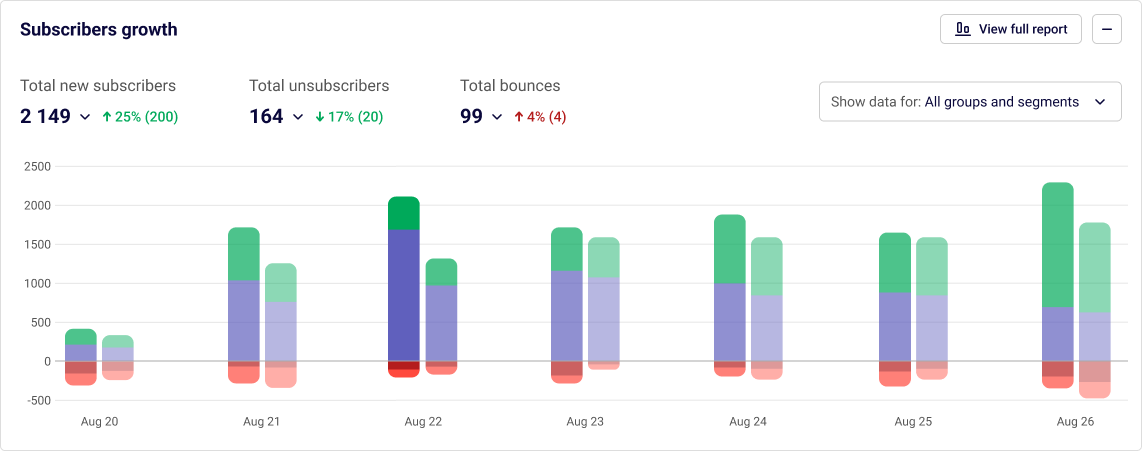
Monitor how your email list is growing over time with detailed daily insights.
At the top of this section, you’ll see three summary metrics with percentage changes compared to your selected comparison period:
Total new subscribers – Contacts added during the period, with a green arrow indicating growth
Total unsubscribers – People who opted out, with the change indicator
Total bounces – Email addresses that bounced, with the change indicator
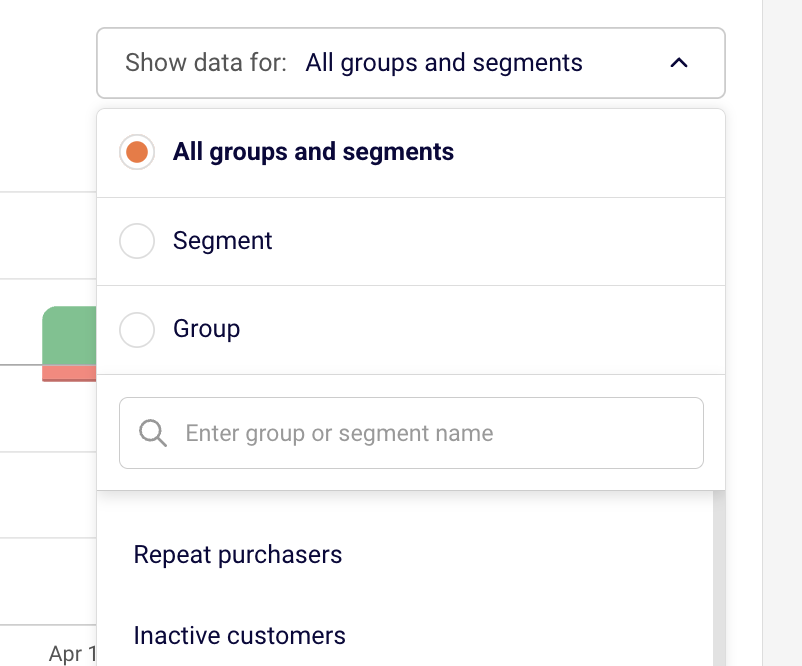
Use the “Show data for” dropdown to filter your subscriber growth by:
All groups and segments – View overall list growth
Segment – Filter by a specific segment you’ve created
Group – Filter by a specific contact group
When you select a filter option, a search field appears where you can type to find specific groups or segments from your list. This filtering capability helps you understand which segments are growing fastest and where your best subscribers are coming from.
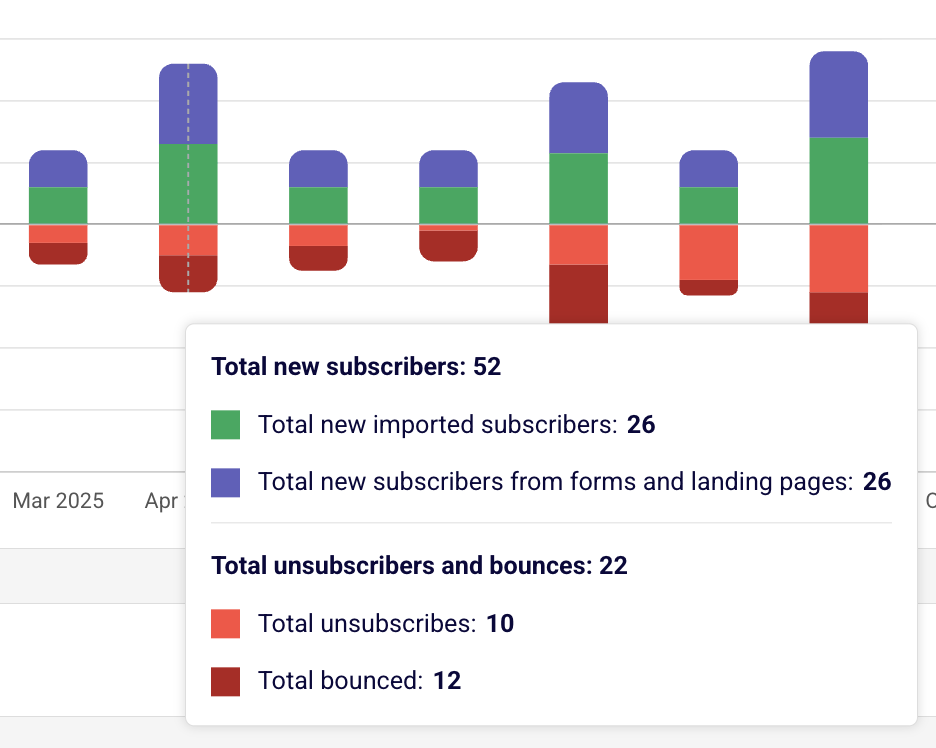
The stacked bar chart displays your net subscriber growth over time. Each bar uses color-coding to show new subscribers, existing subscribers, and losses from unsubscribes and bounces. This visualization makes it easy to spot trends and see the overall health of your list.
Hover your mouse over any specific day to see a detailed breakdown:
Imported subscribers – Contacts added through manual imports or integrations
New subscribers from forms & landing pages – Organic growth from your signup forms
Bounces – Email addresses that bounced
Unsubscribes – People who opted out of your list
This daily breakdown helps you identify your most effective acquisition channels and spot potential issues with list quality.
Recommendations section
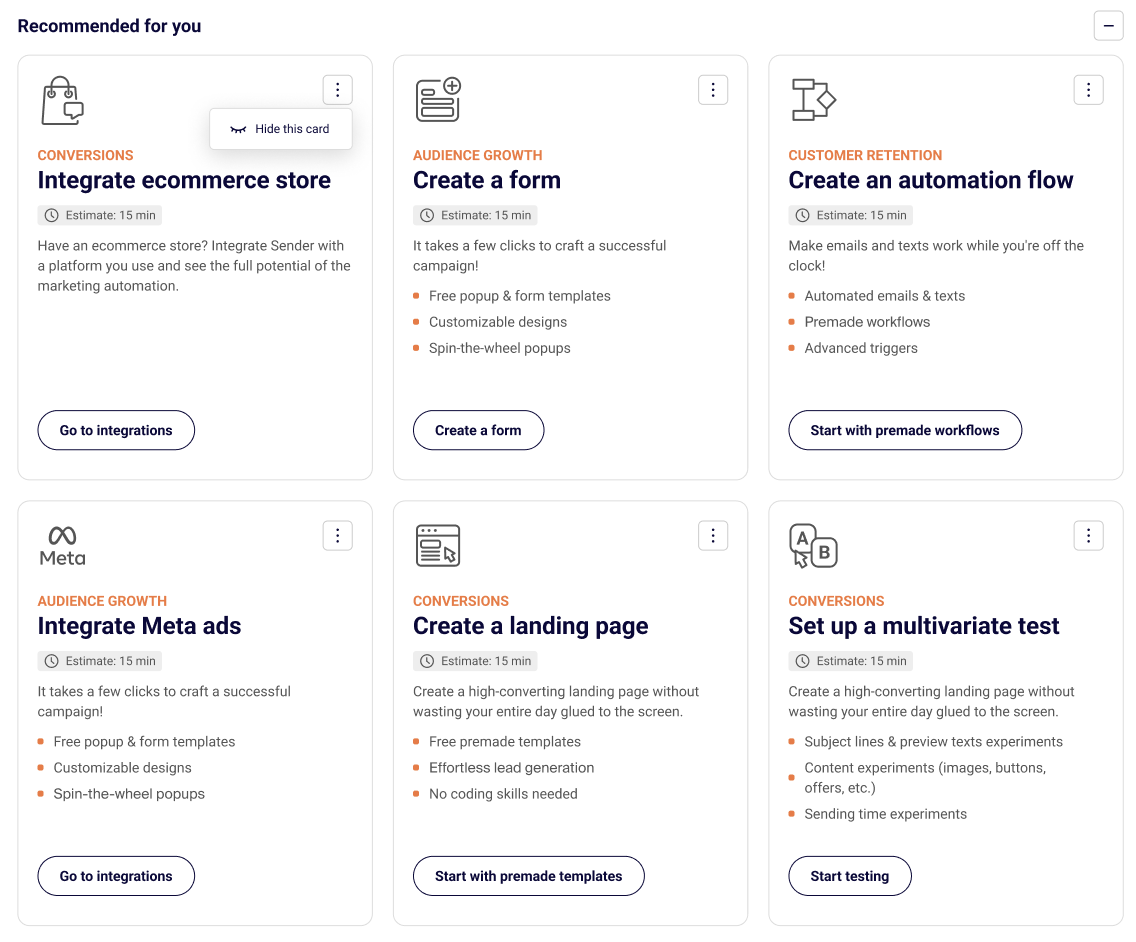
Get personalized suggestions to maximize your email marketing performance under the “Recommended for you” heading. Sender analyzes your account activity and provides actionable recommendations tailored to your needs.
Each recommendation card includes:
Category tag – The focus area such as “Conversions”, “Audience growth”, or “Customer retention”
Action title – What you should do
Time estimate – How long it will take to complete
Description – Why this matters and what you’ll achieve
Key features – Bulleted list of what’s included or what you can do
Action button – Direct link to get started
Marketing calendar
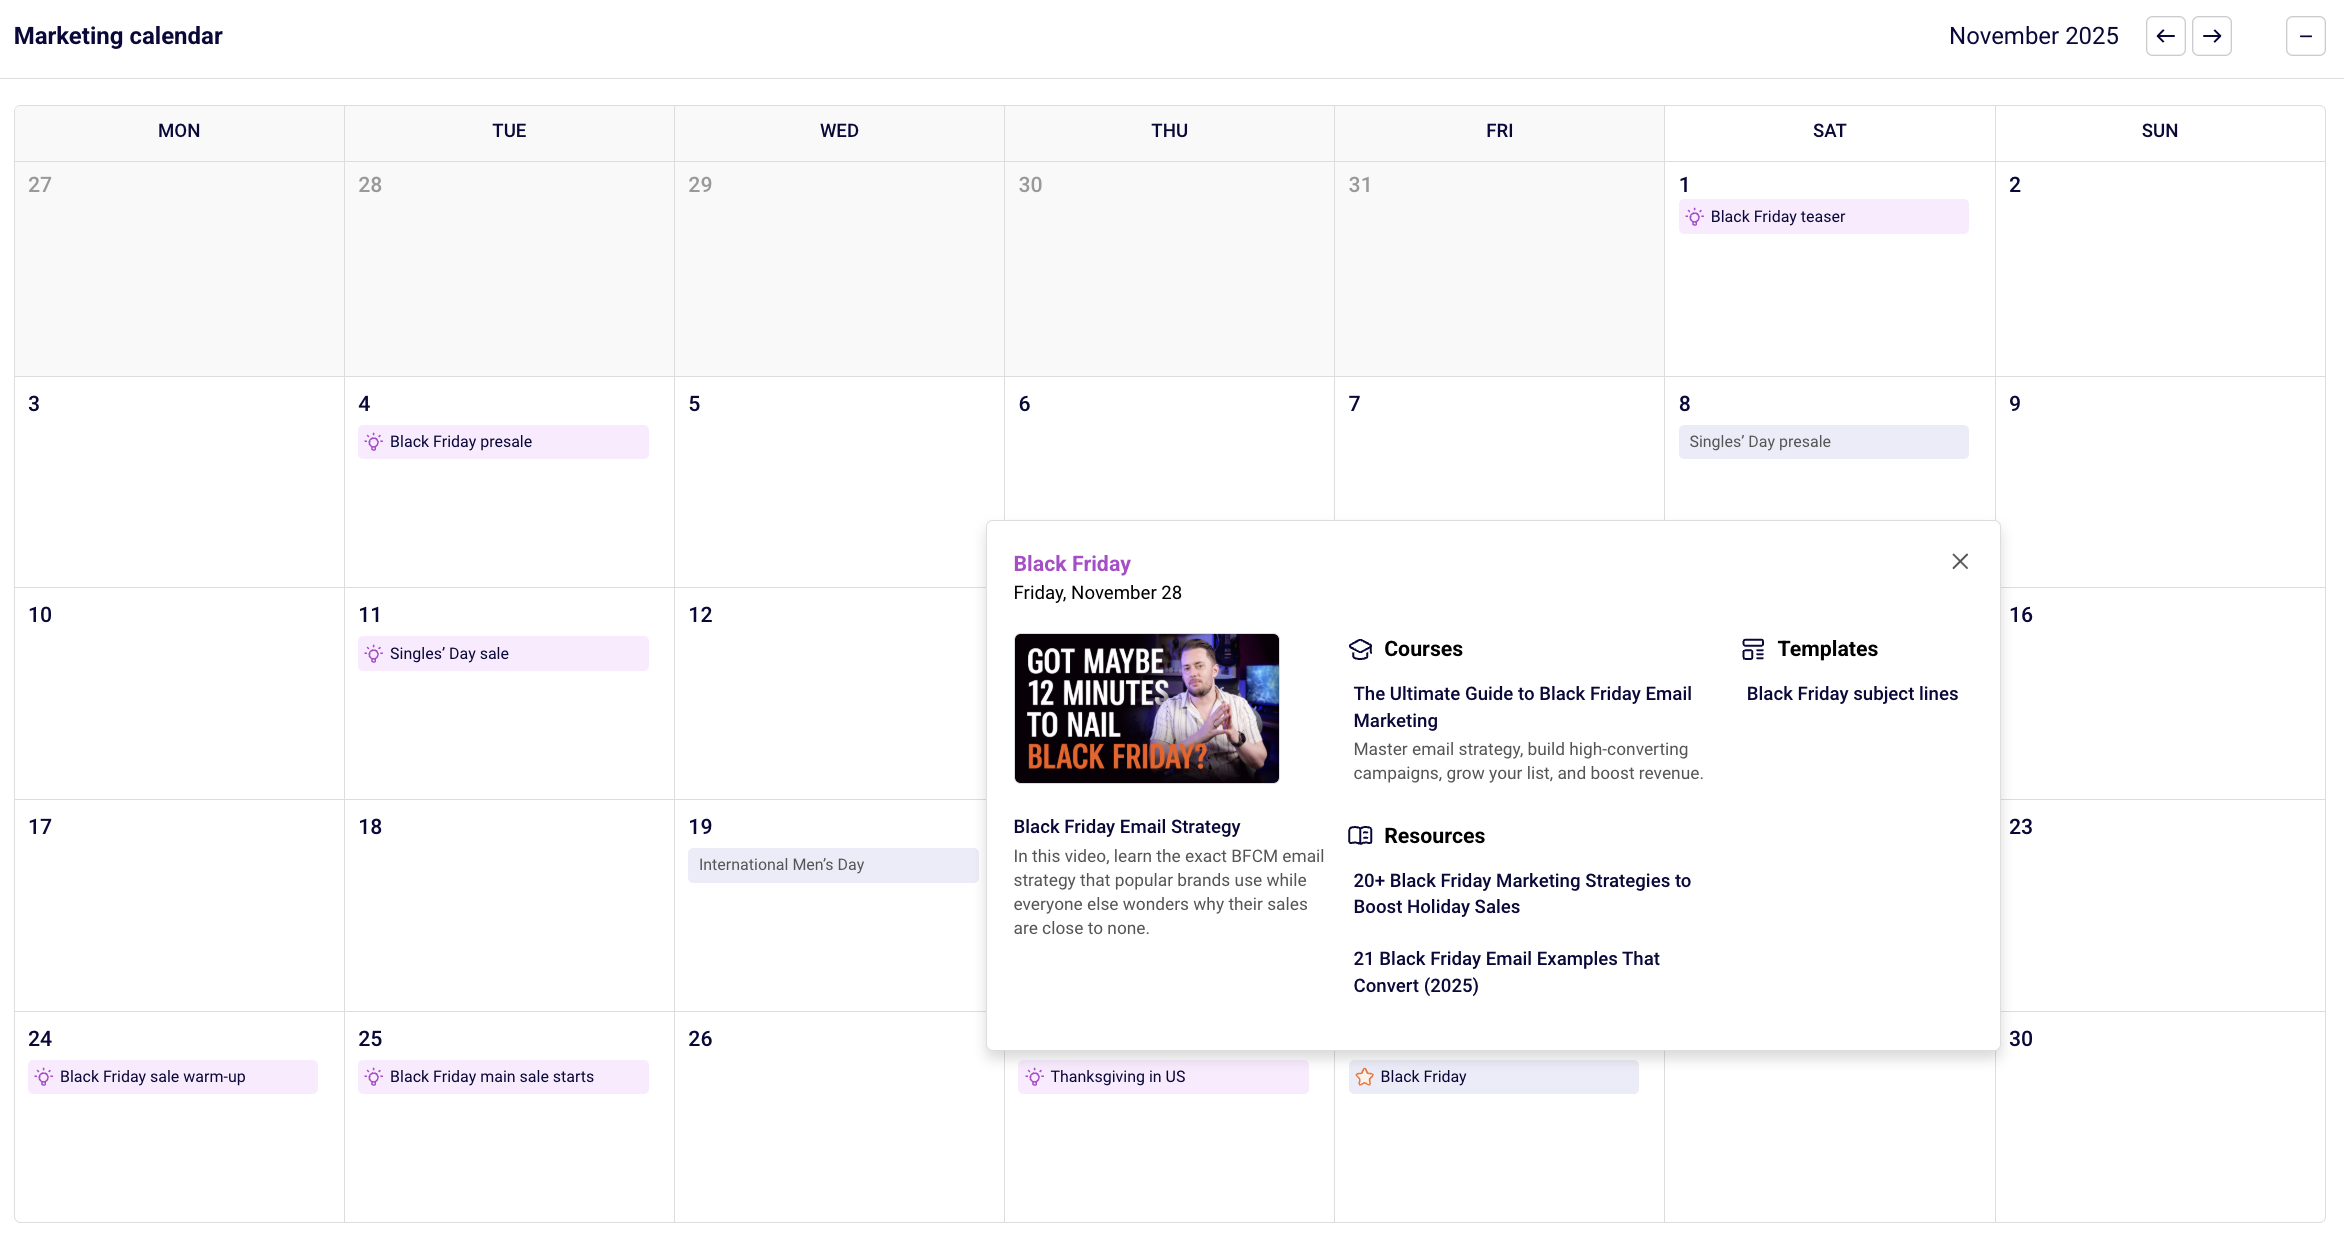
Plan your campaigns for any occasion with the integrated marketing calendar. This component shows upcoming holidays, seasonal events, and your scheduled campaigns all in one place.
The calendar displays:
Current month and year – Navigate between months using the left and right arrow buttons
Campaign status indicators – Color-coded labels showing:
SENT (green) – Campaigns that have been sent, with the number of campaigns in parentheses
SCHEDULED (orange) – Campaigns scheduled to send, with the count
Holiday markers – Important dates like Halloween, Thanksgiving, Black Friday, Diwali, and other seasonal events. These also include educational materials on marketing strategies for these holidays.
Your scheduled campaigns – Click on any date to see campaign details including email campaigns with their titles and SMS campaigns
When you hover over a date with multiple campaigns, you’ll see a preview showing individual campaign names and types (email or SMS). If there are more campaigns than can be displayed, you’ll see a “+1 more” or “+2 more” indicator.
Use the calendar to:
Plan campaigns around holidays and events
View your complete campaign schedule at a glance
Identify gaps in your marketing calendar
Create new campaigns for upcoming occasions
The calendar helps you stay organized and never miss important marketing opportunities throughout the year.
Learning center & tutorials
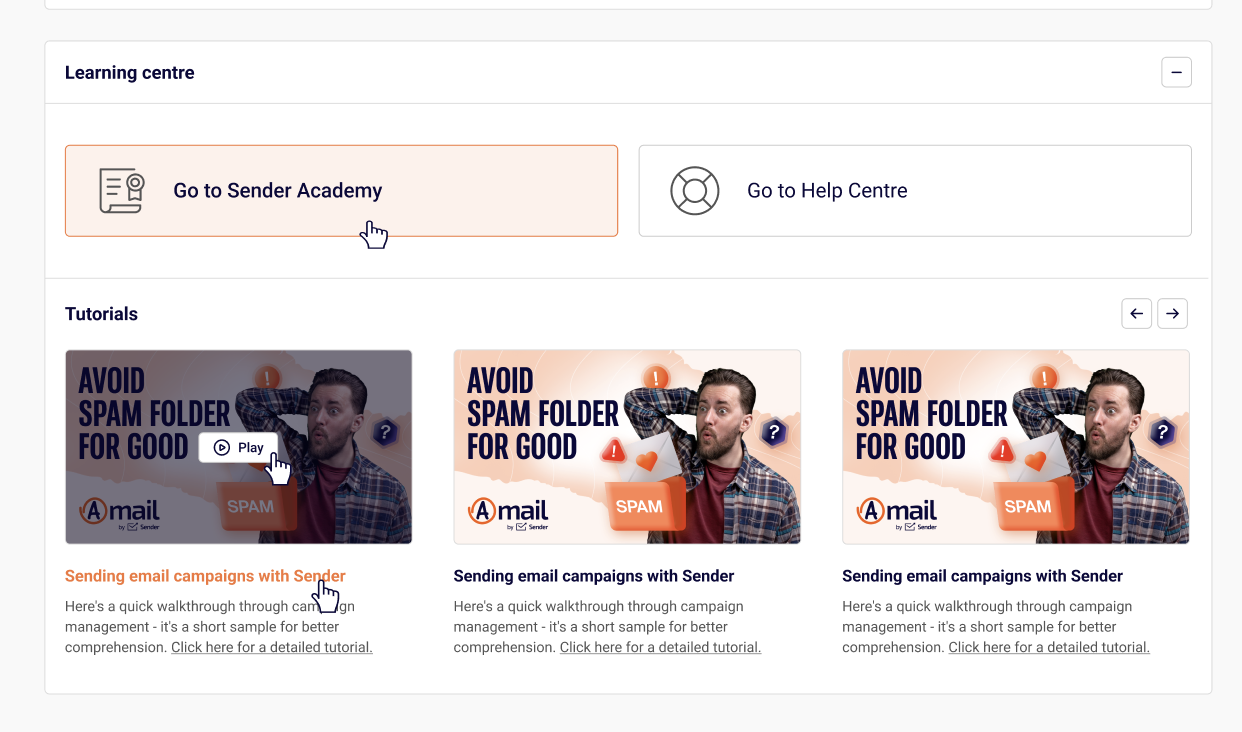
Access educational resources directly from your dashboard. This section includes two quick-access buttons at the top:
Go to Sender Academy – Access comprehensive courses, training materials, and in-depth guides
Go to Help Centre – Browse documentation, support articles, and step-by-step instructions
Below the quick-access buttons, you’ll find a scrollable carousel of video tutorials. Use the left and right arrow buttons to browse through available content.
Learn as you go and implement new strategies without leaving your dashboard. These step-by-step video tutorials make it easy to master Sender’s features at your own pace.
If you got stuck on a specific task or can’t find a way to execute a particular job, contact our support team via LiveChat or [email protected] – we’re here to help 24/7.
If your domain is used by multiple services to send emails e.g. Sender, Gmail, or your web host, you need to merge SPF records into one.
Having multiple SPF records for a domain causes validation errors, which can lead to email delivery issues.
What Is an SPF Record?
An SPF (Sender Policy Framework) record is a type of DNS TXT record that tells mail servers which services are allowed to send emails on your domain’s behalf.
Example of a simple SPF record:
v=spf1 include:sendersrv.com ~all
Why You Should Merge SPF Records?
You can only have one SPF record per domain.
If you add a new email-sending service and create another TXT record (for example, one for Google Workspace and one for Sender), your SPF setup becomes invalid.
If unsure, contact your DNS provider or Sender’s support for help verifying that you merged the record correctly.
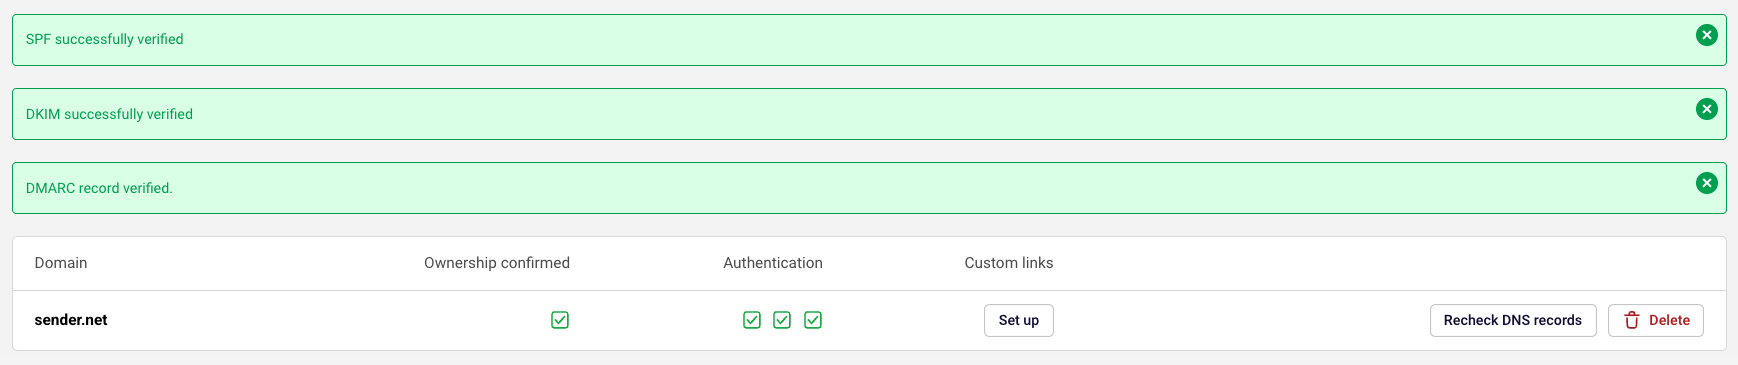
Once you are done, head to your Sender account, go to Account Settings -> Domains and click “Recheck DNS records” next to the domain that you were merging records for.
If everything is merged correctly, you will receive a green verification mark.
Please note that it may take up to 48 hours for the records to propagate.
That’s it!
If you got stuck on a specific task or can’t find a way to execute a particular job, contact our support team via LiveChat or [email protected] – we’re here to help 24/7.
Encountering issues with your sign-up forms? This guide covers common problems and how to resolve them.
Form not displaying
Problem: Your form isn’t showing up on your website or landing page.
Solutions:
Verify the embed code is correctly placed in your website’s HTML
Check that JavaScript is enabled on your website
Clear your browser cache and refresh the page
Ensure there are no conflicting scripts on your page that might block the form
Check if your form is set to active/published status
Submissions not being received
Problem: People are completing the form, but you’re not receiving the submissions.
Solutions:
Verify the form is connected to the correct subscriber list
Check your email notifications settings to ensure you’re receiving submission alerts
Look in your spam or junk folder for notification emails
Review your form’s submission statistics to confirm data is being captured
reCAPTCHA issues
Problem: The reCAPTCHA verification is causing problems for subscribers.
Solutions:
Verify that “Use Google reCAPTCHA” is properly enabled in your form’s Design > Settings
Test the form in different browsers to identify browser-specific issues
Ensure subscribers have JavaScript enabled in their browsers
Check that your website’s security settings or any extensions aren’t blocking Google services
Try disabling and re-enabling reCAPTCHA to reset the configuration
Form fields not working
Problem: Form fields aren’t accepting input or validation isn’t working correctly.
Solutions:
Check that all required fields are properly marked in your form settings
Verify field validation rules are correctly configured
Ensure custom fields are properly mapped to subscriber properties
Test the form in different browsers and devices
Review any custom CSS or JavaScript that might interfere with field functionality
Error messages appearing
Problem: Subscribers see error messages when trying to submit the form.
Solutions:
Review the specific error message to identify the issue
Verify all required fields are filled out correctly
Check email address format validation
Ensure phone number fields accept the correct format
Getting additional help
If you’ve tried these solutions and are still experiencing issues:
Document the specific problem with screenshots
Note which browser and device you’re testing on
Check the browser console for any error messages
Review recent changes made to the form or website
Contact support with detailed information about the issue
Best practices to prevent issues
Test regularly – Test your forms after making any changes to ensure they work correctly.
Use standard formats – Stick to standard email and phone number formats for better compatibility.
Keep it simple – Avoid overly complex forms with too many fields or custom scripts.
Monitor submissions – Regularly check that submissions are coming through as expected.
Stay updated – Keep your embed codes and integrations up to date with the latest versions.
If you got stuck on a specific task or can’t find a way to execute a particular job, contact our support team via LiveChat or [email protected] – we’re here to help 24/7.
CAPTCHA helps protect your sign-up forms from spam and bot submissions by verifying that real people are subscribing to your list. This keeps your subscriber data clean and improves your email deliverability.
What is CAPTCHA?
CAPTCHA (Completely Automated Public Turing test to tell Computers and Humans Apart) is a security feature that challenges users to complete a task that’s easy for humans but difficult for automated bots. This prevents fake sign-ups and spam submissions.
Why use CAPTCHA?
Prevent spam sign-ups – Block bots from submitting fake email addresses or phone numbers to your forms.
Protect your sender reputation – Keeping spam addresses off your list helps maintain good deliverability and reduces bounce rates.
Maintain list quality – Ensure your subscriber list contains only real, engaged users who genuinely want to receive your messages.
Reduce costs – Avoid paying for fake subscribers or wasting resources sending messages to invalid addresses.
How to enable CAPTCHA
To add CAPTCHA protection to your sign-up forms:
Navigate to the form you want to protect
Go to the form’s Design section
Click on Settings
Mark the “Use google reCAPTCHA” option as active
Save your changes
How Google reCAPTCHA works
Google reCAPTCHA analyzes user behavior and interactions to determine if the submission is from a real person or a bot. In most cases, it works invisibly in the background without requiring any action from the subscriber. If suspicious activity is detected, users may be asked to complete a simple challenge to verify they’re human.
Best practices
Enable on public forms – Always use CAPTCHA on forms that are publicly accessible or shared widely online.
Test your forms – After enabling CAPTCHA, test the sign-up process yourself to ensure it works smoothly and doesn’t create friction for legitimate subscribers.
Monitor form submissions – Keep track of your form submission rates after enabling CAPTCHA to ensure it’s not blocking too many legitimate subscribers.
Use on high-traffic forms – Forms that receive a lot of traffic are more likely to attract spam, making CAPTCHA especially important.
That’s it!
If you got stuck on a specific task or can’t find a way to execute a particular job, contact our support team via LiveChat or [email protected] – we’re here to help 24/7.
Segments help you target specific groups of subscribers across your campaigns and workflows. Here’s how you can use segments in different areas of your platform.
Contact management
Use segments to organize and manage your subscribers more effectively.
View segment members – Click “View” next to any segment to see all subscribers who currently match the segment criteria. This gives you a real-time list of everyone in that segment.
Filter subscribers – Use segments to quickly filter your subscriber list and find specific groups of contacts without manually searching through all your data.
Analyze subscriber groups – Compare active and total subscriber counts across segments to understand your audience composition and engagement levels.
Export segment data – Export subscribers from a specific segment when you need to use that data outside the platform or share it with your team.
Email campaigns
Segments are essential for targeting the right audience with your email campaigns.
Target specific audiences – When creating an email campaign, select a segment as your audience to ensure your message reaches only the subscribers who meet your criteria.
Personalize messaging – Use different segments to send tailored messages. For example, send one message to “Highly engaged subscribers” and a different re-engagement campaign to “Inactive users.”
Improve deliverability – By targeting engaged segments, you can improve your email open rates and overall campaign performance.
A/B test audiences – Create similar segments with slight variations to test which audience definition performs best for specific campaign types.
SMS campaigns
Just like email campaigns, segments help you target the right subscribers for SMS.
Target SMS subscribers – Use segments based on SMS subscription status to ensure you’re only messaging subscribers who have opted in to receive text messages.
Location-based messaging – Create segments based on subscriber location to send region-specific SMS campaigns.
Behavior-based SMS – Target segments like “SMS responders” or subscribers who have clicked in previous SMS campaigns to reach your most engaged mobile audience.
Automations
In automations, segments work as conditions to control your workflow.
Add segment conditions – After your automation triggers, you can add a condition to check whether the subscriber is part of a specific segment before continuing the workflow.
Filter automation paths – Use segment membership to create different paths in your automation. For example, send different follow-up messages based on whether someone is in your “Highly engaged users” segment.
Prevent over-messaging – Add conditions to check if subscribers are in exclusion segments like “Recently contacted” to avoid sending too many messages.
Dynamic workflow routing – Since segments update automatically, your automation conditions will reflect real-time segment membership, ensuring subscribers follow the most appropriate path.
Example automation use case
You might create an automation that:
Triggers when a subscriber fulfills an order
Checks if the subscriber is part of the “New subscribers” segment
If yes, sends a welcome series message
If no, sends a different message for existing subscribers
Best practices
Match segments to goals – Choose segments that align with the objective of your campaign or automation.
Keep segments updated – Since segments update automatically, review your segment criteria periodically to ensure they still match your targeting needs.
Test before sending – Preview your segment size before launching campaigns to ensure you’re reaching the intended audience.
Use descriptive names – Clear segment names make it easier to select the right audience when creating campaigns and automations.
Combine with other targeting – Use segments alongside other conditions in automations to create sophisticated, personalized workflows.
If you got stuck on a specific task or can’t find a way to execute a particular job, contact our support team via LiveChat or [email protected] – we’re here to help 24/7.
Once you’ve created segments, you’ll need to manage them effectively to keep your targeting accurate and organized. This guide covers how to view, edit, duplicate, and delete your segments.
Viewing your segments
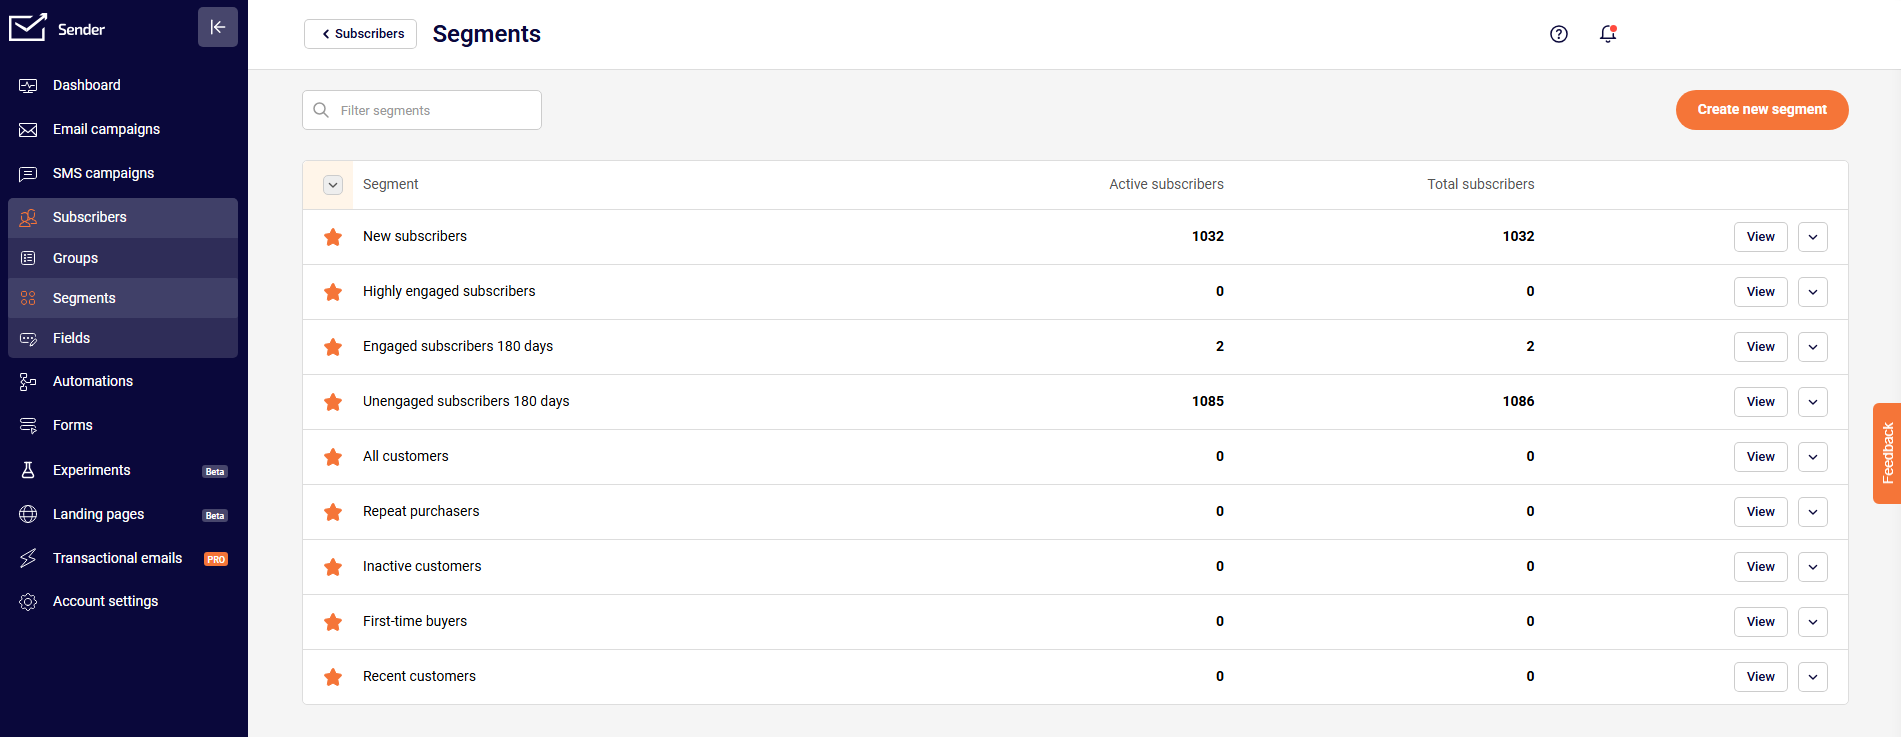
Access all your segments from the segments dashboard. Here you can see:
Segment name – The label you assigned to each segment
Active subscribers – The number of active subscribers in the segment
Total subscribers – The total number of subscribers (active and inactive) in the segment
Segments update automatically as subscribers meet or no longer meet your criteria, so the counts reflect real-time data.
Editing a segment
To modify an existing segment:
Navigate to your segments list
Click on the segment you want to edit
Update the conditions using the advanced filter options
Add or remove conditions using the “Add condition” button
Save your changes
When you edit a segment, the changes apply immediately. Subscribers who no longer match the updated criteria will be removed, and new subscribers who now match will be added automatically.
Creating similar segments
To save time when building related segments:
Open an existing segment that’s similar to what you need
Modify the conditions to match your new requirements
Click “Save as new segment”
Give your new segment a descriptive name
This is especially useful when you want to create variations of the same audience, such as “Active users – Last 30 days” and “Active users – Last 7 days.”
Deleting segments
To remove a segment you no longer need:
Navigate to your segments list
Select the segment you want to delete
Click the delete option after opening the dropdown menu by clicking the arrow
Confirm the deletion
Important: Deleting a segment does not delete the subscribers in it. It only removes the segment definition.
Best practices for segment management
Archive unused segments – If you’re not actively using a segment but want to keep it for reference, consider marking it clearly or organizing it separately.
Use consistent naming – Develop a naming convention for your segments to make them easy to find and understand at a glance.
Document complex segments – For segments with multiple conditions, add notes about their purpose and intended use.
Monitor segment size – Keep an eye on how your segment sizes change over time. Sudden changes might indicate an issue with your conditions or subscriber data.
Clean up outdated segments – Delete segments that are no longer relevant to keep your workspace organized.
If you got stuck on a specific task or can’t find a way to execute a particular job, contact our support team via LiveChat or [email protected] – we’re here to help 24/7.
Segments help you target the right users at the right time. Here are practical examples you can use as inspiration for creating your own segments.
Engagement segments
Active users Users who have engaged with your campaigns recently.
Opened at least once in the last 30 days, OR
Clicked at least once in the last 30 days
Highly engaged users Your most active users who interact frequently with your campaigns.
Opened at least 5 times in the last 30 days, AND
Clicked at least 3 times in the last 30 days
Inactive users Users who haven’t engaged recently and may need re-engagement.
Was sent to at least once in the last 90 days, AND
Has not opened in the last 60 days
Subscription segments
Email subscribers Users who are subscribed to receive email communications.
Subscription status for Email is “Subscribed”
Multi-channel subscribers Users who are opted in to multiple communication channels.
Subscription status for Email is “Subscribed”, AND
Subscription status for SMS is “Subscribed”
SMS subscribers only Users who prefer SMS communications.
Subscription status for SMS is “Subscribed”, AND
Subscription status for Email is “Unsubscribed”
Behavioral segments
Campaign engagers Users who have interacted with your recent campaigns.
Campaign activity: Clicked at least once in the last 14 days
Non-openers Users who receive campaigns but don’t open them.
Campaign activity: Was sent to at least 3 times in the last 30 days, AND
Campaign activity: Opened 0 times in the last 30 days
SMS responders Users who have engaged with SMS campaigns.
SMS campaign activity: Clicked at least once in the last 30 days
Subscriber detail segments
New subscribers Recently added contacts.
Created date is in the last 7 days
Specific location Target users in a particular geographic area.
Subscribers is from “European Union / UK”
Group members Users who belong to a specific group.
Group membership includes “VIP Customers”
Tips for creating segments
Start simple – Begin with one or two conditions and add more as needed.
Use meaningful names – Name segments clearly so anyone on your team understands who’s included.
Monitor segment size – If a segment is too small or too large, adjust your conditions.
Combine conditions strategically – Use AND for more specific segments and OR for broader reach.
That’s it!
If you got stuck on a specific task or can’t find a way to execute a particular job, contact our support team via LiveChat or [email protected] – we’re here to help 24/7.
Segments are dynamic groups of users or customers that are automatically updated based on specific criteria you define. They allow you to organize and target your audience based on shared characteristics, behaviors, or attributes.
Unlike static lists, segments update in real-time as users meet or no longer meet your criteria, ensuring your targeting is always current and accurate.
Why use segments?
Segments help you:
Personalize communication – Send targeted messages to specific groups based on their interests or behavior
Improve engagement – Reach the right people with relevant content at the right time
Analyze user groups – Understand how different segments behave and perform
Automate workflows – Trigger actions when users enter or exit specific segments
Optimize campaigns – Test and refine your approach with different audience groups
Common segment types
Demographic segments Group users by characteristics like location, age, language, or company size.
Behavioral segments Target users based on actions they’ve taken, such as pages visited, features used, or purchases made.
Engagement segments Identify active, inactive, or at-risk users based on their level of engagement with your product or service.
Lifecycle segments Organize users by where they are in the customer journey, from new signups to loyal customers.
How segments work
Segments are built using conditions and filters. When a user matches all the conditions you’ve set, they’re automatically added to the segment. If they stop matching the conditions, they’re removed.
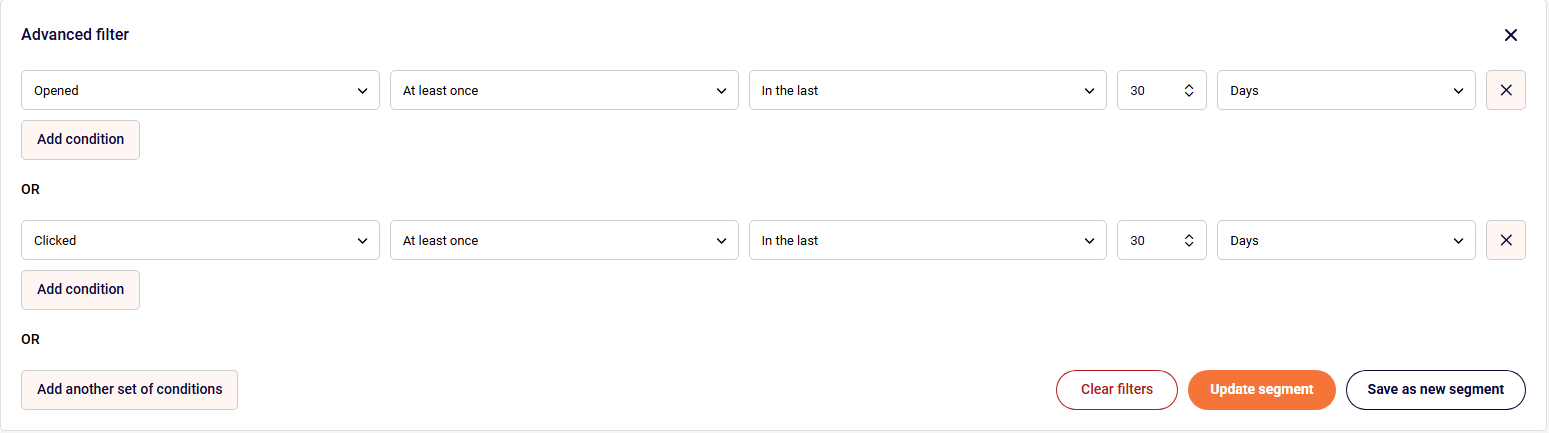
For example, you might create a segment for “Active Users” that includes anyone who:
Opened at least once in the last 30 days
Clicked at least once in the last 30 days
As soon as someone meets these criteria, they join the segment. If they stop meeting the conditions, they’re automatically removed. You may see an example here:
Best practices
Start simple – Begin with broad segments and refine them as you learn more about your audience
Name clearly – Use descriptive names that make it obvious who’s in the segment
Review regularly – Check that your segment criteria still align with your goals
Avoid over-segmentation – Too many small segments can be difficult to manage
Test and iterate – Experiment with different criteria to find what works best
That’s it!
If you got stuck on a specific task or can’t find a way to execute a particular job, contact our support team via LiveChat or [email protected] – we’re here to help 24/7.
Learn about the Segments page in Sender and how to navigate its features for creating and managing contact segments.
What is the Segments Page?
The Segments page is your central hub for creating, viewing, and managing all your contact segments. It allows you to build dynamic filtered lists based on specific criteria like engagement, behavior, demographics, and custom attributes.
Accessing the Segments Page
To access the Segments page:
Click on Subscribers in the left navigation menu
Select Segments from the submenu
You’ll see your segments overview
The Segments Page Interface
Main Components of the Segments Page
Page Header
At the top of the page, you’ll find:
Back to Subscribers button – Returns you to the main subscribers list
Segments title – Confirms you’re on the segments page
Help icon – Access documentation and support
Notifications – View system notifications
Account menu – Access your account settings
Search and Filter Bar
Located below the header:
Filter segments search box – Quickly find specific segments by name
Search through your existing segments to locate the one you need
Create New Segment Button
On the right side of the page:
“Create new segment” button – Click to start building a new segment
Opens the segment creation interface with advanced filtering options
Segments List
The main area displays all your existing segments:
Segment names and descriptions
Contact count for each segment
Creation date and last modified information
Quick access to edit or view each segment
Creating a New Segment
When you click “Create new segment”, you’ll access:
Create alternative condition sets using “Add another set of conditions”
Filter Preview
As you build your segment:
View the number of contacts matching your criteria in real-time
See a preview of contacts who meet the conditions
Verify your segment before saving
Segment Actions
After creating your segment:
Save the segment with a descriptive name
Edit segment conditions at any time
Delete segments you no longer need
Navigation Tips
Finding Segments Quickly
Use the filter search box to locate segments by:
Segment name
Keywords in the description
Partial name matches
Organizing Your Segments
Keep your segments page organized by:
Using clear, descriptive names
Including dates or version numbers when relevant
Archiving or deleting unused segments
Grouping similar segments with consistent naming conventions
That’s it!
If you got stuck on a specific task or can’t find a way to execute a particular job, contact our support team via LiveChat or [email protected] – we’re here to help 24/7.