Category: Create and Setup

  • Sender name and email address configuration

    This guide explains how to configure the sender name and email address for an email campaign in Sender. These settings control how your campaign appears in the recipient’s inbox.

    Where to Find This Feature

    In the Sender dashboard, go to: Email campaigns → New campaign → Settings

    email-campaign-new-campaign

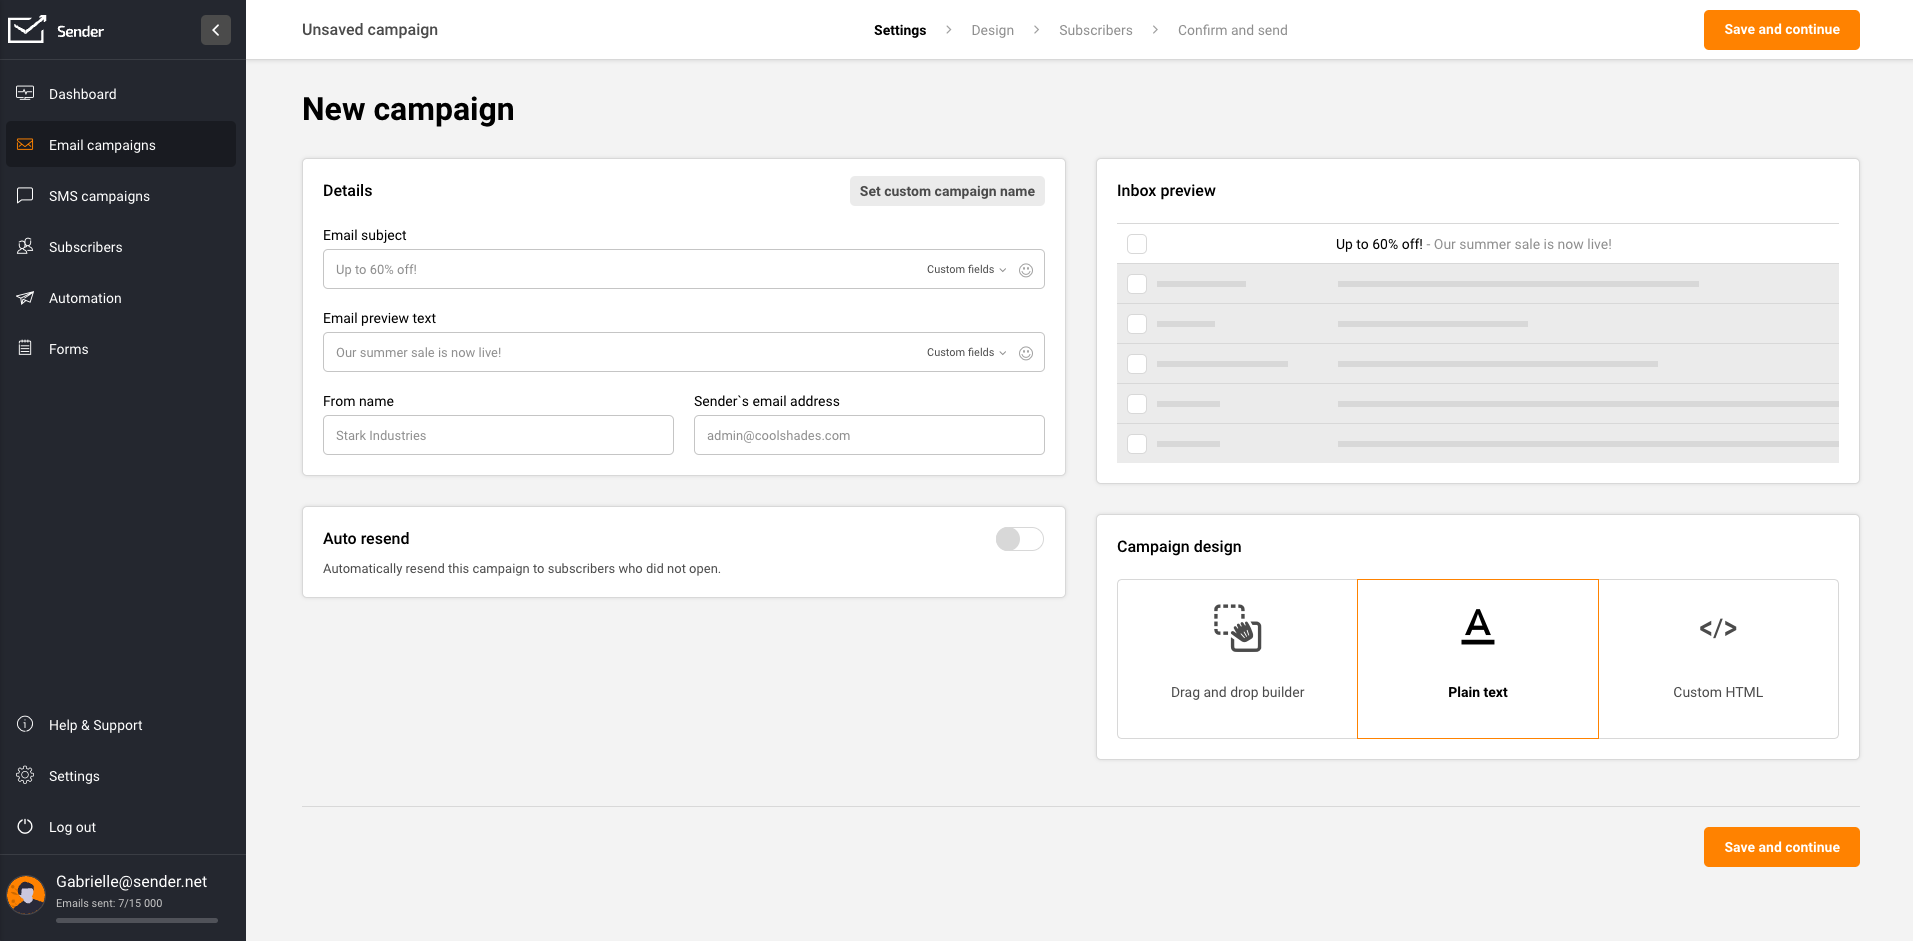
    Click Email campaigns in the left sidebar to open the campaign list. Click the New campaign button in the top-right corner. The Campaign settings page opens on the Settings stage — the first stage of the campaign creation workflow (Settings → Design → Subscribers → Review and send). The Sender details section is located below the Campaign details section on this page.

    Steps to Configure the Sender Name and Email Address

    Step 1 — Open the Campaign Settings page

    Go to Email campaigns in the left sidebar. Click New campaign in the top-right corner.

    campaign-settings

    The Campaign settings page opens. You will see two sections: Campaign details at the top and Sender details below it. An Inbox preview panel on the right side shows how the sender name, subject line, and preview text will appear in the recipient’s inbox.

    Step 2 — Enter the From name

    In the Sender details section, locate the From name field. Type the name you want recipients to see in their inbox.

    campaign-sender-details

    This could be your company name, brand name, or a person’s name. The Inbox preview panel updates in real time to reflect the name you enter.

    Step 3 — Enter the Sender’s email address

    In the Sender details section, locate the Sender’s email address field. Type the email address you want to send the campaign from. This address must use a domain that has been verified in your account. If you have not verified your domain, go to Account settings → Domains to add and verify it before continuing.

    Step 4 — Review the Inbox preview and save

    Check the Inbox preview panel on the right side of the page to confirm the From name displays correctly alongside the subject line and preview text.

    email-inbox-preview

    When you are satisfied with the sender details, click Save and continue to proceed to the Design stage. To save your progress and return later, click I’ll finish later — the campaign is saved as a draft.

    Available Settings

    From name — The name displayed in the recipient’s inbox as the sender of the email. This is a free-text field and accepts any value, such as a company name or a person’s name.

    Sender’s email address — The email address the campaign is sent from. This must use a domain that has been verified under Account settings → Domains.

    Set custom campaign name — Opens an additional Campaign name field above the Email subject field. The campaign name is used for internal reference only and is not visible to recipients. Click Hide custom campaign name to collapse this field.

    Email subject — The subject line recipients see in their inbox. Supports personalization through the Custom fields dropdown and emoji insertion through the emoji picker icon.

    Email Preview text — The short text displayed next to or below the subject line in the recipient’s inbox. Also supports Custom fields and emoji insertion.

    Auto resend — A toggle that, when enabled, automatically resends the campaign to subscribers who did not open it.

    campaign-auto-resend

    Inbox preview — A live preview panel that reflects the From name, Email subject, and Email Preview text as they would appear in a recipient’s inbox.

    Setup Tips

    Use a recognizable sender name — Choose a From name that recipients will immediately recognize, such as your brand name or a familiar contact name. This increases open rates and reduces the likelihood of being marked as spam.

    Match your domain to your brand — The Sender’s email address should use your verified business domain rather than a generic or free email provider. Verify your domain under Account settings → Domains before creating the campaign.

    Preview before proceeding — Always check the Inbox preview panel after entering the From name, Email subject, and Email Preview text. This shows exactly how the campaign will look in the inbox.

    Keep the From name consistent — Use the same From name across campaigns so subscribers learn to recognize your emails. Frequent changes can confuse recipients and lower engagement.

    Set a custom campaign name for internal tracking — Click Set custom campaign name to add an internal label that helps you identify the campaign in the Email campaigns list. This name is not visible to recipients.

    Common Issues

    Sender’s email address is rejected → The email address uses a domain that has not been verified. Go to Account settings → Domains, add your domain, and complete the verification process before returning to the campaign settings.

    From name appears differently in certain email clients → Some email clients truncate long sender names. Keep the From name concise — ideally under 25 characters — to ensure it displays fully across all inboxes.

    Inbox preview does not update → The Inbox preview panel updates in real time as you type. If it does not reflect your changes, refresh the page and re-enter the values. Your draft is saved automatically.

    Campaign cannot proceed past the Settings stage → Required fields such as Email subject and Sender’s email address must be completed before clicking Save and continue. Fill in all required fields to move to the Design stage.

    FAQs

    What is the From name used for? The From name is the sender name recipients see in their inbox. It helps them identify who the email is from before opening it. You can set it to your company name, brand name, or a person’s name.

    Can I use any email address as the Sender’s email address? The Sender’s email address must use a domain that has been verified in your Sender account. Go to Account settings → Domains to verify your sending domain before configuring the campaign.

    Does the From name affect email deliverability? The From name itself does not directly affect deliverability, but using a consistent and recognizable name helps build trust with recipients and reduces the chance of your emails being marked as spam.

    Can I change the sender details after creating the campaign? Yes. As long as the campaign has not been sent, you can return to the Settings stage from the Email campaigns list, click the edit icon on the draft campaign, and update the From name or Sender’s email address.

    What is the difference between the campaign name and the From name? The Campaign name is an internal label visible only in your Email campaigns list. The From name is the sender name displayed to recipients in their inbox. They serve different purposes and can be set independently.

    Where do I verify my sending domain? Go to Account settings → Domains in the left sidebar. Click Add domain, enter your domain, and follow the verification steps. Once the domain shows a confirmed status, you can use it in the Sender’s email address field.

  • Reply-to address configuration

    This guide explains how to configure the reply-to address for an email campaign in Sender.

    Where to Find This Feature

    In the Sender dashboard, go to: Email campaigns → New campaign → Campaign settings

    create-new-campaign

    When you click New campaign, you are taken to the Campaign settings page — the first stage of the campaign creation workflow (Settings → Design → Subscribers → Review and send). The Sender details section on this page contains the Sender’s email address field, which controls where recipient replies are delivered.

    Steps to Configure the Reply-to Address

    Step 1 — Open the Campaign Settings page

    campaign-settings

    From the Sender dashboard sidebar, click Email campaigns. On the campaign list page, click New campaign in the upper-right corner. You are taken to the Campaign settings page with the Settings stage active in the workflow bar. You will see two main sections: Campaign details and Sender details.

    Step 2 — Locate the Sender details section

    Scroll to the Sender details section below Campaign details. This section contains two fields: From name and Sender’s email address. Both fields are pre-filled with your account defaults.

    sender-details

    The Sender’s email address field determines the reply-to address for your campaign — when a recipient replies to your email, the response is sent to this address.

    Step 3 — Enter or update the Sender’s email address

    Click the Sender’s email address field and enter the email address where you want recipient replies delivered. This address must use a verified domain. The From name field controls the display name recipients see in their inbox, while the Sender’s email address serves as both the sending address and the reply-to address.

    Step 4 — Verify your settings in the Inbox preview

    After entering the address, check the Inbox preview panel on the right side of the page. It displays a simulated inbox row showing the From name, Email subject, and Email Preview text.

    campaign-preview

    Confirm that the sender name appears as expected. When you are satisfied, click Save and continue to proceed to the Design stage.

    Available Settings

    From name — The display name recipients see in their inbox when they receive the campaign email. This can be your brand name, a personal name, or any identifiable sender name.

    Sender’s email address — The email address used as both the “from” address and the reply-to address. When a recipient replies to your campaign, the response is delivered to this address. The address must use a verified domain configured under Account settings → Domains.

    Email subject — The subject line of the campaign email. Supports personalization through the Custom fields dropdown.

    Email Preview text — The preview snippet displayed alongside the subject line in the recipient’s inbox. Supports personalization through the Custom fields dropdown.

    Set custom campaign name — An optional internal label for the campaign that does not appear to recipients. Click Set custom campaign name to reveal the Campaign name field.

    Auto resend — A toggle that enables automatic resending of the campaign to subscribers who did not open the original email.

    Setup Tips

    Use a monitored inbox — Set the Sender’s email address to an email address that your team actively monitors, so recipient replies are seen and responded to promptly.

    Verify your domain first — Before entering a sender email address, ensure the domain is verified under Account settings → Domains. An unverified domain will prevent you from sending the campaign.

    Match sender identity to your brand — Set the From name to a recognizable name such as your company or brand name, so recipients can quickly identify who the email is from.

    Keep the sender address consistent — Using the same Sender’s email address across campaigns helps build sender reputation and reduces the likelihood of your emails being marked as spam.

    Use a professional email address — Avoid free email providers (e.g., Gmail, Yahoo) for the Sender’s email address. Use an address on your own verified domain for better deliverability and trust.

    Common Issues

    Replies are going to the wrong address → The reply-to address is determined by the Sender’s email address field. Open the campaign’s Settings stage and update the Sender’s email address to the correct address where you want replies delivered.

    Cannot enter a sender email address → The domain portion of the email address must be verified. Go to Account settings → Domains and verify the domain before using it in the Sender’s email address field.

    Sender’s email address field shows an unfamiliar address → The field is pre-filled with your account default. Click the field and replace it with the correct email address for this specific campaign.

    Recipients see the wrong sender name → The inbox display name is controlled by the From name field, not the Sender’s email address field. Update the From name field in the Sender details section to change the name recipients see.

    FAQs

    Can I set a reply-to address that is different from the sender’s email address? In Sender, the Sender’s email address field serves as both the sending address and the reply-to address. There is no separate reply-to address field. To direct replies to a specific inbox, enter that email address in the Sender’s email address field during the Settings stage of campaign creation.

    Where do replies go when a subscriber responds to my campaign? Replies are delivered to the email address entered in the Sender’s email address field under the Sender details section of the Campaign settings page.

    Can I change the reply-to address after creating the campaign? Yes. Open the campaign from the Email campaigns list, navigate to the Settings stage, and update the Sender’s email address field. Save the changes by clicking Save and continue. Changes can be made at any time before the campaign is sent.

    Does the Sender’s email address need to be on a verified domain? Yes. The email address must use a domain that has been verified under Account settings → Domains. An unverified domain will prevent you from sending the campaign.

    What is the difference between From name and Sender’s email address? The From name is the display name recipients see in their inbox (e.g., “Acme Store”). The Sender’s email address is the actual email address used for sending and receiving replies (e.g., “[email protected]“). Both are configured in the Sender details section of the Settings stage.

  • Choosing campaign types

    This guide shows how to choose a campaign type for your email campaign in Sender. It walks through the initial setup and configuration process, so you can select the right design approach before building your email.


    Where to Find This Feature

    In the Sender dashboard, go to: Email campaigns → New campaign

    new-campaign

    Steps to Choose a Campaign Type

    Step 1 — Configure Campaign Settings

    After clicking New campaign, the Campaign settings page opens. Enter your Email subject and optionally add Email Preview text. You can click Set custom campaign name to give the campaign an internal name. Under Sender details, confirm or update the From name and Sender’s email address. Toggle

    campaign-settings

    Auto resend if you want to automatically resend to subscribers who did not open. Click Save and continue to proceed.

    Step 2 — Select a Campaign Type

    The Design your email page presents three campaign type tabs at the top:

    • Drag and drop builder — Select a premade template or a Blank template from the template library. Filter templates by category using the sidebar: All templates, Branded templates, My templates, Themed templates, or B2B templates. You can also search by name. After selecting a template, click Start creating to open the visual editor.
    • Plain text email — Opens a rich text editor where you type your content directly. Use the right-side panel to adjust Text settings, Heading settings, and Preview & Unsubscribe language. Formatting options like headers, images, and lists are available inline.
    • Custom HTML email — Opens a code editor where you write or paste your own HTML. The editor includes syntax highlighting and line numbers. A rendered preview of your HTML appears on the right side.
    campaign-types

    Click your preferred tab, configure the design, then click Save and continue or Save & continue.

    Step 3 — Choose Recipients

    The Recipients page displays your subscriber groups and segments. Select All active subscribers or check individual groups and segments from the list. Use Find by name to search, or click Sort to reorder.

    campaign-recipients

    To exclude specific audiences, click Exclude groups/segments at the bottom. The Selected recipients count updates as you make selections. Click Save and continue to proceed.

    Step 4 — Review and Send

    The Review and schedule page summarizes your campaign. It shows Tips & Suggestions for any issues to resolve, your Settings (subject, sender details), and Recipients (selected groups with subscriber counts).

    campaign-review-send

    A design preview appears on the right with options to Preview, View plain text version, or Send test email. Click Edit on any section to make changes. When ready, click Send now to send immediately or Schedule to set a future send time.


    What Happens After You Save

    After saving at any stage, the campaign appears in the Email campaigns list with a status of DRAFT. You can return to editing by clicking the pencil icon in the Actions column. Once sent, the status changes to SENT and performance stats (delivered, opened, clicks) become available directly in the campaign list.


    Common Issues

    “Start creating” button is grayed out — No template is selected. Click a template thumbnail from the library before proceeding.

    Cannot switch campaign types after designing — Click Start from scratch on the Email campaign design page. This resets your current design and returns you to the type selection screen. A confirmation dialog warns that all existing design and copy will be lost.

    Preview text not showing in inbox preview — The Email Preview text field on the Settings page is optional but recommended. Return to Settings and add it, or click Resolve on the Review page.


    FAQs

    Can I change the campaign type after I start designing?

    Yes. On the Email campaign design page, click Start from scratch. Confirm the reset, and you’ll return to the type selection screen. Your previous design will be removed.

    What is the difference between the three campaign types?

    Drag and drop builder uses a visual editor with pre-built blocks and templates. Plain text email provides a rich text editor for simple content. Custom HTML email lets you write or paste raw HTML code.

    Can I preview my email before sending?

    Yes. Each editor includes a Send test email button. On the Review and schedule page, you can also click Preview or View plain text version.

    Do I have to pick recipients before reviewing?

    Yes. The workflow requires completing Settings, Design, and Recipients before reaching Review and send.

  • Creating a Newsletter Campaign

    This guide explains how to create a professional newsletter campaign in Sender using the drag and drop email builder feature. It shows where to find it, how the setup process works, and what happens after saving.

    Learn more: https://www.sender.net/free-newsletter-creator/

    Where to Find This Feature

    In the Sender dashboard, go to:

    drag-and-drop-builder

    Email campaigns → New campaign → Settings → Design → Select Drag and drop builder

    drag-and-drop-builder

    Steps to Create a Newsletter Campaign

    Step 1 — Configure Basic Campaign Settings

    Start by entering your Email subject line, which will appear in your subscribers’ inboxes. Add optional Email Preview text below the subject to give a sneak peek of your email content. Fill in the Sender details section with your From name and confirmed Sender’s email address.

    campaign-settings

    You can also enable Auto resend to automatically retry delivery to unopened emails. Once complete, click Save and continue to move to the design phase.

    Step 2 — Choose Your Design Method

    On the Design page, select the Drag and drop builder tab to access the visual email builder. Browse the template library organized by category (All templates, Branded templates, Themed templates, etc.) or choose a Blank template to start from scratch.

    drag-and-drop-email-templates

    Click on your preferred template to preview it, then click Start creating to open the editor.

    Step 3 — Design Your Email Content

    In the drag and drop builder, use the left sidebar tools to add and customize content blocks. You can add text sections, images, buttons, dividers, and other elements by dragging them into your email canvas.

    template-builder-blocks

    Edit existing template content by clicking on blocks and modifying text, colors, fonts, and alignment. Preview your changes in real time. The builder automatically saves your work as indicated by the Changes saved indicator. When satisfied with your design, click Save & continue.

    Step 4 — Select Your Recipients

    On the Recipients page, review the Selected recipients counter at the top. Choose your audience by checking boxes for All active subscribers, specific Groups/segments (like “New subscribers” or “Engaged subscribers”), or create custom audience filters.

    campaign-recipients

    The count updates automatically to show how many subscribers will receive the campaign. You can also use Exclude groups/segments to remove certain subscribers from your send. Once your audience is selected, click Save and continue.

    Step 5 — Review and Send

    On the final Review and schedule page, check Tips & Suggestions for recommendations on improving your campaign, such as fixing placeholder links or adding preview text. Review your email settings, sender details, and recipient count in the collapsible sections.

    campaign-review-send

    Click Preview to see how your email renders, or Send test email to verify it reaches your inbox correctly. Choose Send now to deliver immediately or Schedule to set a specific send time.

    What Happens After You Save

    After saving your campaign, it appears in your Email campaigns list with a status of DRAFT. You can continue editing by clicking the pencil icon, or proceed through the workflow steps using the progress indicators at the top. Performance data including delivery, opens, and clicks becomes available in the campaign’s Stats section after the campaign is sent.

    Common Issues

    “Email subject is required” → The Email subject field must have content. Go back to Settings and add a subject line, then save again.

    “No recipients selected” → You must select at least one audience group or segment. Check the boxes next to your target groups on the Recipients page.

    “Placeholder links in campaign” → The builder warns you about unresolved links. Go back to Design and replace placeholder URLs with real destination links.

    Email not previewing correctly → Click “View it in your browser” to check rendering in different email clients. Test across devices before sending.

    FAQs

    Can I use my own HTML code instead of the drag and drop builder? Yes. On the Design page, select the Custom HTML email tab to paste or write your own code. You can also select Plain text email for text-only campaigns.

    How do I save my design as a template for future use? In the drag and drop builder, look for options to save your current design. Custom templates appear under “My templates” in the template library for quick reuse.

    Can I schedule a campaign to send at a specific time? Yes. On the final Review and schedule page, click Schedule instead of Send now to choose your preferred send date and time.

    What happens if I click “I’ll finish later” during setup? Your campaign saves as a draft and returns to your Email campaigns list. You can resume editing anytime by clicking the campaign name or the pencil icon.

    Can I send a test email before the official send? Yes. On the Review and schedule page, click Send test email to verify how your newsletter looks in your inbox before sending to all recipients.

  • First Email Campaign

    This guide walks you through creating and sending your first email campaign in Sender. An email campaign is a single email you send to a group of subscribers — like a newsletter, announcement, or promotion. By the end of this guide, you will have built an email, chosen your recipients, and either sent or scheduled your first campaign.

    What You’ll Need

    • A Sender account (sign up at sender.net if you have not created one yet)
    • At least one subscriber added to your account (see the Help Center article on adding subscribers if you have not done this yet)
    • Your email content ready — the subject line, body text, and any images you want to include

    Steps to Create and Send Your First Email Campaign

    Step 1 — Start a New Campaign

    Log in to your Sender account. You will land on the Dashboard, your home screen. In the left sidebar, click Email campaigns. This opens a page listing all your campaigns.

    Click the New campaign button in the top-right corner. Sender will take you to the Campaign settings page — the first step of the campaign creation workflow. You will see a progress bar at the top showing all four stages: Settings, Design, Recipients, and Review and send.

    Step 2 — Configure Your Campaign Settings

    On the Campaign settings page, fill in the following fields under Campaign details:

    Email subject — Type the subject line your subscribers will see in their inbox. Keep it short and clear.

    Email Preview text — Type a short summary that appears next to the subject line in most email clients. This is optional but recommended. You can see how your subject line and preview text will appear in the Inbox preview panel on the right.

    Under Sender details, your From name and Sender’s email address are pre-filled from your account settings. Update them here if needed. When you are ready, click Save and continue at the top right.

    Step 3 — Choose a Design Method and Template

    On the Design your email page, choose how you want to build your email. There are three options at the top:

    Drag and drop builder — A visual editor where you add content blocks without writing code. This is the best option for beginners.

    Plain text email — A simple text-only email with no images or formatting.

    Custom HTML email — For users who want to paste or write their own HTML code.

    If you selected Drag and drop builder, you will see a template gallery below. Browse categories like All templates, Branded templates, Themed templates, or B2B templates to find a starting point, or select Blank template to start from scratch. Click a template to select it, then click Start creating in the top-right corner.

    Step 4 — Build Your Email Content

    You are now in the email editor. The main canvas in the center is where your email takes shape. Use the left sidebar to add content:

    Click the Building blocks icon (the grid icon) in the sidebar to see the available content blocks: Headline, Paragraph, Image, Button, Separator, Logo, Video, Social, Product, Menu, and Custom HTML. Drag a block from the sidebar onto the canvas, or click the + icon on the canvas to add a block.

    Click any block on the canvas to select it and edit its content or settings. To preview your email on desktop and mobile, click the eye icon in the top toolbar. When your design is ready, click Save & continue in the top-right corner.

    Step 5 — Choose Your Recipients

    On the Recipients page, you decide who receives your campaign. At the top, you will see Selected recipients with a count of zero.

    To send to everyone in your account, check the box next to All active subscribers. To send to a specific group or segment, find it in the Send to these groups/segments list below and check the box next to it. You can also click Exclude groups/segments at the bottom to prevent certain contacts from receiving the campaign.

    Once you have selected at least one audience, the Save and continue button in the top-right corner becomes active. Click it to proceed.

    Step 6 — Review Your Campaign

    On the Review and schedule page, Sender displays a summary of your campaign. The left side shows two cards:

    Settings — Displays your email subject, preview text, sender name, and sender email address. Click Edit to go back and make changes.

    Recipients — Shows the total number of subscribers who will receive the campaign. Click Edit to change your audience.

    On the right side, you can see a visual preview of your email. Use the Preview, View plain text version, and Send test email tabs to check your email before sending. Sending a test email to yourself is a good way to catch any issues.

    Step 7 — Send or Schedule Your Campaign

    When you are satisfied with everything, you have two options at the top right and bottom of the page:

    Send now — Delivers the campaign to your selected recipients immediately.

    Schedule — Opens a calendar where you pick a future date and time for the campaign to be sent automatically.

    If you are not ready yet, click I’ll finish later to save the campaign as a draft. You can return to it anytime from the Email campaigns page.

    What You’ve Accomplished

    You have created and sent (or scheduled) your first email campaign in Sender. Your email is on its way to your subscribers. You have also learned how to navigate the campaign creation workflow, design an email using the drag-and-drop editor, select your audience, and review your campaign before sending.

    What to Do Next

    Check your campaign results — After your campaign is sent, go to Email campaigns in the left sidebar and click on your campaign to view its performance report, including delivery, open, and click rates. See the Help Center article on campaign reports for details.

    Add more subscribers — Go to Subscribers in the left sidebar to add contacts manually, import a CSV or XLS file, or connect a signup form. The more subscribers you have, the greater your campaign’s reach. See the Help Center article on importing subscribers.

    Create a signup form — Click Forms in the left sidebar to build a form you can embed on your website to collect new subscribers automatically. See the Help Center article on creating signup forms.

    Set up an automation — Click Automations in the left sidebar to create automated email sequences, such as a welcome email that sends when someone subscribes. See the Help Center article on getting started with automations.

    Verify your sending domain — Go to Account settingsDomains to add and verify your domain. This improves email deliverability — the likelihood that your emails land in your subscribers’ inboxes rather than their spam folders. See the Help Center article on domain verification for step-by-step instructions.

    Common Issues

    The Save and continue button is grayed out → This happens when a required field is empty. Make sure you have filled in the Email subject on the Settings page, or selected at least one recipient on the Recipients page. Complete the required fields and the button will become active.

    I do not see any subscribers on the Recipients page → You have not added any contacts to your Sender account yet. Go to Subscribers in the left sidebar and add at least one subscriber manually or import a list before creating your campaign.

    My email looks different from the preview → Email clients (like Gmail, Outlook, or Apple Mail) render emails differently. Use the Send test email option on the Review and schedule page to send a test to your own inbox and check how it looks in your email client before sending to your full list.

    I cannot find my saved draft → All saved drafts appear on the Email campaigns page with a DRAFT label. Click Email campaigns in the left sidebar and look for your campaign in the list. Use the search bar at the top to find it by name.

    My campaign was sent but subscribers say they did not receive it → Emails may land in spam or junk folders, especially if your sending domain is not verified. Ask subscribers to check those folders. For long-term deliverability, verify your domain in Account settingsDomains. See the Help Center article on domain verification.

    FAQs

    Can I edit a campaign after sending it? No. Once a campaign is sent, it cannot be changed. You can duplicate the campaign from the Email campaigns page and make edits to the copy if you want to send a revised version.

    Can I send a campaign to a specific group of subscribers? Yes. On the Recipients step, instead of selecting All active subscribers, check the box next to a specific group or segment in the list. You can select multiple groups or segments, and you can also exclude certain ones.

    What is the difference between Send now and Schedule? Send now delivers your campaign immediately. Schedule lets you pick a future date and time so Sender sends the campaign automatically at that time. Scheduling is useful if you want to reach subscribers during a specific time window.

    Can I send a test email before sending the campaign to everyone? Yes. On the Review and schedule page (the final step), click the Send test email tab above the email preview. You can enter your own email address to receive a test copy and check how the email looks in your inbox.

    What happens if I click I’ll finish later? Your campaign is saved as a draft. You can find it on the Email campaigns page with a DRAFT label. Click the edit icon next to it to pick up where you left off. Nothing is sent until you click Send now or Schedule.

    Is Sender free to use? Sender offers a free plan that includes a generous subscriber and email send limit. You can upgrade to a paid plan at any time from Account settingsBilling if you need higher limits or additional features.

  • Default custom fields list

    Default custom fields allow you to set a fallback value for specific fields in your campaigns, ensuring your messages always feel complete and personalized—even when data is missing.

    For example, if you’re using a custom field like “Favorite Product” but don’t have that information for some subscribers, you can set a default value like “Our Bestsellers” to maintain a smooth and engaging message flow. 

    This feature helps you deliver consistent, polished communication effortlessly!

    To set up these default values for your customer fields follow these steps:

    Head to “Subscribers” and select “Fields”.

    You will notice an arrow that opens a drop-down bar next to the custom fields. These are the custom fields that can have a default value.

    To add the default custom field value, click on the arrow next to the intended field and select “Set default value”.

    Type in the value you like and make sure to update the changes.

    This value will now appear in the email or SMS campaign if the “Organization” custom field is included, but no information is available under a particular subscriber.

    If you are unsure how to include a custom field in a campaign, click here to learn.

    That’s it!

    If you got stuck on a specific task or can’t find a way to execute a particular job, contact our support team via LiveChat or [email protected] – we’re here to help 24/7.

  • Send custom HTML emails

    When you are creating an email campaign, you have an option to create a custom HTML one. Once you fill out the campaign details, you can choose between Drag and drop builder, Plain text email and Custom HTML email.

    When the HTML editor loads, the code of your HTML-coded newsletters will need to be entered here. The HTML newsletters can be imported via URL link – to do that, click on the button import icon “Import from URL” at the top and enter the URL. 

    It is crucial to maintain the standard HTML structure. Otherwise, after sending the campaign, the report will show 0s in the report. This structure must be followed:


    If you got stuck on a specific task or can’t find a way to execute a particular job, contact our support team via LiveChat or [email protected] – we’re here to help 24/7.

  • Send plain-text emails

    Yes, go ahead and click “Email campaigns” and then the “New Campaign” button.

    In the first step of campaign creation, you have the option to choose campaign design – fill in the details then click on the “Plain text” icon and “Save and continue” button.

    Then create the campaign of your liking.

    Once you’re done with the campaign, click the “Save and continue” button at the top right.

    That’s it!

    If you got stuck on a specific task or can’t find a way to execute a particular job, contact our support team via LiveChat or [email protected] – we’re here to help 24/7.

  • Find email templates

    You can find email templates in the campaign section. There is a variety of email templates in the second step of creating a campaign using Drag&Drop editor:

    All the templates are free to use. Please note that new and updated templates are occasionally added to the selection.

    That’s it!

    If you got stuck on a specific task or can’t find a way to execute a particular job, contact our support team via LiveChat or [email protected] – we’re here to help 24/7.