Author: admin

  • Create dynamic segments

    Dynamic segmentation allows you to create highly tailored subscriber segments based on specific user actions, such as placing orders, clicking links, or opening campaigns.

    By applying precise conditions and timeframes, you can filter your audience dynamically, ensuring your campaigns are targeted and engaging.

    This powerful feature helps you deliver the right message to the right people at the right time, maximizing the impact of your marketing efforts.

    How segments are different from groups

    While groups are static and require manual updates to reflect any changes, segments are dynamic and automatically update over time. As new subscribers meet the defined conditions or perform specific actions outlined in the segment setup, they are automatically added to the segment.

    Segments can include multiple conditions or alternative criteria, allowing for limitless configurations to precisely filter the subscribers you need.

    Please note that when sending a scheduled campaign to a dynamic segment, the campaign will be sent to the subscribers who match the segment’s criteria on the day it is sent, not the list as it existed when the segment was originally created.

    You can create segments based on these settings:

    Subscription status

    You can filter out the subscribers that have specific status for one or multiple channels.

    You can choose between:

    • Active
    • Bounced
    • Unsubscribed
    • Reported Spam
    • Non-subscribed

    Saving a segment with subscribers having a specific status can help you quickly move them to another group, export or delete them from your list. As the segment is dynamic, it will renew every time a new subscriber abides by the set conditions.

    Subscriber details

    You can also filter out subscribers by their main details, such as their contact details (email address and phone number), the groups they belong and whether they are from EU/UK or not.

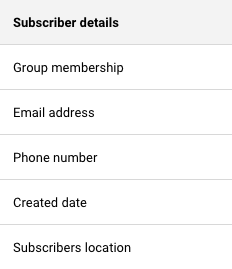
    • Emails and phone numbers can be filtered out on whether they begin, include, end, or do not include specific characters.
    • Group membership and subscriber location can be filtered on the bases that the subscriber belongs or does not belong to specific group or to EU/UK area.
    • Created date allows you to filter the subscribers out by specific periods after, before or in between particular dates.
    • You can filter out subscribers that have or have not provided their phone number too.

    Campaign activity

    Campaign activity refers to the email campaign activity of your subscribers.

    This section allows you to filter out your most engaged and least interested subscribers to make your email campaigns more targeted and bring you better results.

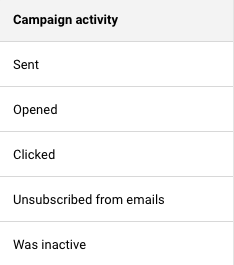
    • You can filter out subscribers that were sent a specific campaign or any campaign in a particular time period.
    • This allows you to filter subscribers that opened or clicked a specific number of times in a specific number of hours, days, or months.
    • Inactive subscribers in this case mean those that have not opened an email/transactional email campaign and have not clicked any of the included links for the set period of time.

    SMS campaign activity

    These settings allow you to filter out subscribers according to their activity within the SMS campaigns.

    • You can segment subscribers according to the number of times you have sent them SMS in a set period of time.
    • Link clicks in the SMS can also be chosen to filter out the most engaged subscribers in a set number of hours, days or months.

    Ecommerce metrics

    If you have an active integration with one of our supported e-commerce stores, this section allows you to filter out subscribers according to their activity within your online store.

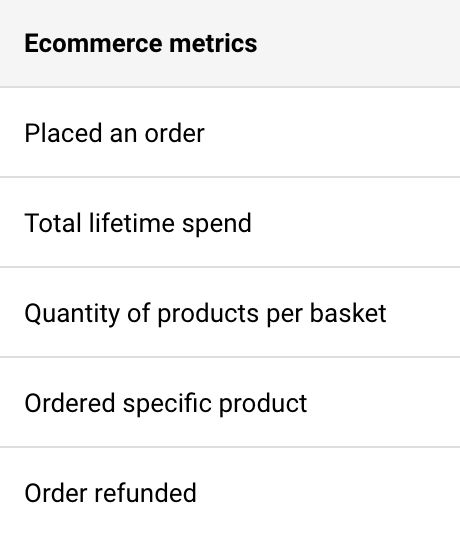
    • You can filter out whether a subscriber has ever placed an order with you and if so, you can specify the time period and the number of orders.
    • This also allows you to filter out the number of purchased products per basket and the total spend of subscribers.
    • You can filter subscribers by specifying a product they have purchased.
    • Subscribers can also be segmented by the period of time when their order was refunded.

    Abandoned cart

    This set of settings also requires an integration with supported e-commerce stores.

    • You can filter out the specific period that checkout has started.
    • You can also segment the specific subscribers that returned to their cart through the abandoned email campaign that has been sent.
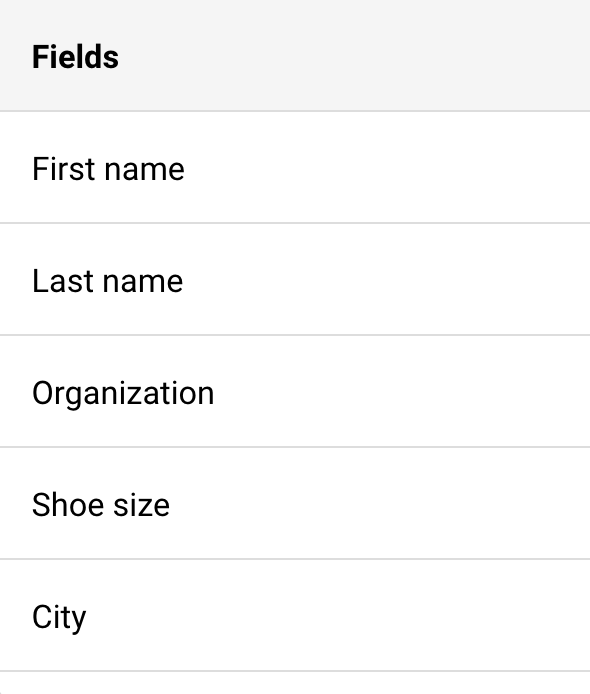
    Custom fields

    Each user’s set of settings will differ in this section, as custom fields can be created.

    Custom field settings will differ according to the type of custom field that is created: text, number, or date.

    • Text type custom fields can be filtered by whether the information begins, ends, includes, or does not include specific characters. You can also filter out whether any data is provided in the field.
    • Number type custom fields can be filtered by whether the number is equal to, does not equal to, is less/more than, or between a specified number.
    • Date type custom fields can be filtered out by whether this date is before/after/on a specified date or between certain dates.

    That’s it!

    If you got stuck on a specific task or can’t find a way to execute a particular job, contact our support team via LiveChat or [email protected] – we’re here to help 24/7.

  • Trigger popup from button

    It’s possible to embed your created popup form into a website by adding an ID to the element you want to use as a trigger.

    Below, you find a generic explanation of how to do this; remember that each website builder usually has instructions on how to do this.

    1. Add an ID to the button you’ll use to trigger this action.
    Button Pop up

    2. Add the ID text created into the “Element Selector” in the popup form. 

    Button Popup form

    Remember to save your changes after each step in your website and form settings.

    Make sure the form is published successfully.

    If you are using WordPress, ensure you have a CSS Tag added to the element that should trigger the form and add that to the element selector. 

    Review this external blog for information on “How to Find a CSS Class or ID Selector in WordPress.” 


    If you got stuck on a specific task or can’t find a way to execute a particular job, contact our support team via LiveChat or [email protected] – we’re here to help 24/7.

  • Popupsmart Integration via Zapier

    Popupsmart is a user-friendly, no-code pop-up builder that allows businesses to create targeted and customizable pop-ups to enhance website engagement, increase conversions, and collect customer data. It provides a range of pop-up templates, customization options, and advanced targeting tools. 

    When integrated with platforms like Sender, an email marketing and automation tool, the synergy between the two enhances user engagement, lead collection, and nurturing efforts.

    Follow these steps to connect Popupsmart and Sender:

    Log in to your Popupsmart account and create a popup campaign. Make sure to include an email address field, as that is needed to later import the subscriber into Sender.

    Once the pop-up campaign is created, add it to your website and activate it.

    Now head to your Zapier account and create a new Zap.

    Name your Zap and for the trigger search for “Popupsmart” and choose it from the list.

    Once you choose the trigger app, choose the trigger event to be “New Popup Form Data” and connect your Popupsmart account to Zapier.

    In the next step, choose the pop-up that you created for this connection.

    For the action step, search for Sender in apps and select it.

    Set up the action event to be “Add/update subscriber” and connect your Sender account to Zapier.

    Ensure that the custom field from the Popupsmart email source is selected for email transfers to Sender; only then can a subscriber be created or updated in your Sender account.

    Select the group(s) where new subscribers should be added. Then, choose any additional fields you’d like to transfer to Sender along with their information.

    Don’t forget to publish your Zap once you finish the setup!


    If you got stuck on a specific task or can’t find a way to execute a particular job, contact our support team via LiveChat or [email protected] – we’re here to help 24/7.

  • Ottokit Integration

    Ottokit integrates seamlessly with Sender, allowing you to connect many apps that don’t have direct integration with Sender otherwise.

    With Ottokit, you can automate email campaigns in Sender by seamlessly syncing subscriber data from other apps whenever users take actions like signing up, making purchases, or filling out forms. This event-driven automation allows for efficient workflows, triggering tasks like sending targeted emails or updating campaigns.

    How to integrate Ottokit with Sender

    • Create an account on Ottokit or log into an existing one.
    • Once logged in, go to your dashboard and create a new workflow. You’ll be prompted to select a trigger, which is the action that starts the automation (e.g., new signup, form submission, or purchase). This would be the app that you choose to connect with Sender.
    • Once you setup the trigger, add next step in the workflow editor and search for “Sender” under available apps.
    • Select “Sender” as the action and follow the prompts to authorize your Sender account. You’ll need to provide your Sender API key, which you can find in your Sender account’s API settings. Follow this link to learn how to create an API token.
    • After connecting Sender, configure what you want Ottokit to do with the data. For example, add a new subscriber to a specific email list or trigger a particular email campaign.
    • Before finalizing, test the workflow to ensure everything is connected properly. Ottokit offers a test feature to simulate the trigger and check if the actions in Sender work as expected.
    • Once everything looks good, activate the workflow.

    Now, whenever the specified event occurs in your connected apps, Ottokit will automatically sync the data or trigger the relevant actions in Sender.


    If you got stuck on a specific task or can’t find a way to execute a particular job, contact our support team via LiveChat or [email protected] – we’re here to help 24/7.

  • Create custom campaign links

    Custom link feature allows you to send campaigns with links tailored to your subdomain. This approach not only enhances the likelihood of your subscribers clicking on them but also gives you full control over the links’ reputation.

    By taking care of the reputation of your own links, you can prevent them from being flagged as phishing or spam, increasing the chances that your subscribers will be more engaging.

    Setting up custom links is simple. Go to your Settings -> Domains and click “Set up” next to Custom links.

    You’ll be prompted to enter the subdomain name that will be used for email link tracking.

    Ensure that the subdomain you choose isn’t currently in use and is dedicated solely as a custom domain for your emails sent through Sender.net.

    After entering the subdomain name, go to your domain’s DNS panel and create a CNAME record with the values provided.

    This will change how your links look to your subscribers, making them match your domain and appear more trustworthy.

    Finally, remember to follow best email marketing practices to maintain great reputation of your domain and subdomains as well as your overall campaign deliverability.

    That’s it!

    If you got stuck on a specific task or can’t find a way to execute a particular job, contact our support team via LiveChat or [email protected] – we’re here to help 24/7.

  • Use automation blocks

    We have added four new blocks to our Automation Email Campaign Drag & Drop Builder to help you create effective eCommerce campaigns. These additions will streamline the process of building and customizing your eCommerce email campaigns.

    These automation blocks include:

    Note: these blocks are available only in Automation email campaign Drag&Drop builder.

    Abandoned cart block

    This block in the email campaign helps recover lost sales by re-engaging customers who left items in their shopping carts. 

    It includes the abandoned product image and description, price and discount as well as a button to go back to the checkout page to encourage customers to complete their purchases.

    Once the block is dragged into the template, you will see a sample preview of abandoned cart block, it’s content will be replaced with actual product from the cart. Nevertheless, the block itself is highly customizable to fit your template and brand.

    You can edit:

    • Image layout and size
    • Product title and description
    • Price
    • Checkout button
    • Block’s overall appearance

    Order details block

    The Order details block provides a comprehensive overview of a customer’s purchase and its details.

    This block enhances customer experience by offering a clear and detailed summary of their transaction.

    Once the block is dragged into the template, a sample preview of the order details will appear. When the campaign is sent after an automation is triggered by an actual purchase, this content will be replaced with the customer’s order details. 

    The block is customizable to better fit your overall campaign.

    You can edit:

    • Summary header
    • Product title and body
    • Price and currency
    • Summary footer
    • Block’s overall appearance

    Order total block

    The Order total block provides customers with a summary of their purchase.

    If discounts or other elements are not part of the order, those sections will not be added to the Order total block automatically.

    After dragging the block into the template, you’ll see a sample preview of the order total. When the campaign is sent due to an actual purchase triggered by automation, this sample will be replaced with the real order data. 

    The block is highly editable to fit your specific needs.

    You can edit:

    • Title
    • Body and its labels
    • Price and currency
    • Footer
    • Block’s overall appearance

    Billing & Shipping block

    The Shipping & Billing block in our email campaign builder provides key information about the delivery timeline and addresses.

    Once you add the block to your template, a preview of the shipping and billing details will be displayed. When the campaign is triggered by an actual purchase, this preview will update with the accurate shipping method, billing address, and shipping address. 

    The block is fully customizable to suit your requirements.

    You can edit:

    • Title
    • Shipping method settings
    • Address settings
    • Block’s overall appearance

    If you got stuck on a specific task or can’t find a way to execute a particular job, contact our support team via LiveChat or [email protected] – we’re here to help 24/7.

  • Outgrow Integration via Zapier

    Outgrow is a tool that enables users to create interactive content such as calculators, quizzes, assessments, recommendations, polls, chatbots, and surveys without requiring any coding skills. This platform is particularly beneficial for businesses and marketers aiming to engage their audience, generate leads, and optimize conversions.

    Integrating Outgrow with the Sender enhances lead nurturing. When leads are captured through Outgrow’s interactive content, they can be automatically transferred into Sender. This transition ensures that leads receive immediate and personalized follow-up via email.

    The data collected from Outgrow’s quizzes, surveys, and assessments can be utilized in Sender to segment the audience based on specific characteristics and preferences. This segmentation allows marketers to tailor their email messages, making them more relevant and engaging to each recipient.

    To connect Outgrow and Sender via Zapier, follow the tutorial below:

    Creating an automated workflow in Sender that gets triggered once a lead comes in from Outgrow content nurtures leads efficiently. This automation reduces manual work and enhances marketing effectiveness. Real-time analytics allow for performance monitoring and strategy optimization. By connecting Outgrow with Sender, you can improve user engagement and conversion rates through personalized communication.

    Follow the tutorial below to create an automation workflow for newly captured leads:

    Once a customer completes a form or survey on Outgrow, they will be added to the selected group in Sender. This action triggers the automation and sends them an email campaign.

    That’s it!

    If you got stuck on a specific task or can’t find a way to execute a particular job, contact our support team via LiveChat or [email protected] – we’re here to help 24/7.

  • Improve SMS deliverability

    To maintain good SMS deliverability, focus on the message content, how you send your messages, and how you handle any delivery issues.

    While some delivery failures are beyond your control, there are several steps you can take to maximize success:

    Make sure your customers are opt-in

    Start that by making it simple for customers to opt in to receive messages from your business. Your business cannot contact individuals via text until they give written consent. 

    Obtain this consent by collecting your subscribers’ phone numbers via a subscription form. Click here to learn more about subscription forms. Add this form on your website and share it in social media posts, and email campaigns, if they are already subscribed to your email content.

    The first text you send should be an opt-in message (also known as a call-to-action message) reminding customers that they have consented to receive communications from your organization. This initial message should clearly state:

    • Your organization’s name and purpose
    • How often customers will receive texts
    • Opt-out instructions

    Once customers have opted in, you’ve set the stage for effective customer service communications. Customers will understand why you’re contacting them and what types of communications to expect in the future.

    Send timely, relevant, and concise messages

    • Craft your messages carefully to avoid appearing as spam. Use clear language, proper capitalization, and punctuation. While texting can be informal, using proper grammar and punctuation ensures your messages are clear and professional.


    • Ensure your messages are relevant and timely. Send messages that align with the customer’s current situation and deliver them at times when customers are likely to read and respond. For instance, check in with a customer a few hours after they’ve interacted with tech support to confirm their issue is resolved or send a reminder the morning before an appointment.

    NOTE: According to the TCPA, businesses cannot text customers before 8:00 AM or after 9:00 PM local time. Adhering to this timeframe avoids complaints and fines and increases the likelihood that customers will see and respond to your messages.

    • Craft your messages to be short and to the point. Since SMS messages are limited to 160 characters, longer messages will be split into multiple texts, potentially increasing your costs. Concise messages are more likely to be read and acted upon, so avoid unnecessary words or technical jargon.


    Include clear opt-out instructions

    There are two ways to give your subscribers a chance to opt out of your SMS content:

    • You can include instructions on how to unsubscribe via SMS. Add “Reply STOP to unsubscribe” at the end of your SMS campaigns.

    • You can also add an unsubscribe link to make this process easier for your recipients. This will allow to quickly unsubscribe from your content and prevent any possible spam reports from them. Simply swich the toggle to “Add Opt – Out instructions” in the SMS campaign Settings tab:

    Track message status and reach out for immediate support

    Keep track of SMS message status codes in the SMS campaign reports. If you notice that your SMS campaign has multiple failed deliveries, please check the failed delivery error meaning and get in touch with support for further help at [email protected] or via LiveChat.

    By following these practices, you can ensure higher SMS delivery rates. High-quality content combined with effective issue-handling will maximize your deliverability.


    If you are stuck on a specific task or can’t find a way to execute a particular job, contact our support team via LiveChat or [email protected] – we’re here to help 24/7.

  • PageFly Integration

    PageFly is a tool for Shopify store owners that lets you design custom pages with a simple drag-and-drop system. You don’t need any coding skills, so creating unique layouts and landing pages is a breeze. When you connect PageFly with Sender, you can easily add a form to collect subscribers and create email campaigns that match your store’s look and feel. This helps create a consistent brand experience for your customers and can boost engagement with your emails.

    Follow the step-by-step tutorial to connect your Sender and PageFly accounts, and seamlessly add your Sender form to your PageFly pages.

    If you do not have a form yet, do not worry; follow this tutorial on how to create one.


    If you are stuck on a specific task or can’t find a way to execute a particular job, contact our support team via LiveChat or [email protected] – we’re here to help 24/7.

  • Forms.app Integration via Zapier

    Use forms.app to create any online forms, e.g., feedback forms. Such forms act as digital questionnaires that businesses use to collect customer feedback and help understand customer experiences, identify areas for improvement, and ultimately improve customer satisfaction.

    To make sure that the customers are more inclined to leave a feedback, inform them about a discount code provided at the end of the process, which can be setup to be sent automatically via email using Sender’s automation workflow. The instructions for that will be given at the end of the post.

    To start, make sure to have or create a forms.app account. Once you have that, head to your forms.app account and follow this tutorial:

    To provide the discount code via an automated email campaign at the end of filling out the feedback form, let’s create an automation workflow at Sender.

    Now, once a customer fills out the feedback form, they will be put into the selected group, which triggers the automation in Sender and sends them an email with a discount code as a sign of gratitude.


    If you got stuck on a specific task or can’t find a way to execute a particular job, contact our support team via LiveChat or [email protected] – we’re here to help 24/7.