That’s it!
If you got stuck on a specific task or can’t find a way to execute a particular job, contact our support team via LiveChat or [email protected] – we’re here to help 24/7.
That’s it!
If you got stuck on a specific task or can’t find a way to execute a particular job, contact our support team via LiveChat or [email protected] – we’re here to help 24/7.
That’s it!
If you got stuck on a specific task or can’t find a way to execute a particular job, contact our support team via LiveChat or [email protected] – we’re here to help 24/7.
If you got stuck on a specific task or can’t find a way to execute a particular job, contact our support team via LiveChat or [email protected] – we’re here to help 24/7.
If you got stuck on a specific task or can’t find a way to execute a particular job, contact our support team via LiveChat or [email protected] – we’re here to help 24/7.
That’s it!
If you got stuck on a specific task or can’t find a way to execute a particular job, contact our support team via LiveChat or [email protected] – we’re here to help 24/7.
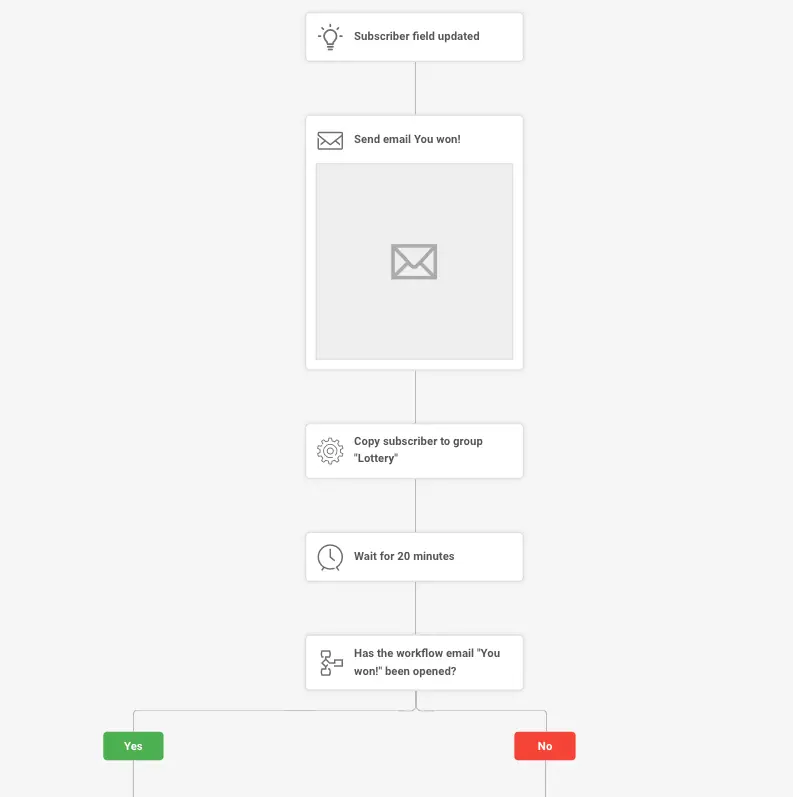
First of all, make sure you already have a Spin to Win form before creating an associated automation workflow.
This automation enables you to effortlessly streamline the distribution of coupon codes to your subscribers who have successfully engaged with the Spin to Win form and secured a winning slice.
The following tutorial provides a straightforward guide for implementing the most basic setup for sending out these winning coupons.
Feel free to enhance the automation by adding extra steps. For instance, you might want to check whether the customer has opened the initial email containing the coupon. If not, consider setting up an automated process to resend the coupon for their convenience.
Additionally, you can include an action that categorizes or assigns the subscriber to a specific group once they’ve successfully secured a coupon code.
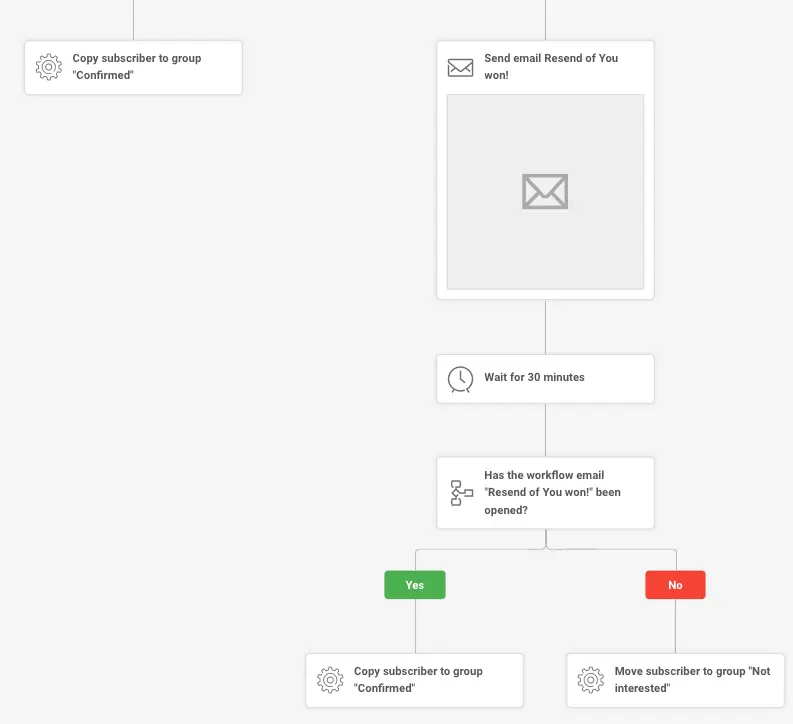
Here’s an illustration of a more intricate and detailed automation workflow:
Based on whether a subscriber opens your email with the winner’s information, you can automatically nudge those who missed it with a follow-up or move those who engaged into a specific ‘Confirmed’ group.
If you got stuck on a specific task or can’t find a way to execute a particular job, contact our support team via LiveChat or [email protected] – we’re here to help 24/7.
Follow the interactive tutorial to connect your Jumpseller with your Sender account.
As you now have connected your Jumseller store with Sender, you can add your first embedded form in your store website.
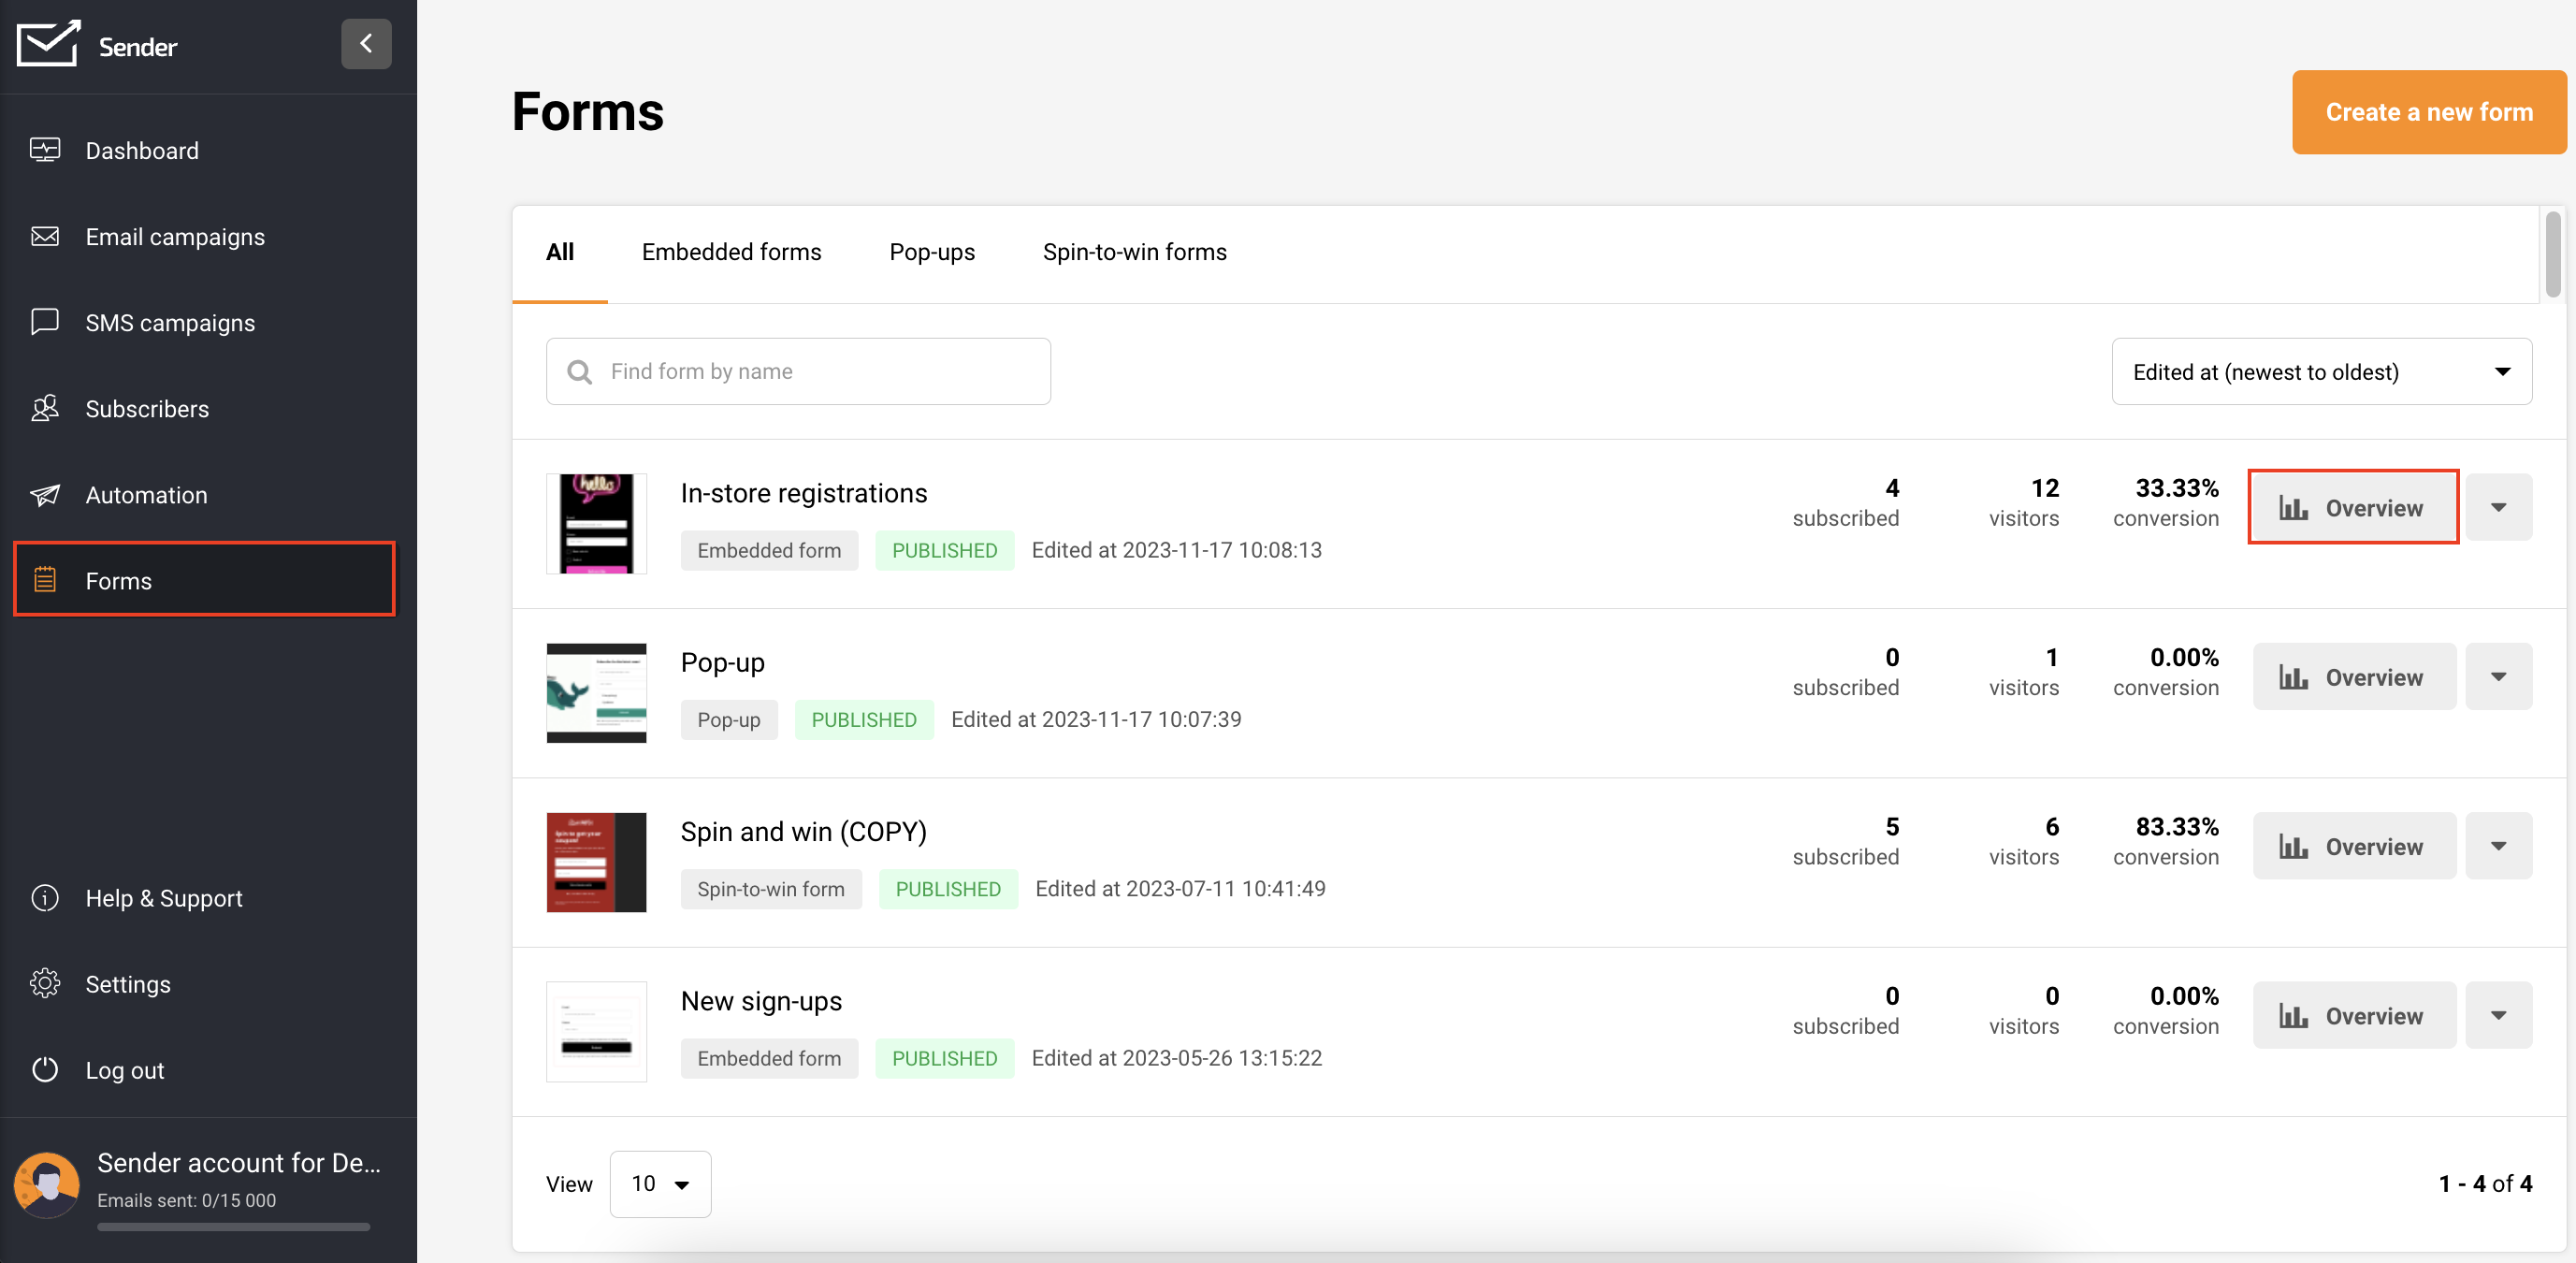
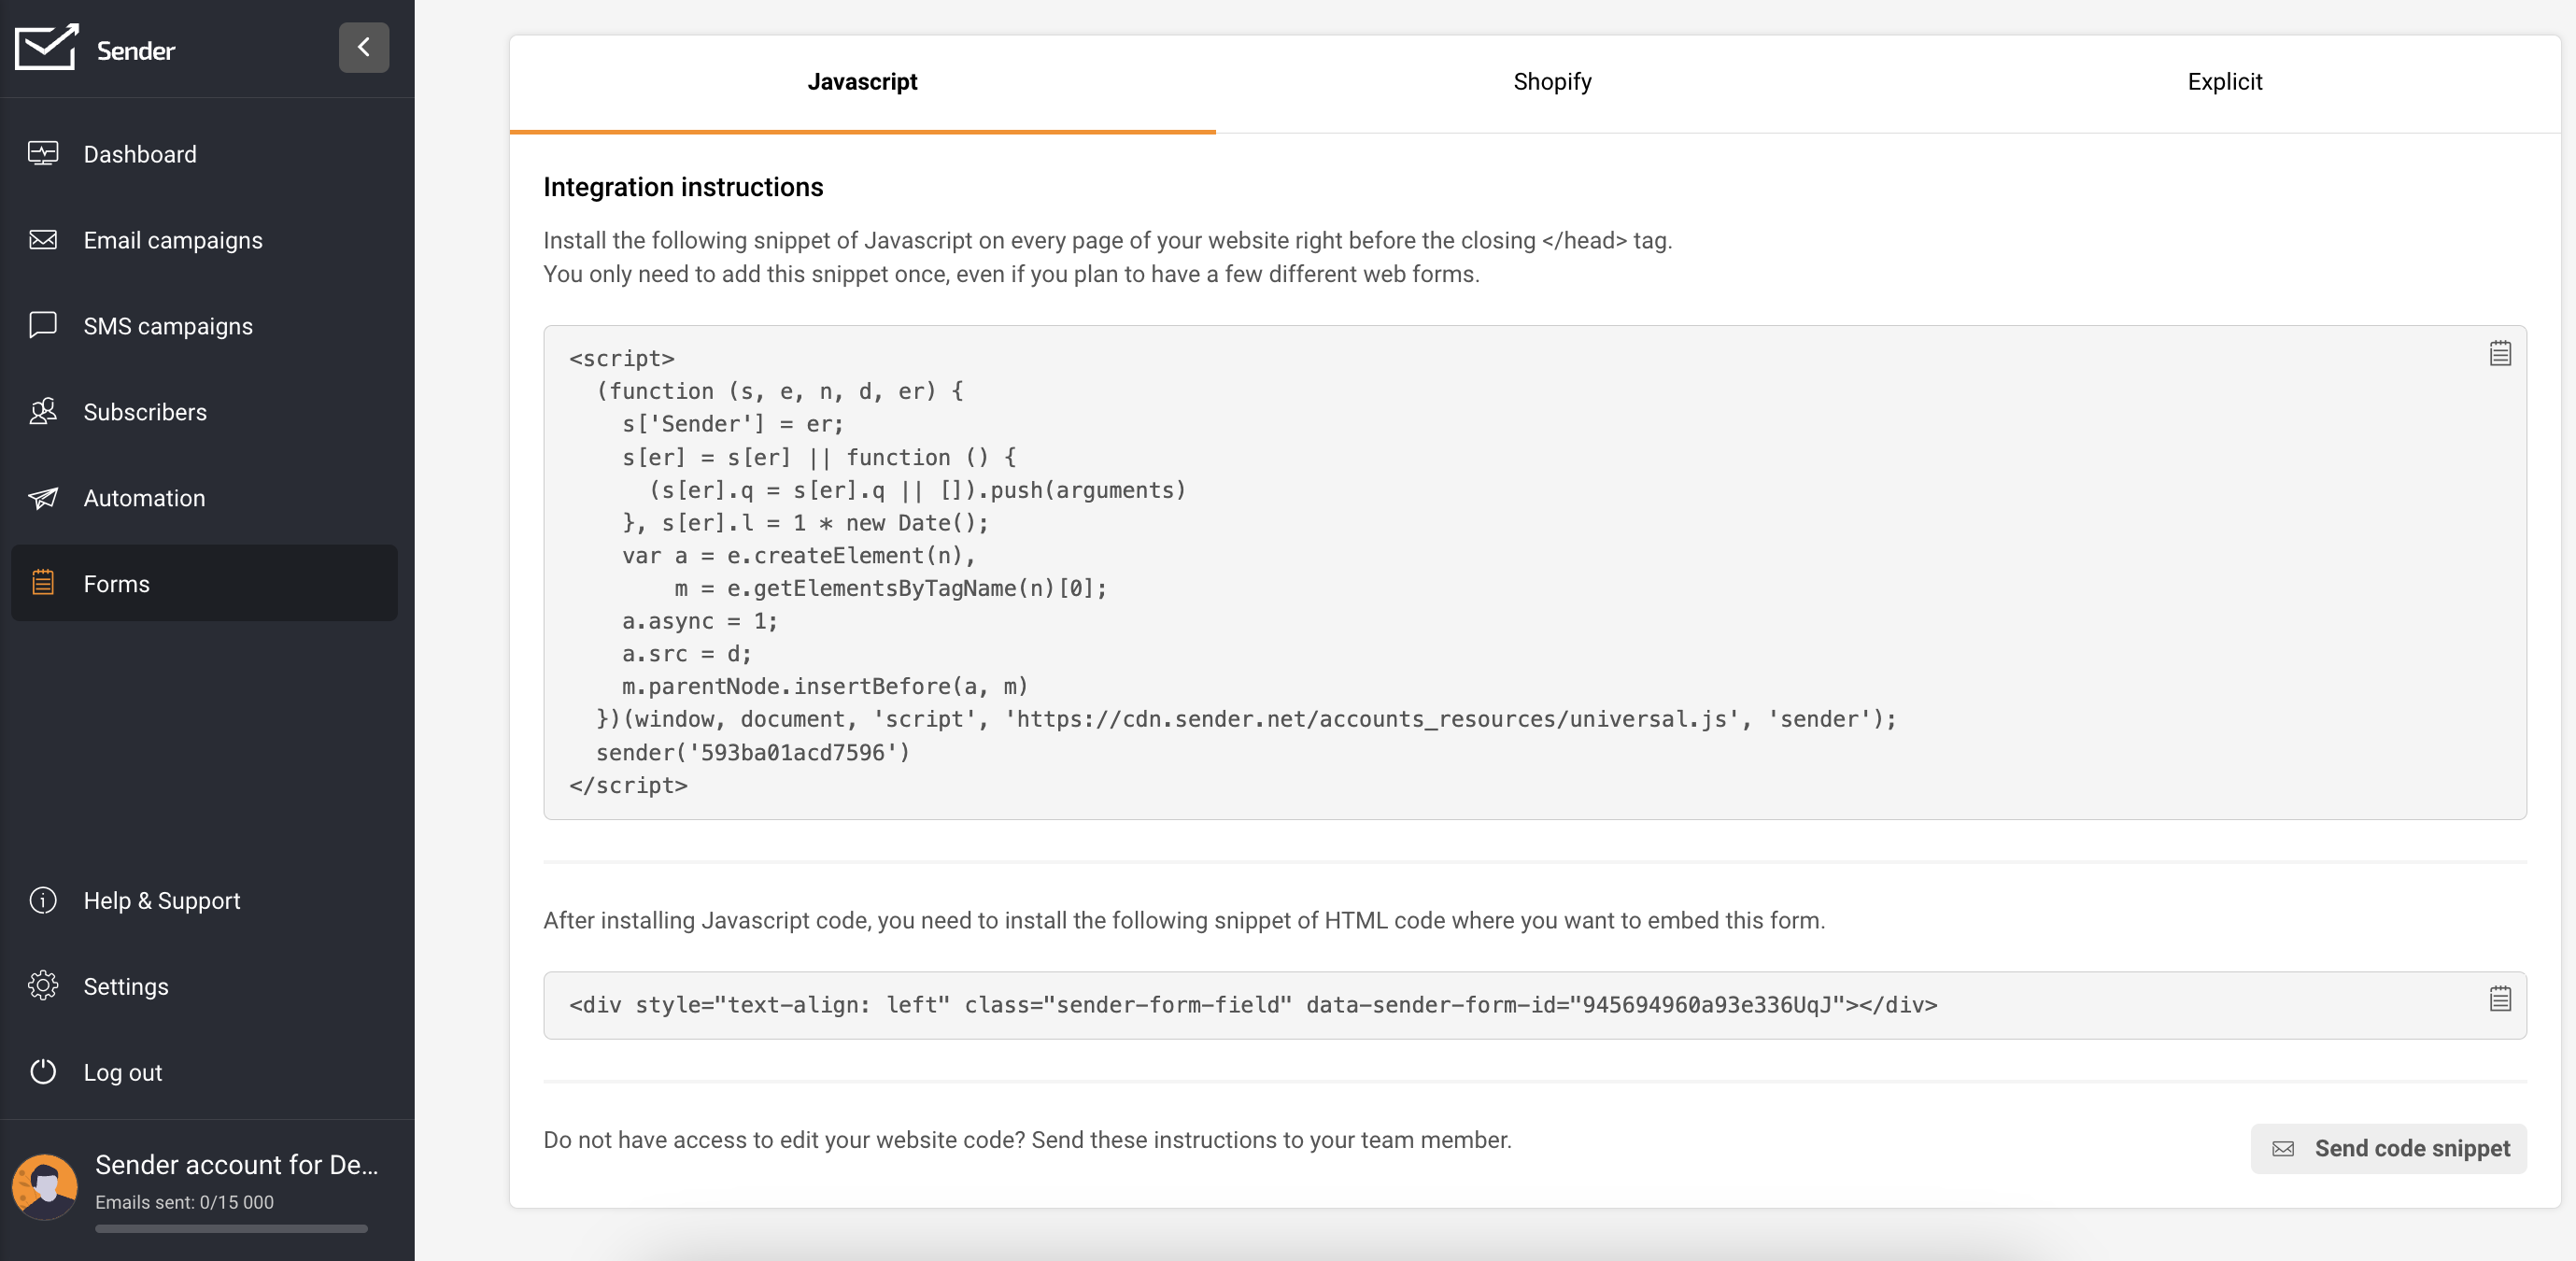
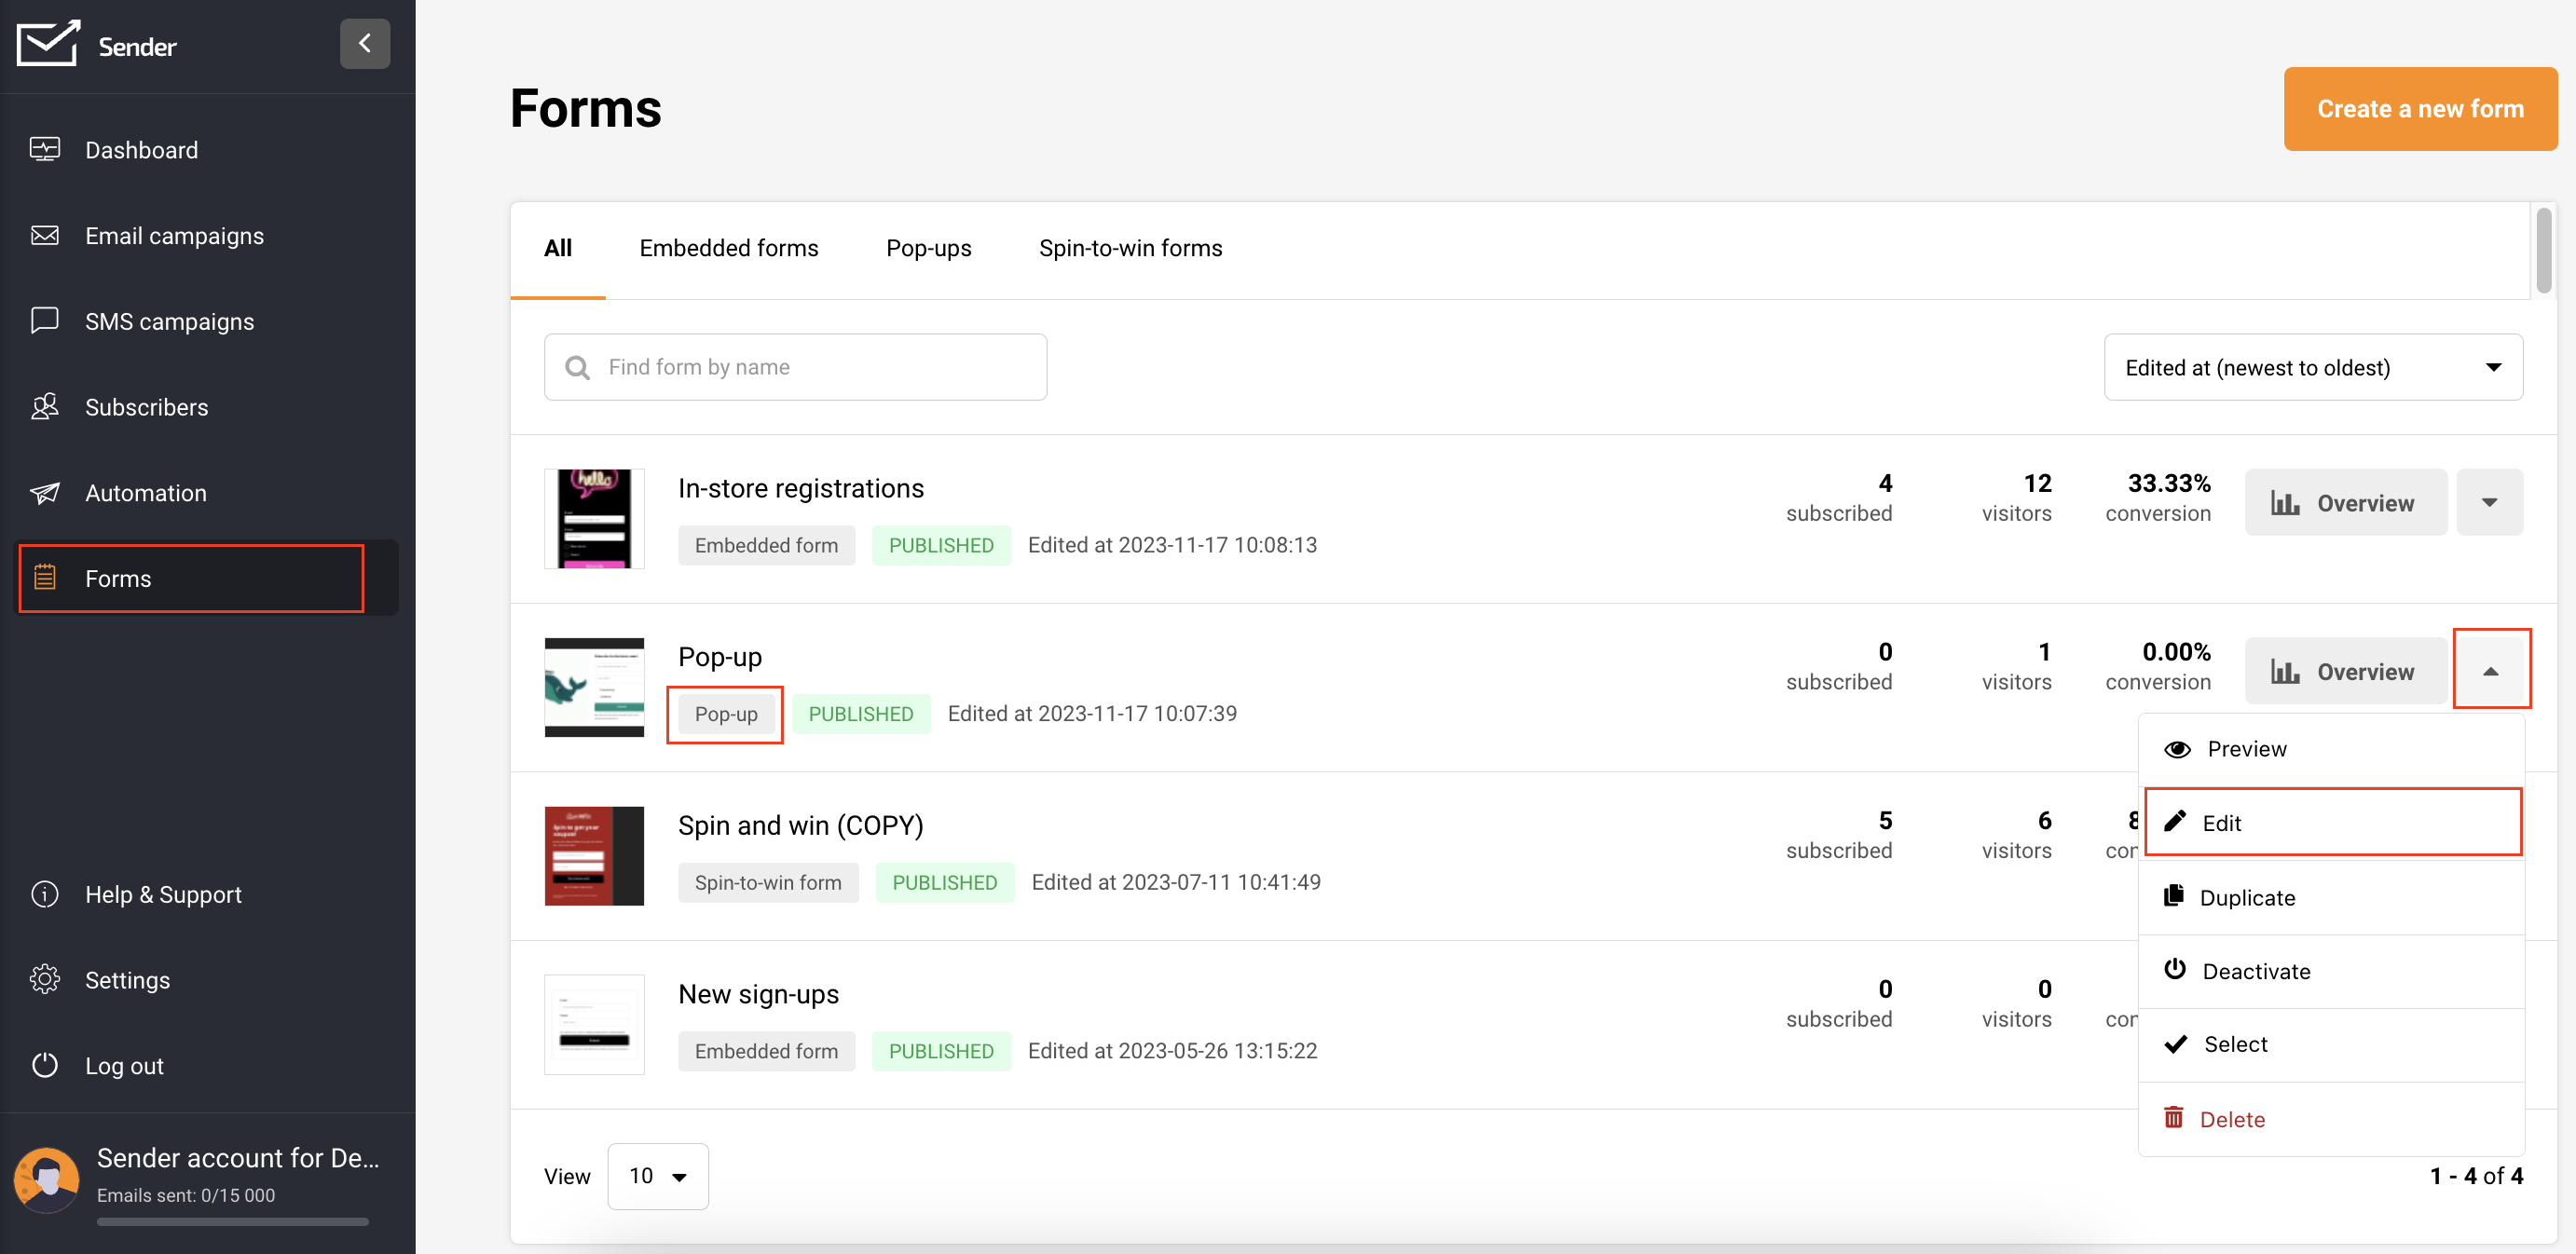
In your Sender account, go to Forms and select “Create a new form” if you haven’t already. Follow this tutorial to create an embedded form. To edit an existing form, click the arrow button next to “Overview” and choose “Edit.”

Once you have an embedded form, click the “Overview” button beside it.
On this page, you’ll find the Activity summary, Form URL, QR code for the form, and integration instructions.
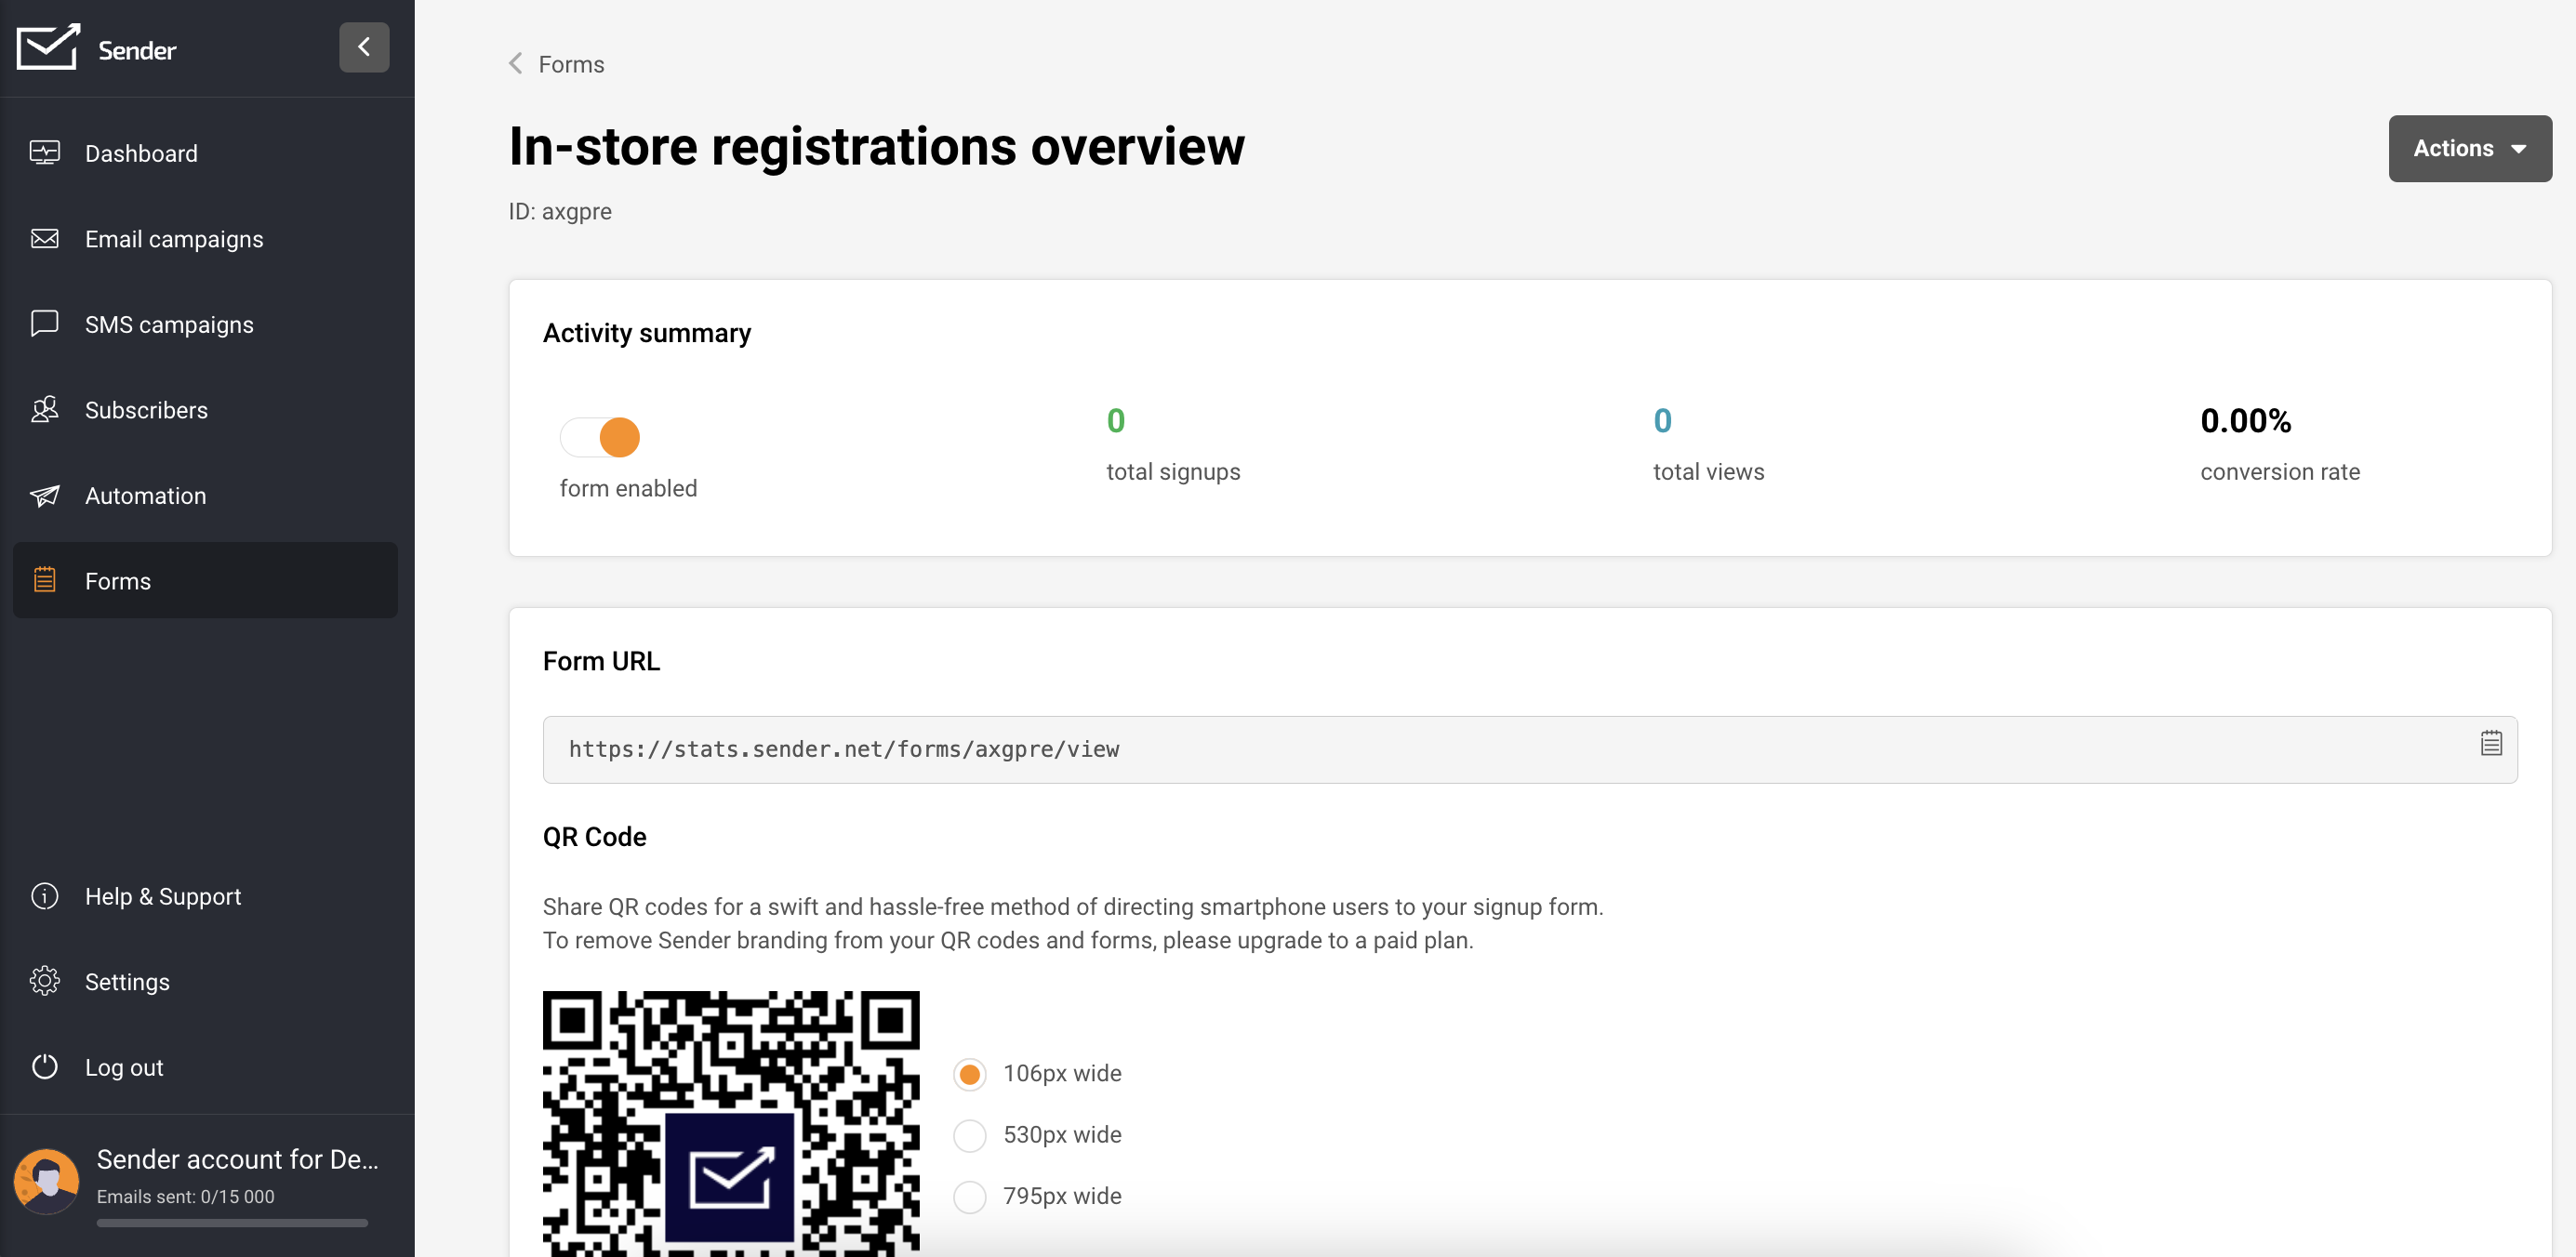
In the integration instructions, find the form’s script (embedded forms have two script parts).
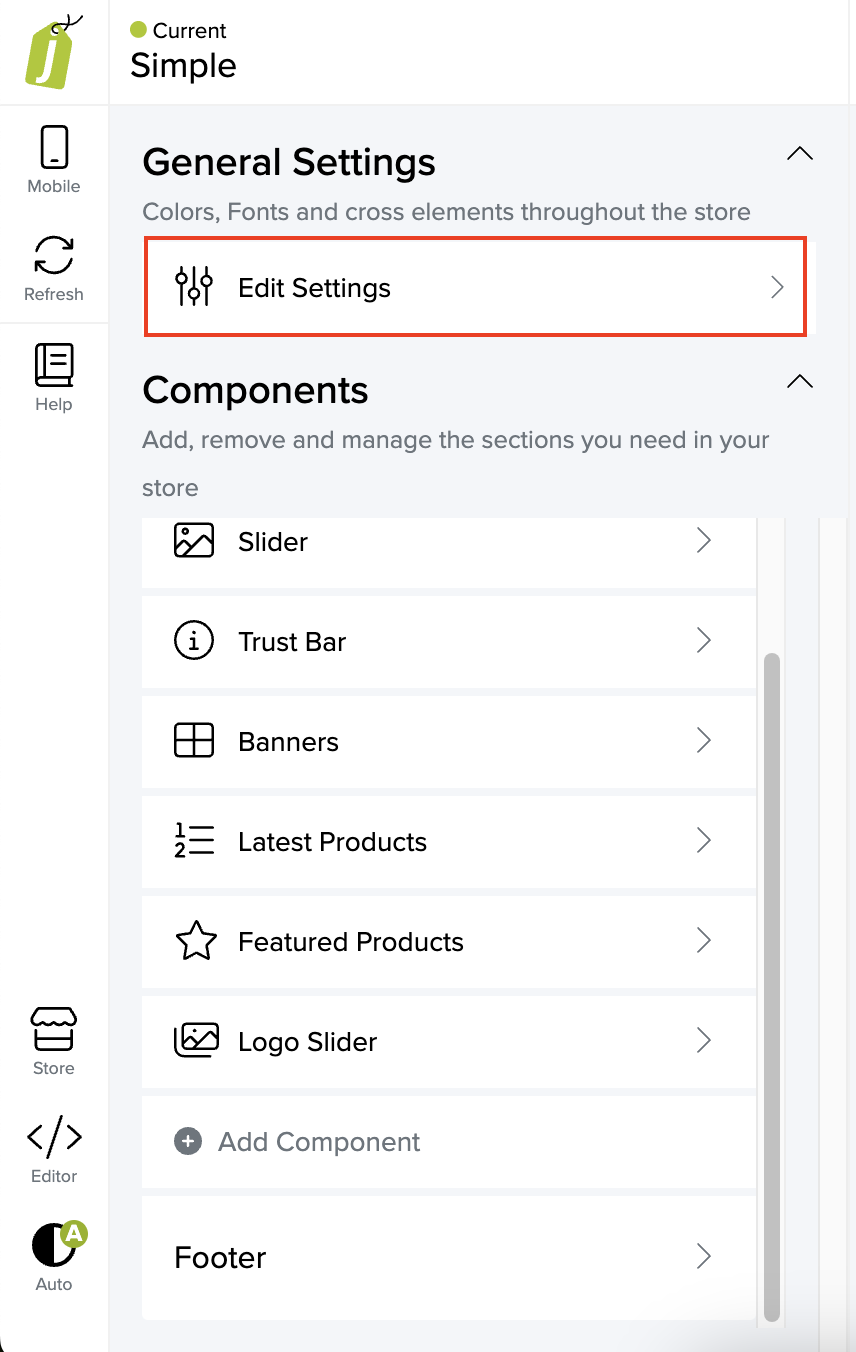
Once you have your scripts prepared, go to your Jumpseller store: Admin Panel -> Themes -> Visual Editor.

Navigate to General settings -> Edit Settings -> Other options.
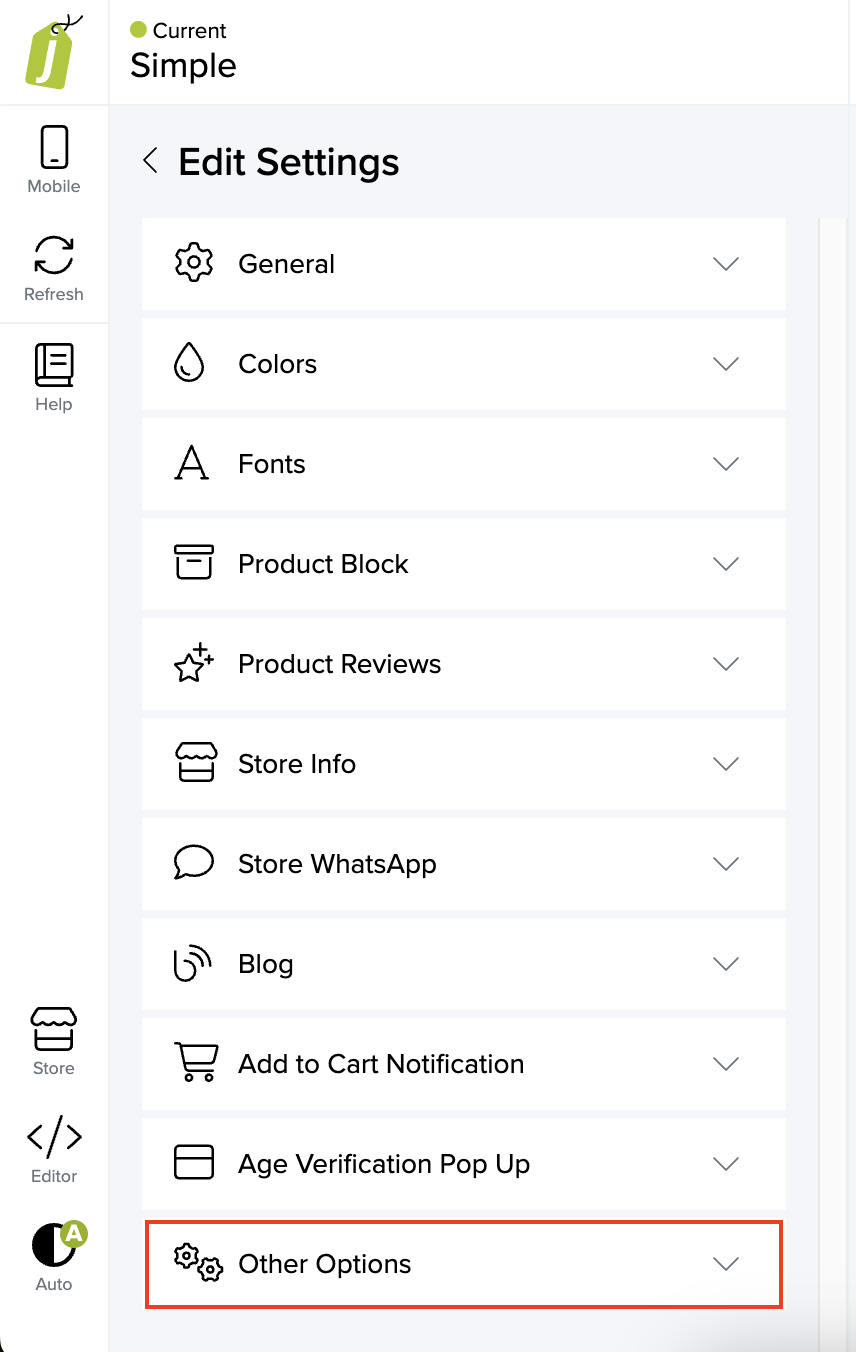
Insert the first script into “Embed code on the end of ” and the second one into “Embed code on the end of .”

Save the changes.
Make sure you have already integrated your Jumpseller store with Sender.
Navigate to the Forms section within your Sender account. If you do not have a form already, choose “Create a new form” by following these instructions.
To modify an existing form, click the arrow button adjacent to “Overview” and select “Edit.”
Before proceeding, ensure to customize the form behavior settings according to your preferences. These can be found on the form editing page, under “Behavior”.
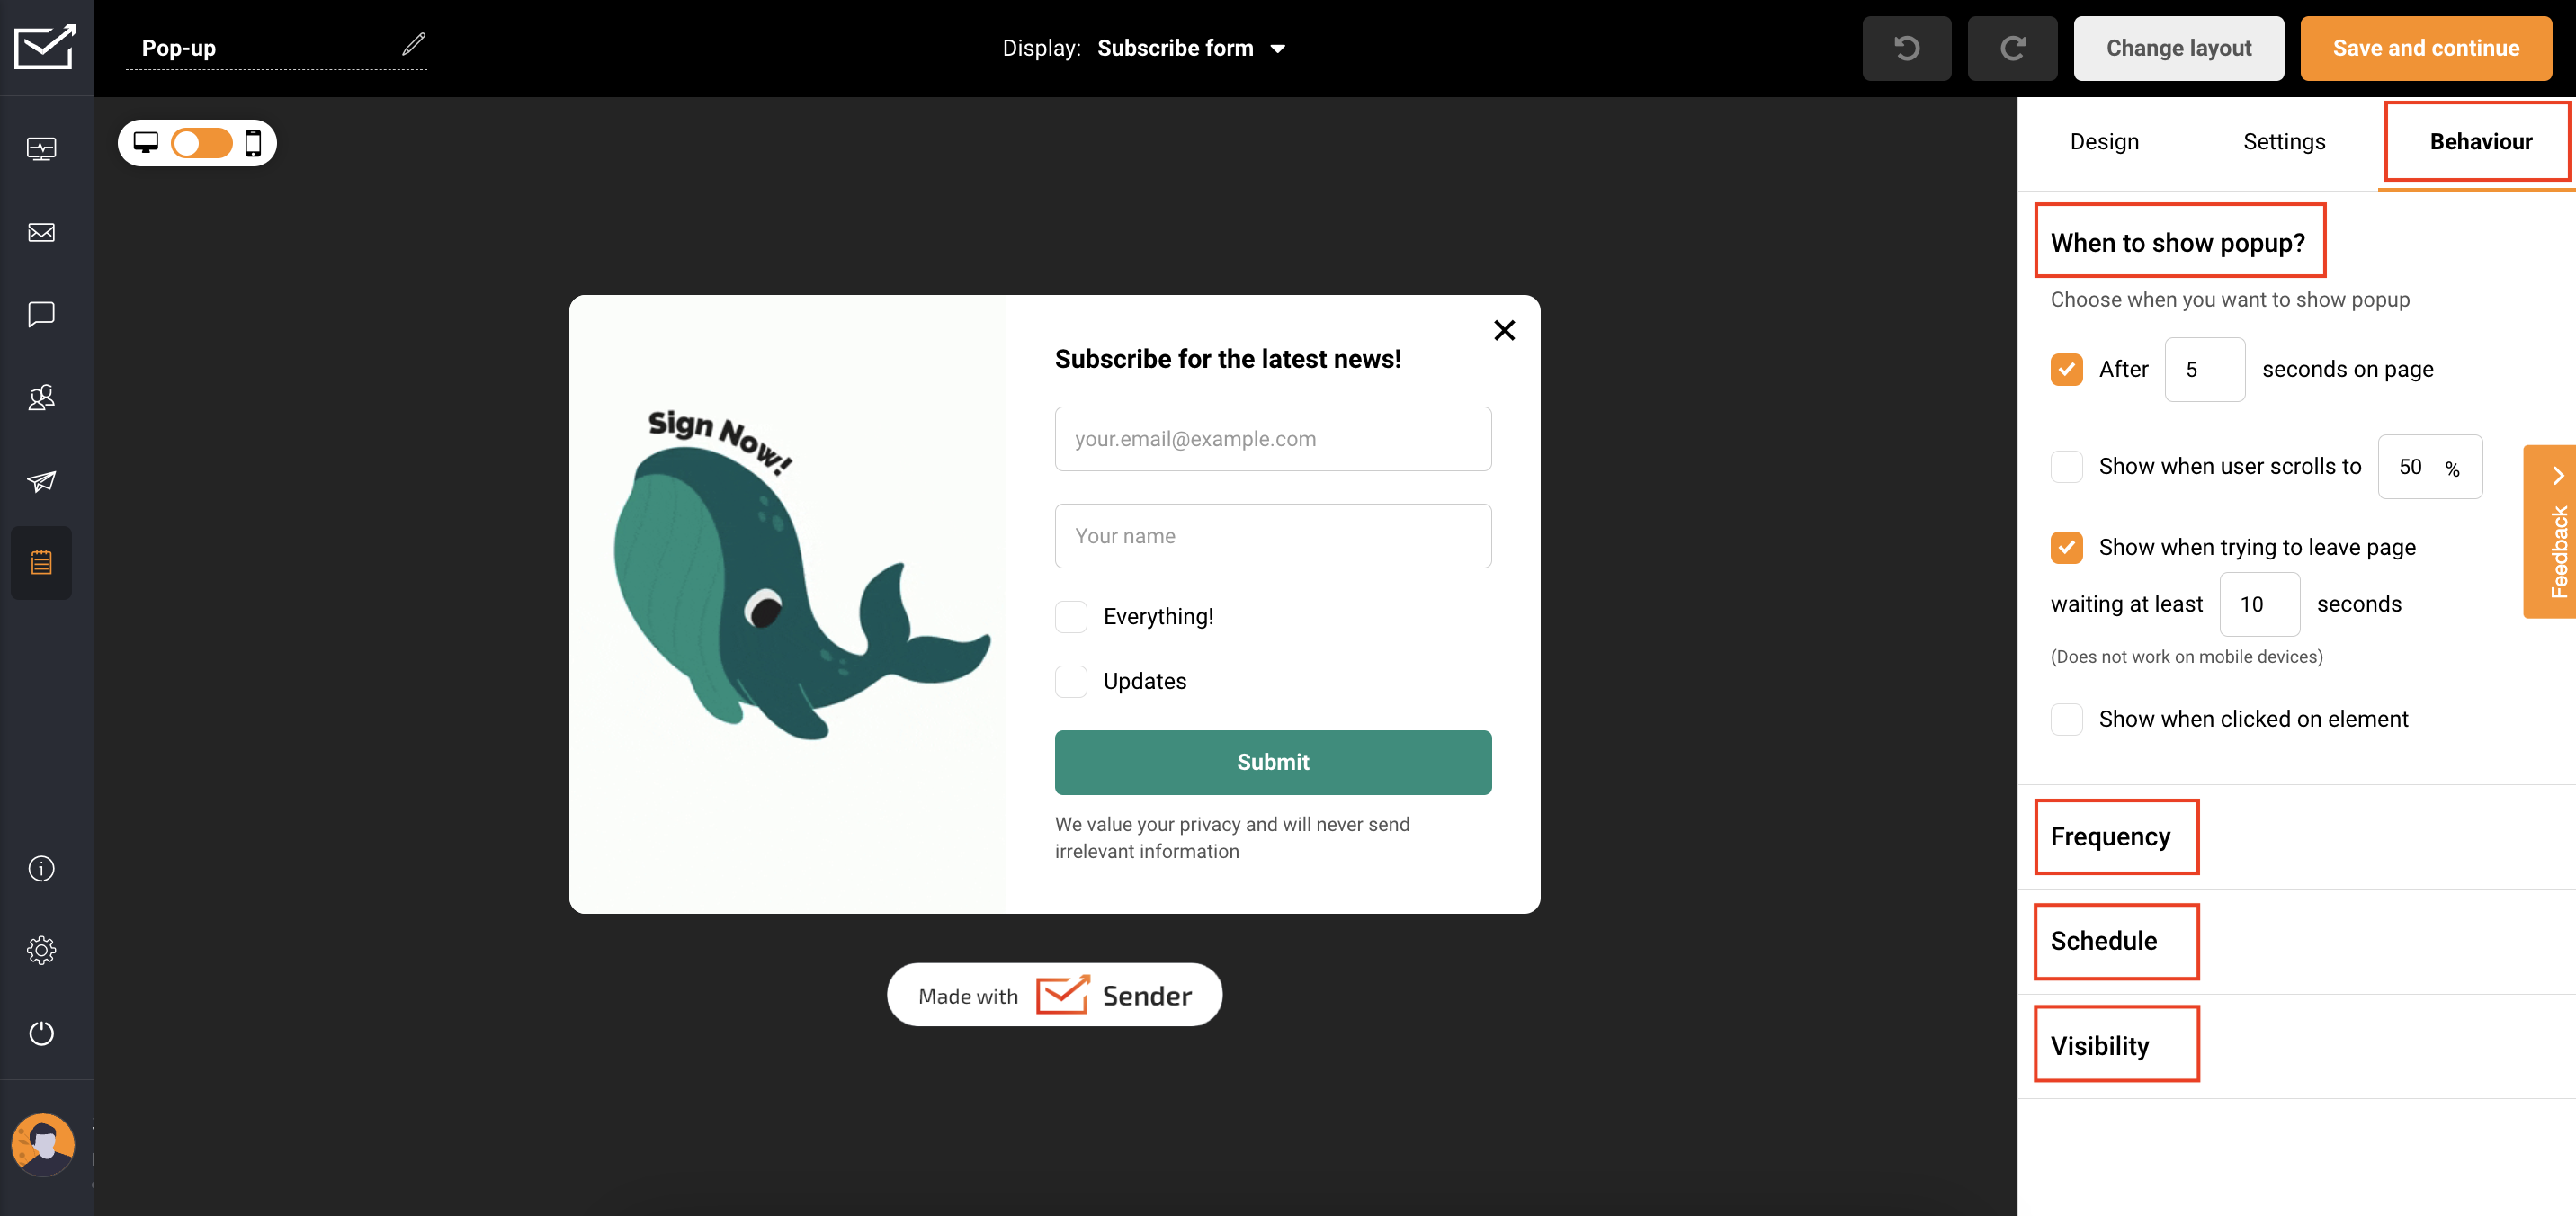
Once you have finished editing, click Save and Continue.
In the Overview page, under Activity summary, enable the form by switching the toggle.
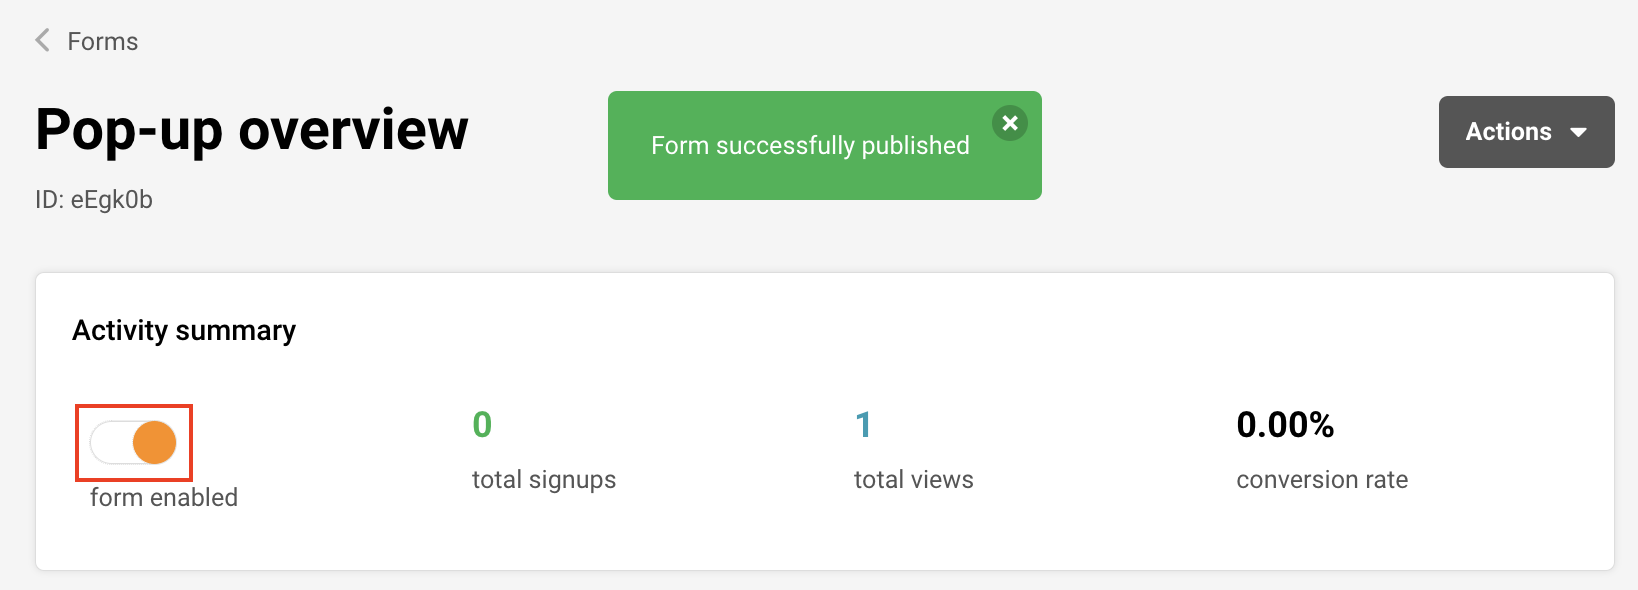
Congratulations! Your form will now be displayed on your website based on the behavior settings you have selected.
Once you have have your Jumpseller store connected to Sender, your customers will be automatically added to your subscriber list in Sender.
To effectively manage your subscribers, use segmentation and advanced filters.
You can filter subscribers by the following:
By creating and saving a segment, any upcoming customers within the specified range will be automatically included in that segment, enabling you to send personalized and targeted email/SMS campaigns.
Follow this link to learn how to create a segment.
Cart tracking is enabled automatically if you connect your Jumpseller store with Sender.
Use this feature to set up automated workflows for your e-commerce processes. If you haven’t set up these workflows yet, click here to establish an Abandoned Cart workflow and here to set up a post-purchase automation workflow.
Initiating a warm welcome for your new subscribers not only establishes a meaningful connection but also plays a crucial role in cultivating their loyalty as customers. Sending a personalized greeting creates an engaging experience that encourages them to remain connected with your content.
For insights on implementing this strategy, follow this link to explore a comprehensive guide on setting up a welcome email automation sequence.
If you choose to gather your customers’ birthdates, it opens the door to sending them special birthday codes for enticing purchases on their special day or throughout the birthday week. Explore this tutorial to learn how to establish an effective birthday automation workflow.
That’s it!
If you got stuck on a specific task or can’t find a way to execute a particular job, contact our support team via LiveChat or [email protected] we’re here to help 24/7.
When you get a dedicated IP address with our Enterprise plan, our system automatically initiates the warming-up process on your behalf, utilizing a portion of your most engaged subscribers. It typically takes 4-8 weeks to achieve maximum deliverability (depending on volume and engagement).
The warming-up period may extend if mailbox providers perceive that the emails are not explicitly desired by the recipients, such as when recipients have not explicitly signed up. Certain mailbox providers impose sender thresholds, restricting the number of messages delivered per day until a sender establishes a reputation.
If you prefer to manage the warming-up of dedicated IP addresses yourself, you can request to disable this automatic process.
However, it is crucial to avoid sending large volumes of emails immediately after the warm-up process ends. Instead, gradually increase the number of emails sent until you reach your intended volume. A sudden and substantial surge in the number of emails from an IP address may lead email providers to block or throttle message delivery from that address.
Important note: If you choose to disable the automatic warm-up feature, the responsibility of warming up your dedicated IP addresses falls on you. Sending emails from addresses that haven’t undergone proper warm-up may result in poor delivery rates or delays.
| Warmup Age (Days) | Hourly Email Limit |
| 0 | 20 |
| 1 | 28 |
| 2 | 39 |
| 3 | 55 |
| 4 | 77 |
| 5 | 108 |
| 6 | 151 |
| 7 | 211 |
| 8 | 295 |
| 9 | 413 |
| 10 | 579 |
| 11 | 810 |
| 12 | 1,000 |
| 13 | 1,587 |
| 14 | 2,222 |
| 15 | 3,111 |
| 16 | 4,356 |
| 17 | 6,098 |
| 18 | 8,583 |
| 19 | 11,953 |
| 20 | 16,734 |
| 21 | 23,427 |
| 22 | 32,798 |
| 23 | 45,917 |
| 24 | 64,284 |
| 25 | 89,998 |
| 26 | 125,997 |
| 27 | 176,395 |
| 28 | 246,953 |
| 29 | 345,735 |
| 30 | 484,029 |
| 31 | 677,640 |
| 32 | 948,696 |
| 33 | 1,328,175 |
| 34 | 1,859,444 |
| 35 | 2,603,222 |
That’s it!
If you got stuck on a specific task or can’t find a way to execute a particular job, contact our support team via LiveChat or [email protected] – we’re here to help 24/7.
Automated emails and transactional emails serve different purposes and have distinct characteristics. Here are the key differences between the two:
Automated Emails: Automated emails are typically used for marketing and engagement purposes. They are sent to a list of subscribers or customers to deliver promotional content, newsletters, product recommendations, or other marketing messages. These emails are often triggered by specific actions or events, such as signing up for a newsletter or making a purchase.
Transactional Emails: Transactional emails are primarily functional in nature. They are sent in response to a user’s specific action or transaction, providing important and often time-sensitive information related to that action. Examples include order confirmations, shipping notifications, password reset emails, and account verification emails.
Automated Emails: The content of automated emails is usually marketing-oriented and is designed to encourage user engagement, drive sales, or promote a brand. They may contain promotional offers, news updates, and personalized recommendations.
Transactional Emails: Transactional emails contain information directly related to the user’s interaction with a service or platform. They typically include order details, account information, receipts, and other essential data necessary for the completion of a transaction or action.
Automated Emails: Automated emails are triggered by predefined events or user behaviors, such as subscribing to a newsletter, browsing specific products, or reaching a certain milestone in a customer journey.
Transactional Emails: Transactional emails are triggered by specific actions taken by users, such as making a purchase, requesting a password reset, or confirming an email address. They are generated in response to these actions.
Automated Emails: Marketing emails, including automated ones, must comply with anti-spam laws and regulations, like the CAN-SPAM Act in the United States or the GDPR in Europe. They require recipients’ consent and provide options for unsubscribing.
Transactional Emails: Transactional emails are generally exempt from many of the strict marketing email regulations because they are essential for user experience and are expected by users in response to their actions.
Automated Emails: Marketers often track open rates and click-through rates for automated emails to measure the success of their marketing campaigns.
Transactional Emails: Transactional emails may also be monitored for delivery and open rates, but their primary focus is on ensuring that users receive critical information.
In summary, automated emails are marketing-focused and initiated by predefined triggers, while transactional emails are functional and directly related to user actions. Both types of emails play essential roles in communication with customers and subscribers, but they serve different purposes in the email marketing ecosystem.
That’s it!
If you got stuck on a specific task or can’t find a way to execute a particular job, contact our support team via LiveChat or [email protected] we’re here to help 24/7.
The integration with Crowdin simplifies translation management for your content, making it a breeze to create multilingual email marketing campaigns. Whether you’re a blogger, run an e-commerce business, or fall in between, this dynamic duo helps you effortlessly reach a global audience.
Integration with Crowdin allows you to:
To integrate Crowdin with Sender takes only a few steps:
To bring content into translation mode from Sender.net, follow these simple steps:
Now, if you want to export your translations back to Sender.net, here’s what you do:
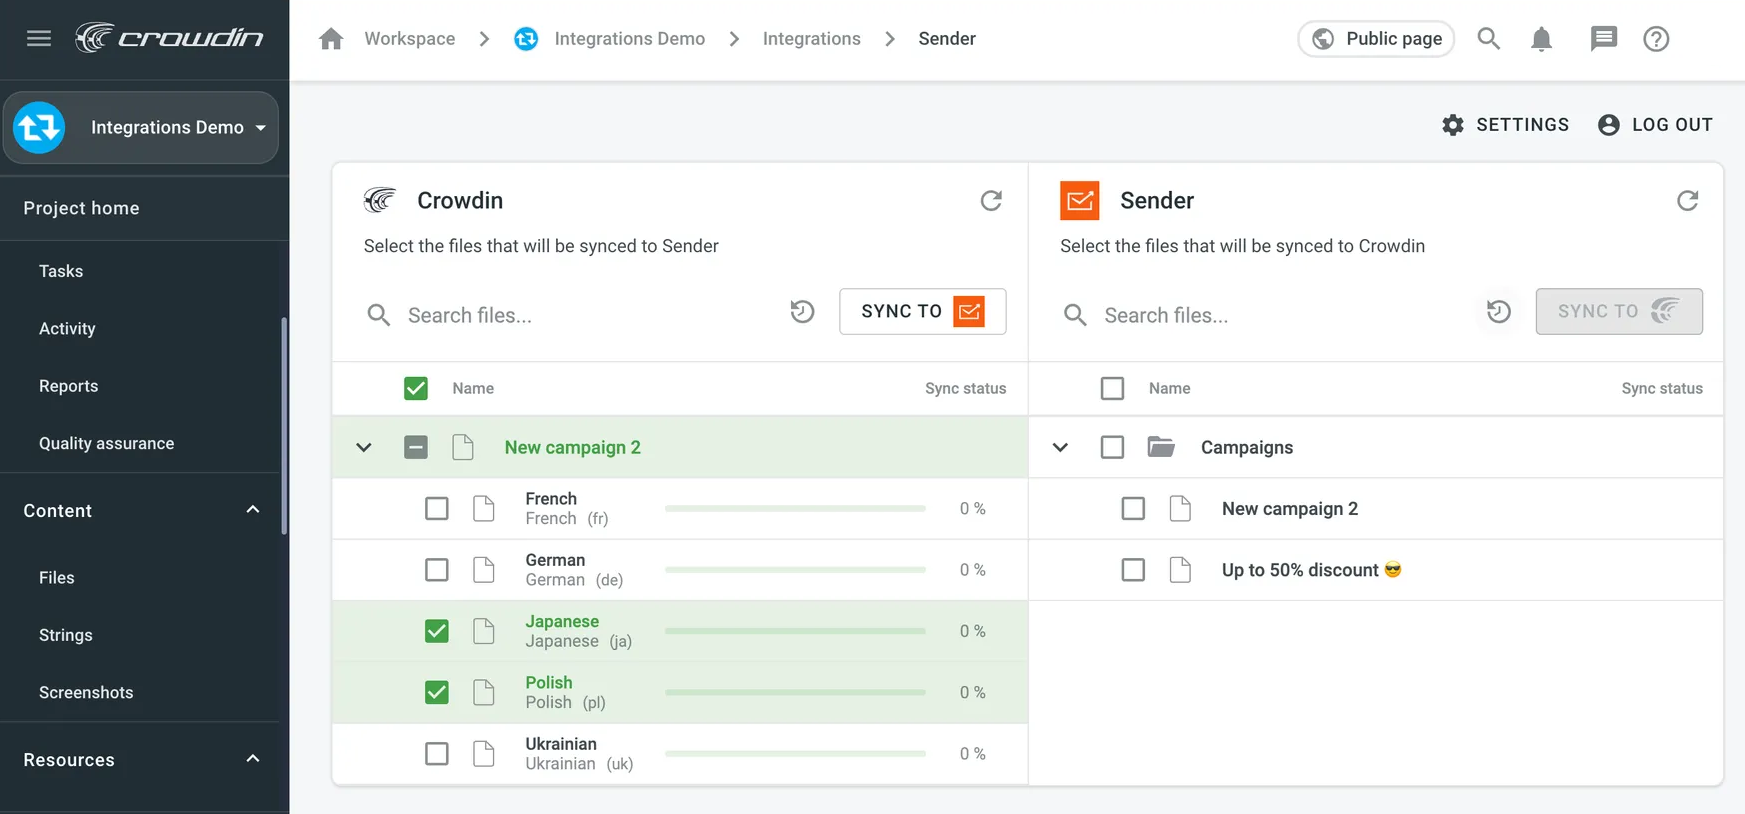
To effortlessly import content for translation from Sender.net, select the files and then click on “Scheduled Sync,” located in the right panel within the Sender.net integration.
The chosen file will be automatically transferred at a predefined time (typically, once per day). The same button serves the purpose of exporting translated files from Crowdin to Sender.net (found in the left panel).
You can deactivate this function by clicking on “Disable Sync.”
That’s it!
If you got stuck on a specific task or can’t find a way to execute a particular job, contact our support team via LiveChat or [email protected] – we’re here to help 24/7.