Blog

  • CAN-SPAM and GDPR Compliance

    This guide explains what CAN-SPAM and GDPR require from email senders and how to configure Sender’s tools to meet those requirements.

    Why This Matters

    Violating CAN-SPAM or GDPR can result in significant financial penalties, legal action, and permanent damage to your sender reputation. CAN-SPAM fines can reach over $50,000 per non-compliant email, while GDPR penalties can reach up to 4% of annual global revenue. Beyond legal risk, non-compliance leads to spam complaints, subscriber distrust, and potential account suspension on Sender.

    What Is Required

    Unsubscribe mechanism — Every commercial email must include a clear, working unsubscribe link. CAN-SPAM requires that opt-out requests be honored within 10 business days. GDPR requires that recipients can withdraw consent at any time. Failure to include an unsubscribe link violates both regulations and Sender’s sending policies.

    Physical mailing address — CAN-SPAM requires a valid physical postal address in every commercial email. This can be a street address, a P.O. box registered with the postal service, or a private mailbox registered with a commercial mail receiving agency. Omitting it is a direct violation of U.S. federal law.

    Accurate sender identity — CAN-SPAM prohibits misleading “From” names, email addresses, and subject lines. The sender information in your campaign must accurately identify the person or business sending the email. Deceptive header information or subject lines can trigger enforcement action.

    Lawful basis for processing (GDPR) — Under GDPR, you must have a lawful basis — typically explicit consent — before sending marketing emails to individuals in the European Economic Area (EEA) or the UK. Consent must be freely given, specific, informed, and unambiguous. Pre-checked boxes do not constitute valid consent.

    Data subject rights (GDPR) — GDPR gives subscribers the right to access, correct, export, and delete their personal data. You must be able to respond to these requests promptly. Failure to comply can result in regulatory complaints and fines.

    Note: This article provides general guidance on compliance requirements. Consult a legal professional for advice specific to your jurisdiction and business.

    Steps to Configure Compliance Settings in Sender

    Step 1 — Add your physical mailing address

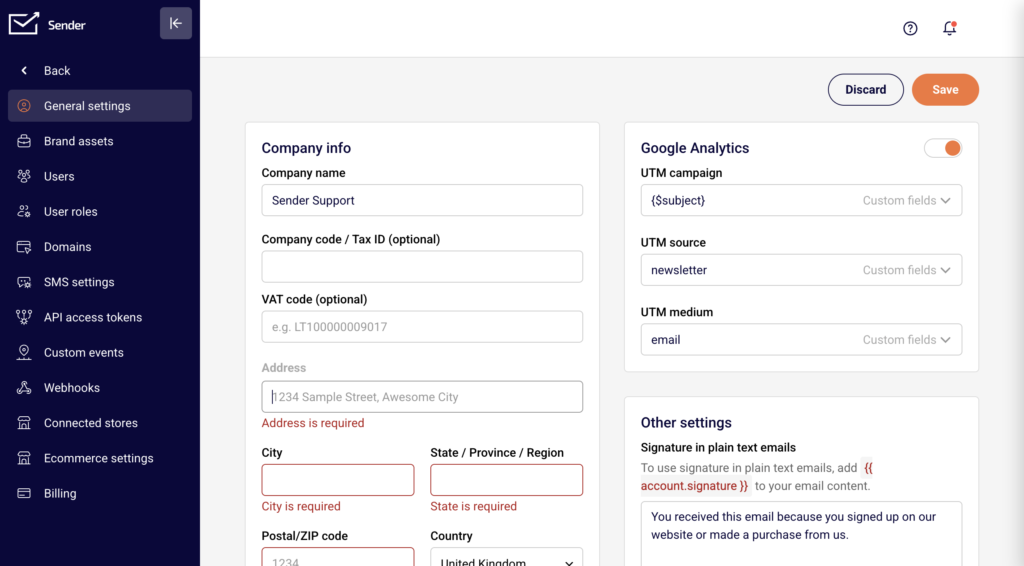
    Go to Account settings → General settings. Under the Company info section, fill in the Address, City, State / Province / Region, Postal/ZIP code, and Country fields. Click Save.

    account-company-info

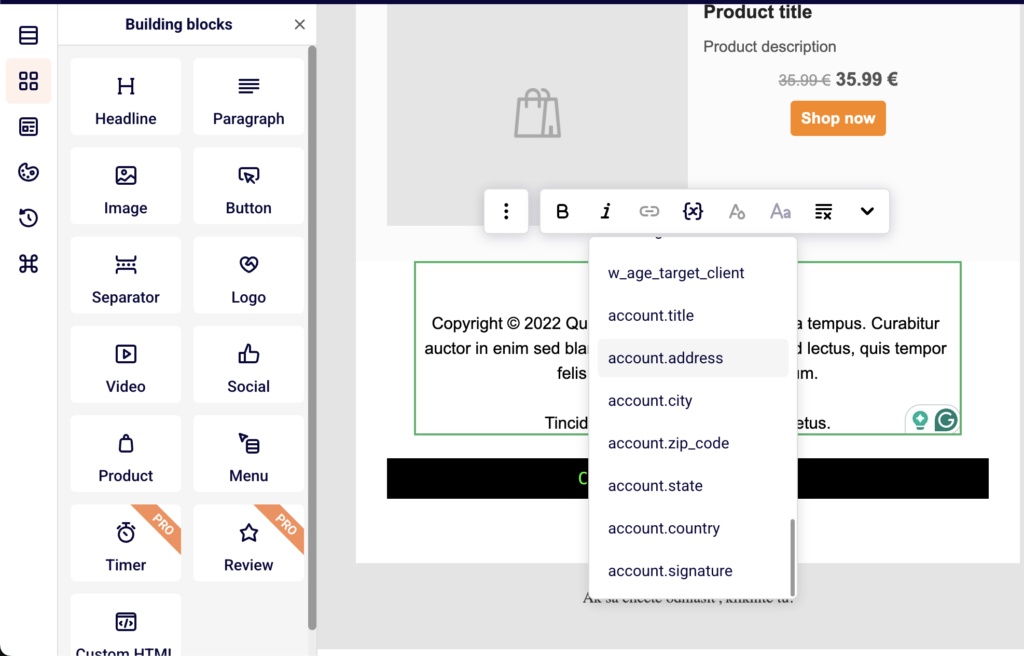
    Sender’s default email templates automatically insert this address into your email footer using variables like {{ account.address }} and {{ account.city }}.

    liquid-tags

    Once saved, every email sent using a default template will display your physical address, satisfying the CAN-SPAM address requirement.

    Step 2 — Verify unsubscribe link and confirmation settings

    Sender automatically includes an unsubscribe link in the footer of every email sent through default templates. The link text reads “If you would like to unsubscribe, please click here.”

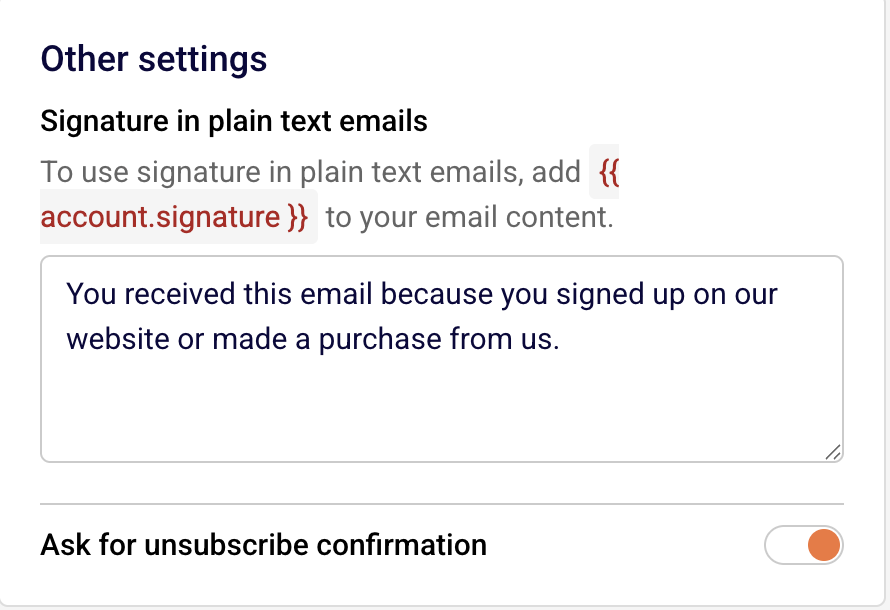
    subscriber-confirmation

    To configure whether subscribers see a confirmation step, go to Account settings → General settings and locate the Ask for unsubscribe confirmation toggle under Other settings. Enable or disable this based on your preference. This satisfies the CAN-SPAM opt-out and GDPR withdrawal-of-consent requirements.

    Step 3 — Enable double opt-in for signup forms

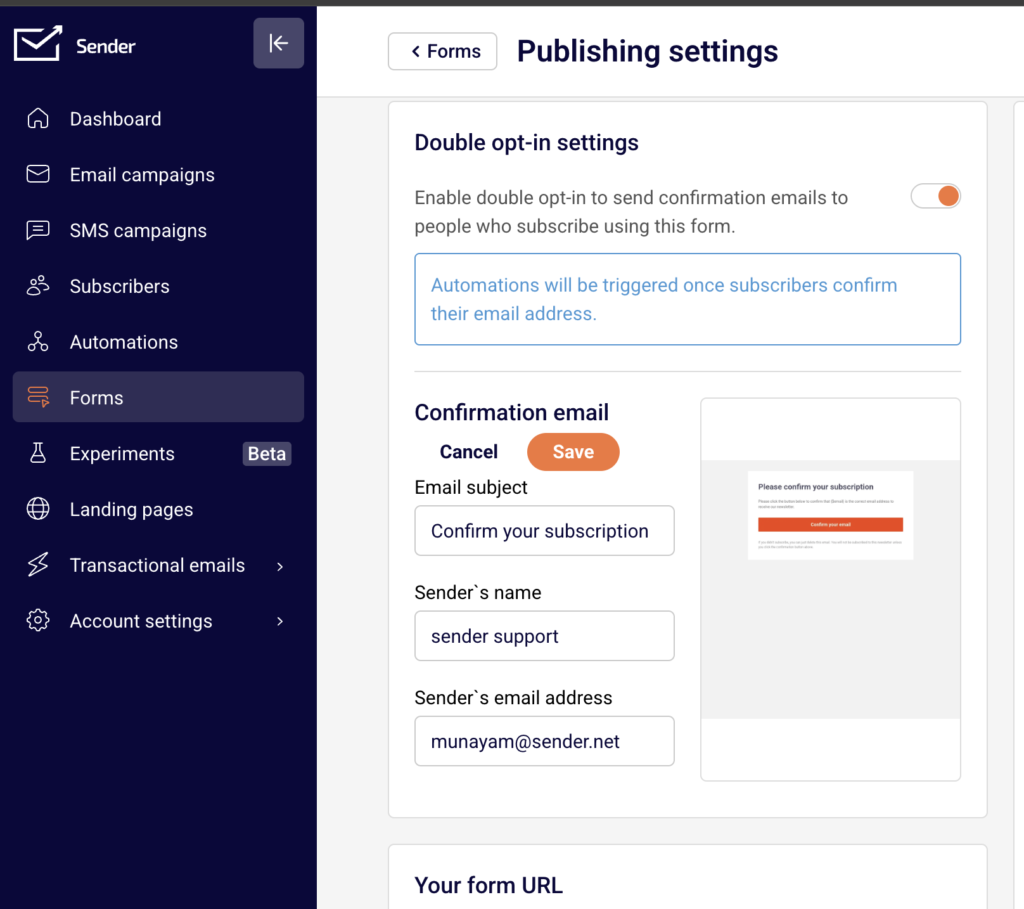
    Go to Forms, select a form, and click the settings icon to open Publishing settings. At the top, locate Double opt-in settings and enable the toggle to send confirmation emails to new subscribers.

    double-opt-in-form-settings

    Customize the Confirmation email subject, sender name, and sender email address using the Edit button. When enabled, subscribers must confirm their email address before being added to your list. This helps demonstrate explicit consent as required by GDPR.

    Step 4 — Set accurate sender identity in campaigns

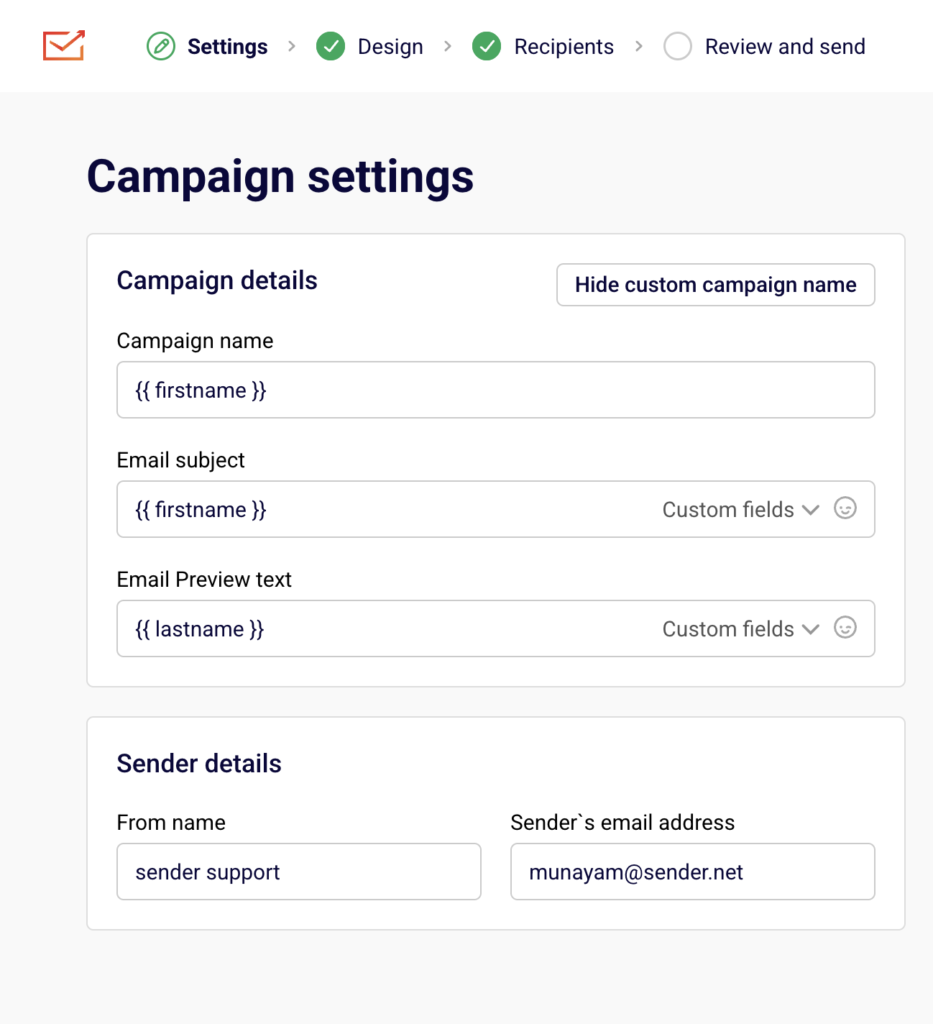
    When creating or editing a campaign, the Campaign settings page includes a Sender details section with From name and Sender’s email address fields.

    campaign-settings-sender-details

    Ensure these accurately represent your business or brand. CAN-SPAM prohibits misleading header information, so the “From” name and email address must truthfully identify the sender. Review the Email subject field to confirm it is not deceptive or misleading.

    Step 5 — Handle data subject requests

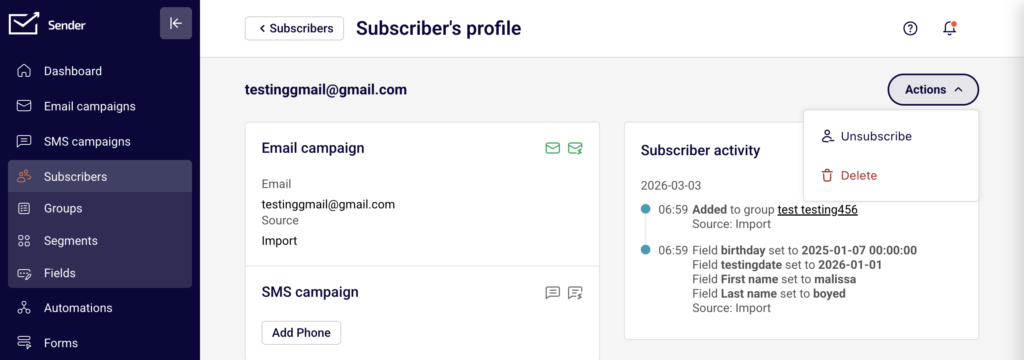
    To respond to a GDPR data access or deletion request, go to Subscribers and locate the subscriber using the search or filter tools. Click on the subscriber’s email to open their Subscriber’s profile. To export their data, return to the Subscribers list, select the subscriber’s checkbox, click Actions, and choose Export to CSV or Export to XLSX.

    subscriber-profile-delete

    To delete their record, open their Subscriber’s profile, click Actions in the top-right corner, and select Delete. Always confirm the request is legitimate before processing.

    Sender’s Policies

    Working unsubscribe link required — Every marketing email sent through Sender must contain a functional unsubscribe link. Sender’s default templates include one automatically. Removing or obscuring the unsubscribe link violates Sender’s sending policies and may result in account suspension.

    Purchased and scraped lists prohibited — Sender’s acceptable use policy prohibits sending to purchased, rented, or scraped email lists. Sending to non-consented contacts leads to high bounce rates, spam complaints, and account suspension.

    Misleading content prohibited — Sender prohibits the use of deceptive subject lines, false sender identities, or misleading email content. Campaigns flagged for misleading practices may be paused or blocked, and the account may be placed under review.

    Consent verification on onboarding — During account setup, Sender asks whether you have explicit permission (opt-in) from all subscribers on your list. Sender may request additional details about your email collection practices at any time to verify compliance.

    Account suspension and reinstatement — If your account is suspended for a policy violation, Sender sends a notification explaining the reason. You must correct the issue — such as removing non-consented contacts or updating content — and follow the reinstatement instructions. Contact Sender support if you need assistance.

    Compliance Tips

    Use double opt-in wherever possible — Enabling double opt-in in your form Publishing settings creates a verifiable record of consent, which strengthens your position under GDPR and reduces spam complaints.

    Audit your subscriber list regularly — Review your Subscribers list periodically and remove contacts who have not engaged. This reduces the risk of complaints and improves deliverability.

    Keep your address up to date — If your physical mailing address changes, update it immediately in Account settings → General settings under Company info. Outdated addresses violate CAN-SPAM.

    Document your consent records — Track when and how each subscriber gave consent (e.g., which form, what date, what disclosure was shown). This documentation is critical for responding to GDPR inquiries.

    Review campaigns before sending — Check every campaign’s From name, Sender’s email address, and Email subject on the Campaign settings page to ensure accuracy and transparency before clicking send.

    Common Issues

    Unsubscribe link missing from email → This happens when using custom HTML without including the Sender unsubscribe variable. Use Sender’s default drag-and-drop templates, which include the unsubscribe link automatically, or manually add the unsubscribe tag to your custom HTML.

    Physical address not appearing in email footer → The Address, City, and Country fields in Account settings → General settings are empty or incomplete. Fill in all address fields and click Save. The template variables will then populate correctly.

    Account suspended for sending to non-consented contacts → This occurs when emails are sent to purchased, scraped, or otherwise non-opted-in lists. Review the suspension notification email, remove non-consented subscribers from your list, and follow the reinstatement instructions provided.

    Double opt-in confirmation emails not sending → The Double opt-in settings toggle in the form’s Publishing settings is disabled. Open the form settings, enable the toggle, and verify the Confirmation email details are configured correctly.

    Subscriber requests data deletion but record still exists → Ensure you are using the Delete option from the Actions dropdown on the Subscriber’s profile page, not simply unsubscribing them. Unsubscribing stops emails but retains the record. Deletion removes the subscriber’s data entirely.

    FAQs

    Do I need an unsubscribe link in every email?

    Yes. Every marketing email sent through Sender must include a working unsubscribe link. This is required by CAN-SPAM, GDPR, and Sender’s own sending policies. Transactional emails are generally exempt, but including one is still recommended.

    Can I send to a purchased email list?

    No. Sender’s acceptable use policy prohibits sending to purchased, rented, or scraped email lists. Sending to these lists results in high bounce rates, spam complaints, and may lead to account suspension.

    What happens if my account is suspended for a policy violation?

    Sender sends a notification email explaining the reason for suspension. Review the details, correct the issue (e.g., remove non-consented contacts, update content), and follow the reinstatement instructions provided in the notification. Contact Sender support if you need assistance.

    Am I required to include a physical address in my emails?

    Yes. CAN-SPAM requires a valid physical postal address in every commercial email. Add your address in Account settings → General settings under Company info. Sender automatically includes it in your email footer when using the default templates.

    How do I handle a GDPR data deletion request from a subscriber?

    Locate the subscriber in the Subscribers section, click their email to open their Subscriber’s profile, then click Actions → Delete. If you need to confirm what data is stored, you can export the subscriber’s data first via Actions → Export to CSV from the subscriber list view. Consult a legal professional for guidance on your specific obligations under GDPR.

    What is double opt-in and should I enable it?

    Double opt-in means a new subscriber must confirm their email address by clicking a link in a confirmation email before being added to your list. Enable it in your form’s Publishing settings under Double opt-in settings. It is strongly recommended for GDPR compliance because it provides verifiable proof of consent.

    Does Sender automatically handle CAN-SPAM and GDPR compliance for me?

    Sender provides tools that help you comply — such as automatic unsubscribe links, physical address template variables, and double opt-in — but compliance is ultimately your responsibility. You must ensure your content, consent practices, and data handling meet the requirements of all applicable regulations. Consult a legal professional for jurisdiction-specific advice.

  • Sender reputation basics

    This guide explains what sender reputation is, how mailbox providers evaluate it, and how to monitor and protect it as a Sender user.

    Why this matters

    Sender reputation is a score that mailbox providers (Gmail, Outlook, Yahoo) assign to your sending domain and IP address based on your email sending behavior. A strong reputation means your emails reach the inbox; a damaged reputation causes emails to land in spam or get rejected entirely. Every campaign you send contributes to this score, making ongoing monitoring essential to maintaining consistent inbox placement.

    How to identify the problem

    Hard bounce rate — Open your Dashboard and check the Hard bounce rate in the Traffic and reach report section. A hard bounce rate above 2% signals that your list contains invalid addresses, which degrades your reputation with mailbox providers.
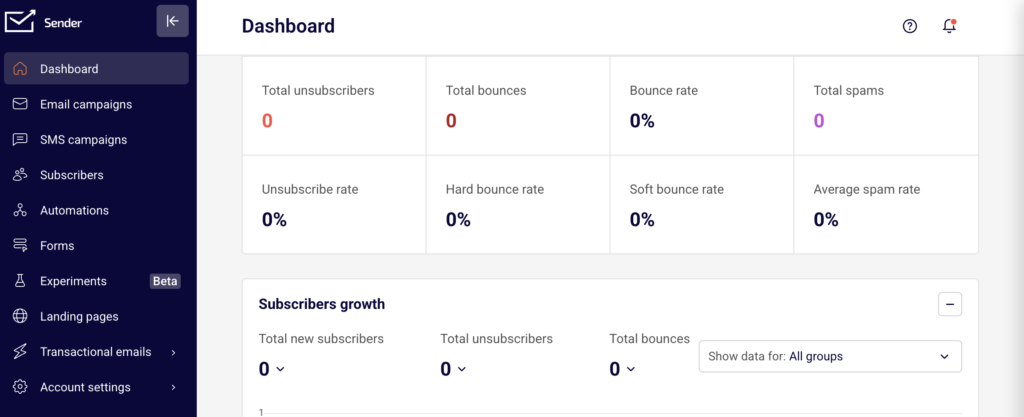
    Average spam rate — On the Dashboard, review the Average spam rate metric below the chart. A spam rate above 0.1% is a warning sign. Rates above 0.3% can cause mailbox providers to throttle or filter your emails aggressively.

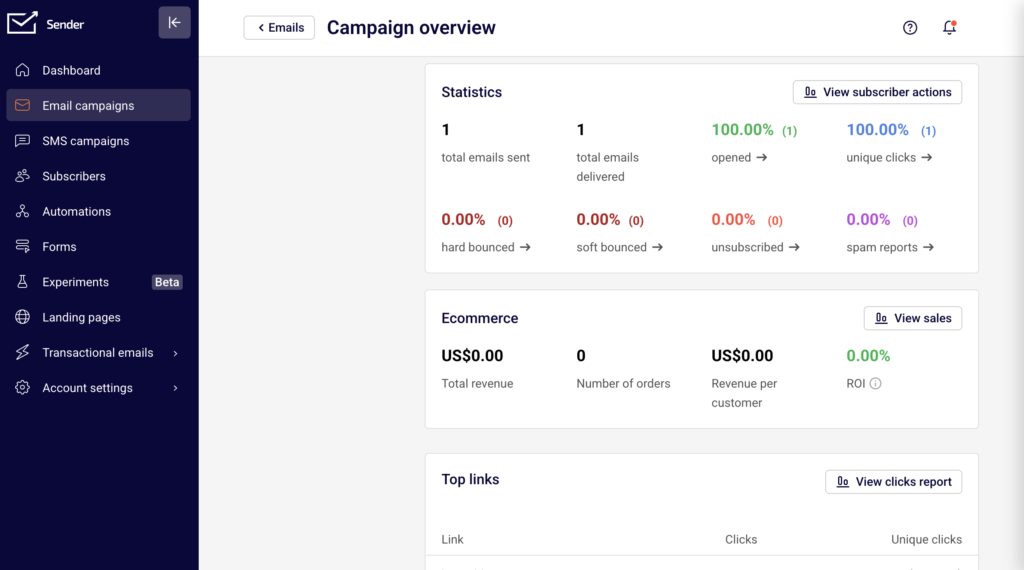
    Campaign-level spam reports — Navigate to Email campaigns, select a sent campaign, and open the Campaign overview. In the Statistics section, check the spam reports count. A spike in spam reports on a specific campaign indicates content or targeting issues that need immediate attention.

    Google Postmaster Tools — If you send to Gmail recipients, check Google Postmaster Tools for your domain’s reputation rating (High, Medium, Low, Bad). This external tool provides domain-level reputation data that supplements Sender’s built-in metrics and shows how Gmail specifically views your sending behavior.

    MXToolbox Blacklist Check — Run your sending domain and IP through MXToolbox Blacklist Lookup to check whether you appear on any major blacklists. Being listed on blacklists such as Spamhaus, Barracuda, or SORBS directly causes email rejections and filtering.

    Steps to monitor and protect your reputation

    Step 1 — Review your Dashboard metrics weekly

    Go to Dashboard and review the Traffic and reach report. Check the Hard bounce rate, Average spam rate, and Bounce rate values. Compare them over time using the date selector in the top right corner. If any metric trends upward across multiple sending periods, investigate the cause before sending your next campaign. Healthy sending shows a hard bounce rate below 2% and a spam rate below 0.1%.

    Step 2 — Audit campaign-level performance after each send

    After each campaign, navigate to Email campaigns, open the sent campaign, and review the Statistics section on the Campaign overview page. Compare spam reports, hard bounced, soft bounced, and unsubscribed counts against previous campaigns. If spam reports or hard bounced numbers are higher than usual, pause sending and review your recipient list and content before the next campaign.

    Step 3 — Check external reputation tools monthly

    Visit Google Postmaster Tools to review your domain reputation and spam rate as reported by Gmail. Run a blacklist check on MXToolbox for both your sending domain and IP. If your domain reputation is rated Low or Bad in Google Postmaster Tools, or if you appear on any blacklist, take corrective action immediately — reduce sending volume and focus only on your most engaged subscribers.

    Step 4 — Clean your subscriber list regularly

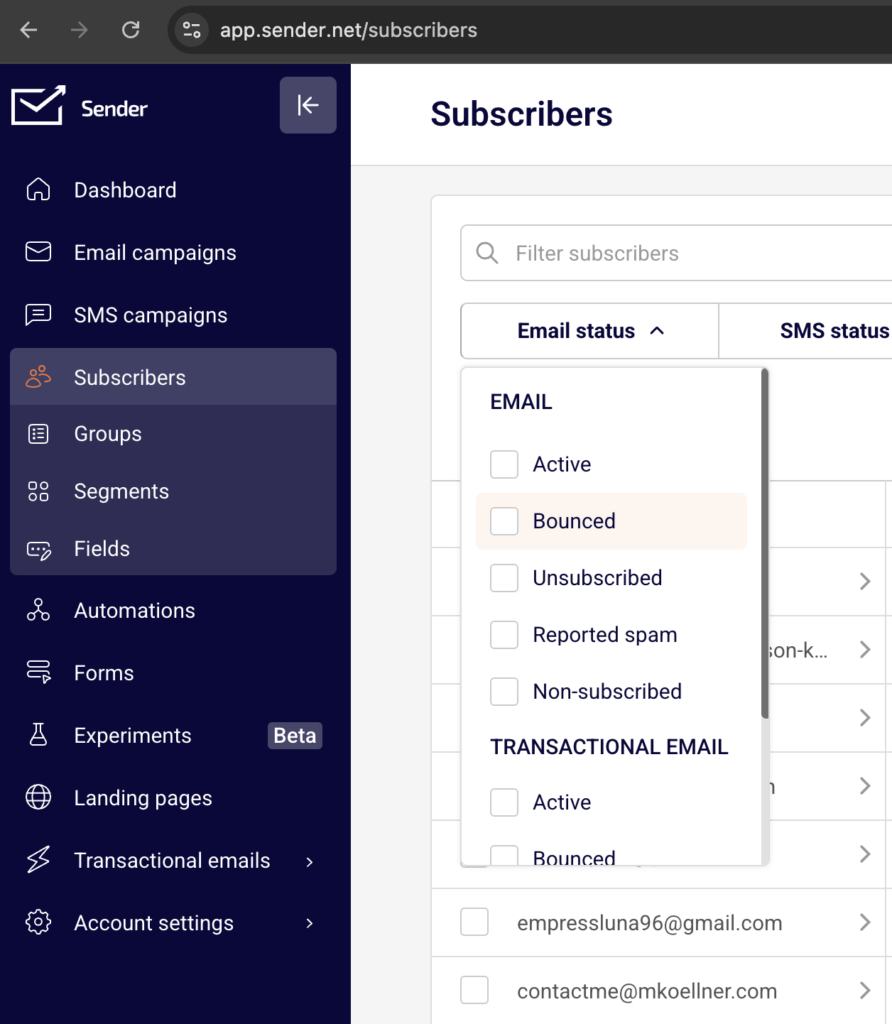
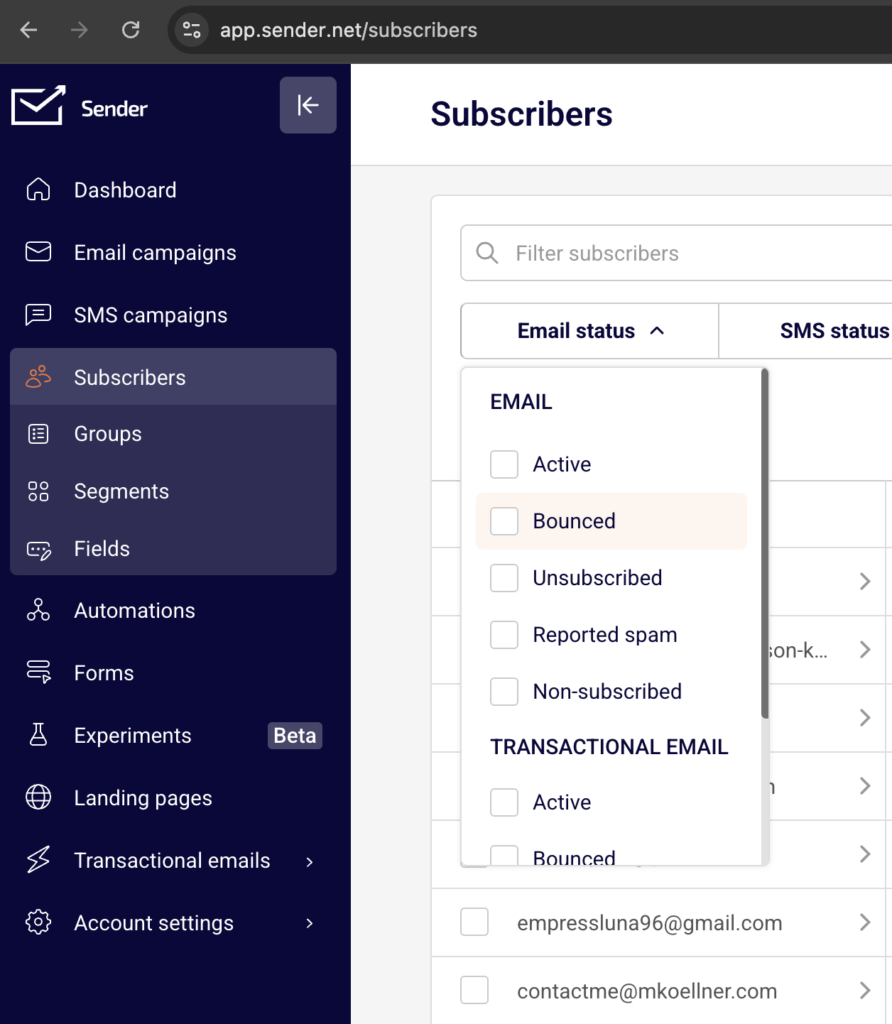
    Go to Subscribers and use the Email status filter to identify inactive or problematic addresses.

    subscriber-email-status

    Remove subscribers who have not opened or clicked any email in the last 90–120 days. Sending to disengaged recipients lowers your engagement rate, which mailbox providers interpret as a negative reputation signal. Regular list hygiene also reduces the risk of hitting spam traps.

    Step 5 — Monitor transactional email metrics separately

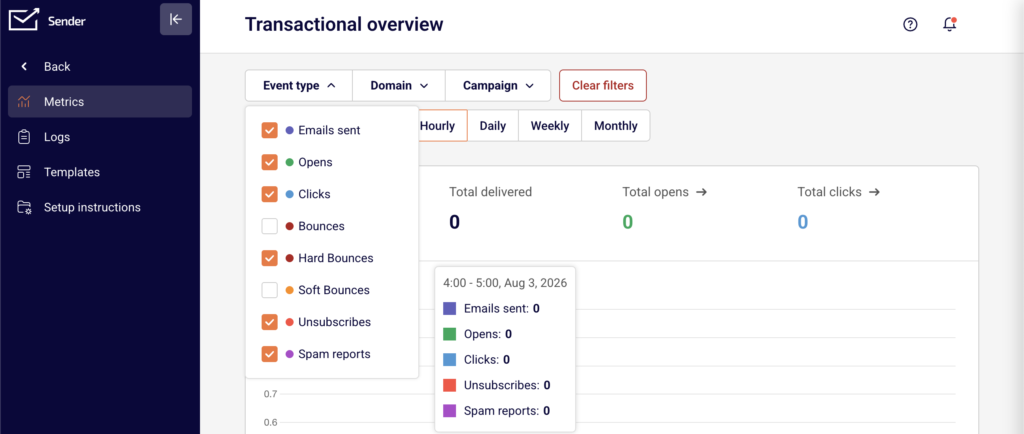
    Navigate to Transactional emails → Metrics and check the Hard bounces and Spam reports counts.

    transactional-email-metrics

    Transactional emails contribute to your domain reputation just like marketing campaigns. Filter by Domain to isolate performance per sending domain. If transactional emails show rising bounces or spam reports, verify that your transactional sending triggers and recipient data are accurate.

    How filtering works

    Reputation scoring — Mailbox providers assign a reputation score to your sending domain and IP address based on historical sending patterns. This score incorporates bounce rates, spam complaint rates, engagement metrics, and blacklist status. A low score causes your emails to be filtered to spam or rejected outright.

    Engagement-based filtering — Providers like Gmail weigh recipient engagement heavily. If recipients consistently open, click, and reply to your emails, your reputation strengthens. If recipients ignore, delete, or mark your emails as spam, your reputation degrades. This is why sending to engaged subscribers is critical for inbox placement.

    Content filtering — Spam filters analyze email content for patterns associated with spam, including excessive use of capital letters, misleading subject lines, heavy image-to-text ratios, and known spam phrases. Content filtering works alongside reputation scoring — poor content can trigger spam placement even when reputation is otherwise healthy.

    Blacklist filtering — Blacklist operators like Spamhaus, Barracuda, and SORBS maintain lists of IPs and domains associated with spam. Mailbox providers query these blacklists in real time. If your domain or IP appears on a blacklist, providers may reject your emails entirely or route them to spam regardless of other reputation signals.

    Feedback loops — Mailbox providers send complaint data back to email service providers like Sender when a recipient marks an email as spam. Sender processes this data and reflects it in your spam reports metric. High complaint rates through feedback loops directly lower your reputation score with the reporting provider.

    Recovery tips

    Reduce sending volume — If your reputation is damaged, temporarily reduce your sending volume and frequency. Send only to your most engaged subscribers to generate positive engagement signals and gradually rebuild trust with mailbox providers.

    Remove problematic addresses — Go to Subscribers and remove addresses that have hard bounced, repeatedly soft bounced, or generated spam complaints. Continuing to send to these addresses accelerates reputation damage.

    Send re-engagement campaigns — Before removing inactive subscribers entirely, send a targeted re-engagement campaign to a small segment. Subscribers who do not engage after re-engagement should be removed from your active list to prevent further reputation harm.

    Request delisting if blacklisted — If you find your domain or IP on a blacklist through MXToolbox, visit the blacklist provider’s website (such as Spamhaus, Barracuda, or SORBS) and submit a delisting request. Most providers require you to demonstrate that the underlying issue has been resolved before granting removal.

    Monitor continuously after correction — After taking corrective action, monitor your Dashboard metrics and Google Postmaster Tools daily for at least two weeks. Reputation recovery is gradual, and sustained improvement in bounce rates, spam rates, and engagement is necessary to restore inbox placement.

    Common issues

    Sudden spike in hard bounces → This typically happens after importing an old or unverified list. Remove all hard-bounced addresses immediately from Subscribers and avoid importing lists that have not been verified recently.

    Emails going to spam despite low complaint rates → Low engagement (opens and clicks) can cause spam placement even without complaints. Review your Campaign overview → Statistics for opened and unique clicks rates, and segment your list to target only active subscribers.

    Blacklisted after a single campaign → Sending a large volume to an unclean list can trigger blacklisting in one send. Check MXToolbox for listings, submit delisting requests, and reduce your next send volume significantly while focusing on list quality.

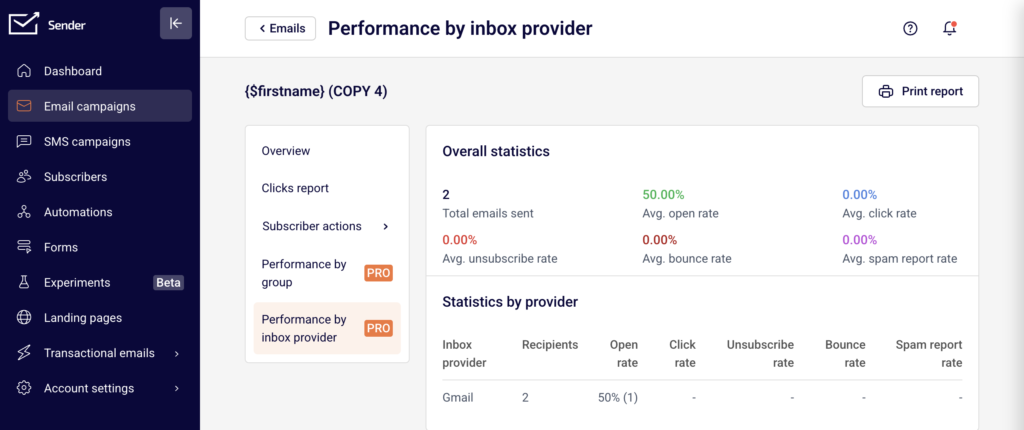
    Reputation differs across providers → Gmail, Outlook, and Yahoo use independent reputation systems. Your emails may reach the inbox at one provider but land in spam at another. Use Google Postmaster Tools for Gmail-specific data, and review per-provider patterns in the Performance by inbox provider report on the Campaign overview page (available on Pro plans).

    Spam rate rising gradually over time → This signals list fatigue or a growing number of disengaged recipients. Check the Average spam rate on your Dashboard over progressively longer date ranges. Implement regular list cleaning and re-engagement workflows to reverse the trend.

    FAQs

    How do I know if my domain is on a blacklist?

    Use external tools like MXToolbox, Spamhaus Lookup, or Barracuda Reputation to check your domain and sending IP. If listed, follow the blacklist provider’s delisting process. Monitor your Hard bounce rate and Average spam rate on the Dashboard for signs of blacklisting, such as a sudden spike in rejections from a specific provider.

    How long does it take to recover sender reputation?

    Recovery time varies depending on the severity of the damage and the actions taken. Minor issues may resolve within one to two weeks of corrected sending behavior. Severe reputation damage, such as sustained high spam complaint rates, can take several weeks to months. Consistent, lower-volume sending to engaged subscribers accelerates recovery.

    What is a spam trap and how does it affect my reputation?

    A spam trap is an email address used by blacklist operators or mailbox providers to identify senders with poor list practices. Sending to a spam trap signals that your list contains unverified or outdated addresses. This can result in blacklisting or reduced inbox placement. Remove inactive subscribers regularly through the Subscribers section to reduce spam trap risk.

    Does Sender share my sending IP with other users?

    Sender’s infrastructure and IP allocation policies may vary by plan. Check your account settings or contact Sender support to understand whether your account uses shared or dedicated IPs, as this affects how other senders’ behavior may influence your reputation.

    Why are my emails going to spam even though authentication passes?

    Authentication (SPF, DKIM, DMARC) is necessary but not sufficient for inbox placement. Mailbox providers also evaluate sender reputation, engagement rates, complaint rates, and content quality. If your emails pass authentication but land in spam, focus on improving engagement metrics visible in your Campaign overview → Statistics, reducing complaints, and reviewing your content for spam trigger patterns.

  • Warming Up Your Domain

    This guide explains how to warm up a new or inactive sending domain in Sender by gradually increasing email volume and building a positive sender reputation with mailbox providers.

    Prerequisites

    • An active Sender account
    • A domain you own or manage, added and verified in Sender
    • SPF, DKIM, and DMARC authentication fully configured and showing green checkmarks in the Authentication column
    • Access to your domain’s DNS settings (through your domain registrar or DNS provider)
    • A subscriber list with identifiable engaged contacts (recent opens or clicks)

    Where to Find This Setting

    Domain warming is not a single toggle in Sender — it is a sending strategy you execute across multiple areas of the dashboard. The key locations are:

    account-settings-domain

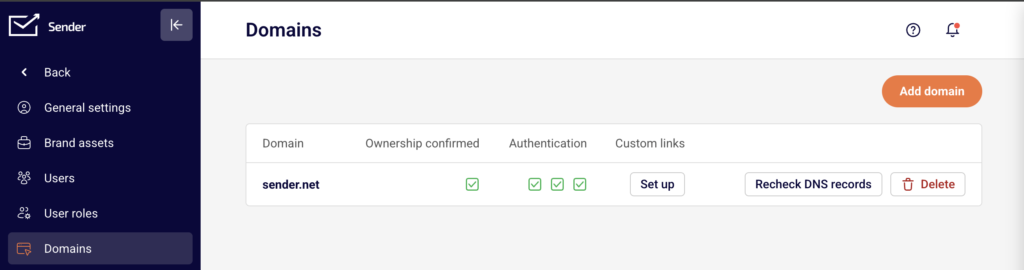
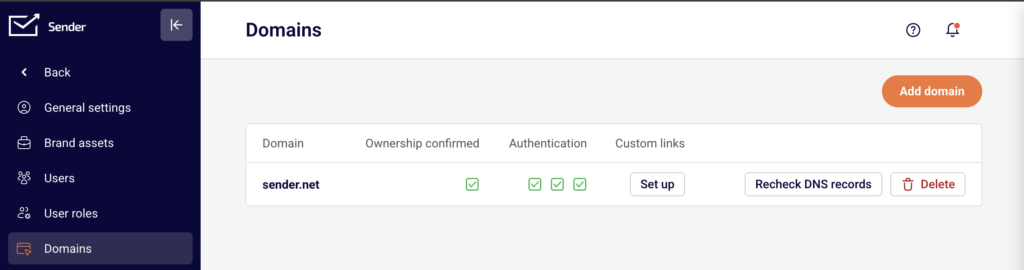
    Account settings → Domains — confirm your domain is authenticated before you begin warming. You will see a table listing each domain with its Ownership confirmed status, Authentication checkmarks (SPF, DKIM, DMARC), and Custom links column. Use the Recheck DNS records button to verify your records are current.

    premade-segments

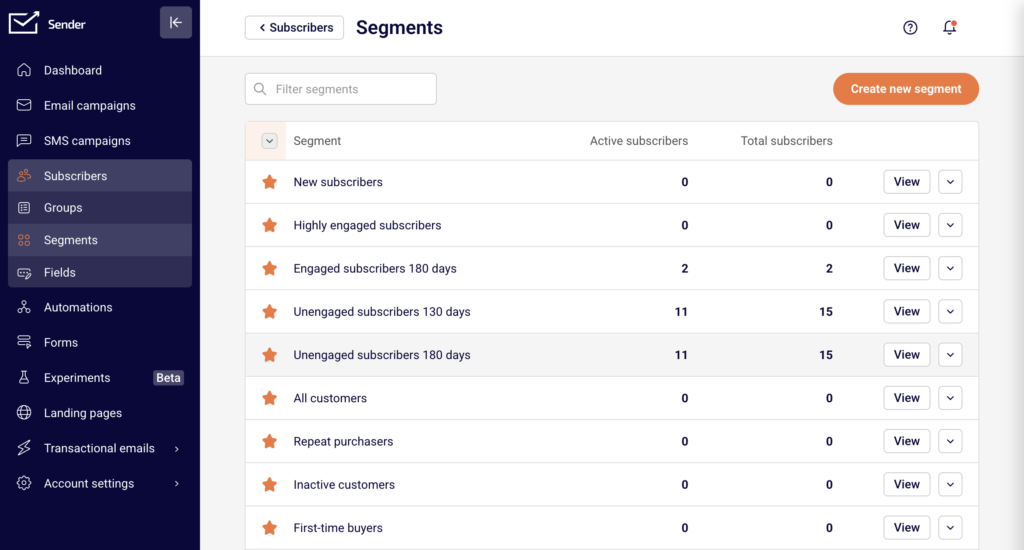
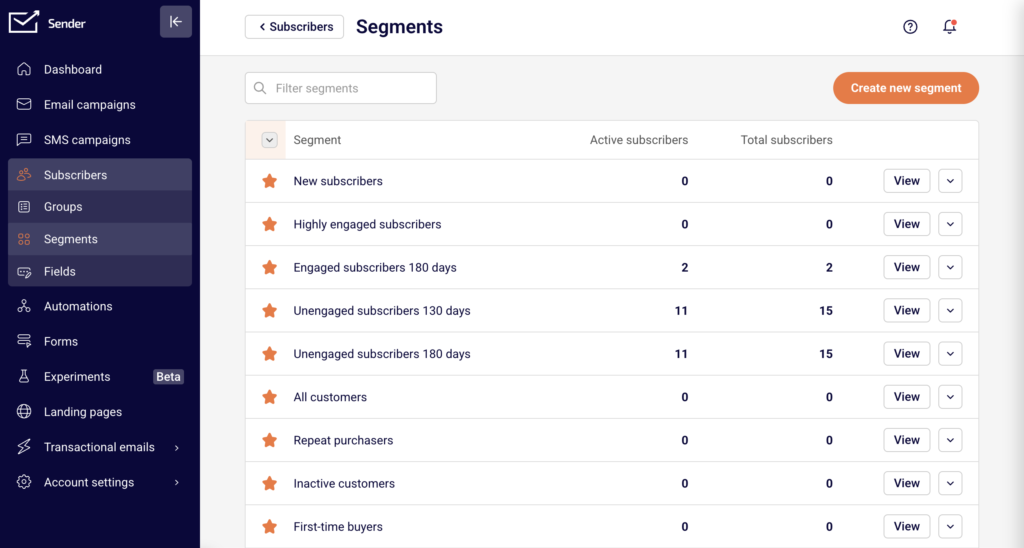
    Subscribers → Segments — use the premade segments such as Highly engaged subscribers, Engaged subscribers 180 days, and New subscribers to target your warmup sends.

    dashboard-traffic-report

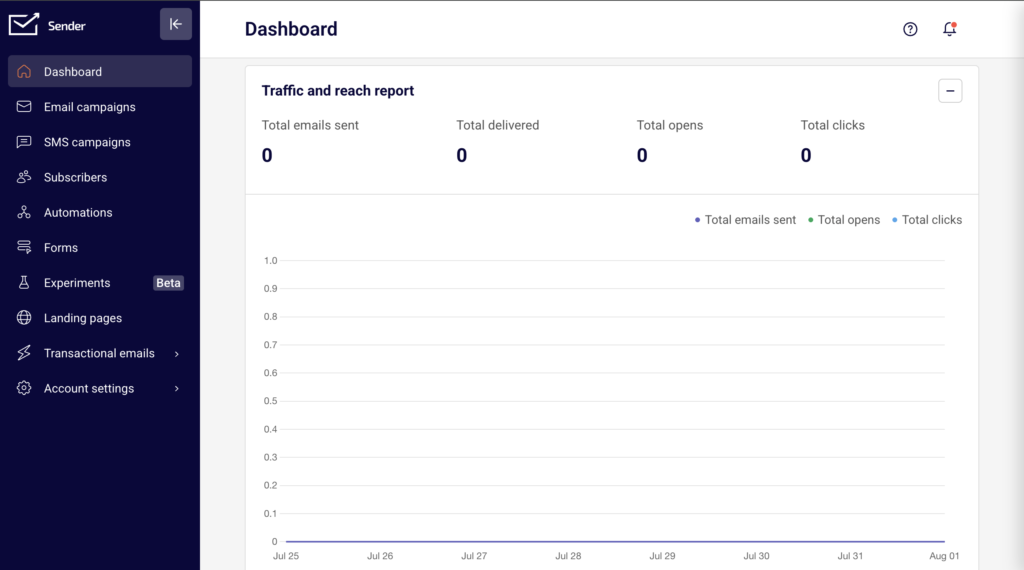
    Dashboard — monitor the Traffic and reach report for Total emails sent, Total delivered, Total opens, Total clicks, Bounce rate, Total spams, and Average spam rate throughout the warming period.

    Steps to Warm Up Your Domain

    Step 1 — Verify domain authentication is complete

    Go to Account settings → Domains. Confirm that your sending domain shows a green checkmark under Ownership confirmed and three green checkmarks under Authentication (one each for SPF, DKIM, and DMARC). If any checkmark is missing or shows a warning, resolve the DNS issue before starting the warmup. Click Recheck DNS records if you recently updated your DNS configuration. Do not begin sending volume until all three protocols pass verification.

    Step 2 — Set up engagement-based automations

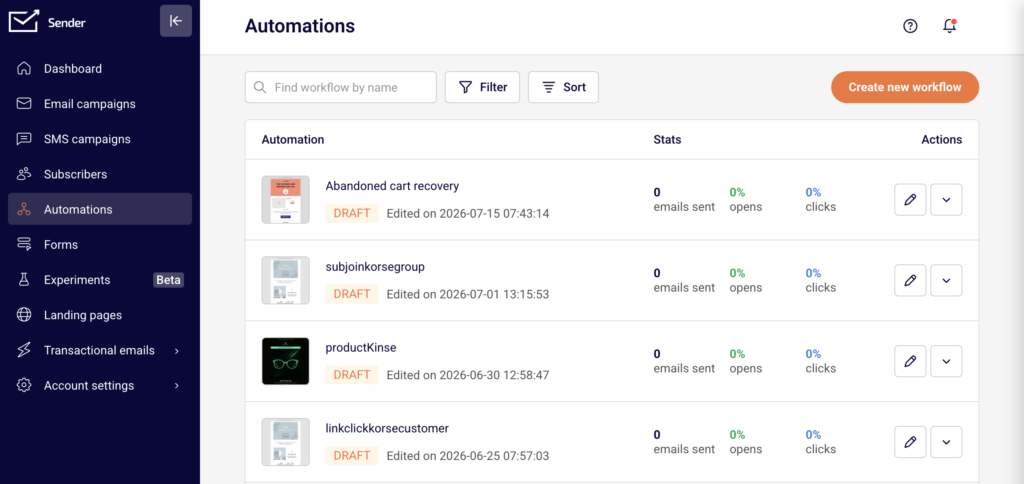
    Go to Automations and click Create new workflow. Build high-engagement automation flows such as Welcome series or Abandoned cart sequences.

    automations-list

    These automations generate one-to-one, subscriber-triggered emails that produce strong open and click signals. Activate these automations and let them run for at least 3–10 days before sending any bulk campaigns. This initial automated sending establishes positive engagement patterns with mailbox providers and lays the foundation for your domain’s reputation.

    Step 3 — Segment your most engaged subscribers

    Go to Subscribers → Segments. Use the premade Highly engaged subscribers or Engaged subscribers 180 days segment to identify contacts who have recently opened or clicked your emails. If you are migrating from another email platform, create a custom segment of contacts who engaged within the last 180 days. Your first manual campaigns should target only these engaged subscribers and any new subscribers from the last 45 days.

    Step 4 — Send campaigns with gradually increasing volume

    Go to Email campaigns and click New campaign. Send your first campaign to the engaged segment you created in Step 3. Start with a small portion of your list — a few hundred to a few thousand recipients depending on your total list size.

    email-campaigns

    Over the following 2–4 weeks, gradually increase the number of recipients per campaign. Add less-engaged segments only after your engagement metrics remain healthy. Avoid sending to your full list until the warmup period is complete.

    Step 5 — Monitor metrics and adjust

    Return to the Dashboard after each campaign send. Review the Traffic and reach report for the following key indicators: Total opens, Total clicks, Bounce rate, Total spams, and Average spam rate. Aim for open rates above 20%, bounce rates below 2%, and spam complaint rates below 0.1%. If metrics trend downward, reduce volume, clean your list, or re-check your authentication. Continue monitoring for the full warmup duration of 2–4 weeks.

    How to Verify

    Go to Account settings → Domains and confirm all three green checkmarks remain visible in the Authentication column throughout the warming period. On the Dashboard, check the Traffic and reach report — healthy warming shows steady or increasing open rates, low bounce rates, and minimal spam complaints across sends. If authentication checkmarks disappear or metrics degrade significantly, pause sending, review your DNS records, and click Recheck DNS records. Consistent positive engagement metrics across 2–4 weeks of gradual volume increases indicate a successfully warmed domain.

    How It Works

    Domain reputation — Mailbox providers such as Gmail, Outlook, and Yahoo assign a reputation score to every sending domain. This score is built over time based on recipient engagement, bounce rates, and spam complaints. A new or inactive domain has no established reputation, so mailbox providers treat its emails with caution and may throttle or filter them.

    Gradual volume increase — Sending a large volume of email from a domain with no history triggers spam filters and rate limits. By starting with small sends to engaged recipients and slowly increasing volume, you signal to mailbox providers that your domain sends wanted email. Each successful send with positive engagement improves the domain’s reputation incrementally.

    Authentication as a foundation — SPF, DKIM, and DMARC records do not warm a domain on their own, but they are required for warming to succeed. SPF tells mailbox providers which servers are authorized to send on your domain’s behalf. DKIM cryptographically signs each message to prove it was not altered in transit. DMARC instructs mailbox providers how to handle messages that fail SPF or DKIM checks. Without all three in place, warming efforts will produce inconsistent results.

    Engagement signals — Mailbox providers weight recipient actions such as opens, clicks, and replies heavily when evaluating sender reputation. Sending to engaged subscribers during the warming period generates the positive signals that build trust. Sending to unengaged or invalid addresses generates bounces and spam complaints that damage reputation and can undo warming progress.

    Common Issues

    High bounce rate during early sends → Your subscriber list may contain outdated or invalid email addresses. Clean your list before starting the warmup by removing hard bounces and long-inactive subscribers. Use the Subscribers page to filter by Email status and remove invalid contacts.

    Emails landing in spam despite authentication passing → Authentication alone does not guarantee inbox placement. Mailbox providers also evaluate domain age, sending history, content quality, and engagement metrics. Reduce your send volume, target only highly engaged subscribers, and check that your email content does not trigger spam filters.

    Sudden drop in open rates after increasing volume → You likely increased volume too quickly or added less-engaged segments too early. Scale back to the volume and audience of your last successful send, wait several days, then increase more gradually.

    Authentication checkmarks disappear after domain was verified → Your DNS records may have been modified or removed by your DNS provider or another administrator. Go to Account settings → Domains and click Recheck DNS records. Compare the records shown in Sender with your current DNS configuration and restore any missing TXT or CNAME entries.

    Mailbox provider throttling or deferring messages → Some providers impose per-sender limits for domains with no reputation. This is expected behavior during warming. Continue sending at moderate volumes and the throttling will ease as your reputation improves. Do not attempt to bypass throttling by sending large bursts.

    FAQs

    How long does domain warming take?

    Most domains require 2–4 weeks of consistent, gradually increasing sends to build a stable reputation. The exact timeline depends on your total list size, engagement quality, and how aggressively you scale volume. Domains with very large lists or lower engagement may need longer.

    Is domain warming the same as IP warming?

    No. Domain warming builds reputation for your sending domain (the address in the From field), while IP warming builds reputation for the specific IP address your emails are sent from. On Sender’s shared infrastructure, IP reputation is managed for you. If you have a dedicated IP through the Enterprise plan, you need to warm both the IP and the domain separately.

    Can I skip warming if my domain is already authenticated?

    Authentication (SPF, DKIM, DMARC) is a prerequisite for warming, not a substitute for it. A fully authenticated domain with no sending history still has no reputation. Mailbox providers will throttle or filter emails from an authenticated but unwarmed domain.

    What volume should I start with?

    Start with your most engaged subscribers — typically a few hundred to a few thousand recipients. Increase volume by roughly 25–50% with each subsequent send, provided engagement metrics remain healthy. There is no universal number because list size and engagement vary.

    Do I need to warm my domain if I am migrating from another email platform?

    Yes. Even if your domain had a strong reputation on your previous platform, switching to Sender changes the sending infrastructure. Create a segment of contacts who engaged in the last 180 days and follow the warming steps starting with that segment. Your existing domain reputation will help, but a gradual ramp-up is still necessary.

    What metrics should I watch during warming?

    Monitor Total opens, Total clicks, Bounce rate, Total spams, and Average spam rate on the Dashboard. Open rates above 20%, bounce rates below 2%, and spam complaint rates below 0.1% indicate healthy warming. If any metric trends into a warning zone, reduce volume and review your list quality.

    Can I send to my full list on day one?

    No. Sending to your entire list before building reputation is the most common cause of deliverability problems with a new domain. Always start with engaged subscribers and scale gradually over 2–4 weeks.

  • How email deliverability works

    This guide covers how email deliverability works, what factors determine whether your emails reach the inbox, and what actions you can take in Sender to improve your results.

    Why this matters

    Email deliverability is the ability of your emails to reach the recipient’s inbox rather than being filtered to spam or blocked entirely. Mailbox providers such as Gmail, Yahoo, and Outlook evaluate every incoming email based on the sender’s reputation, authentication setup, content quality, and subscriber engagement. Poor deliverability means your campaigns go unseen, regardless of how many emails you send. Understanding the factors that affect deliverability helps you take the right actions to protect your sender reputation and maintain consistent inbox placement.

    Recommended practices

    Authenticate your sending domain

    Domain authentication tells mailbox providers that you are a legitimate sender and that your emails have not been tampered with. Set up SPF, DKIM, and DMARC records for your sending domain. In Sender, go to Account settings → Domains to check whether your domain’s Ownership confirmed and Authentication columns show verified status. Unauthenticated emails are far more likely to be filtered to spam or rejected outright.

    Warm up new sending domains gradually

    When you start sending from a new domain or return after a long period of inactivity, mailbox providers have no history to evaluate your reputation. Sending a large volume immediately can trigger spam filters. Start with a small batch of emails to your most engaged subscribers — those who have recently opened or clicked — and increase volume steadily over 2–4 weeks. Monitor your Bounce rate and Average spam rate on the Dashboard during this period to catch problems early.

    Send to engaged subscribers

    Engagement — opens, clicks, and replies — is one of the strongest signals mailbox providers use to determine inbox placement. Subscribers who do not interact with your emails signal to providers that your content may be unwanted. Create segments in Subscribers → Segments that target contacts who have opened or clicked within the last 30–90 days. Prioritize these segments for your campaigns. This directly improves the engagement signals mailbox providers track.

    Maintain list hygiene

    Invalid and inactive addresses on your list increase your bounce rate and reduce engagement, both of which damage your sender reputation. Regularly review subscribers with a Bounced status by filtering with the Email status dropdown on the Subscribers page. Remove or suppress contacts who have not engaged in 90–180 days. Never use purchased or scraped email lists — these contacts have not opted in and will generate bounces and spam complaints.

    Keep sending volume and frequency consistent

    Sudden spikes in email volume are a red flag for mailbox providers. If you typically send 5,000 emails per week and suddenly send 50,000, providers may throttle or block your messages. Establish a regular sending schedule and stick to it. Use the Traffic and reach report on the Dashboard to track your Total emails sent over time and verify your sending patterns remain stable.

    Key metrics to watch

    Bounce rate — The percentage of sent emails that were not accepted by the recipient’s mail server. Found on the Dashboard under the Traffic and reach report section. A bounce rate above 2% indicates list quality issues that need attention.

    Hard bounce rate — The percentage of emails that permanently failed, typically due to invalid or non-existent addresses. Displayed on the Dashboard below the main chart. Any hard bounce rate above 0.5% suggests your list contains outdated or incorrect addresses that should be removed.

    Average spam rate — The percentage of recipients who marked your email as spam. Shown on the Dashboard alongside bounce metrics. Keep this below 0.1% — exceeding this threshold can cause providers like Gmail to route your emails to spam.

    Unsubscribe rate — The percentage of recipients who unsubscribed after receiving your email. Visible on the Dashboard and in each campaign’s Statistics section under the Campaign overview. A rising unsubscribe rate may indicate your content is not matching subscriber expectations or you are sending too frequently.

    Opened and unique clicks — Engagement metrics that indicate whether recipients are interacting with your content. Found in the Statistics section of each campaign’s Campaign overview page. Consistently low open or click rates suggest your subject lines, content, or sending times need adjustment, and may negatively affect inbox placement over time.

    Common mistakes

    Sending to your entire list without segmentation → Mailbox providers weigh engagement heavily. Sending to unengaged subscribers drags down your open and click rates, which signals low-quality sending. Use Subscribers → Segments to target active subscribers.

    Ignoring bounces → Continuing to send to addresses that bounce damages your sender reputation. Filter by Email status → Bounced on the Subscribers page to identify and remove invalid addresses after every campaign.

    Using a purchased or rented email list → These contacts have not opted in to your emails. Sending to them generates high bounce rates, spam complaints, and can lead to account suspension. Build your list through organic opt-in methods only.

    Sending inconsistently → Long gaps between sends followed by large blasts make your sending pattern unpredictable to mailbox providers. Maintain a regular schedule and use the Dashboard to monitor volume trends.

    Skipping domain authentication → Without SPF, DKIM, and DMARC, mailbox providers cannot verify your identity. This significantly increases the chance of your emails being filtered to spam. Verify your authentication status under Account settings → Domains.

    FAQs

    What is the difference between delivery rate and inbox placement?

    Delivery rate measures the percentage of emails accepted by the recipient’s mail server — it does not mean they reached the inbox. Inbox placement measures how many of those accepted emails actually land in the inbox versus the spam folder. You can have a high delivery rate while many emails still go to spam.

    How long does it take to warm up a new sending domain?

    A typical warm-up takes 2–4 weeks. Start by sending small volumes to your most engaged subscribers and gradually increase the amount each day or week until you reach your full sending capacity. Monitor your Bounce rate and Average spam rate on the Dashboard throughout the process.

    Does Sender automatically handle hard bounces?

    Sender manages hard bounces according to its bounce handling policies. You can check a subscriber’s status by using the Email status filter on the Subscribers page. Contacts marked as Bounced will not receive further emails. You can also manually review and clean bounced contacts from your list.

    How do spam complaints affect my deliverability?

    Mailbox providers track your spam complaint rate closely. If your Average spam rate exceeds approximately 0.1%, providers like Gmail may begin routing your emails to spam. Monitor Total spams and Average spam rate on the Dashboard and investigate any spikes immediately.

    Should I buy an email list to grow my audience?

    No. Purchased lists contain addresses that have not opted in to receive your emails. This leads to high bounce rates, spam complaints, and potential account suspension. Build your list organically using signup forms and lead magnets so every subscriber has chosen to hear from you.

    Why are my emails going to spam even though my delivery rate is high?

    A high delivery rate only means the mail server accepted your emails — it does not control inbox placement. Common causes of spam folder placement include missing domain authentication, low engagement rates, high spam complaint rates, or content that triggers spam filters. Review your Average spam rate and engagement metrics on the Dashboard and verify your domain authentication under Account settings → Domains.

  • How to Set Up SPF, DKIM, and DMARC for Your Sending Domain

    This guide explains how to configure SPF, DKIM, and DMARC authentication records for your sending domain in Sender. Completing all three ensures mailbox providers can verify emails sent through your account.

    Prerequisites

    • An active Sender account
    • A domain you own or manage (e.g., yourdomain.com)
    • Access to your domain’s DNS settings through your domain registrar or DNS provider
    • A working email address on the domain you want to authenticate (used to verify domain ownership)

    Where to Find This Setting

    In the Sender dashboard, go to: Account settings → Domains

    domain-list-page

    On this page, you will see a table listing your sending domains. Each domain row shows four columns: Domain, Ownership confirmed, Authentication, and Custom links. The Authentication column displays three status indicators — one each for SPF, DKIM, and DMARC. A green checkmark means the record is verified. An Add domain button appears in the top-right corner, and each domain row includes a Recheck DNS records button.

    Steps to Set Up SPF, DKIM, and DMARC

    Step 1 — Add your domain and verify ownership

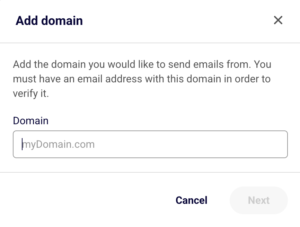
    Click Add domain in the top-right corner of the Domains page. In the dialog that appears, enter your domain name (e.g., yourdomain.com) in the Domain field and click Next.

    add-domain

    On the following screen, enter an email address associated with that domain in the Email field and click Verify ownership. Sender will send a verification email to that address. Open the email and click the verification link to confirm domain ownership. Once verified, a green checkmark appears in the Ownership confirmed column.

    Step 2 — Add DNS records to your domain

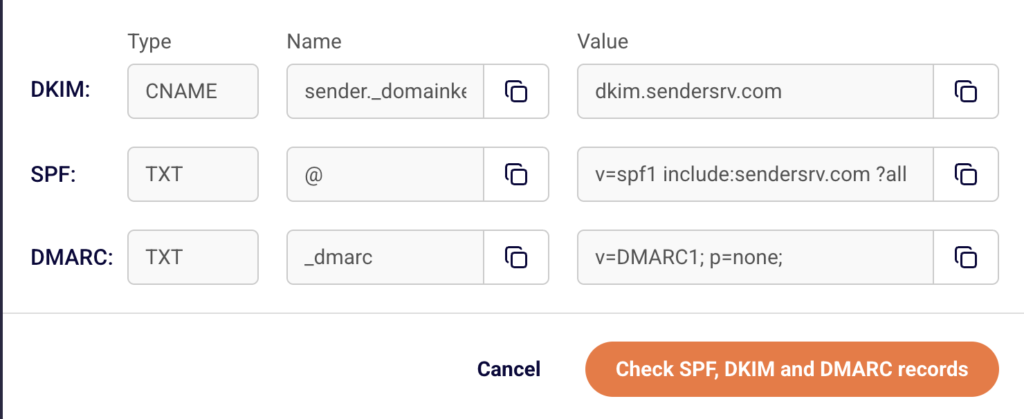
    After ownership is verified, click the domain row to open the DNS records dialog titled Authenticate your SPF, DKIM and DMARC records. Sender displays three records you need to add at your DNS provider. Each record shows a Type, Name, and Value.

    DKIM record:

    Type: CNAME

    Name/Host: sender._domainkey

    Value: dkim.sendersrv.com

    TTL: 3600

    SPF record:

    Type: TXT

    Name/Host: @

    Value: v=spf1 include:sendersrv.com ?all

    TTL: 3600

    DMARC record:

    Type: TXT

    Name/Host: _dmarc

    Value: v=DMARC1; p=none;

    TTL: 300

    Log in to your DNS provider and create each record using the values above. Exact steps vary by provider — if you are unsure how to add DNS records, contact your domain registrar’s support team with these values.

    Note: If your domain already has an existing SPF TXT record, do not create a second one. Instead, merge the Sender include into your existing record by adding include:sendersrv.com before the all mechanism. A domain must have only one SPF TXT record to pass validation.

    Step 3 — Verify your DNS records in Sender

    Return to the DNS records dialog in Sender and click Check SPF, DKIM and DMARC records. Sender will query your domain’s DNS to verify that all three records are correctly configured.

    check-dns

    If verification succeeds, the dialog closes and three green checkmarks appear in the Authentication column on the Domains page. If one or more records fail, review the values at your DNS provider, correct any mismatches, and click Recheck DNS records to try again. DNS changes can take up to 24–48 hours to propagate, though most complete within minutes.

    How to Verify

    Go to Account settings → Domains and locate your domain in the table. The Authentication column should display three green checkmarks — one each for SPF, DKIM, and DMARC. If any checkmark is missing or shows a warning, click Recheck DNS records to re-query your DNS. DNS propagation typically completes within minutes but can take up to 24–48 hours depending on your DNS provider and TTL (time-to-live) settings. If records still fail after 48 hours, verify the exact values at your DNS provider match those shown in Sender.

    How It Works

    SPF (Sender Policy Framework) — SPF is a TXT DNS record that specifies which mail servers are authorized to send email on behalf of your domain. When a receiving server gets an email from your domain, it checks the SPF record to confirm the sending server’s IP address is permitted. Adding include:sendersrv.com authorizes Sender’s servers to send on your behalf.

    DKIM (DomainKeys Identified Mail) — DKIM adds a cryptographic signature to outgoing emails using a public-private key pair. The CNAME record you add at sender._domainkey points to Sender’s DKIM key. Receiving servers retrieve this public key from DNS and use it to verify that the message was not altered in transit and was authorized by the domain owner.

    DMARC (Domain-based Message Authentication, Reporting and Conformance) — DMARC builds on SPF and DKIM by telling receiving servers what to do when an email fails authentication. The p=none; policy in the default Sender record instructs receivers to deliver messages even if they fail checks, while still generating reports. You can later strengthen this to p=quarantine; or p=reject; as you gain confidence in your authentication setup.

    Common Issues

    SPF record not verifying → Your domain may already have an existing SPF TXT record. DNS allows only one SPF record per domain. Merge Sender’s include:sendersrv.com into your existing SPF record rather than creating a second one.

    DKIM record not verifying → The CNAME record may have been created with an incorrect name or value. Confirm the name is exactly sender._domainkey (some DNS providers automatically append your domain, so you may not need to include the full sender._domainkey.yourdomain.com). The value must point to dkim.sendersrv.com.

    DMARC record not verifying → Ensure the TXT record is created with the name _dmarc (not _dmarc.yourdomain.com if your provider appends the domain automatically). The value must begin with v=DMARC1; — this tag is case-sensitive.

    DNS changes not appearing after several hours → DNS propagation depends on the TTL value set on your records and your DNS provider’s infrastructure. Wait up to 48 hours, then click Recheck DNS records in Sender. If records still fail, use a third-party DNS lookup tool to confirm the records are publicly visible.

    Warning icon instead of a green checkmark → A warning indicates the DNS record exists but may be misconfigured or contain an incorrect value. Compare the record value shown in Sender’s DNS setup dialog with what is configured at your DNS provider. Correct any mismatches and click Recheck DNS records.

    FAQs

    How long does DNS verification take?

    Most DNS changes propagate within minutes to a few hours. In some cases, propagation can take up to 24–48 hours depending on your DNS provider and TTL settings. Click Recheck DNS records in Sender after waiting to verify.

    Do I need all three — SPF, DKIM, and DMARC?

    Yes. All three authentication protocols work together to verify your identity as a sender. SPF validates which servers can send on your behalf, DKIM ensures message integrity, and DMARC tells receiving servers what to do with unauthenticated messages. All three should show green checkmarks in the Authentication column.

    Can I use Sender with a free email address like Gmail or Yahoo?

    Using a free email address as your sender address is not recommended. Most mailbox providers enforce strict DMARC policies on free email domains, which will cause your emails to fail authentication and land in spam or be rejected.

    What happens if I change my DNS records after verification?

    If you modify or remove the DNS records Sender relies on, authentication will fail. Mailbox providers may begin rejecting or spam-filtering your emails. Go to Account settings → Domains and click Recheck DNS records to confirm your records are still valid.

    My domain shows a warning instead of a green checkmark. What does this mean?

    A warning indicates that the DNS record exists but may be misconfigured or incomplete. Review the record value shown in Sender and compare it to what is configured in your DNS provider. Correct any mismatches and click Recheck DNS records.

    What does the p=none DMARC policy mean?

    The p=none policy instructs receiving mail servers to take no enforcement action on emails that fail SPF or DKIM checks. It is a monitoring-only policy that allows you to receive DMARC reports without affecting delivery. Once you confirm all legitimate email passes authentication, you can update the policy to p=quarantine or p=reject for stronger protection.

    My DNS provider only allows one TXT record for SPF. What should I do?

    DNS requires exactly one SPF TXT record per domain. If you already have an existing SPF record, add include:sendersrv.com to it rather than creating a separate record. For example, if your existing record is v=spf1 include:otherprovider.com ~all, update it to v=spf1 include:otherprovider.com include:sendersrv.com ~all. Contact your DNS provider if you need help merging records.

  • Deleting a landing page

    This guide explains how to permanently delete a landing page from your Sender account.

    Where to Find This Setting

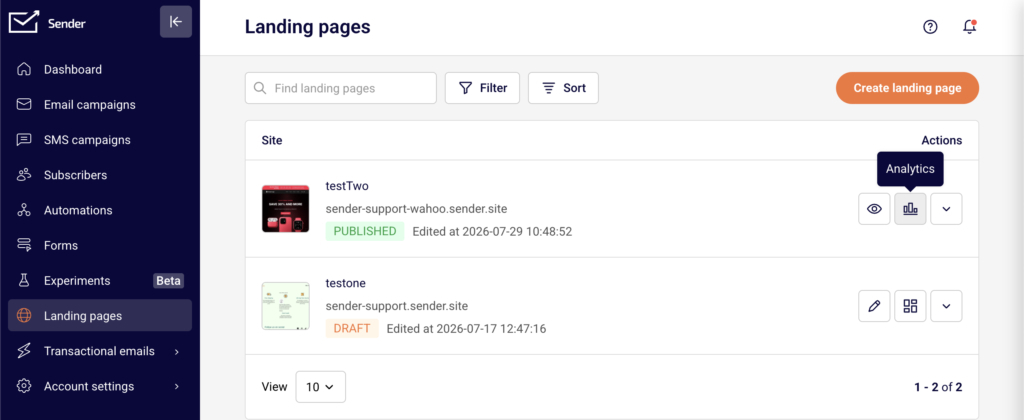
    In the Sender dashboard, go to Landing pages from the left sidebar menu. This opens the landing pages list, where all your existing pages are displayed with their name, subdomain, status, and last edited date.

    landingpage-list

    The delete option is located in the actions menu for each individual landing page.

    Steps to Delete a Landing Page

    Step 1 — Open the actions menu

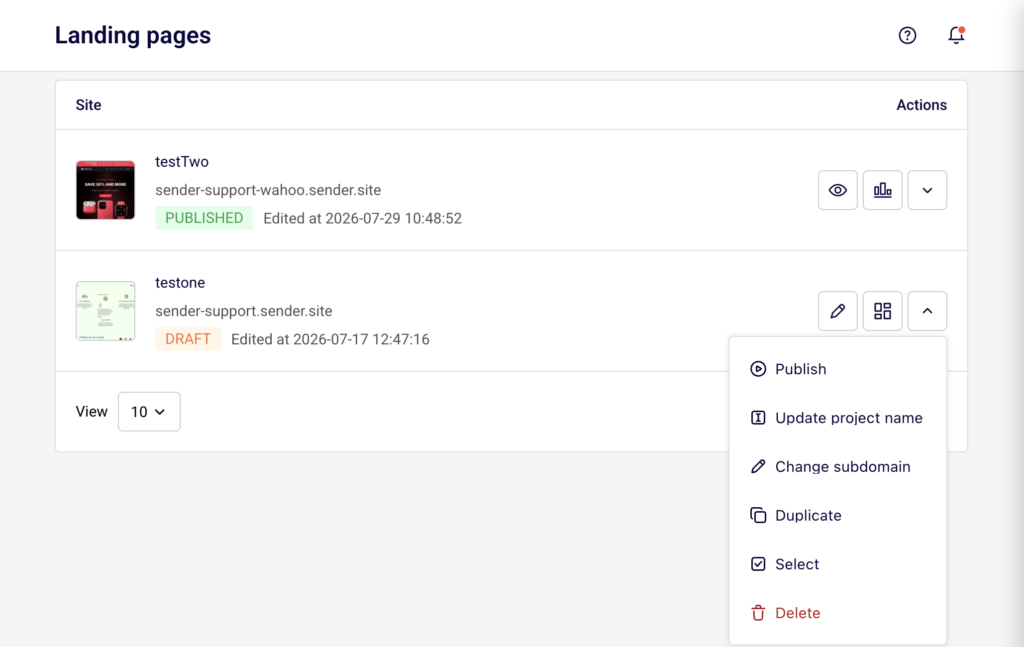
    In the Landing pages list, find the page you want to delete. On the right side of the page row, under the Actions column, click the dropdown arrow icon (next to the edit and grid icons). A menu appears with several options, including Publish, Update project name, Change subdomain, Duplicate, Select, and Delete.

    landingpage-publish-delete-duplicate

    Step 2 — Select Delete

    Click Delete at the bottom of the actions menu. It is displayed in red text to indicate this is a destructive action. A confirmation dialog titled Delete Page appears, asking “Are you sure you want to delete your site [page name]?”

    Step 3 — Confirm the deletion

    In the Delete Page dialog, click Yes, I am sure to permanently delete the landing page. To cancel and keep the page, click No, let’s keep it instead. Once confirmed, the page is removed from the landing pages list immediately.

    What Happens After the Change

    The landing page is permanently removed from your account. It no longer appears in the Landing pages list.

    If the page was published, its URL becomes inactive immediately. Visitors who try to access the old URL will see an error page.

    Any subscribers who signed up through forms on the deleted landing page remain in their assigned subscriber groups. Deleting the page does not remove subscriber data.

    This action cannot be undone. There is no way to restore a deleted landing page.

    Management Tips

    Duplicate before deleting — If you might need the page design later, use the Duplicate option from the actions menu to create a copy before you delete the original.

    Unpublish first if you’re unsure — If you only want to take a page offline temporarily, consider unpublishing it instead of deleting it. This keeps the page in your list as a draft while making the URL inactive.

    Check for active traffic — Before deleting a published landing page, verify that no active campaigns, emails, or external links are directing visitors to its URL.

    Review subscriber groups — Subscriber data collected through the page remains intact after deletion, but the form and page are no longer available for new signups. Make sure you have alternative signup paths in place if needed.

    Common Issues

    Delete option is not visible → The Delete option is located at the bottom of the actions dropdown menu. Click the dropdown arrow icon in the Actions column for the landing page to reveal the menu.

    Accidentally deleted a page → Deletion is permanent and cannot be undone. If you need to recreate the page, you will need to build it again from scratch. To prevent this, always use the Duplicate option before deleting.

    Old URL still loads after deletion → Browser caching may temporarily display the old page. Clear your browser cache or try accessing the URL in a private/incognito window to confirm the page has been fully removed.

    FAQs

    Can I undo a landing page deletion?

    No. Once you click Yes, I am sure in the Delete Page confirmation dialog, the landing page is permanently removed. There is no trash folder or undo option.

    Does deleting a landing page remove its subscriber data?

    No. Subscribers who signed up through a form on the landing page remain in their assigned groups. Deleting the page only removes the page itself.

    Can I delete a published landing page?

    Yes. You can delete a landing page regardless of its status — Draft, Published, or Unpublished. If the page is published, the URL becomes inactive immediately upon deletion.

    Can I delete multiple landing pages at once?

    You can use the Select option from the actions menu to select pages individually. Check whether a bulk delete option is available from the selection toolbar once pages are selected.

    What happens to links pointing to a deleted page?

    Any links pointing to the deleted page’s URL will stop working. Visitors who click those links will see an error page. Update or remove these links from your campaigns and external sources.

  • Publishing and unpublishing a landing page

    This guide explains how to publish a landing page to make it live, and how to unpublish it to take it offline in Sender.

    Where to find this setting

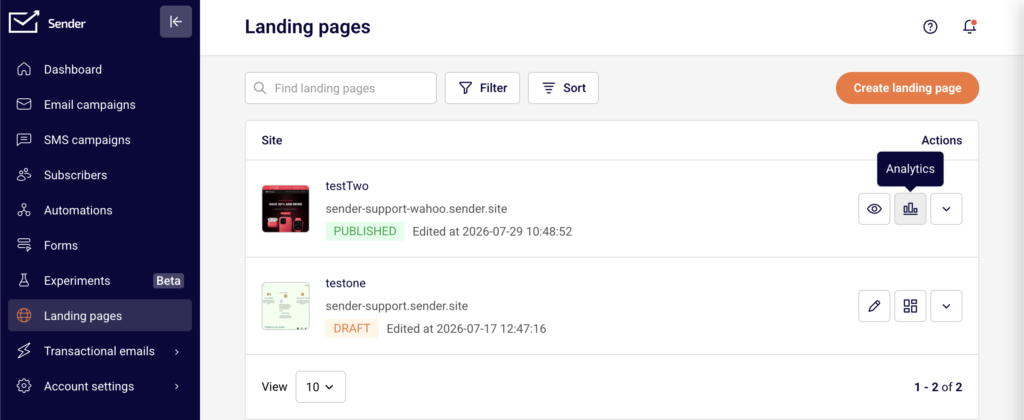
    In the Sender dashboard, go to Landing pages in the left sidebar. This opens the landing pages list, where each page displays its name, subdomain, status badge (Draft or Published), and last edited timestamp.

    landingpage-list

    You can publish or unpublish a page from two locations: the actions menu (dropdown arrow) in the landing pages list, or the Overview page for an individual landing page.

    landingpage-publish

    To open the Overview page, click the page row or the grid icon next to the page name in the list. The Overview page shows the Publish, Re-Publish, or Unpublish buttons in the top-right corner, depending on the current page status.

    Steps to publish and unpublish a landing page

    Step 1 — Open the landing page Overview or actions menu

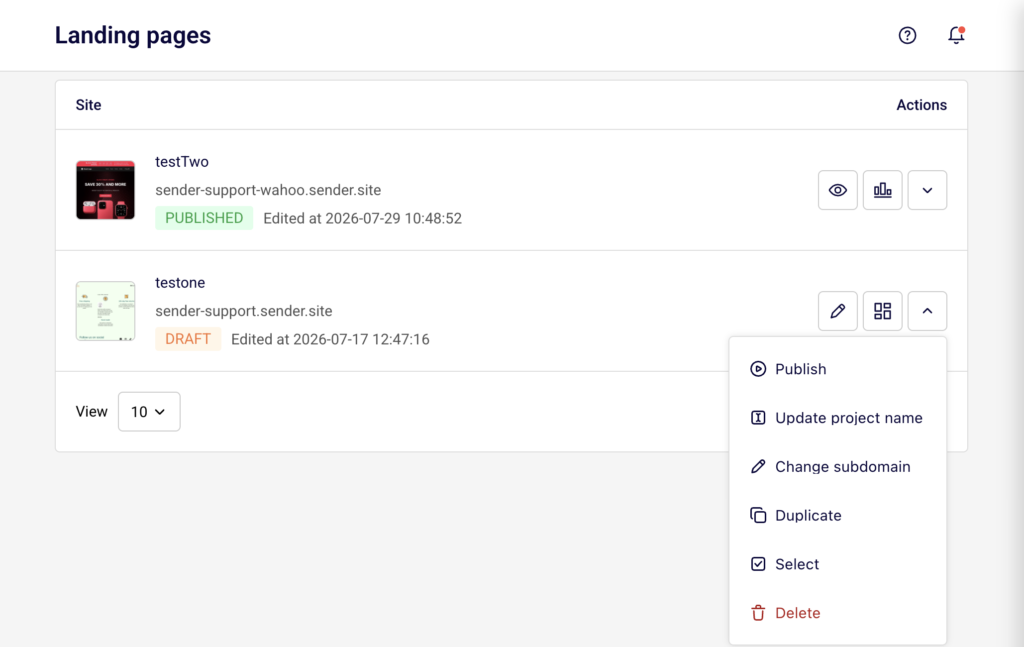
    From the Landing pages list, locate the page you want to publish or unpublish. Click the dropdown arrow in the Actions column to open the actions menu. For a page in Draft status, the menu includes a Publish option. For a page in Published status, the menu includes an Unpublish option.

    landingpage-publish-unpublish

    Alternatively, click the page row to open its Overview page, where the Publish or Unpublish button appears in the top-right corner.

    Step 2 — Publish the landing page

    Click Publish from the actions menu or from the Overview page. A green notification banner confirms “Page published.” The page status changes from Draft to Published in the landing pages list. The page is now live and accessible at its subdomain URL.

    On the Overview page, the button area updates to show Re-Publish and Unpublish as separate buttons, replacing the single Publish button.

    Step 3 — Unpublish the landing page

    To take the page offline, click Unpublish from the actions menu in the landing pages list or from the Overview page. A notification confirms “Page unpublished.” The page status returns to Draft, and the page URL becomes inactive. Visitors who try to access the URL will no longer see the page.

    The Publish button reappears on the Overview page, allowing you to republish at any time.

    Step 4 — Republish after making changes

    If you edit a previously published page in the builder, a yellow banner appears on the Overview page stating that the site has been updated with new changes and prompting you to re-publish. Click Save changes or Save and continue in the builder to save your edits first, then click Re-Publish on the Overview page to push the updated version live.

    What happens after the change

    When you publish a landing page, its status changes to Published and the page becomes accessible at its assigned subdomain URL (e.g., your-subdomain.sender.site).

    When you unpublish a landing page, the status returns to Draft and the URL becomes inactive immediately. Any visitors currently on the page can still see it until they refresh or navigate away, but new visits to the URL will fail.

    You can confirm the current status from the landing pages list, where the status badge next to each page shows either Draft or Published. Use the Filter button above the list and select Draft or Published to display only pages with a specific status.

    Management tips

    Preview before publishing — Click Preview in the builder toolbar to review your landing page before making it live. This lets you verify layout and content without affecting the published version.

    Use Re-Publish for updates — After editing a live page in the builder, return to the Overview page and click Re-Publish to apply changes. Edits saved in the builder are not reflected on the live page until you republish.

    Check the yellow update banner — If you see a yellow banner on the Overview page indicating new changes, your live page is out of date. Click Re-Publish to sync the published version with your latest edits.

    Filter your pages by status — Use the Filter button on the landing pages list to quickly show only Draft or Published pages. This helps you identify which pages are currently live and which are still in progress.

    Save your work frequently — Click Save changes in the builder toolbar to save progress without leaving the editor. Use Save and continue when you are ready to move to the Overview page and proceed with publishing.

    Common issues

    Page still shows old content after editing → Changes saved in the builder are not automatically applied to the live page. Click Re-Publish on the Overview page to push your updates live.

    Page URL returns an error after unpublishing → This is expected. Unpublishing a page deactivates the URL immediately. Republish the page to restore access.

    Publish button is missing from the actions menu → The Publish option only appears for pages in Draft status. If the page is already published, the menu shows Unpublish instead. Check the status badge next to the page name.

    Yellow banner appears on the Overview page → This means the page has been edited since it was last published. Click Re-Publish to apply the pending changes to the live version.

    FAQs

    Can I edit a landing page after it is published? 

    Yes. Click Edit from the actions menu or click the edit (pencil) icon in the landing pages list to open the page in the builder. Make your changes, click Save changes, then click Re-Publish on the Overview page to apply the updates. The page URL remains the same.

    What happens when I unpublish a landing page? 

    The page is taken offline and the URL becomes inactive. Visitors who try to access the URL will see an error or blank page. The page status returns to Draft. You can republish at any time to make it live again.

    Can I publish a landing page directly from the builder? 

    Not directly. The builder toolbar includes Save changes, Preview, and Save and continue buttons. To publish, click Save and continue to go to the Overview page, then click Publish or Re-Publish from there.

    Does unpublishing a landing page delete it? 

    No. Unpublishing only takes the page offline and changes its status to Draft. The page design, settings, and any collected subscriber data are preserved. You can edit and republish the page at any time.

    Can I change the subdomain of my landing page? 

    Yes. From the Overview page, expand Domain settings and click Edit next to the temporary domain. Enter a new subdomain in the Change subdomain dialog and click Save. You can also add a custom domain by clicking Add domain under Domain settings.

  • Connecting a signup form to your landing page

    This guide explains how to add a Leads form block to your landing page and connect it to a subscriber group in Sender’s landing page builder.

    Where to find this feature

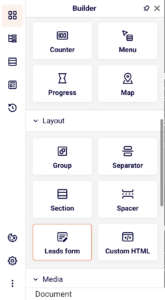
    The Leads form block is located in the Builder panel on the left sidebar of the landing page builder. Click the Building blocks icon (the first icon at the top of the left sidebar) to open the panel, then scroll down to the Layout section. The Leads form block appears alongside other layout elements like Section, Spacer, and Custom HTML.

    landingpage-leads-form

    Once added to the canvas, the form’s connection and field settings are managed in the right panel under the Content tab.

    Steps to connect a signup form

    Step 1 — Add the Leads form block to your page

    Select an existing block on the canvas, then click the parent Column in the breadcrumb bar at the bottom of the screen. Click the green + button that appears at the bottom of the column. In the block picker dialog, select Leads form.

    leads-form-input-fields

    The form appears on the canvas with a default Email field and a Submit button. You can also drag the Leads form block directly from the Builder panel onto the canvas.

    Step 2 — Connect the form to a subscriber group

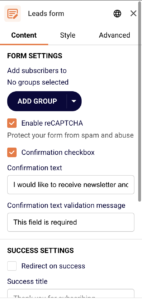
    Click the Leads form block on the canvas to open its settings in the right panel. Under the Content tab, find the FORM SETTINGS section.

    leads-form-group-assign

    The Add subscribers to field shows “No groups selected” by default. Click ADD GROUP to open a dropdown listing your existing subscriber groups. Select a group from the list, use the Find by name search field to locate a specific group, or click + Create a new group to set one up. The selected group appears as a tag with an × button to remove it. You can add multiple groups if needed.

    Step 3 — Add and configure form fields

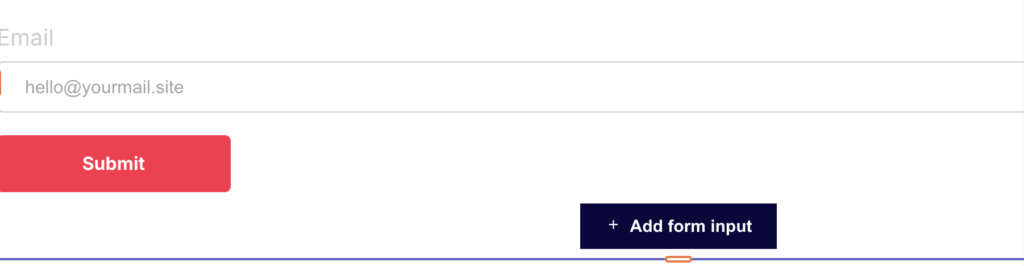
    The form includes an Email field by default. To add more fields, click + Add form input at the bottom of the form on the canvas.

    add-form-input-fields

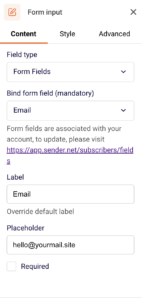
    Each field has its own settings in the right panel under the Content tab. Use the Bind form field dropdown to assign a field type — options include Email, First name, Last name, and Phone number. Customize the Label, Placeholder text, and toggle the Required checkbox for each field.

    Step 4 — Customize form appearance and messages

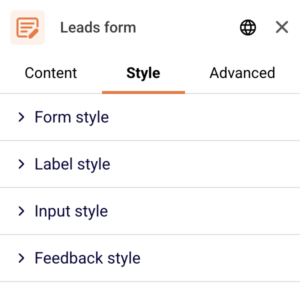
    Click the Leads form block and switch to the Style tab in the right panel. Under Form style, adjust the Background color, Gap between fields, Text alignment, and Button alignment.

    form-input-style

    Expand the Label style, Input style, and Feedback style sections for finer control. Switch back to the Content tab to edit SUCCESS SETTINGS — set the Success title (default: “Thank you for subscribing”) or enable Redirect on success. Under FAILURE SETTINGS, customize the Required error message and the general failure Message.

    Step 5 — Preview and save your changes

    Click Preview in the top-right toolbar to check how the form looks and behaves on desktop and mobile. Use the device icons in the top toolbar to switch between desktop, tablet, and mobile views. Once satisfied, click Save changes or Save and continue to preserve your work.

    Design tips

    Choose the right fields — Keep signup forms short. An Email field alone often performs best. Add First name only if you plan to use personalization in your email campaigns.

    Align the form with your page layout — Use the Button alignment and Text alignment options in the Style tab to match the form’s visual positioning with the rest of your landing page content.

    Enable reCAPTCHA for public pages — Under FORM SETTINGS in the Content tab, check Enable reCAPTCHA to protect your form from spam submissions.

    Customize success and error messages — Update the Success title and Required error message fields under the Content tab so visitors receive clear, on-brand feedback after submitting the form.

    Preview on all devices — Use the device icons (desktop, tablet, mobile) in the top toolbar to verify the form fields, labels, and button render correctly at every screen size.

    Common issues

    Form not saving subscribers → No subscriber group is connected. Click the Leads form block, open the Content tab, and click ADD GROUP under FORM SETTINGS to select or create a group.

    “Duplicate form field name” warning appears → Two or more form inputs are bound to the same field type. Click each Form input on the canvas and change the Bind form field dropdown so every field uses a unique value.

    Submit button settings are locked → The button inside the Leads form is locked by default. Click the lock icon in the floating toolbar above the button to unlock it before editing its style.

    Form fields not visible after adding → The new field may be added below the visible area of the form. Scroll down on the canvas or check the Blocks Tree panel (second icon in the left sidebar) to confirm the field exists inside the Leads form block.

    FAQs

    Can I connect a signup form to multiple subscriber groups? 

    Yes. In the Leads form settings under the Content tab, click ADD GROUP to select additional groups. Each group appears as a separate tag under Add subscribers to. New signups are stored in all selected groups.

    What form fields can I add to the signup form? 

    The default field options include Email, First name, Last name, and Phone number. These are set through the Bind form field dropdown in each Form input block’s Content tab. To manage custom fields, visit the subscriber fields page linked in the form input settings.

    Can I redirect visitors after they submit the form? 

    Yes. Click the Leads form block, open the Content tab, and check Redirect on success under SUCCESS SETTINGS. Enter the destination URL where visitors should be sent after a successful submission.

    How do I change the submit button text or style? 

    Click the Submit button on the canvas. If the settings show “Unlock the block to edit settings,” click the lock icon in the floating toolbar to unlock it. You can then edit the button text directly on the canvas and adjust its style in the right panel.

    Do design changes save automatically? 

    The builder includes an autosave indicator at the bottom of the screen. You can also click Save changes in the top-right toolbar at any time to manually save your progress before leaving the builder.

  • Landing page analytics and performance

    This guide explains how to view analytics and monitor the performance of your landing pages in Sender.

    Where to find this setting

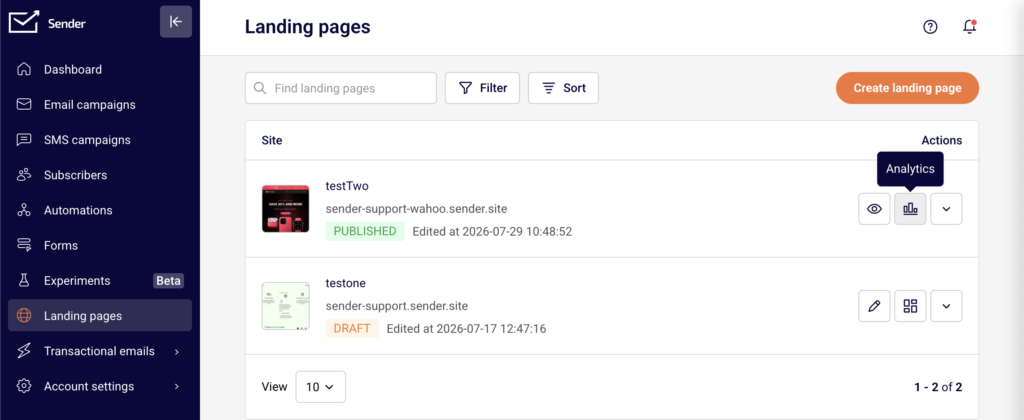
    In the Sender dashboard, go to Landing pages. This opens the landing pages list showing all your pages with their status, subdomain URL, and last edited date.

    landingpage-analytcs

    To access analytics for a specific page, click the view icon (grid icon) in the Actions column next to the landing page you want to review. This opens the landing page management screen, which has three tabs at the top: Overview, Analytics, and Double opt-in. Performance data is available on both the Overview and Analytics tabs.

    Steps to view and use landing page analytics

    Step 1 — Open the landing page Overview

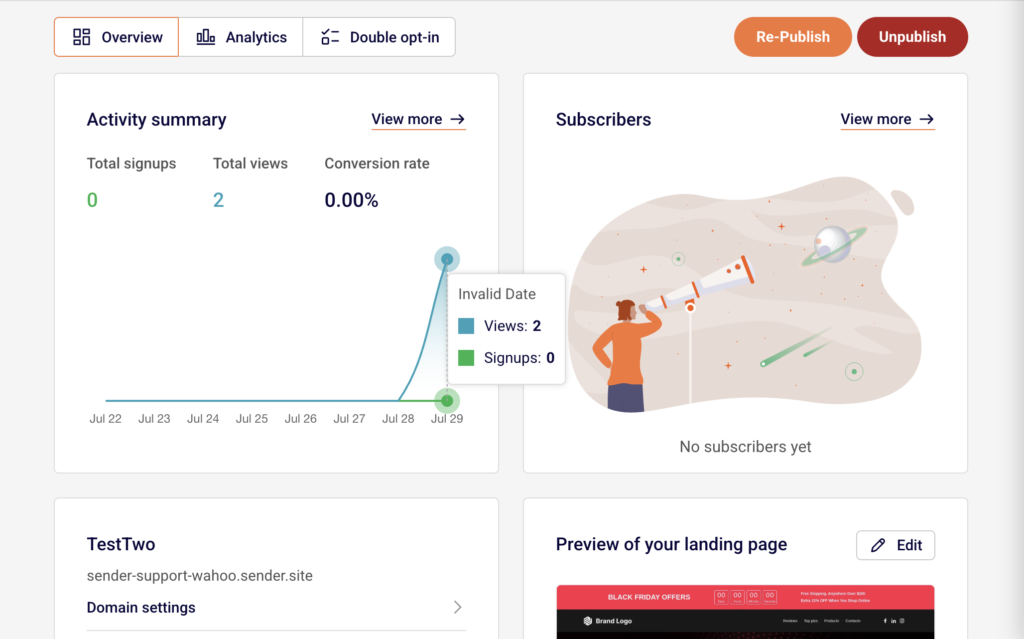
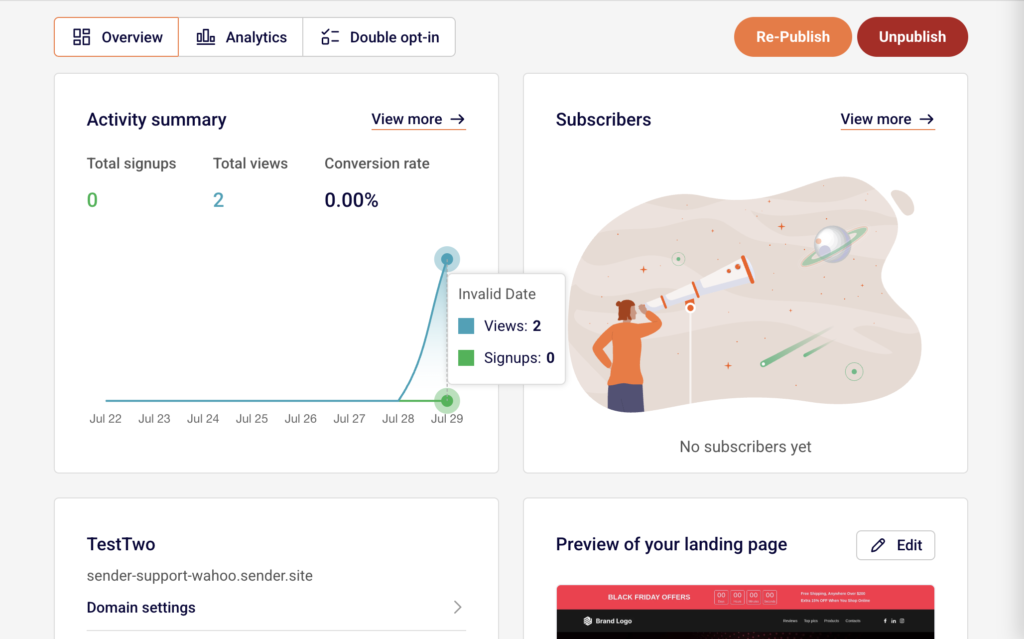
    From the Landing pages list, click the view icon next to the page you want to review. The Overview tab loads by default. At the top, the Activity summary section displays three key metrics: Total signups, Total views, and Conversion rate.

    landingpage-overview

    A chart below these metrics shows activity over the past week. To the right, the Subscribers section lists recent signups. Click View more next to either section to go directly to the Analytics tab for detailed data.

    Step 2 — Review detailed metrics on the Analytics tab

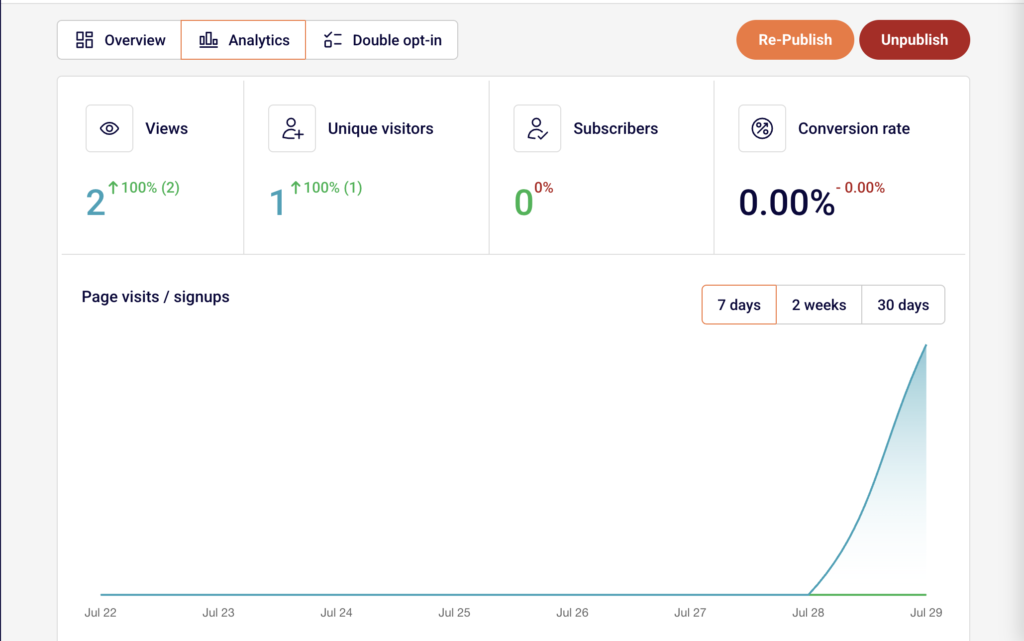
    Click the Analytics tab at the top of the page. Four metric cards appear: Views, Unique visitors, Subscribers, and Conversion rate.

    landingpage-analytics

    Each card shows the current value and a percentage change indicator so you can see whether performance is trending up or down. Below the cards, the Page visits / signups chart displays activity over time. Use the 7 days, 2 weeks, or 30 days buttons above the chart to change the reporting period. The chart and metric cards update to reflect the selected range.

    Step 3 — Review the Subscribers table

    Below the chart on the Analytics tab, the Subscribers section lists every person who signed up through your landing page. The table includes four columns: Email/Phone, Name, Date & Time, and IP address. This gives you a complete record of each signup with the exact timestamp and source IP. To download this data, click the Export CSV button in the top-right corner of the Subscribers section. The file contains all subscriber records for the selected landing page.

    Step 4 — Compare performance across time ranges

    Use the time range filters above the Page visits / signups chart to compare performance across different periods. Select 7 days for a short-term view of recent activity, 2 weeks for a mid-range snapshot, or 30 days for a broader trend. The percentage indicators on each metric card update based on the selected range, showing the rate of change for Views, Unique visitors, Subscribers, and Conversion rate relative to the prior equivalent period.

    What happens after the change

    Analytics data is read-only and does not affect your landing page content, status, or URL. The metrics update automatically as visitors interact with your published page.

    Changing the time range filter only adjusts the reporting window displayed on the Analytics tab. It does not alter any underlying data.

    Exporting subscribers to CSV creates a snapshot file of the current data. New signups after the export are not included in that file.

    If your page is in Draft status or has been unpublished, analytics still display historical data from when the page was live, but no new views or signups will be recorded until the page is published again.

    Management tips

    Check analytics regularly — Review the Analytics tab at least weekly after publishing to identify trends in visitor traffic and signups early.

    Use time range filters for context — Switch between 7 days, 2 weeks, and 30 days to distinguish short-term spikes from sustained trends. A single-day spike may look significant at 7 days but minor at 30 days.

    Export subscriber data for external use — Click Export CSV to download your landing page signups. Use this file to cross-reference subscriber data with other tools or to keep an offline backup.

    Monitor conversion rate closely — The Conversion rate metric shows the percentage of visitors who signed up. If views are high but conversions are low, consider revisiting your page content or form placement in the builder.

    Start from the Overview tab — Use the Overview tab for a quick snapshot of Total signups, Total views, and Conversion rate without navigating into full analytics. Click View more only when you need deeper detail.

    Common issues

    Analytics show zero values for a published page → This typically happens if the page was just published and has not yet received any traffic. Allow time for visitors to find the page, then check again. Confirm the page status is Published and the URL is accessible.

    Percentage change indicators show 0% → This occurs when there is no data in the comparison period. If your page is new, the prior period has no baseline to compare against. As data accumulates over time, percentage changes will begin to reflect actual trends.

    Export CSV button does not produce a file → This happens when there are no subscribers to export. The Subscribers table must contain at least one record for the export to generate a file. Verify that your landing page has a signup form and that it has received submissions.

    FAQs

    Where can I see how many people visited my landing page? 

    Open your landing page from the Landing pages list, then click the Analytics tab. The Views and Unique visitors metric cards at the top show your traffic numbers.

    What is the difference between Views and Unique visitors? 

    Views counts the total number of times your landing page was loaded, including repeat visits from the same person. Unique visitors counts individual visitors, so one person visiting three times counts as one unique visitor but three views.

    Can I see analytics for a landing page that is not published? 

    Yes. Historical data from when the page was live remains visible on the Analytics tab. However, no new data is recorded while the page is in Draft or unpublished status.

    How do I export my landing page subscriber list? 

    Go to the Analytics tab for the landing page and click the Export CSV button above the Subscribers table. This downloads a CSV file with all subscriber records including Email/Phone, Name, Date & Time, and IP address.

    How often does analytics data update? 

    Analytics data updates automatically as visitors view the page and submit forms. There is no manual refresh needed. Reloading the Analytics tab shows the most current data.

    Can I change the date range for the analytics chart? 

    Yes. Use the 7 days, 2 weeks, or 30 days buttons above the Page visits / signups chart to switch the reporting period. The metric cards and chart update to reflect the selected time range.

  • Editing and customizing landing page content

    This guide explains how to edit text, images, buttons, and other content blocks, and customize the visual design of your landing page in Sender’s landing page builder.

    Where to find this feature

    Go to Landing pages in the main sidebar. Click the edit (pencil) icon next to an existing landing page to open it in the builder.

    landingpage-list

    The builder interface has three main areas: the left sidebar for adding blocks and managing page structure, the central canvas where you edit content visually, and the right panel that displays settings for whichever block or section is currently selected. The top toolbar provides device preview switching, zoom controls, undo/redo, Save changes, Preview, and Save and continue buttons.

    Steps to edit and customize landing page content

    Step 1 — Add and arrange content blocks on the canvas

    Click the Builder icon (the grid icon at the top of the left sidebar) to open the blocks panel.

    landingpage-blocks

    Blocks are organized into four categories: Content (Headline, Paragraph, Buttons, List, Icon, and more), Layout (Section, Spacer, Separator, Leads form), Media (Image, Gallery, Video), and Carousel. Click the + button inside any section on the canvas, then select a block from the popup to add it.

    landingpage-sections

    You can also use the Section Templates panel in the left sidebar to insert pre-built sections such as Hero, CTA, Header, or Footer. Use the block toolbar to reorder blocks with the Move up and Move down arrows, Duplicate a block, or Delete it.

    Step 2 — Edit text, images, and button content directly on the canvas

    Click any text block (such as a Headline or Paragraph) on the canvas to select it, then double-click to enter inline editing mode and type your content directly. The right panel opens the block’s Style tab where you can adjust Font family, Font weight, Font size, Line height, Letter spacing, Color, and Alignment. Use the Html tag buttons (H1–H6) on a Headline block to set the heading level.

    landingpage-block-options

    For an Image block, click it to open the image settings in the right panel where you can upload or replace the image. For a Buttons block, click the button on the canvas to edit its label, and use the right panel to configure the link URL, button color, and styling.

    Step 3 — Customize section layout, spacing, and backgrounds

    Click on any section on the canvas to open its settings in the right panel. Under the Style tab, set the Maximum width, choose an Alignment (left, center, or right), and configure Vertical align to control how blocks sit within the section.

    landingpage-section-settings

    Adjust the SPACING sliders for Between columns, Between rows, and Between blocks to control internal spacing. In the BACKGROUND area, set a Color value or add a background Image. Use BORDER to apply a Border style and Border radius, and the SHAPE DIVIDER to add decorative section edges at the top or bottom.

    Step 4 — Adjust page-level theme and typography settings

    Click the Theme Settings icon (the globe icon in the lower-left sidebar) to open page-wide design controls. Expand Page styles to set the PAGE BACKGROUND color or image, configure PAGE SPACING padding, and adjust BLOCK SPACING between sections and blocks. Open Font settings to manage which fonts are loaded on your page and add new ones using the Add another font button.

    landingpage-theme-settings

    Expand Theme colors & typography to define your Primary, Secondary, Heading, and Text colors, and edit FONT STYLES presets like Title font 1–4, Body font, and Button font to maintain consistent typography across the entire page.

    Step 5 — Preview your design on desktop, tablet, and mobile

    Use the three device icons in the top toolbar to switch between desktop, tablet, and mobile canvas views. The builder resizes the canvas to reflect each breakpoint (tablet: 768px–991px, mobile: 0px–767px), so you can see how your layout and content adapt.

    landingpage-preview-options

    Many block settings in the right panel include separate device toggles, allowing you to set different font sizes, spacing, or alignment for each screen size. Click Preview in the top toolbar to open a full preview of the published page in a new tab. Click Save changes to save your work, or Save and continue to save and proceed to the next step.

    Design tips

    Use section templates for faster layout building — Instead of building from scratch, click the Section Templates icon in the left sidebar and choose from pre-built sections like Hero, CTA, Pricing, or Testimonial to quickly scaffold your page structure.

    landingpage-prebuilt-sections

    Set theme colors and fonts before styling individual blocks — Define your brand colors and typography in Theme Settings first. Blocks that use the theme defaults will automatically inherit these values, saving you from configuring each block separately.

    landingpage-theme-settings

    Check spacing on all three breakpoints — Spacing that looks balanced on desktop may feel too tight or too loose on mobile. Switch between device views in the top toolbar and use the device toggles in the right panel to fine-tune padding and block spacing for each screen size.

    landingpage-blocks-tree

    Use the Blocks Tree to navigate complex pages — Click the Blocks Tree icon in the left sidebar to see a structured overview of every section, column, and block on your page. This makes it easy to select deeply nested blocks or reorder elements without scrolling through the canvas.

    Save frequently and use version history — Click Save changes regularly. If you need to revert, click the History icon in the left sidebar to view saved versions and Restore a previous one.

    Common issues

    Block not appearing after dragging → The block may have landed outside the section column. Click the + button inside the section on the canvas to add blocks directly, or use the Blocks Tree to verify where the block was placed.

    Text changes not showing in the right panel settings → Inline text edits happen directly on the canvas and do not change the settings panel inputs. The right panel controls styling properties like font size, color, and alignment, not the text content itself.

    Spacing looks different on mobile → Page and block spacing values set for desktop do not automatically adjust for smaller screens. Switch to the mobile view using the device icons in the top toolbar, then use the device toggles in the right panel’s spacing controls to set mobile-specific values.

    Background image not visible → The background may be set at the section level while you are checking the page-level settings, or vice versa. Verify in both the section’s BACKGROUND settings (right panel) and Theme Settings > Page styles > PAGE BACKGROUND to confirm where the background is applied.

    FAQs

    Can I add a signup form to my landing page? 

    Yes. Open the Builder panel and drag a Leads form block onto the canvas inside a section. Configure the form fields and connect it to a subscriber group so new signups are stored in the correct list.

    How do I change the landing page background color? 

    Click the Theme Settings icon (globe) in the lower-left sidebar. Expand Page styles and update the Background color hex value under PAGE BACKGROUND. The change applies to the entire page. You can also set a background color on individual sections through the section’s BACKGROUND settings in the right panel.

    Can I preview my landing page on mobile? 

    Yes. Click the mobile device icon in the top toolbar to switch the canvas to mobile view (0px–767px). For a full preview, click Preview in the top toolbar to open the page in a new tab, then resize your browser window or use your browser’s responsive mode to simulate a mobile screen.

    Do design changes save automatically? 

    No. You need to click Save changes in the top toolbar to preserve your edits. The builder also shows a Page content saved confirmation when a save completes. Use the History panel in the left sidebar to view and restore previously saved versions.

    Can I use custom fonts on my landing page? 

    Yes. Open Theme Settings, expand Font settings, and click Add another font to add a new font to your page. You can then select it from the Font family dropdown in any text block’s style settings. The builder supports adding multiple fonts with different weight options.

    How do I reorder blocks on the page? 

    Click a block on the canvas to select it. Use the Move up and Move down arrows in the block toolbar, or click the three-dot menu for additional options including Duplicate, Group, Lock, Copy styles, and Delete. You can also rearrange blocks by dragging them via the move handle (the four-arrow icon) in the block toolbar.