Blog

  • Testing API Calls

    This guide explains how to test your API calls to Sender's REST API, verify authentication, validate request and response patterns, and confirm that your integration works correctly before deploying to production.

    Prerequisites

    • An active Sender account
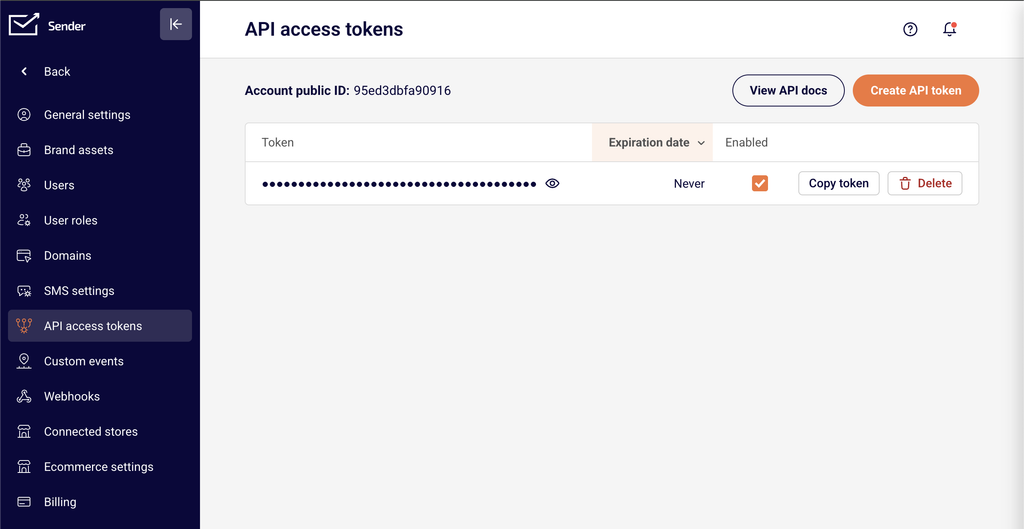
    • An API access token generated from Account settings → API access tokens
    • A tool or environment for making HTTP requests (e.g., cURL, Postman, or application code)
    • Familiarity with reading JSON response bodies and HTTP status codes

    Authentication

    All requests to the Sender API require a Bearer token passed in the Authorization header. The base URL for all API v2 endpoints is https://api.sender.net/v2/. Every request must also include Content-Type: application/json and Accept: application/json headers.

    A minimal authenticated request looks like this:

    bash

    curl -X GET \

      "https://api.sender.net/v2/subscribers" \

      -H "Authorization: Bearer YOUR_API_TOKEN" \

      -H "Content-Type: application/json" \

      -H "Accept: application/json"

    Replace YOUR_API_TOKEN with the token you generated from Account settings → API access tokens. If the token is valid, you receive a 200 response with data. If it is invalid or missing, you receive a 401 response.

    Steps to Test API Calls

    Step 1 — Verify your authentication with a read-only request

    Start by sending a GET request to https://api.sender.net/v2/subscribers to confirm your API token works. This is a safe, read-only call that returns your subscriber list without modifying any data.

    bash

    curl -X GET \

      "https://api.sender.net/v2/subscribers" \

      -H "Authorization: Bearer YOUR_API_TOKEN" \

      -H "Content-Type: application/json" \

      -H "Accept: application/json"

    A successful 200 response returns a JSON body with data, links, and meta objects. If you receive a 401 status code, your token is invalid — generate a new one from Account settings → API access tokens.

    Step 2 — Test a GET request with query parameters

    Send a GET request to https://api.sender.net/v2/groups to retrieve your subscriber groups. Add pagination parameters to test parameterized requests. Append ?page=1&limit=5 to the URL to return only the first five results.

    bash

    curl -X GET \

      "https://api.sender.net/v2/groups?page=1&limit=5" \

      -H "Authorization: Bearer YOUR_API_TOKEN" \

      -H "Content-Type: application/json" \

      -H "Accept: application/json"

    The 200 response includes a data array of group objects and a meta object showing current_page, per_page, total, and last_page values. Verify these pagination fields reflect your parameters.

    Step 3 — Test a POST request with a request body

    Send a POST request to https://api.sender.net/v2/subscribers to test creating a resource. Include a JSON request body with at least the required email field. Set trigger_automation to false to prevent triggering any automations during testing.

    bash

    curl -X POST \

      "https://api.sender.net/v2/subscribers" \

      -H "Authorization: Bearer YOUR_API_TOKEN" \

      -H "Content-Type: application/json" \

      -H "Accept: application/json" \

      -d '{

        "email": "[email protected]",

        "firstname": "Test",

        "lastname": "User",

        "trigger_automation": false

      }'

    A successful response returns a 200 status with "success": true and the full subscriber object in the data field. If the email field is missing or invalid, the API returns a 422 status with an errors object detailing the validation failure.

    Step 4 — Test error handling by sending an invalid request

    Intentionally send a malformed request to verify your code handles errors correctly. Send a POST request to https://api.sender.net/v2/subscribers with an invalid email value or omit the required email field entirely.

    bash

    curl -X POST \

      "https://api.sender.net/v2/subscribers" \

      -H "Authorization: Bearer YOUR_API_TOKEN" \

      -H "Content-Type: application/json" \

      -H "Accept: application/json" \

      -d '{"email": "not-a-valid-email"}'

    The API returns a 422 status code with a response body containing a message field and an errors object. Each key in errors is a field name, and its value is an array of validation messages. Confirm your code parses this structure correctly.

    Step 5 — Verify the result in the Sender dashboard

    After a successful POST test, confirm the data persists by retrieving it with a GET request. Send a GET request to https://api.sender.net/v2/subscribers/{email} replacing {email} with the email address you used in Step 3.

    bash

    curl -X GET \

      "https://api.sender.net/v2/subscribers/[email protected]" \

      -H "Authorization: Bearer YOUR_API_TOKEN" \

      -H "Content-Type: application/json" \

      -H "Accept: application/json"

    The 200 response returns the subscriber's full profile in the data object, including id, email, firstname, lastname, status, and subscriber_tags. You can also log in to the Sender dashboard, navigate to Subscribers, and confirm the test subscriber appears there.

    Endpoint Reference

    GET /v2/subscribers — Returns a paginated list of all subscribers in your account. Supports page, limit, order, and direction query parameters. No request body required.

    GET /v2/subscribers/{email}or{phone}or{ID} — Returns a single subscriber's full profile. Replace the path parameter with the subscriber's email address, phone number, or subscriber ID. No request body required.

    POST /v2/subscribers — Creates a new subscriber. The email field is required in the request body. Optional fields include firstname, lastname, groups, fields, phone, and trigger_automation.

    GET /v2/groups — Returns a paginated list of all subscriber groups. Supports page, limit, order, and direction query parameters. No request body required.

    Error Handling

    401 — Unauthorized — The API could not authenticate your request. Verify that your Authorization header uses the format Bearer YOUR_API_TOKEN and that the token is active in Account settings → API access tokens.

    400 — Bad request — The request is malformed or references an invalid action. The response body includes a message field with details. Check that your request URL and HTTP method are correct.

    404 — Not found — The requested resource does not exist. Verify the endpoint path and any resource IDs or email addresses in the URL are correct.

    422 — Bad request parameters — One or more fields failed validation. The response includes a message field and an errors object where each key is a field name mapped to an array of error messages. Fix the invalid fields and retry.

    429 — Too many requests — You have exceeded the API rate limit. The response includes X-RateLimit-Limit, X-RateLimit-Remaining, X-RateLimit-Reset, and Retry-After headers. Wait for the number of seconds specified in Retry-After before sending another request.

    5xx — Server error — An internal error occurred on Sender's servers. Retry the request after a short delay. If the issue persists, contact [email protected].

    API Tips

    Use read-only endpoints first — Start testing with GET requests like GET /v2/subscribers or GET /v2/groups to verify authentication and connectivity without modifying any data.

    Disable automations during testing — When creating subscribers via the API during testing, set "trigger_automation": false in the request body to prevent unintended automation triggers.

    Check response headers for rate limits — Every API response includes X-RateLimit-Remaining and X-RateLimit-Limit headers. Monitor these during testing to understand your usage and implement backoff strategies before hitting limits.

    Test pagination with small limits — Use ?page=1&limit=2 to return minimal data while verifying that your pagination logic correctly reads the meta object fields like current_page, last_page, and total.

    Log full responses during development — Capture the complete HTTP status code, response headers, and body during testing. This gives you full visibility into errors, rate limit state, and response structure before writing production error handling.

    Common Issues

    401 on every request → The API token may be expired, revoked, or incorrectly formatted. Ensure the Authorization header value is exactly Bearer YOUR_API_TOKEN with a single space after Bearer. Regenerate the token from Account settings → API access tokens if needed.

    422 when creating a subscriber → The email field is either missing or contains an invalid value. Verify the request body is valid JSON with "email" set to a properly formatted email address.

    Empty data array in response → The account has no resources of the requested type, or the pagination parameters point beyond the available results. Check the meta.total value and adjust your page parameter.

    Connection refused or timeout → The API only accepts HTTPS connections at https://api.sender.net/v2/. Ensure you are not using http:// and that your network allows outbound HTTPS traffic on port 443.

    Response body is not JSON → The Accept: application/json header may be missing from your request. Include both Content-Type: application/json and Accept: application/json in every request.

    FAQs

    Where do I find my API access token? Go to Account settings → API access tokens in the Sender dashboard. Click Create API token to generate a new one. Copy the token immediately — it may not be displayed again after you navigate away.

    What is the base URL for all API requests? All Sender API v2 requests use the base URL https://api.sender.net/v2/. Append the specific endpoint path after this base URL. The API is served only over HTTPS.

    What tools can I use to test API calls? You can use cURL from the command line, Postman as a graphical client, or write test scripts in any language that supports HTTP requests (JavaScript, Python, PHP, etc.). The Sender API docs provide code examples in JavaScript, PHP, Python, and Bash.

    How do I know if my API call was successful? Successful responses return a 200 or 201 status code with the resource data in the response body. Error responses return 4xx or 5xx status codes with a message field and, for validation errors, an errors object describing each invalid field.

    What happens if I exceed the API rate limit? The API returns a 429 Too Many Requests response with a Retry-After header. Wait for the specified number of seconds before retrying. Implement exponential backoff in your code to handle rate limits gracefully.

    Can I test write operations without affecting my live data? Use the trigger_automation parameter set to false when creating subscribers to prevent automations from firing. You can delete test subscribers after testing. There is no sandbox environment, so all API calls operate on your live account data.

  • Connecting with your store

    This guide explains how to connect your ecommerce store to Sender so you can sync customer data, track cart activity, trigger automations, and send targeted campaigns based on purchase behavior.

    Prerequisites

    • An active Sender account
    • An active ecommerce store on a supported platform (Shopify, WooCommerce, PrestaShop, Jumpseller, or Drupal)
    • Admin access to your ecommerce platform’s dashboard or admin panel
    • An API access token from Sender (required for WooCommerce, PrestaShop, and plugin-based integrations)

    Where to Find This Setting

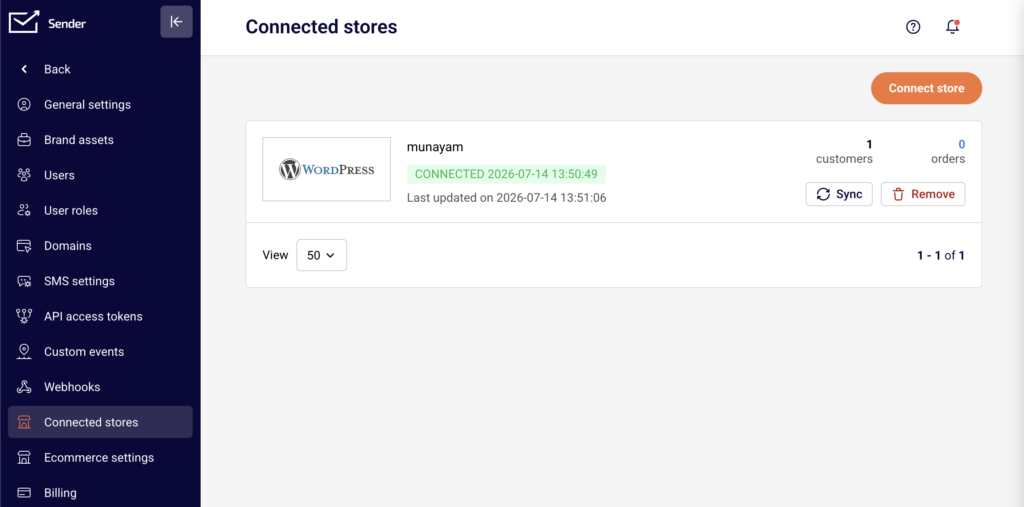
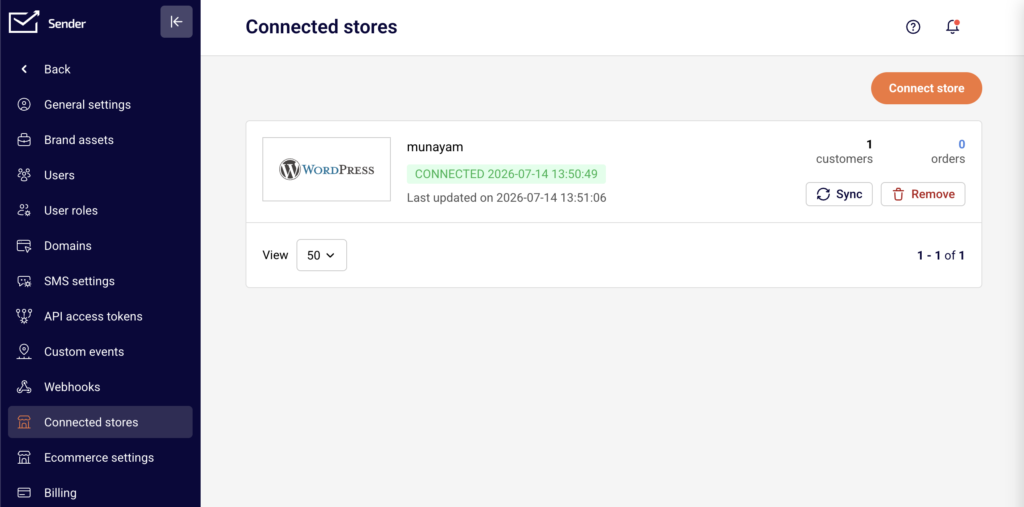
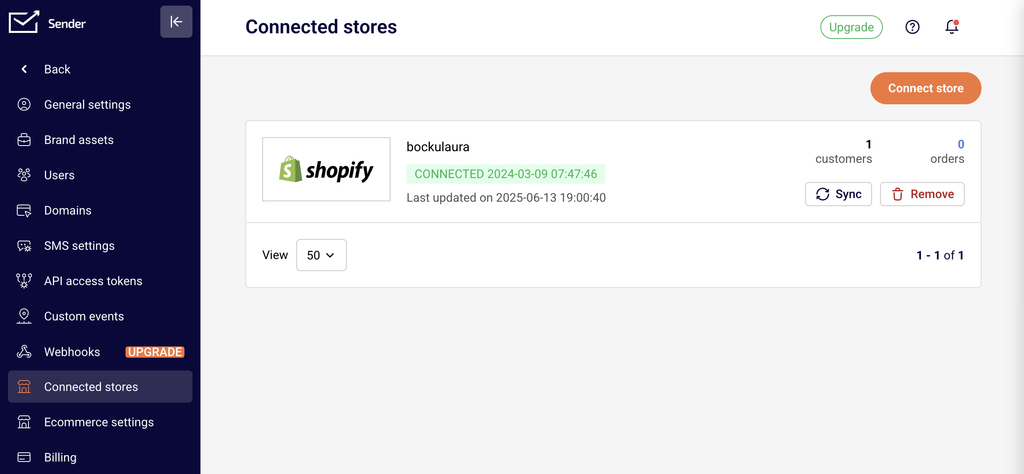
    In the Sender dashboard, go to Account settings → Connected stores. This page displays all currently connected stores and provides the Connect store button to add a new connection.

    account-settings-connected-stores

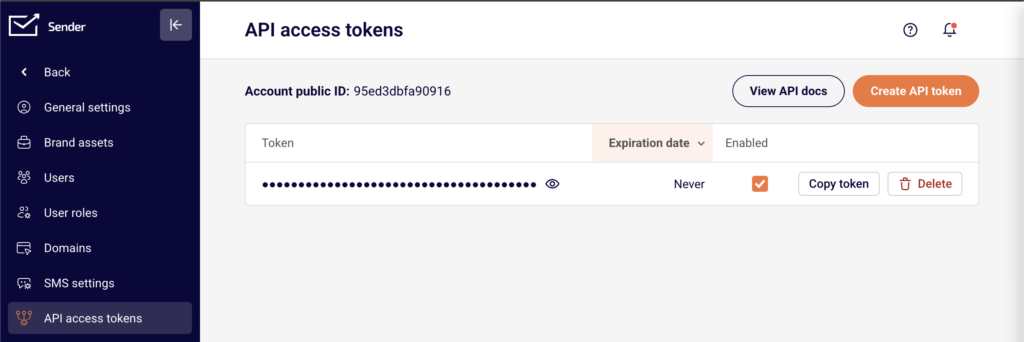
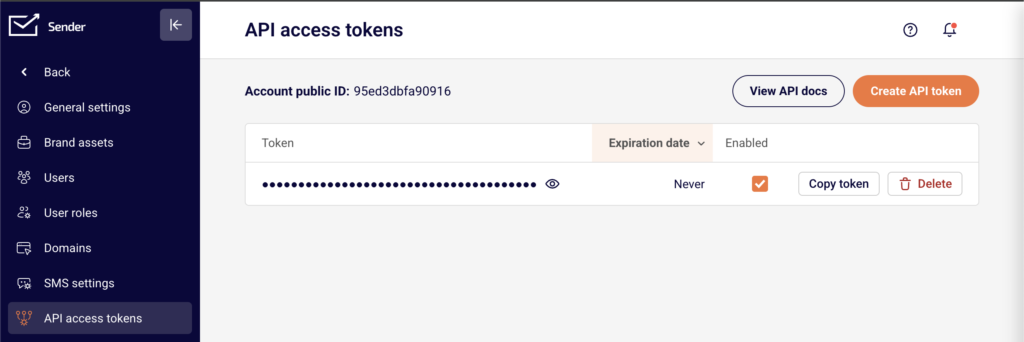
    For plugin-based integrations (such as WooCommerce or PrestaShop), you also need an API access token. Go to Account settings → API access tokens to generate one.

    account-settings-api-token

    The connection process differs depending on your ecommerce platform. Shopify connects directly through the Shopify App Store. WooCommerce, WordPress, and PrestaShop require installing a plugin and authenticating with your Sender API token. Jumpseller connects through an interactive setup flow.

    Note: Third-party platform interfaces may change over time. The steps below reflect the current process but may vary slightly depending on your platform version.

    Steps to Connect Your Store

    Step 1 — Generate an API access token in Sender

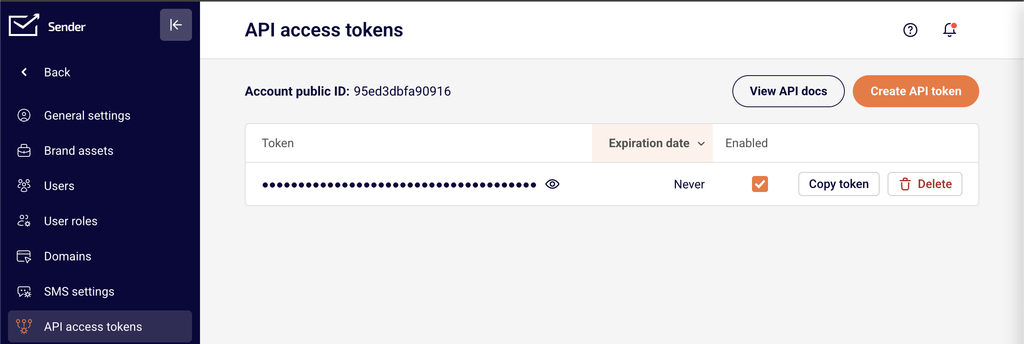
    Go to Account settings → API access tokens in the Sender dashboard. Click Create API token. In the dialog that appears, select a validity period — options include Forever, 30 days, 7 days, or 1 day. Click Create. Copy the generated token and store it securely. You will need this token to authenticate plugin-based integrations such as WooCommerce and PrestaShop.
    Step 2 — Install and authenticate the integration on your ecommerce platform

    The installation process depends on your platform:

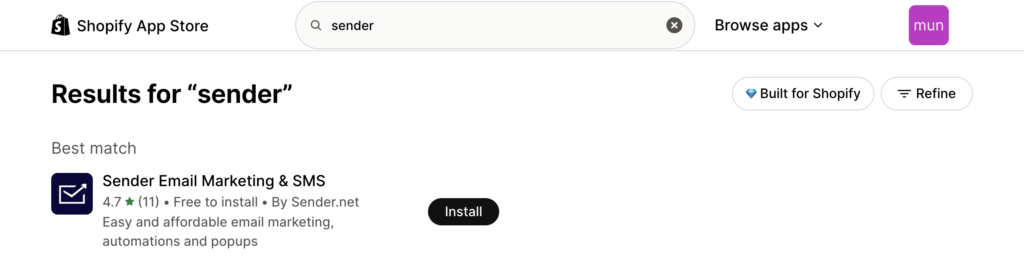
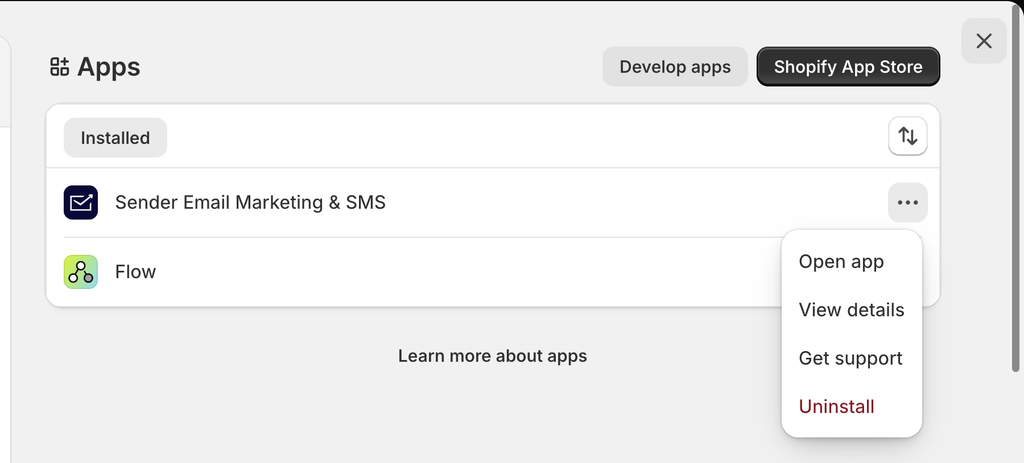
    Shopify — Log into your Shopify admin. Click Add apps, then go to the Shopify App Store. Search for Sender Email Marketing & SMS. Click Add app and then Install app. You will be redirected to the Sender app inside Shopify to complete the connection.

    shopify-app-store

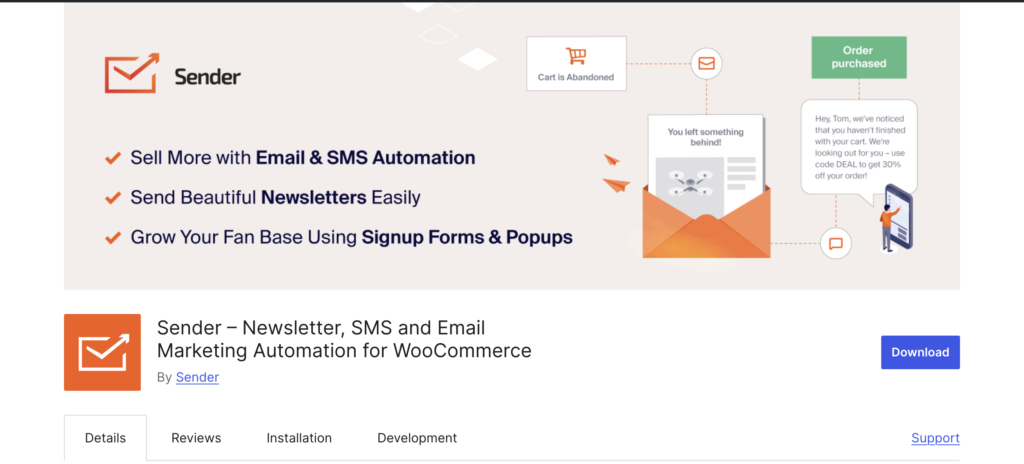
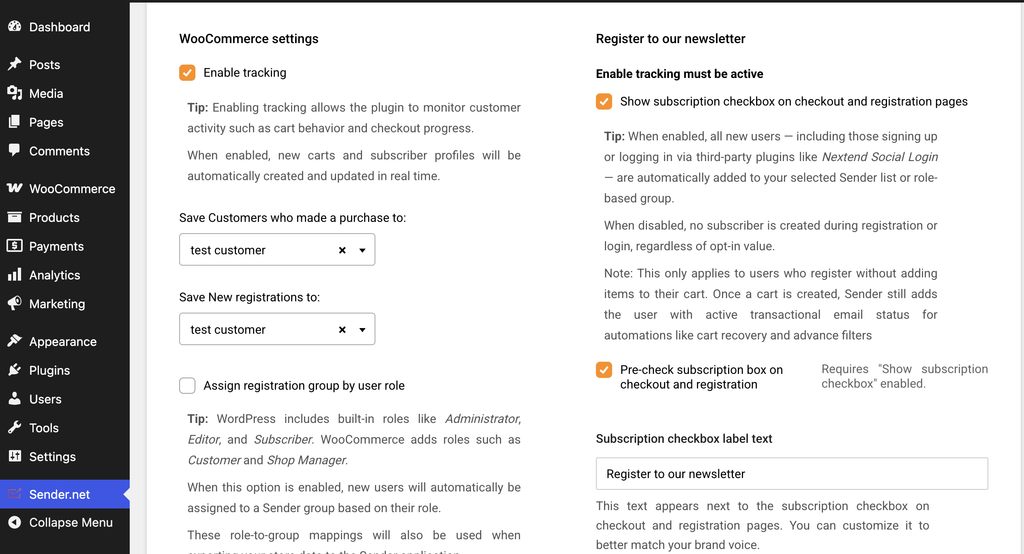
    WooCommerce — Download the Sender.net plugin from the WordPress plugin store. Install and activate the plugin in your WordPress admin. Enter your API access token from Sender to authenticate. The Sender.net section will appear in your WordPress sidebar.

    sender-wordpress-plugin

    PrestaShop — Download the Sender.net module from the Sender website. In your PrestaShop admin panel, go to Modules and Services → Add a new module. Upload the downloaded file and install it. Navigate to the Emailing & SMS section, find the Sender.net module, and click Install. Enter your API access token to authenticate.

    Jumpseller — Follow the interactive tutorial provided by Sender to connect your Jumpseller store directly to your account.

    Step 3 — Configure tracking and sync settings

    Once connected, configure your integration settings within the plugin or app on your ecommerce platform.

    sender-woocommerce-cart-tracking

    For WooCommerce and PrestaShop, enable the Enable tracking option to activate cart tracking and customer data sync. Select which subscriber group new customers and guest visitors should be added to.

    sender-shopify-app-integration

    For Shopify, cart tracking is enabled automatically after you connect. Your connected store will now appear on the Connected stores page in Sender.

    How to Verify the Integration

    Go to Account settings → Connected stores in Sender and confirm your store is listed with an active status.

    sender-shopify-connected-store

    Place a test order or add items to a cart on your store, then check the Subscribers section in Sender to verify that customer data has synced. Navigate to Automations and confirm that ecommerce triggers such as A cart is abandoned and A product is purchased are available for use.

    What Syncs Between Platforms

    Customer email addresses → Sender — When a customer makes a purchase, creates an account, or is captured as a guest visitor, their email address is automatically added to the designated subscriber group in Sender. This happens in real time as events occur on your store.

    Cart activity → Sender — Abandoned cart data and product purchase events are tracked and sent to Sender in real time. This data powers the A cart is abandoned and A product is purchased automation triggers.

    Subscriber group assignment → Sender — New customers and guest visitors are assigned to the subscriber groups you configure in the plugin settings. You can set different groups for purchasers, new registrations, and guest cart captures.

    Customer fields → Sender — Depending on the platform and your plugin configuration, additional customer data such as name, gender, and date of birth can be synced to custom fields in Sender. This is configurable in platforms like PrestaShop through the Customer data settings in the plugin.

    Integration Tips

    Use a long-lived API token for stable connections — When generating an API access token for a plugin integration, select Forever as the validity period to avoid unexpected disconnections caused by token expiration.

    Assign separate subscriber groups for different customer types — Configure your plugin to save purchasers, new registrations, and guest visitors into distinct subscriber groups. This makes it easier to create targeted segments and campaigns in Sender.

    Enable tracking before setting up automations — Make sure the Enable tracking option is active in your plugin settings before creating abandoned cart or post-purchase automation workflows. Without tracking enabled, the automation triggers will not receive cart or purchase data.

    Test the connection with a sample transaction — After connecting your store, complete a test purchase or add-to-cart action to confirm data is flowing into Sender before launching live campaigns.

    Common Issues

    Store does not appear on the Connected stores page → The plugin or app installation may not have completed successfully. Revisit your ecommerce platform’s plugin settings and confirm that the API access token is entered correctly and the plugin is activated.

    Subscribers are not syncing to Sender → The Enable tracking option may be disabled in your plugin settings. Go to the Sender.net plugin settings in your ecommerce admin and verify that tracking is turned on and a subscriber group is selected.

    API token authentication fails → The token may have expired or been deleted. Go to Account settings → API access tokens in Sender, generate a new token, and re-enter it in your plugin’s authentication field.

    Abandoned cart automation is not triggering → Cart tracking must be active and the automation workflow must be set to Active status. Verify both in your plugin settings and in Sender under Automations.

    Pop-up forms are not appearing on the store website → Ensure the form is activated in Sender under Forms. Pop-up forms display automatically on connected stores once they are toggled to active — no additional script installation is needed.

    FAQs

    Where do I find my Sender API access token?

    Go to Account settings → API access tokens in the Sender dashboard. Click Create API token if you do not have one yet. Select a validity period, click Create, then copy the token and paste it into your plugin’s authentication field.

    Which ecommerce platforms does Sender support for direct store connections?

    Sender offers direct integrations with Shopify, WooCommerce, PrestaShop, Jumpseller, and Drupal. Each platform has its own connection method — either through an app store, a downloadable plugin, or an interactive setup flow.

    Does connecting my store sync existing customers or only new ones?

    This depends on the platform. Some integrations, such as PrestaShop, offer an Export customers option that lets you sync your full customer list to a subscriber group in Sender. Others sync only new activity going forward. Check your plugin’s settings for export or sync options.

    Can I connect multiple stores to the same Sender account?

    Yes. You can connect multiple stores across different platforms. Each connected store will appear separately on the Connected stores page under Account settings.

    What happens if I disconnect a store from Sender?

    Disconnecting stops future data sync between the store and Sender. Subscribers and data already synced to your Sender account remain intact and are not deleted. You can reconnect the store at any time by repeating the setup process.

    Do I need a paid Sender plan to use store integrations?

    Store integrations are available on all plans. However, certain features such as Revenue tracking require a Pro plan. Check the Billing section in Sender for details on your current plan’s capabilities.

  • Available integrations overview

    This guide provides an overview of all available integrations in Sender, organized by category and integration type, so you can identify the right connection for syncing subscribers, automating workflows, capturing leads, and extending your email marketing across third-party platforms.

    Prerequisites

    • An active Sender account.
    • An account on the third-party platform you want to integrate with.
    • An API access token from Sender (required for API-based and third-party integrations).
    • Admin or owner-level access on the third-party platform, depending on the integration.

    Where to Find This Setting

    Sender integrations are accessed from two locations depending on the integration type.

    For ecommerce store connections, go to Account settings → Connected stores in the Sender dashboard. Click Connect store to begin linking a supported ecommerce platform.

    account-settings-connected-stores

    For API-based integrations and third-party connections, go to Account settings → API access tokens to generate the API access token required by external platforms. Webhook-based integrations are managed under Account settings → Webhooks.

    account-settings-api-tokens

    A full directory of supported integrations is available at https://www.sender.net/integrations/, where you can browse and filter by category and integration type.

    Steps to Browse and Connect an Integration

    Step 1 — Identify the integration type

    Sender organizes integrations into three types. Native integration means a built-in, direct connection configured within Sender or via a dedicated plugin. Automatic import enables one-click contact migration from another email marketing provider into Sender. Third-party integrations connect Sender to external platforms using your API access token or through the third-party platform’s own configuration interface.

    Step 2 — Choose the integration category

    Browse integrations by category to find the platform that matches your use case. The available categories are Ecommerce platforms, Content management, Workflow automation, Email builders, Leads capture, Tracking & analytics, Translations, and Email marketing providers. Select a category from the sidebar on the integrations directory page to filter the list.

    Step 3 — Review ecommerce platform integrations

    The Ecommerce platforms category includes native integrations with Shopify, WooCommerce, PrestaShop, Jumpseller, and Drupal. These connect your online store to Sender for syncing customer data, sending automated product recommendations, abandoned cart reminders, and order-based follow-ups. Access these through Account settings → Connected stores in the Sender dashboard.

    Step 4 — Review content management integrations

    The Content management category includes a native integration with WordPress. The Sender plugin lets you capture leads directly from your website, sync subscriber lists, and manage campaigns. Install the plugin from the WordPress plugin directory and authenticate using your API access token.

    Step 5 — Review workflow automation integrations

    The Workflow automation category includes Zapier, OttoKit, Make, Pabbly, Pipedream, Integrately, and ZohoFlow. These platforms connect Sender to thousands of other apps through automated workflows. Configure these integrations within each third-party platform by selecting Sender as a connected app and authenticating with your API access token.

    Step 6 — Review email builder integrations

    The Email builders category includes Stripo.email. This integration lets you design fully customized email templates using Stripo’s editor and export them directly into Sender for use in campaigns. Configure the connection within Stripo by selecting Sender as the export destination.

    Step 7 — Review leads capture integrations

    The Leads capture category includes Pagefly, Leadsnotify, Brave, Zotabox, Hellobar, and forms.app. These tools capture visitor information through landing pages, pop-ups, contact forms, and floating bars, then push new subscribers directly into your Sender subscriber groups.

    Step 8 — Review tracking and analytics integrations

    The Tracking & analytics category includes Google Tag Manager (GTM). This integration lets you deploy Sender tracking on your website to monitor user behavior, optimize email performance, and implement event-based triggers without modifying your site’s code directly.

    Step 9 — Review translation integrations

    The Translations category includes Crowdin. This integration enables you to translate your email content into multiple languages through Crowdin’s localization platform, feeding translated content back into your Sender campaigns for international audiences.

    Step 10 — Review email marketing provider integrations

    The Email marketing providers category includes Mailchimp and GetResponse. These are automatic import integrations that let you migrate your existing contacts from these platforms into Sender in just a few minutes, with no manual steps required. All contacts transfer automatically into one place.

    How to Verify the Integration

    After connecting any integration, verify it is working by performing a test action on the third-party platform, such as adding a subscriber or triggering a workflow. In the Sender dashboard, go to Subscribers to confirm that new contacts appear in the correct Subscriber group. For ecommerce integrations, check Account settings → Connected stores to confirm the store shows a connected status. A successful integration displays the connected platform’s name and status in the relevant settings page.

    What Syncs Between Platforms

    Ecommerce data (Shopify, WooCommerce, PrestaShop, Jumpseller, Drupal) — Customer information, purchase history, and order data sync from your connected store into Sender. This data enables automated campaigns such as abandoned cart reminders and product recommendations.

    Subscriber data (Workflow automation and leads capture tools) — New subscriber details captured through third-party forms, landing pages, or automation workflows sync into Sender subscriber groups. The direction is typically one-way, from the third-party platform into Sender.

    Contact migration (Mailchimp, GetResponse) — Existing contacts import automatically from the source email marketing provider into Sender. This is a one-time bulk transfer that moves all contacts without manual steps.

    Email templates (Stripo.email) — Completed email designs export from Stripo directly into Sender for use in campaigns. The sync direction is one-way, from Stripo into Sender.

    Tracking events (Google Tag Manager) — Website visitor behavior data flows from your site through GTM into Sender, enabling event-based triggers and performance optimization for your email campaigns.

    Integration Tips

    Generate your API access token first — Most third-party integrations require an API access token. Go to Account settings → API access tokens and click Create API token before starting any integration setup.

    Use one integration per purpose — Avoid connecting multiple integrations that serve the same function, such as two different leads capture tools pushing to the same subscriber group, to prevent duplicate subscribers.

    Check integration type before setup — Native integrations are configured within Sender or via a dedicated plugin. Third-party integrations are configured within the external platform. Knowing the type determines where you start the setup process.

    Test with a single record first — Before relying on any integration for live campaigns, send a test subscriber or trigger a test event to confirm data flows correctly between platforms.

    Keep API tokens secure — Treat your API access token like a password. Do not share it publicly or include it in client-side code. Revoke and regenerate tokens if you suspect unauthorized access.

    Common Issues

    Integration not appearing in Connected stores → This page only shows ecommerce store connections (Shopify, WooCommerce, PrestaShop, Jumpseller, Drupal). Workflow automation and third-party integrations are configured within the external platform using your API access token.

    No data syncing after connection → Verify that your API access token has not been revoked. Go to Account settings → API access tokens and confirm the token is active. Re-authenticate the integration in the third-party platform if needed.

    Duplicate subscribers appearing → Multiple integrations or forms pushing to the same subscriber group can create duplicates. Review your connected integrations and ensure only one source feeds into each group, or use Sender’s deduplication based on email address.

    Third-party platform interface looks different → External platforms update their interfaces independently. If the steps described in an integration guide do not match exactly, look for equivalent settings in the platform’s current layout or check their help documentation.

    Automatic import not transferring all contacts → Mailchimp and GetResponse imports transfer all contacts from the connected account. If some contacts are missing, verify that they are active subscribers in the source platform and not on a suppression or unsubscribe list.

    FAQs

    Where do I find my Sender API access token?

    Go to Account settings → API access tokens in the Sender dashboard. Click Create API token if you don’t have one yet. Copy the token and paste it into the third-party platform’s authentication field.

    Does the integration sync existing subscribers or only new ones?

    This depends on the specific integration. Automatic import integrations (Mailchimp, GetResponse) sync all existing contacts on first connection. Most workflow automation and leads capture integrations only sync new subscribers going forward. Check the integration’s settings for sync scope options.

    Can I connect Sender to multiple third-party platforms at the same time?

    Yes. Each integration operates independently. You can connect Sender to WordPress, Shopify, Zapier, and other platforms simultaneously without conflicts.

    What happens if I disconnect the integration?

    Disconnecting stops future data sync between the platforms. Subscribers and data already synced to Sender remain in your account and are not deleted.

    The integration stopped syncing data. What should I check?

    Verify that your API access token has not been revoked or expired. Check that the integration is still enabled and properly configured in the third-party platform. Re-authenticate if the platform requires it.

    How many integrations does Sender support?

    Sender currently supports 24 integrations across eight categories: Ecommerce platforms, Content management, Workflow automation, Email builders, Leads capture, Tracking & analytics, Translations, and Email marketing providers. New integrations are added regularly.

    Are integrations available on all Sender plans?

    Integration availability may vary by plan. Check your current plan details under Account settings → Billing or visit the Sender pricing page for specifics.

    Note: Third-party platform interfaces may change over time. The steps and settings described in this article reflect the current state at the time of writing and may vary slightly in the future.

  • Gmail and Yahoo sender requirements

    This guide explains what Gmail and Yahoo require from bulk email senders and how to configure your Sender account to meet those requirements.

    Why This Matters

    Gmail and Yahoo enforce strict sender requirements that affect whether your emails reach subscriber inboxes or get rejected entirely. Senders who do not comply risk having their messages blocked, filtered to spam, or silently dropped. Non-compliance can also trigger domain reputation damage that affects all emails sent from your domain, not just those sent through Sender. Meeting these requirements is essential to maintaining deliverability and avoiding disruption to your email program.

    What Is Required

    Domain authentication — Gmail and Yahoo require that all bulk senders authenticate their sending domain using SPF, DKIM, and DMARC. Messages that fail authentication checks are more likely to be rejected or sent to spam. This applies to anyone sending marketing or bulk email to Gmail or Yahoo recipients.

    One-click unsubscribe (RFC 8058) — Bulk senders must support one-click unsubscribe by including a functioning List-Unsubscribe header in every marketing email. Gmail and Yahoo expect this header to allow recipients to unsubscribe without additional steps. Failure to include it can result in emails being blocked.

    Low spam complaint rate — Gmail requires senders to keep their spam complaint rate below 0.3%, with a recommended target below 0.10%. Yahoo applies similar thresholds. Exceeding these limits triggers filtering or blocking of your messages.

    Valid “From” address and matching domain — The domain in your “From” address must match the domain you have authenticated. Gmail and Yahoo check this alignment as part of DMARC validation. Sending from a free email address (e.g., gmail.com, yahoo.com) as your “From” address will cause authentication failures.

    Physical mailing address — CAN-SPAM and other regulations require a valid physical postal address in every commercial email. While not a Gmail- or Yahoo-specific rule, it is enforced by Sender and expected by mailbox providers as a trust signal.

    Proper DNS records (PTR/reverse DNS) — Sending IP addresses must have valid PTR records that resolve correctly. Sender manages this for emails sent through its infrastructure, but if you use a custom sending setup, you should verify this with your provider.

    Note: This article describes general compliance guidance. Consult a legal professional for jurisdiction-specific advice on email regulations.

    Steps to Meet Gmail and Yahoo Requirements

    Step 1 — Verify your sending domain authentication

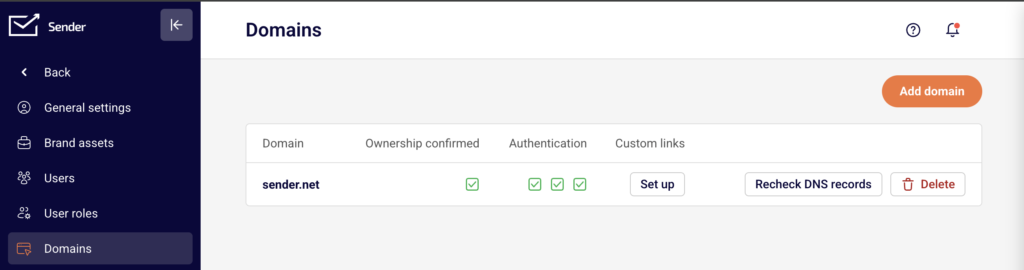
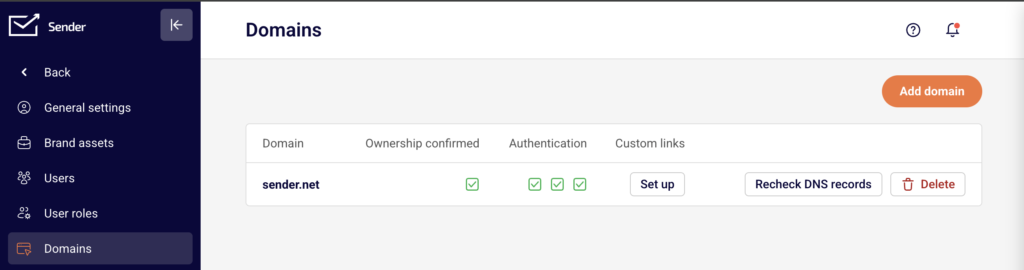
    Go to Account settings → Domains. Locate your sending domain in the list and check the Authentication column.

    account-settings-domains

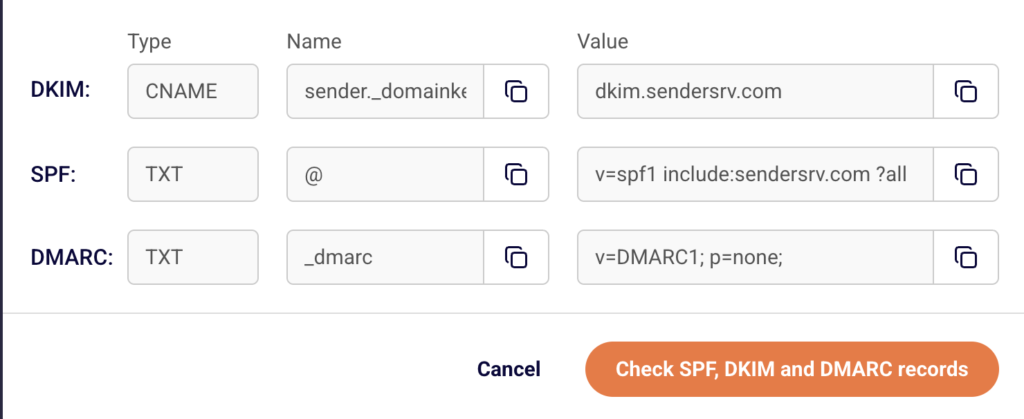
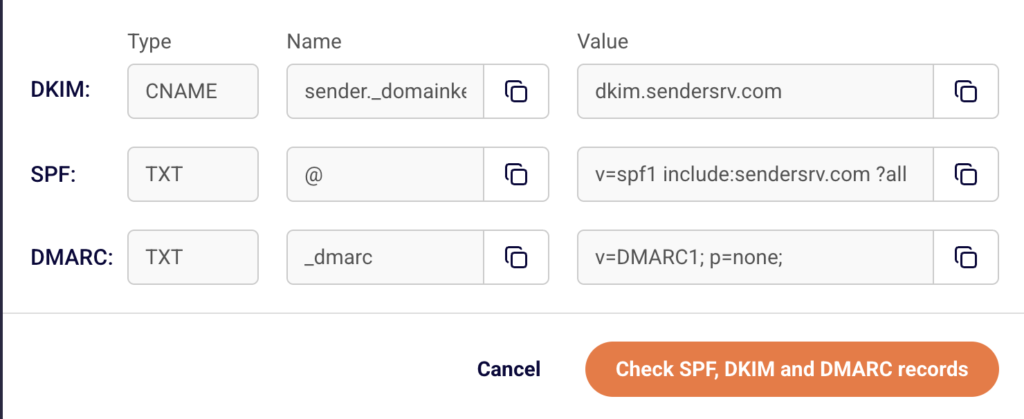
    Three green checkmarks should appear, confirming that SPF, DKIM, and DMARC are properly configured. If any are missing, click Recheck DNS records to refresh the status.

    account-settings-domains-dns

    If authentication is not yet set up, click Add domain and follow the setup instructions provided. All three protocols must be verified before sending to Gmail or Yahoo recipients.

    Step 2 — Use an authenticated “From” address

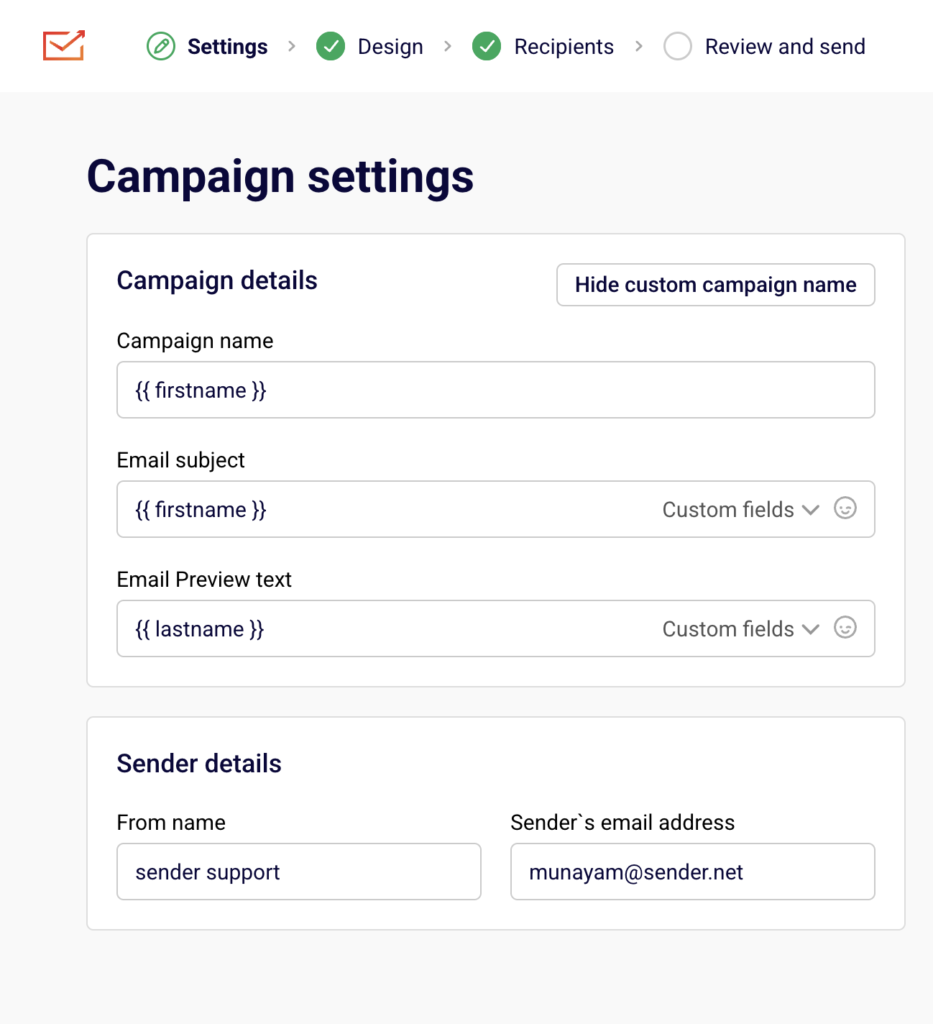
    When creating a campaign, go to the Settings step and review the Sender details section. Confirm that the Sender’s email address field uses a domain you have already authenticated in Account settings → Domains.

    campaign-settings-sender-details

    Do not use a free email provider address (e.g., gmail.com, yahoo.com) as your “From” address. The domain in your “From” address must match the authenticated domain for DMARC alignment to pass. If needed, update the From name field to reflect a recognizable sender identity.

    Step 3 — Confirm your physical address is set

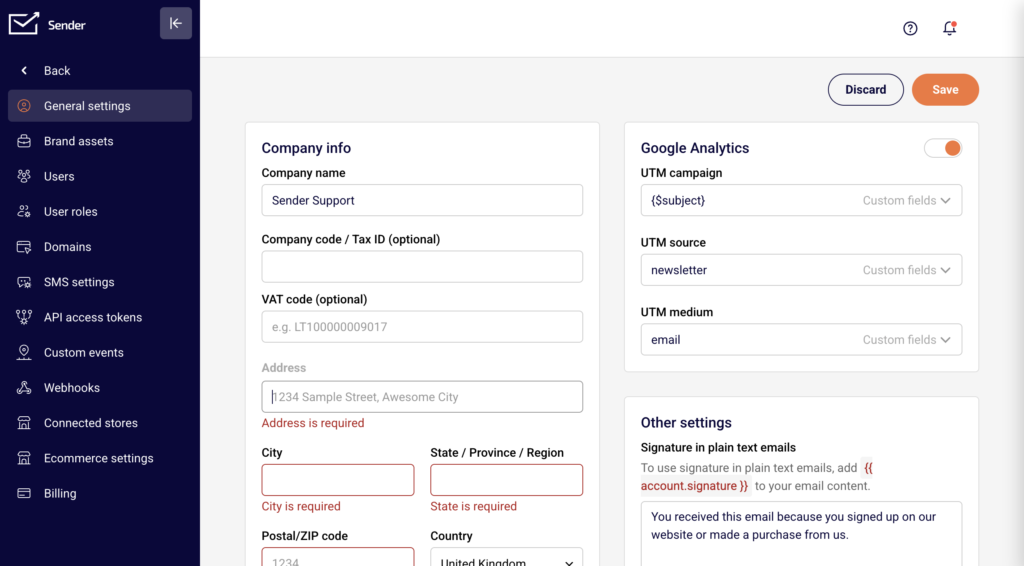
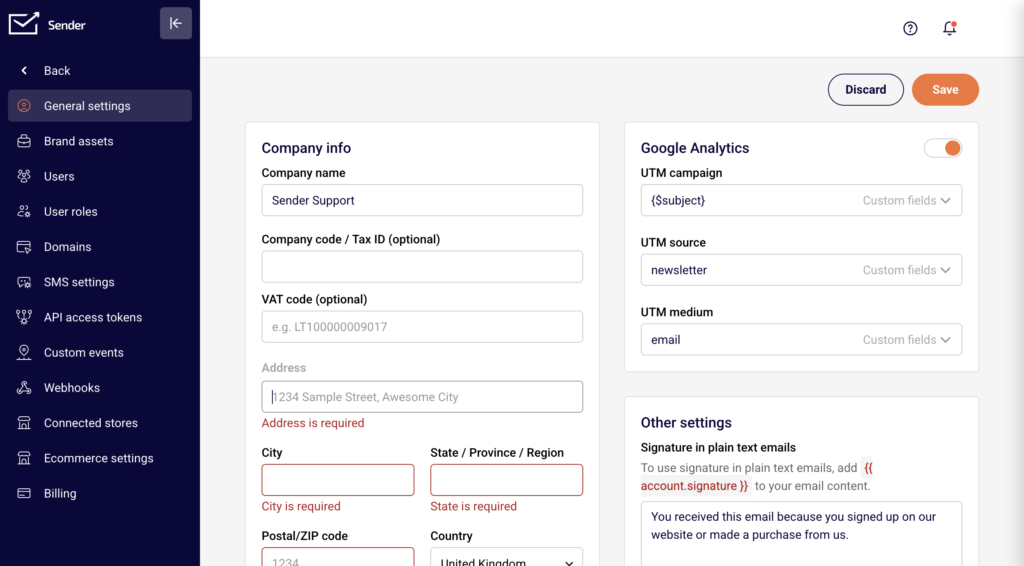
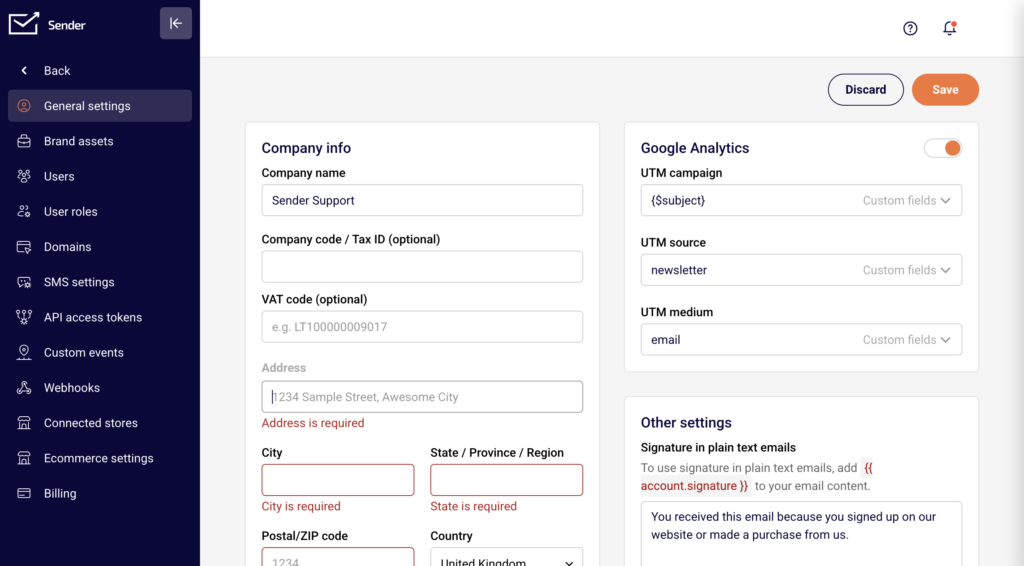
    Go to Account settings → General settings. Under the Company info section, fill in the Address, City, State / Province / Region, Postal/ZIP code, and Country fields. This address is included in your email footer automatically when using Sender’s default templates.

    account-settings-company-info

    Click Save to apply changes. A valid mailing address is required by CAN-SPAM and is expected by Gmail and Yahoo as part of sender compliance.

    Step 4 — Ensure unsubscribe handling is configured

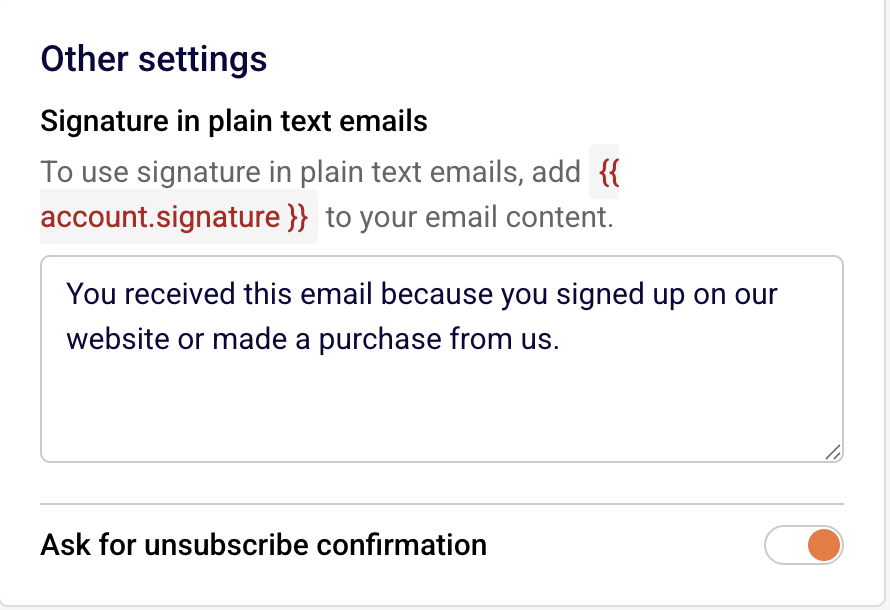
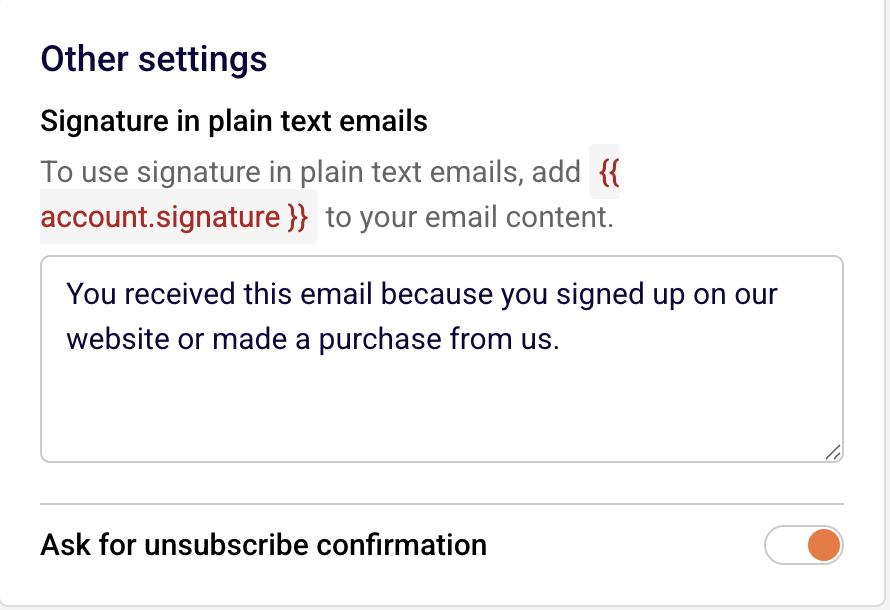
    Sender automatically includes a List-Unsubscribe header and a visible unsubscribe link in marketing emails sent through its templates. To adjust unsubscribe behavior, go to Account settings → General settings and locate the Ask for unsubscribe confirmation toggle under Other settings.

    account-settings-unsubscribe-confirmation

    When this toggle is off, recipients are unsubscribed immediately upon clicking the link, which aligns with Gmail and Yahoo’s one-click unsubscribe requirement. Confirm this setting matches your compliance needs.

    Step 5 — Monitor your spam complaint rate

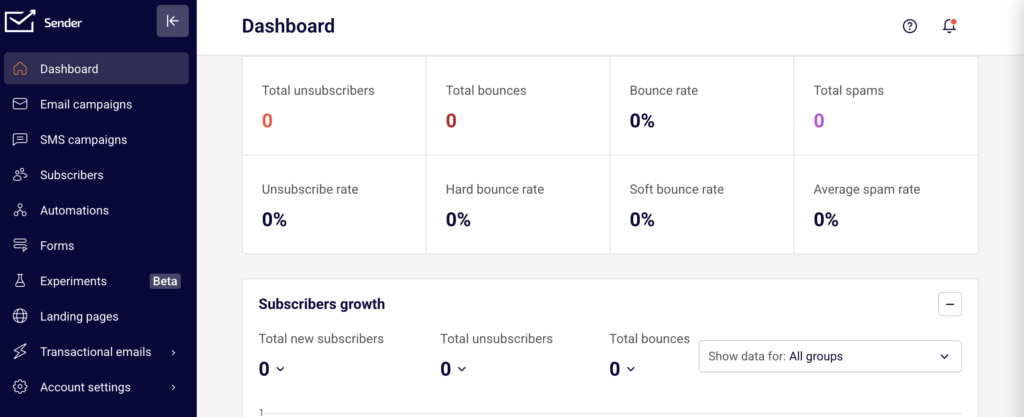
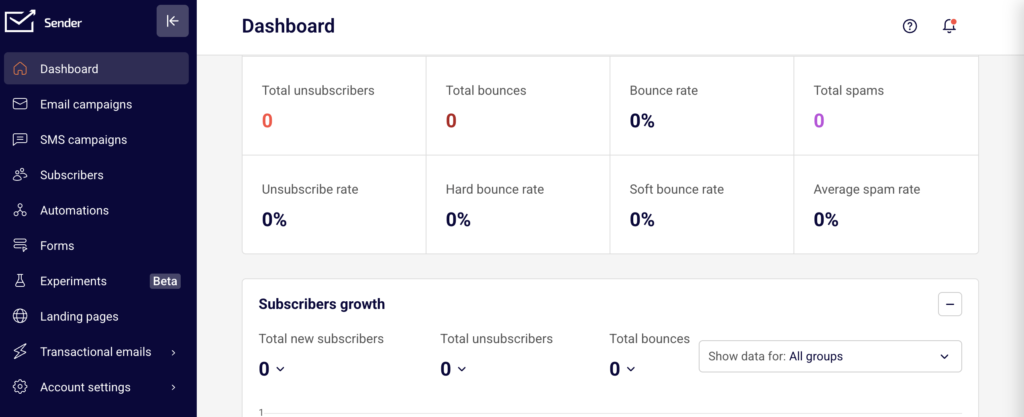
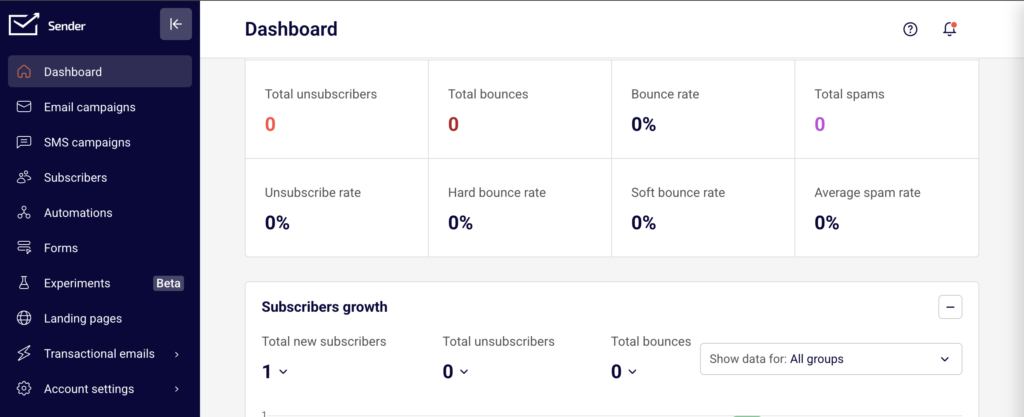
    Return to your Dashboard and review the Average spam rate metric in the Traffic and reach report section. Gmail and Yahoo expect this rate to stay below 0.3%, with a recommended target below 0.10%. If your spam rate is climbing, review your subscriber list for non-consented contacts, reduce sending frequency, or improve content relevance.

    dashboard-traffic-reach

    Sustained high complaint rates can trigger filtering or blocking by Gmail and Yahoo, and may also result in a review from Sender.

    Sender’s Policies

    Authenticated domain required — Sender requires you to add and verify a sending domain in Account settings → Domains before you can send campaigns. Sending from unverified or free email domains is restricted and may result in delivery failures.

    Unsubscribe link required — Every marketing email sent through Sender must include a working unsubscribe link. Sender’s default templates include this automatically. Removing or hiding the unsubscribe link violates Sender’s sending policies and may lead to account suspension.

    Purchased lists prohibited — Sender’s acceptable use policy prohibits sending to purchased, rented, or scraped email lists. Sending to these lists leads to high bounce rates and spam complaints, which violate Gmail and Yahoo thresholds and may result in account suspension.

    Spam complaint monitoring — Sender monitors spam complaint rates across all accounts. If your complaint rate exceeds acceptable levels, your account may be flagged for review, restricted, or suspended. This enforcement aligns with Gmail and Yahoo’s requirement to maintain complaint rates below 0.3%.

    Physical address required — Sender requires a valid physical mailing address in Account settings → General settings. This address is automatically inserted into email footers. Leaving it blank or entering invalid information violates Sender’s policies and CAN-SPAM regulations.

    Compliance Tips

    Keep your “From” domain consistent — Always send from the same authenticated domain. Switching between multiple unauthenticated domains confuses mailbox providers and damages your sender reputation with Gmail and Yahoo.

    Disable unsubscribe confirmation for bulk sending — Gmail and Yahoo’s one-click unsubscribe requirement works best when subscribers are removed immediately. If the Ask for unsubscribe confirmation toggle is enabled, consider turning it off to ensure seamless compliance.

    Clean your list before sending — Remove inactive, bounced, and unengaged subscribers regularly. High bounce rates and low engagement signal poor list quality to Gmail and Yahoo, increasing the likelihood of filtering.

    Send only to opted-in subscribers — Every recipient on your list should have given explicit permission to receive your emails. Consent-based sending is the most effective way to maintain low complaint rates and comply with Gmail, Yahoo, and regulatory requirements.

    Test authentication before launching campaigns — After adding your domain in Account settings → Domains, click Recheck DNS records to confirm all three authentication checks (SPF, DKIM, DMARC) show green checkmarks before sending your first campaign.

    Common Issues

    Emails landing in Gmail spam despite authentication → This typically happens when your spam complaint rate exceeds Gmail’s threshold or your DMARC policy is not aligned with your “From” domain. Check Account settings → Domains to verify all three authentication checks are green, and review your Dashboard for rising spam rates.

    DMARC alignment failure → This occurs when the domain in your Sender’s email address field does not match the domain authenticated in Account settings → Domains. Update your “From” address to use the verified domain.

    Unsubscribe link missing from emails → If you are using a custom HTML template without Sender’s default footer blocks, the unsubscribe link may not be included. Add the unsubscribe merge tag manually to your template to ensure compliance with Gmail, Yahoo, and Sender requirements.

    Account flagged for high spam complaints → Sender monitors complaint rates and may restrict your account if rates are too high. Review your subscriber list for non-consented contacts, reduce frequency to unengaged segments, and ensure your content matches subscriber expectations.

    Physical address missing from email footer → Go to Account settings → General settings and complete all fields under Company info. If you are using a custom template, confirm that the address merge tag is included in the footer.

    FAQs

    Do Gmail and Yahoo requirements apply to all senders?

    The strictest requirements (domain authentication, one-click unsubscribe, low spam rates) apply specifically to bulk senders — generally those sending more than 5,000 messages per day to Gmail or Yahoo addresses. However, all senders benefit from following these requirements, and Sender enforces many of them regardless of volume.

    Can I send from a Gmail or Yahoo email address as my “From” address?

    No. Gmail and Yahoo’s DMARC policies reject emails sent from their domains through third-party platforms like Sender. You must use a custom domain that you own and have authenticated in Account settings → Domains.

    What happens if I don’t set up DMARC?

    Gmail and Yahoo may reject or filter your emails if DMARC is not configured. At minimum, you need a DMARC record published on your domain, even if it is set to a monitoring-only policy. Check the Authentication column in Account settings → Domains to confirm your DMARC status.

    How does Sender handle the one-click unsubscribe requirement?

    Sender automatically adds the List-Unsubscribe header to marketing emails, which satisfies Gmail and Yahoo’s one-click unsubscribe requirement. If you disable the Ask for unsubscribe confirmation toggle in Account settings → General settings, subscribers are removed immediately upon clicking, fully meeting the one-click standard.

    Will my emails be blocked if my spam rate exceeds 0.3%?

    Gmail may begin filtering or rejecting your messages if your spam complaint rate stays above 0.3%. Yahoo applies similar enforcement. If your rate is elevated, Sender may also flag your account for review. Reduce sending to unengaged contacts and review your list hygiene practices to bring the rate down.

    Where do I check my authentication status in Sender?

    Go to Account settings → Domains. Each domain in the list shows green checkmarks for SPF, DKIM, and DMARC under the Authentication column. If any checkmark is missing, your authentication is incomplete.

  • Zapier Integration

    This guide explains how to connect Sender to Zapier so you can automate workflows between Sender and thousands of other apps — such as syncing new subscribers, triggering actions when campaigns are created, or adding contacts from external tools.

    Prerequisites

    • An active Sender account
    • A Zapier account (free or paid plan)
    • An API access token from Sender (generated in Account settings → API access tokens)
    • A Zap idea in mind — knowing which trigger and action you want to automate

    Where to Find This Setting

    The Sender side of the connection is managed through your API access token. To find it, go to Account settings → API access tokens in your Sender dashboard. Click Create API token if you don't have one yet, then copy the token value.

    The Zapier side of the connection is managed entirely within Zapier. You configure the integration when creating or editing a Zap in the Zap editor at https://zapier.com. You can also manage existing connections from the Apps page under My Apps in your Zapier dashboard.

    Note: The Zapier interface may change over time. Steps and menu labels described below reflect the current layout but may vary slightly.

    Steps to Connect Sender to Zapier

    Step 1 — Generate an API Access Token in Sender

    In your Sender dashboard, navigate to Account settings → API access tokens. Click Create API token. Give your token a descriptive name (e.g., Zapier integration) so you can identify it later. Once the token is created, copy it and store it securely. You will paste this token into Zapier during the authentication step.

    Step 2 — Create a Zap and Authenticate Sender

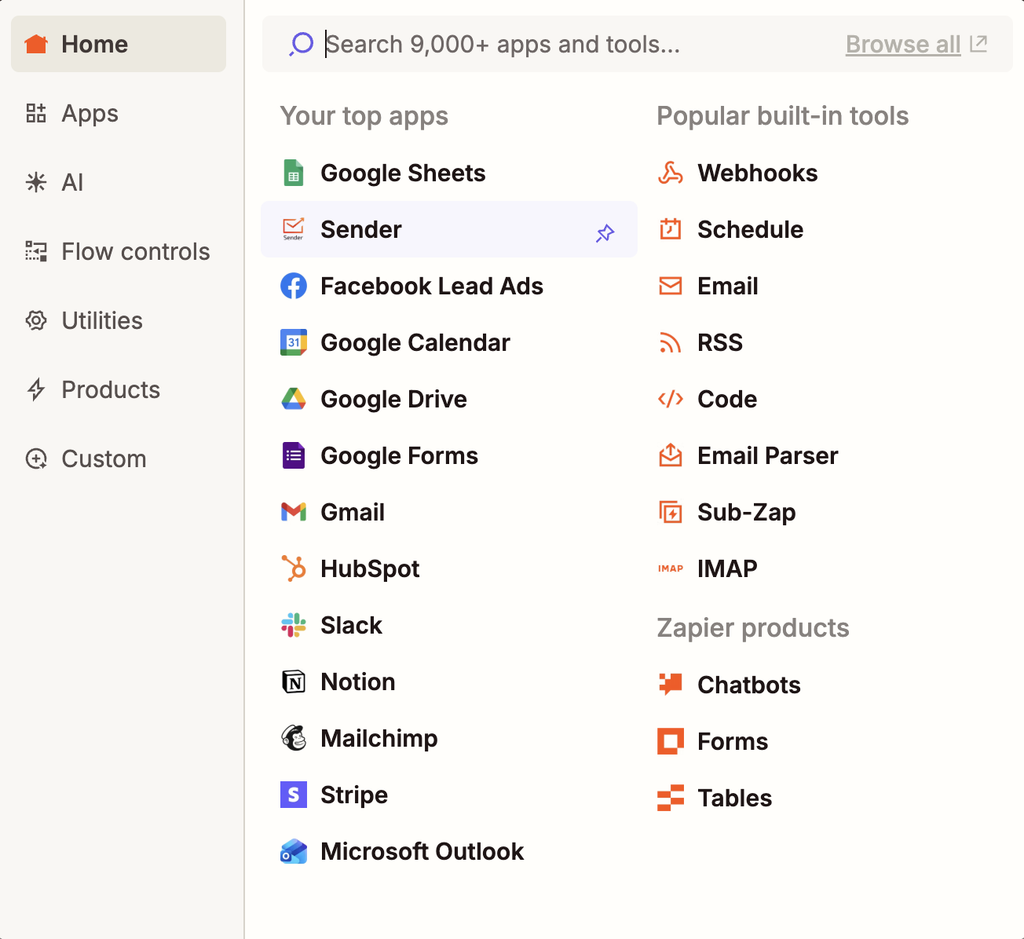
    Log in to your Zapier account and click Create → Zaps (or + Create depending on your interface). In the Zap editor, choose whether Sender will serve as the trigger app or the action app. Search for and select Sender. When prompted to connect your Sender account, click Sign in and paste your API access token into the authentication field. Click Yes, Continue to confirm the connection.

    Step 3 — Configure the Trigger and Action

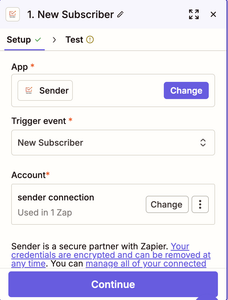
    Select the specific trigger event or action event you want to use. If Sender is your trigger, choose an event such as New Subscriber or New Campaign. If Sender is your action, choose an event such as Add / Update Subscriber or Add Subscriber to Group. Configure any required fields — such as selecting a subscriber group — then click Continue. Test the step to confirm data is flowing correctly, then publish your Zap by toggling it on.

    How to Verify the Integration

    After publishing your Zap, trigger the event manually to confirm data flows as expected. For example, if your trigger is New Subscriber, add a test subscriber in Sender and check that the action fires in the connected app. In Sender, go to Subscribers to verify that any new contacts pushed by a Zap action appear in the correct subscriber group. In Zapier, check the Zap History page to confirm the Zap ran successfully without errors.

    What Syncs Between Platforms

    Subscriber data (Sender → Zapier) — When a trigger event occurs in Sender (such as a new subscriber being added, updated, or unsubscribed), Zapier receives the subscriber's details in real time. All Sender triggers are instant, meaning data is sent to Zapier immediately when the event happens.

    Subscriber data (Zapier → Sender) — When a Zap action pushes data into Sender, it can create or update subscribers, add or remove subscribers from groups, or unsubscribe email addresses. Data is sent to Sender as soon as the Zap's trigger fires.

    Campaign data (bidirectional) — Sender can trigger a Zap when a new campaign is created. In the other direction, Zapier can create a draft campaign or send an existing draft campaign in Sender.

    Integration Tips

    Use descriptive token names — When creating your API access token in Sender, name it something identifiable like Zapier integration so you can easily manage or revoke it later without affecting other integrations.

    Test before publishing — Always use Zapier's built-in test feature for each step before turning on your Zap. This confirms that authentication works and data maps correctly between platforms.

    Use filters and formatting in Zapier — Add Zapier filter or formatter steps between your trigger and action to control which data flows into Sender. For example, filter out subscribers from a specific domain or format phone numbers before syncing.

    Monitor Zap History — Regularly check the Zap History page in Zapier to catch errors early. Failed Zap runs typically indicate expired tokens, missing required fields, or changed configurations.

    One token per integration — Consider creating a separate API access token for each third-party integration. This way, revoking one token does not break other connected services.

    Common Issues

    Sender account fails to authenticate in Zapier → The API access token may be incorrect or contain extra spaces. Go to Account settings → API access tokens in Sender, create a new token, and paste it carefully into Zapier without any leading or trailing spaces.

    Zap runs but no data appears in Sender → The action step may be misconfigured. Open the Zap in the Zap editor, verify that required fields (such as email address and subscriber group) are correctly mapped, and re-test the step.

    Trigger not firing for new events → All Sender triggers are instant and rely on webhooks. If triggers stop working, go to My Apps in Zapier, find the Sender connection, and click Reconnect to re-establish the webhook connection.

    Duplicate subscribers appearing in Sender → Use the Add / Update Subscriber action instead of creating a new subscriber each time. This action checks for an existing email address and updates the record rather than creating a duplicate.

    Zap turns off automatically → Zapier disables Zaps after repeated errors. Check the Zap History for error details, fix the underlying issue (expired token, deleted group, etc.), and turn the Zap back on.

    FAQs

    Where do I find my Sender API access token?

    Go to Account settings → API access tokens in the Sender dashboard. Click Create API token if you don't have one yet. Copy the token and paste it into the Zapier authentication field when connecting your Sender account.

    What triggers and actions does Sender support in Zapier?

    Sender supports seven instant triggers: New Campaign, New Subscriber, New Group, New Subscriber in Group, New Unsubscriber, New Unsubscriber From Group, and Updated Subscriber. It also supports seven actions: Add / Update Subscriber, Add Subscriber to Group, Remove Subscriber From Group, Create Campaign, Send Campaign, Send Transactional Campaign, and Unsubscribe Email.

    Does the integration sync existing subscribers or only new ones?

    Sender triggers in Zapier only fire for new events going forward — they do not sync historical data. To bring existing subscribers into a Zap workflow, use a Zapier action triggered by another app (such as a spreadsheet) to push contacts into Sender.

    Can I connect Sender to multiple apps through Zapier at the same time?

    Yes. Each Zap operates independently. You can create multiple Zaps that connect Sender to different apps simultaneously without conflicts.

    What happens if I revoke my API access token in Sender?

    Any Zapier Zaps authenticated with that token will stop working. You will need to create a new token in Account settings → API access tokens and reconnect your Sender account in Zapier using the new token.

    Are Sender triggers in Zapier instant or polling-based?

    All Sender triggers in Zapier are instant. They use webhooks to send data to Zapier the moment the event occurs in Sender, with no polling delay.

  • Why campaigns get paused

    This guide explains why Sender may pause or prevent your email campaigns from sending and how to resolve the underlying compliance or policy issues.

    Why This Matters

    When Sender pauses a campaign, it means your sending activity or email content has triggered a compliance or policy threshold. Paused campaigns do not reach your subscribers, which directly impacts your marketing performance. If the underlying issue is not resolved, continued violations can escalate to a full account suspension, permanent loss of sending privileges, and potential legal liability under regulations like CAN-SPAM or GDPR.

    What Is Required

    Spam complaint rate below 0.1% — Sender’s anti-spam policy requires that spam reports stay below 0.1% when sending to over 1,000 subscribers, and never exceed 50 reports per day in total. Exceeding this threshold can result in your campaign being paused or your account being suspended.

    Hard bounce rate below 10% — Sender monitors hard bounces across all campaigns. A hard bounce rate exceeding 10% indicates poor list quality and may trigger a campaign pause or account review.

    Unsubscribe rate below 1% — Your unsubscribe rate must remain below 1%, and the number of unsubscribes must not exceed the number of clicks. Campaigns that exceed this threshold may be paused automatically.

    No spamtrap hits or abuse complaints — Any spamtrap hits, SpamCop reports, or abuse complaints can result in an immediate campaign pause or account suspension, regardless of other metrics.

    Working unsubscribe link in every email — Every marketing email must contain a functional unsubscribe link. Sender blocks campaigns from sending if the email template does not include one. This is required by CAN-SPAM, GDPR, and Sender’s own policies.

    Valid physical mailing address — CAN-SPAM requires a valid physical postal address in every commercial email. Sender pulls this from your account settings and includes it in your email footer.

    No prohibited content — Sender strictly prohibits content related to affiliate marketing, gambling, forex or “get rich quick” schemes, pornography, drugs, solo email ads, loans, and weight loss products. Campaigns containing this content are paused or rejected.

    Opt-in consent for all subscribers — You must be able to provide proof of opt-in consent for your contacts at any time when requested by Sender’s compliance team. Sending to purchased, rented, or scraped lists violates Sender’s anti-spam policy.

    Always consult a legal professional for jurisdiction-specific guidance on your obligations under CAN-SPAM, GDPR, CASL, or other applicable email regulations.

    Steps to Resolve a Paused Campaign

    Step 1 — Review your campaign metrics

    Go to Dashboard and check your Traffic and reach report for the metrics that may have triggered the pause. Look at Total spams, Bounce rate, Unsubscribe rate, and Average spam rate.

    campaign-traffic-reach-report

    Compare these values against Sender’s thresholds: spam complaints below 0.1%, hard bounces below 10%, and unsubscribes below 1%. This tells you which metric caused the issue.

    Step 2 — Clean your subscriber list

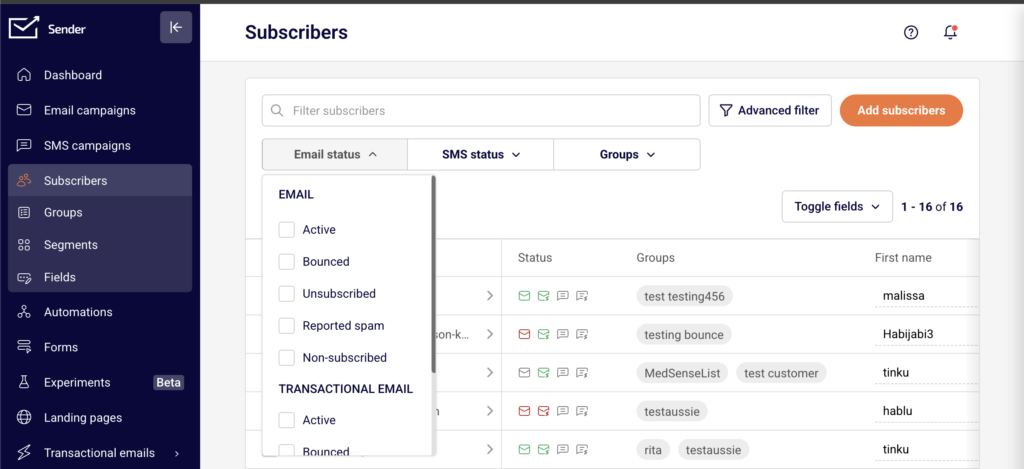
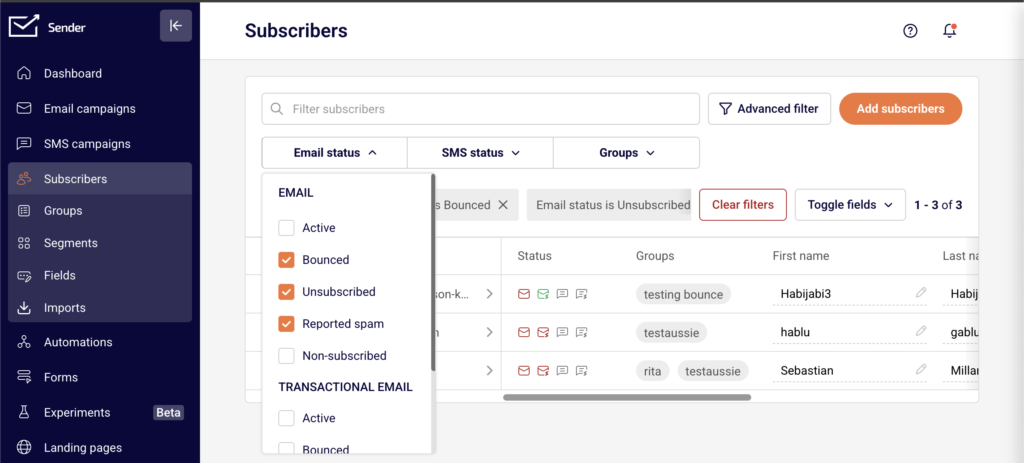
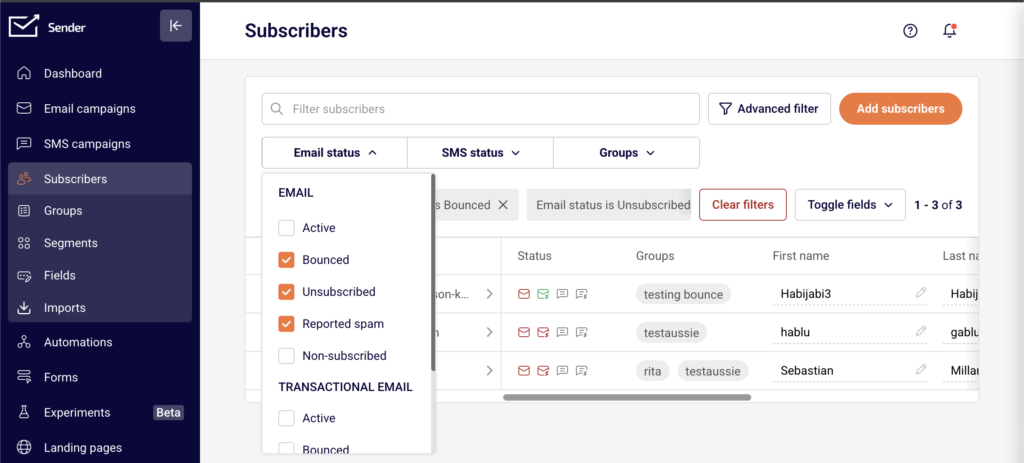
    Go to Subscribers from the left sidebar. Use the Email status and Advanced filter options to identify inactive, bounced, or unsubscribed contacts. Remove subscribers who hard bounced, never engaged, or did not provide opt-in consent.

    subscribers-email-status

    Reducing invalid and disengaged contacts directly lowers your bounce and complaint rates.

    Step 3 — Verify your email content and compliance settings

    Go to Account settings → General settings. Confirm that your Address, City, State / Province / Region, Postal/ZIP code, and Country fields are filled in with a valid physical mailing address.

    account-settings-company-info

    This address is included in your email footer to satisfy CAN-SPAM requirements. Then open your campaign in the editor and confirm it contains a working unsubscribe link and does not include any prohibited content.

    Step 4 — Check your account verification status

    New accounts must pass Sender’s account verification process before campaigns can be sent. Your account requires a legitimate, verified website and a campaign that reflects that website’s content. If your account is still pending verification, your campaigns remain paused until the review is complete. Contact [email protected] or use LiveChat if you need clarification on your verification status.

    Step 5 — Contact Sender support

    If you have addressed the compliance issue but your campaign remains paused, contact Sender’s support team via LiveChat or at [email protected]. Provide details about the campaign in question and the steps you have taken to resolve the issue. Sender’s compliance team will review your account and advise on next steps or reinstatement.

    Sender’s Policies

    Zero-tolerance spam policy — Sender prohibits sending unsolicited emails of any form. This includes emails to harvested addresses, purchased or rented lists, and recipients who previously unsubscribed. Violations result in campaign pauses or account termination without refund.

    Sending threshold enforcement — Sender actively monitors spam complaint rates, bounce rates, unsubscribe rates, and spamtrap hits across all accounts. Campaigns that exceed the defined thresholds are paused automatically, and repeated violations lead to account suspension.

    Prohibited content policy — Sender does not allow campaigns that promote affiliate marketing, gambling, forex or stock trading tips, pornography, drugs, solo email ads, loans, or weight loss products. Campaigns containing this content are rejected or paused on detection.

    Unsubscribe link requirement — Every email template must include a working unsubscribe link. Sender prevents campaigns from being sent if the unsubscribe link is missing or broken. For custom HTML templates, the link must use the {{unsubscribe_link}} merge tag.

    Account verification requirement — New accounts undergo a verification process that evaluates the legitimacy of the associated website and campaign content. Campaigns cannot be sent from unverified accounts.

    One account per sender policy — You are only allowed one Sender account sending the same or similar content. If your account is suspended or disabled, creating another account results in automatic cancellation of the new account.

    Compliance Tips

    Monitor your dashboard metrics regularly — Check your Bounce rate, Unsubscribe rate, and Total spams on the Dashboard after every campaign send. Catching a rising metric early allows you to clean your list before reaching a threshold that pauses your campaigns.

    Use double opt-in for new subscribers — Requiring subscribers to confirm their email address before being added to your list reduces hard bounces, spam complaints, and spamtrap hits. This protects your sending metrics and provides documented proof of consent.

    Keep your physical address current — Update your mailing address in Account settings → General settings whenever it changes. Sender uses this address in your email footer, and an outdated or missing address violates CAN-SPAM requirements.

    Review content against prohibited categories before sending — Before scheduling a campaign, verify that your email content does not fall into any of Sender’s prohibited content categories. A single campaign with prohibited content can result in an immediate pause or suspension.

    Maintain opt-in records — Keep documentation of how and when each subscriber opted in. Sender’s compliance team may request proof of consent at any time, and failure to provide it is treated as a policy violation.

    Common Issues

    Campaign blocked for missing unsubscribe link → Your email template does not include a working unsubscribe link. Open the campaign editor and add one. For custom HTML, insert <a href="{{unsubscribe_link}}">{{unsubscribe_text}}</a> into your template code.

    Campaign paused after high bounce rate → Your subscriber list contains too many invalid email addresses. Go to Subscribers, filter by bounced status, and remove those contacts. Consider validating your list before your next send.

    Account suspended after sending to a purchased list → Sender’s anti-spam policy prohibits sending to purchased, rented, or scraped email lists. These lists generate high bounce rates, spam complaints, and spamtrap hits. In most cases, suspensions for this reason are permanent.

    Campaign stuck in review for a new account → New accounts must pass Sender’s verification process. Ensure you have added and verified a legitimate website and that your campaign content reflects that website. Contact support if the review is taking longer than expected.

    Unsubscribe rate exceeded the threshold → Your unsubscribe rate has risen above 1% or the number of unsubscribes exceeds clicks. Review your sending frequency, audience targeting, and content relevance. Remove disengaged subscribers and segment your list more carefully.

    FAQs

    Why was my campaign paused by Sender?

    Sender pauses campaigns when they exceed compliance thresholds or violate sending policies. Common triggers include a spam complaint rate above 0.1%, a hard bounce rate above 10%, an unsubscribe rate above 1%, missing unsubscribe links, prohibited content, or sending to non-consented contacts. Check your Dashboard metrics and review the notification from Sender for specific details.

    Can I resume a paused campaign after fixing the issue?

    It depends on the reason for the pause. If the campaign was blocked for a missing unsubscribe link or content issue, correcting the problem and resubmitting the campaign should allow it to proceed. If your account was suspended for a policy violation, contact [email protected] to discuss reinstatement options.

    What content types are prohibited on Sender?

    Sender prohibits affiliate marketing, gambling and betting, forex and stock trading tips, “get rich quick” or “work at home” schemes, pornography and dating services, drugs and male enhancement products, solo email ads (campaigns for multiple companies to the same list), loans, and weight loss products.

    Do I need an unsubscribe link in every email?

    Yes. Every marketing email sent through Sender must include a working unsubscribe link. This is required by CAN-SPAM, GDPR, and Sender’s own sending policies. Sender blocks campaigns that do not contain one. Transactional emails are generally exempt, but including one is still recommended.

    What happens if my account is suspended for a policy violation?

    In most cases, suspension for a policy violation is permanent. If you believe your account complies with Sender’s terms of service and anti-spam policy, you can contact [email protected] to request a review. No refunds are provided for accounts suspended due to policy violations.

    Am I required to include a physical address in my emails?

    Yes. CAN-SPAM requires a valid physical postal address in every commercial email. Add your address in Account settings → General settings under the Address, City, State / Province / Region, Postal/ZIP code, and Country fields. Sender automatically includes this address in your email footer when using default templates.

    Can I send to a purchased email list?

    No. Sender’s anti-spam policy prohibits sending to purchased, rented, or scraped email lists. Sending to these lists results in high bounce rates, spam complaints, spamtrap hits, and will lead to campaign pauses or account suspension.

  • Understanding Bounce Management in Sender

    This guide helps you diagnose and resolve email bounce issues in Sender by identifying bounce types, reviewing your metrics, and taking corrective action.

    Symptoms

    Your Dashboard shows an elevated Bounce rate, Hard bounce rate, or Soft bounce rate in the Traffic and reach report.

    The Total bounces count is increasing after recent sends.

    Subscribers you expected to receive your emails have a Bounced status when you filter by Email status on the Subscribers page.

    Campaign reports show a high number of bounced recipients, and your Total delivered count is significantly lower than Total emails sent.

    Possible Causes

    Invalid or nonexistent email addresses — The subscriber list contains addresses with typos, deactivated mailboxes, or domains that no longer exist. These generate hard bounces because the receiving server permanently rejects the message.

    Full or temporarily unavailable inboxes — The recipient’s mailbox is full, the mail server is temporarily down, or the message exceeds size limits. These produce soft bounces that may resolve on retry.

    Domain authentication failures — SPF, DKIM, or DMARC records are missing, misconfigured, or were recently changed. Receiving servers may reject or bounce emails that fail authentication checks.

    Recipient domain blocking your sends — A specific mailbox provider (e.g., Gmail, Outlook) is rejecting your emails due to reputation issues, blacklisting, or policy restrictions at the domain level.

    Stale or unvalidated subscriber list — A list that has not been cleaned or validated in a long time accumulates invalid addresses, spam traps, and disengaged contacts, all of which increase bounce rates.

    Steps to Resolve

    Step 1 — Review your bounce metrics on the Dashboard

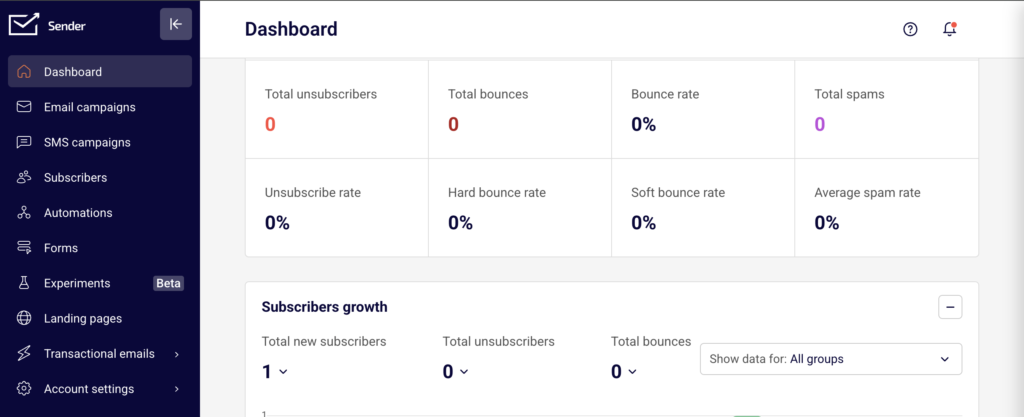
    Go to Dashboard and locate the Traffic and reach report. Check the Hard bounce rate and Soft bounce rate to understand the scope. A high Hard bounce rate indicates permanent delivery failures from invalid addresses.

    dashboard-traffic-reach

    A high Soft bounce rate suggests temporary issues. Note the Total bounces count and compare it against Total emails sent to determine the severity. If bounces are concentrated after a specific send, investigate that campaign first.

    Step 2 — Identify bounced subscribers and clean your list

    Go to Subscribers and click the Email status dropdown. Select Bounced to filter for all subscribers with a bounced status.

    subscribers-email-status

    Review the list to identify patterns — such as addresses from the same domain or addresses with obvious typos. If you find invalid addresses that were imported without validation, consider running your list through an external email verification service before your next send.

    Step 3 — Verify your domain authentication status

    Go to Account settings → Domains. Check that your domain shows a green checkmark for all three Authentication indicators: SPF, DKIM, and DMARC.

    account-settings-domains

    If any checkmark is missing or shows an error, your DNS records need attention.

    account-settings-domains-dns

    Click Recheck DNS records to refresh the status. Authentication failures can cause receiving servers to bounce your emails, especially if a DNS change was recently made.

    Step 4 — Investigate bounces by domain using transactional logs

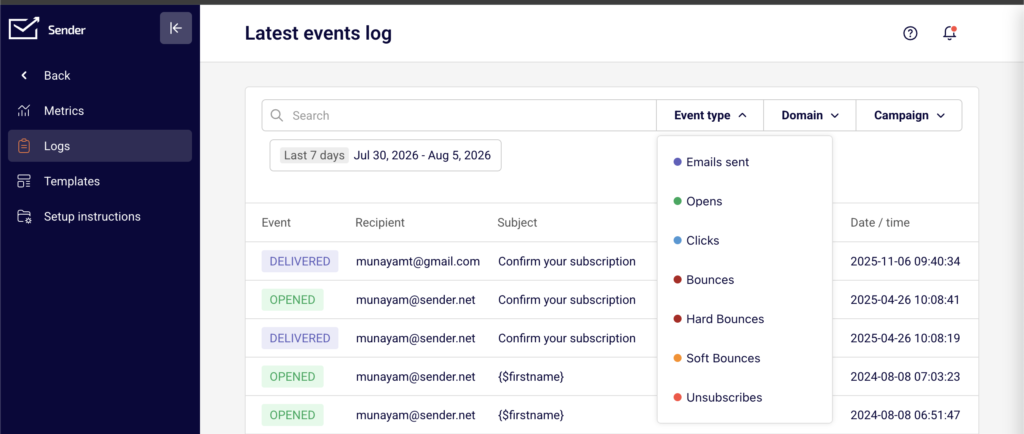
    Go to Transactional emails → Logs. Use the Event type filter and select Bounces to isolate bounce events.

    transactional-logs

    Then use the Domain filter to check whether bounces are concentrated on a specific recipient domain. If most bounces come from a single provider, the issue may be a block or reputation problem with that provider rather than a list-wide issue. Cross-reference with an external tool like MXToolbox to check for blacklisting.

    Step 5 — Send a test campaign and monitor results

    After applying fixes — such as removing invalid addresses, correcting authentication, or resolving a blacklisting issue — send a small test campaign to a segment of known-valid subscribers. Monitor the Dashboard for that send. Check the Bounce rate, Hard bounce rate, and Soft bounce rate. If rates return to normal, the fix is working. Continue monitoring across 2–3 subsequent sends to confirm stability.

    How Sender Handles It

    Automatic hard bounce suppression — Sender automatically suppresses email addresses that return a hard bounce. These contacts are marked with a Bounced status under Email status and are excluded from all future email sends. You can view them by filtering for Bounced on the Subscribers page.

    Soft bounce retry logic — When a soft bounce occurs, Sender retries delivery automatically. If the soft bounce persists after multiple retry attempts, the address may be reclassified and suppressed. You do not need to manually retry soft bounces.

    Bounce rate tracking on the Dashboard — Sender calculates and displays your Bounce rate, Hard bounce rate, and Soft bounce rate separately in the Traffic and reach report on the Dashboard. These metrics update with each send, allowing you to detect trends and spikes over time by adjusting the date range filter.

    Transactional bounce separation — For transactional emails, Sender tracks Hard bounces and Soft bounces as separate metrics under Transactional emails → Metrics. Bounced transactional contacts are managed independently and appear under the TRANSACTIONAL EMAIL section of the Email status filter on the Subscribers page.

    How to Verify the Fix

    After applying your fix, send a small test campaign to a segment of engaged, recently active subscribers. Go to the Dashboard and check the Traffic and reach report for that send — confirm that Total delivered is close to Total emails sent and that the Hard bounce rate and Soft bounce rate have returned to acceptable levels. Go to Subscribers, filter by Email status → Bounced, and confirm no new addresses were added after the test send. If bounces persist, revisit your domain authentication under Account settings → Domains and run an external blacklist check.

    Common Issues

    Bounce rate spikes after importing a new list → The imported list likely contains invalid or outdated addresses. Validate your list using an external email verification tool before importing, and remove any addresses that fail validation.

    Bounces concentrated on one recipient domain → The receiving domain may be blocking your sends due to reputation or policy. Use the Domain filter in Transactional emails → Logs to confirm, then check your sending domain against blacklists using MXToolbox.

    Authentication checkmarks disappeared after a DNS change → A recent DNS update may have overwritten or removed your SPF, DKIM, or DMARC records. Go to Account settings → Domains and click Recheck DNS records. If any checkmark is missing, re-add the required DNS records.
    Emails bouncing despite valid addresses → The recipient’s mailbox may be full or temporarily unavailable (soft bounce), or your sending domain may have a reputation issue. Check whether the bounces are hard or soft on the Dashboard, and review the Event type → Bounces log in Transactional emails → Logs for details.

    Previously active subscribers now showing Bounced status → Mailboxes can be deactivated over time. Filter by Email status → Bounced on the Subscribers page to review affected contacts. These addresses have been automatically suppressed by Sender and will not receive future sends.

    FAQs

    Does Sender automatically stop sending to hard-bounced addresses?

    Yes. Sender suppresses hard-bounced email addresses automatically. These contacts are marked with a Bounced status and excluded from future sends. You can view bounced subscribers on the Subscribers page by filtering Email status to Bounced.

    What is the difference between a hard bounce and a soft bounce?

    A hard bounce is a permanent delivery failure — the address does not exist or the domain is invalid. A soft bounce is a temporary failure — the inbox may be full or the server temporarily unavailable. Sender retries soft bounces automatically and suppresses hard bounces.

    My emails were delivering fine but suddenly started bouncing. What happened?

    A sudden spike in bounces may indicate a DNS change affecting your authentication, a blacklisting event, or a list quality issue. Check your domain authentication status under Account settings → Domains, review your bounce metrics by inspecting the Hard bounce rate and Soft bounce rate on the Dashboard, and run a blacklist check using an external tool like MXToolbox.

    How long should I wait before checking if a fix worked?

    Send a small test campaign immediately after applying the fix. Monitor the Dashboard metrics for that send. If the Bounce rate has returned to normal levels, the fix is working. Continue monitoring for 2–3 subsequent sends to confirm stability.

    Can I reactivate a subscriber who was marked as Bounced?

    Subscribers marked as Bounced were suppressed because their address returned a permanent delivery failure. Re-sending to these addresses is not recommended, as it can harm your sender reputation. If you believe the bounce was temporary or the address has been corrected, contact Sender support for guidance.

    Where can I see bounce details for transactional emails?

    Go to Transactional emails → Metrics to view Hard bounces and Soft bounces totals. For individual bounce events, go to Transactional emails → Logs and select Bounces from the Event type filter. You can further narrow results using the Domain and Campaign filters.

  • Unsubscribe compliance and configuration

    This guide explains the requirements for including and managing unsubscribe links in your emails and how to configure Sender’s unsubscribe settings to meet those obligations.

    Why This Matters

    Every marketing email you send must include a working unsubscribe mechanism. Failing to provide one violates CAN-SPAM, GDPR, CASL, and Sender’s own sending policies, and can result in spam complaints, deliverability damage, and account suspension. Subscribers who cannot easily opt out are more likely to mark your emails as spam, which directly harms your sender reputation. Proper unsubscribe configuration protects both your account standing and your recipients’ rights.

    What Is Required

    Working unsubscribe link in every marketing email — CAN-SPAM (the U.S. law governing commercial email) requires a clear and conspicuous opt-out mechanism in every commercial message. GDPR (the EU’s data protection regulation) and CASL (Canada’s anti-spam legislation) impose similar requirements. Emails sent without a functional unsubscribe link may trigger spam complaints, mailbox provider filtering, and regulatory penalties.

    Timely processing of unsubscribe requests — CAN-SPAM requires that opt-out requests be honored within 10 business days. Sender processes unsubscribes automatically and immediately when a subscriber clicks the unsubscribe link. You must not re-add or re-email contacts who have unsubscribed unless they explicitly re-consent.

    Physical mailing address in every commercial email — CAN-SPAM requires a valid physical postal address in every marketing email. This address must be entered in your Sender account settings and appears automatically in the email footer when using Sender’s default templates.

    Unsubscribe confirmation behavior — Some regulations and best practices recommend confirming the unsubscribe action rather than requiring additional steps that could delay opt-out processing. Sender offers an optional confirmation step that you can enable or leave disabled based on your compliance needs.

    Note: Regulations vary by jurisdiction. Consult a legal professional for guidance specific to your region and audience.

    Steps to Configure Unsubscribe Compliance

    Step 1 — Add your physical mailing address

    Go to Account settings → General settings. In the Company info section, fill in the Address, City, State / Province / Region, Postal/ZIP code, and Country fields with your valid business mailing address. Click Save.

    account-settings-company-info

    This address is automatically inserted into your email footer using template variables ({{ account.address }}, {{ account.city }}, {{ account.country }}), satisfying the CAN-SPAM physical address requirement.

    Step 2 — Verify the unsubscribe link is visible in your email template

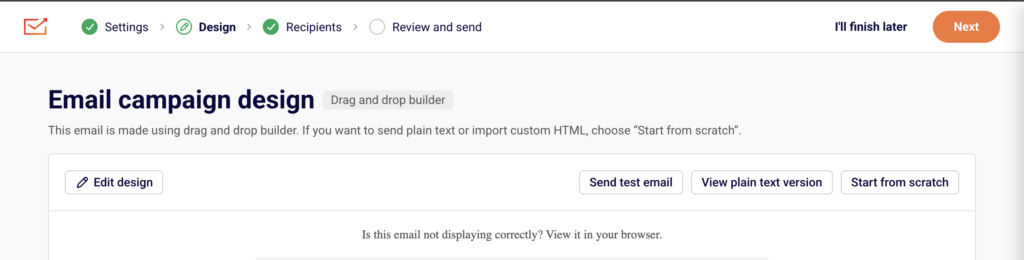
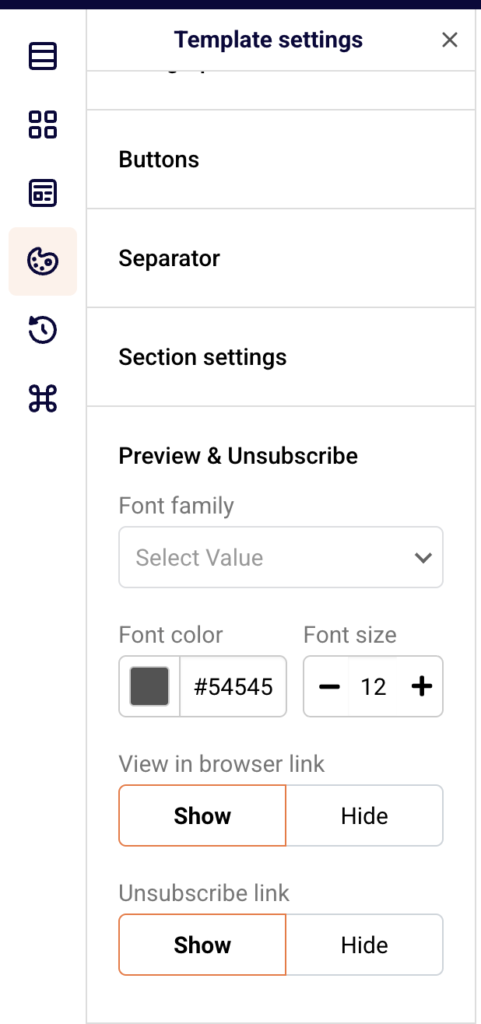
    Open your campaign in the email builder (Email campaigns → select a campaign → Design → Edit design). In the left sidebar, click the Template settings icon, then expand Preview & Unsubscribe.

    campaign-design

    template-settings-preview-unsubscribe

    Confirm that the Unsubscribe link option is set to Show. This ensures every email sent from this template includes the unsubscribe link in the footer. The default footer text reads “If you would like to unsubscribe, please click here.”

    Step 3 — Configure the unsubscribe confirmation setting

    Go to Account settings → General settings. Scroll to the Other settings section and locate the Ask for unsubscribe confirmation toggle.

    unsubscribe-confirmation

    When disabled, subscribers are unsubscribed immediately upon clicking the link. When enabled, subscribers see a confirmation step before the unsubscribe is processed. Choose the setting that fits your compliance strategy — immediate processing is generally safer for regulatory compliance. Click Save.

    Step 4 — Review unsubscribed subscribers

    Go to Subscribers and click the Email status dropdown filter. Select Unsubscribed to view all contacts who have opted out. Sender automatically prevents these subscribers from receiving future marketing campaigns. Do not export and re-import unsubscribed contacts into active lists, as this violates sending policies and regulations.

    Step 5 — Handle individual unsubscribe and deletion requests

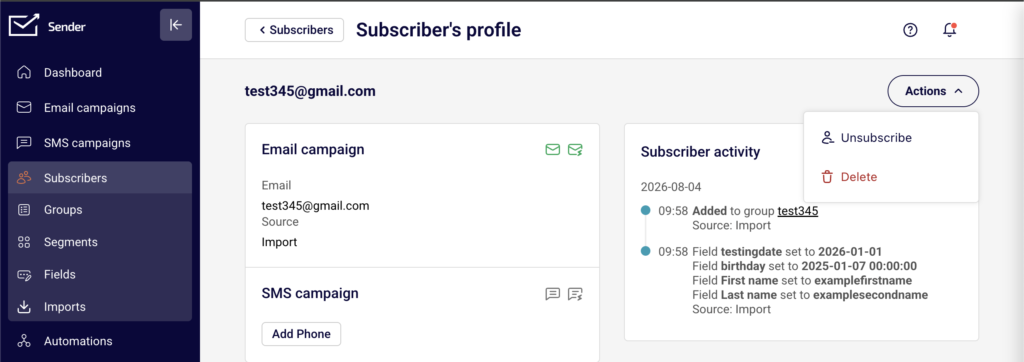
    To manually unsubscribe or delete a subscriber, go to Subscribers, click on the subscriber’s email to open their Subscriber’s profile, then click Actions in the top right.

    subscriber-profile

    Select Unsubscribe to opt them out, or Delete to remove their record entirely. Use Delete when processing a GDPR data deletion request. You can also export their data first using the Actions → Export to CSV or Export to XLSX option on the main Subscribers page to fulfill data access or portability requests.

    Sender’s Policies

    Unsubscribe link required — Sender requires every marketing email to include a working unsubscribe link. Removing or hiding the unsubscribe link from your campaigns violates Sender’s acceptable use policy and may result in account review or suspension.

    Automatic unsubscribe processing — When a subscriber clicks the unsubscribe link, Sender automatically updates their status to Unsubscribed and excludes them from future campaign sends. You cannot override this behavior or send marketing emails to unsubscribed contacts.

    No re-subscribing without consent — Sender prohibits re-adding unsubscribed contacts to active mailing lists unless the contact has explicitly re-consented through a new opt-in action. Bulk re-subscribing unsubscribed contacts may trigger an account review.

    Physical address enforcement — Sender’s default email templates include footer variables that pull your physical address from Account settings → General settings. If the address fields are empty, the footer will display incomplete information, which may violate CAN-SPAM and Sender’s policies.

    Compliance Tips

    Always use Sender’s default footer — The default email templates include both the unsubscribe link and physical address variables. Avoid removing or replacing the default footer in the email builder, as this is the simplest way to stay compliant with CAN-SPAM and Sender’s policies.

    Test your unsubscribe link before sending — Use the Send test email button on the Design step of your campaign to send a test to yourself. Click the unsubscribe link in the test email to verify it works and leads to the correct opt-out page.

    Enable double opt-in on your forms — In Forms → select a form → Publishing settings, enable the Double opt-in settings toggle. This sends a confirmation email to new subscribers before adding them to your list, which strengthens consent documentation and helps meet GDPR and CASL requirements.

    Keep your address current — If your business address changes, update it immediately in Account settings → General settings. All future campaigns will automatically use the updated address in the footer.

    Monitor your unsubscribe rate — Check the Unsubscribe rate metric on the Dashboard. A consistently high unsubscribe rate may indicate issues with content relevance, sending frequency, or list quality, and could trigger a Sender account review.

    Common Issues

    Unsubscribe link missing from sent emails → The Unsubscribe link is set to Hide in the email builder’s Template settings → Preview & Unsubscribe section. Open the campaign design, navigate to Template settings, expand Preview & Unsubscribe, and set the Unsubscribe link to Show.

    Physical address showing as blank in email footer → The address fields in Account settings → General settings are empty or incomplete. Fill in the Address, City, State / Province / Region, Postal/ZIP code, and Country fields, then click Save.

    Unsubscribed contact still receiving emails → This typically occurs if the contact was re-imported into an active list or added through an API call after unsubscribing. Check the subscriber’s status under Subscribers → Email status filter. If their status is Unsubscribed, Sender will not send them campaigns. If they appear as Active, verify your import process is not overriding unsubscribe status.

    Subscriber complains they cannot unsubscribe → Verify the unsubscribe link is present and functional by sending a test email. If using a custom HTML template, confirm the unsubscribe tag is included in your email code. In the drag and drop builder, check Template settings → Preview & Unsubscribe to ensure the link is set to Show.

    FAQs

    Do I need an unsubscribe link in every email?

    Yes. Every marketing email sent through Sender must include a working unsubscribe link. This is required by CAN-SPAM, GDPR, and Sender’s own sending policies. Transactional emails are generally exempt, but including one is still recommended.

    Can I customize the unsubscribe link text in the email footer?

    The default unsubscribe text in drag and drop templates reads “If you would like to unsubscribe, please click here.” You can modify this text by editing the footer section in the email builder. However, the unsubscribe link itself must remain functional and clearly identifiable as an opt-out mechanism.

    What happens when a subscriber clicks the unsubscribe link?

    Sender immediately updates the subscriber’s status to Unsubscribed. If you have enabled the Ask for unsubscribe confirmation toggle in Account settings → General settings, the subscriber sees a confirmation step first. Once unsubscribed, the contact is automatically excluded from all future marketing campaign sends.

    Can I send to a purchased email list?

    No. Sender’s acceptable use policy prohibits sending to purchased, rented, or scraped email lists. Sending to these lists results in high bounce rates, spam complaints, and may lead to account suspension.

    What happens if my account is suspended for a policy violation?

    Sender sends a notification email explaining the reason for suspension. Review the details, correct the issue (e.g., remove non-consented contacts, update content), and follow the reinstatement instructions provided in the notification. Contact Sender support if you need assistance.

    Am I required to include a physical address in my emails?

    Yes. CAN-SPAM requires a valid physical postal address in every commercial email. Add your address in Account settings → General settings under Company info. Sender automatically includes it in your email footer when using the default templates.

    How do I handle a GDPR data deletion request from a subscriber?

    Locate the subscriber in the Subscribers section, click their email to open the Subscriber’s profile, and select Delete from the Actions dropdown. If you need to confirm what data is stored, you can export the subscriber’s data first using the Export to CSV or Export to XLSX option on the main Subscribers page. Consult a legal professional for guidance on your specific obligations under GDPR.

    Should I enable double opt-in?

    Double opt-in is not required by all regulations but is strongly recommended, especially if you have subscribers in the EU or Canada. Enable it in Forms → select your form → Publishing settings → Double opt-in settings. It strengthens your consent records and reduces invalid signups.

  • Blacklist monitoring

    This guide explains how to monitor your sending domain and IP against email blacklists and how to respond if a listing is detected as a Sender user.

    Why this matters

    If your domain or sending IP appears on a blacklist, mailbox providers may reject your emails outright or route them to spam. Blacklisting is one of the most severe reputation events a sender can experience, and it directly reduces inbox placement across all recipient providers. Proactive monitoring allows you to detect a listing early, identify the cause, and begin the delisting process before sustained delivery failures damage your sender reputation further.

    How to identify the problem

    Hard bounce rate on the Dashboard — Go to Dashboard and review the Hard bounce rate metric in the Traffic and reach report section. A sudden spike in hard bounces, particularly from a single mailbox provider, often indicates that your IP or domain has been blacklisted by that provider or by a blacklist it references.

    dashboard-traffic-reach

    Average spam rate on the Dashboard — Check the Average spam rate metric on the Dashboard. A rising spam rate signals that recipients are marking your emails as spam, which contributes to blacklist listings. An Average spam rate above 0.1% is a warning sign that blacklisting may follow.

    Total spams on the Dashboard — Review the Total spams count in the Traffic and reach report on the Dashboard. A high absolute number of spam reports over a short period increases the likelihood that blacklist operators will flag your sending infrastructure.

    MXToolbox Blacklist Check — Use MXToolbox (mxtoolbox.com/blacklists.aspx) to run a multi-blacklist lookup against your sending domain or IP address. This tool checks your domain and IP against dozens of blacklists simultaneously and reports any active listings.

    Spamhaus Lookup — Search your domain and sending IP on Spamhaus (check.spamhaus.org). Spamhaus operates several widely used blacklists including the SBL (Spamhaus Block List) and DBL (Domain Block List). A listing on Spamhaus has a high impact because many mailbox providers reference it directly.

    Google Postmaster Tools — If you send to Gmail recipients, check Google Postmaster Tools (postmaster.google.com) for domain reputation data. A reputation rating of “Bad” or “Low” alongside delivery failures to Gmail may indicate an active blacklisting or severe reputation degradation.

    Steps to monitor and respond

    Step 1 — Run a blacklist check on your domain and IP

    Open MXToolbox (mxtoolbox.com/blacklists.aspx) and enter your sending domain. Run the lookup to scan across multiple blacklists at once. Note any blacklists where your domain or IP is listed. Then repeat the check on Spamhaus (check.spamhaus.org) specifically, since Spamhaus listings have the widest impact on delivery. Record which blacklists show an active listing and the reason provided.

    Step 2 — Correlate with Sender dashboard metrics

    Go to your Dashboard in Sender and review the Hard bounce rate, Average spam rate, and Total spams in the Traffic and reach report. Compare the date when these metrics spiked against the approximate listing date shown by the blacklist provider. This helps you identify the sending behavior or campaign that triggered the listing, whether it was a high-complaint campaign, a list with outdated addresses, or a spam trap hit.

    Step 3 — Submit a delisting request

    Visit the blacklist provider’s website and follow their delisting process. For Spamhaus, submit a removal request through their lookup tool after addressing the underlying cause. For Barracuda, use the Barracuda Central removal request form. For SORBS, follow the delisting instructions on their lookup page. Each provider requires that you describe the corrective action you have taken. Do not request delisting until you have identified and resolved the root cause.

    Step 4 — Address the root cause

    Based on the metrics from Step 2, take corrective action. If Average spam rate is elevated, review recent campaign content and subscriber sources.

    subscribers-email-status

    If Hard bounce rate spiked, clean your subscriber list by removing invalid addresses — go to Subscribers and filter by bounce status. If you suspect a spam trap hit, remove subscribers who have not engaged (opened or clicked) in the past 6–12 months. These actions prevent re-listing after delisting.

    Step 5 — Monitor continuously after delisting

    After your delisting request is approved, schedule regular blacklist checks using MXToolbox at least weekly for the first month. Continue reviewing Hard bounce rate, Average spam rate, and Total spams on the Dashboard after each campaign send. If metrics remain stable and no new listings appear, extend your monitoring cadence to biweekly or monthly. Re-listing can occur quickly if the underlying issue was not fully resolved.

    How filtering works

    Blacklist-based filtering — Mailbox providers query blacklists such as Spamhaus, Barracuda, and SORBS during the SMTP connection or message evaluation. If the sending IP or domain is listed, the provider may reject the message at the connection level or route it directly to spam. Different providers reference different blacklists, so a single listing may affect delivery to some providers but not others.

    IP reputation scoring — Mailbox providers maintain internal reputation scores for sending IP addresses based on bounce rates, spam complaints, spam trap hits, and sending volume patterns. A blacklist listing typically occurs after the IP reputation has already degraded past a threshold. Recovering the IP reputation requires sustained clean sending behavior even after a blacklist removal.

    Domain reputation scoring — In addition to IP reputation, providers like Gmail evaluate the reputation of your sending domain independently. Domain-based blacklists such as the Spamhaus DBL and SURBL list domains found in spam messages. A domain listing can affect delivery regardless of which IP you send from, making domain reputation monitoring equally important.

    Spam trap detection — Blacklist operators maintain spam trap email addresses — addresses that should never receive email because they were either abandoned or were never associated with a real user. Sending to a spam trap signals poor list acquisition or maintenance practices. A single spam trap hit on a high-priority blacklist like Spamhaus can result in an immediate listing.

    Feedback loop data — Some mailbox providers operate feedback loops (FBLs) that report back to senders when a recipient marks an email as spam. High complaint volumes reported through FBLs contribute to blacklist listings over time. Monitoring your Total spams and Average spam rate on the Sender Dashboard reflects this complaint data.

    Recovery tips

    Fix the root cause before requesting delisting — Blacklist providers review delisting requests and may deny them or re-list your IP/domain if the underlying issue persists. Identify whether the cause was a bad list segment, spam trap exposure, or a content issue before submitting a request.

    Reduce sending volume temporarily — After a blacklist event, lower your sending volume and send only to your most engaged subscribers. This generates positive engagement signals and helps rebuild IP and domain reputation with mailbox providers.

    Remove unengaged subscribers — Go to Subscribers in Sender and identify contacts who have not opened or clicked in the past 6–12 months. Removing these subscribers reduces the risk of hitting spam traps and improves overall engagement rates, which supports reputation recovery.

    Send a re-engagement campaign first — Before resuming full-volume sending, send a targeted re-engagement campaign to moderately active subscribers. Monitor the resulting Hard bounce rate and Average spam rate on the Dashboard closely. If metrics remain clean, gradually increase volume.

    Set up ongoing monitoring — Use MXToolbox to schedule automated blacklist monitoring alerts for your domain and IP. Combine this with regular reviews of your Dashboard metrics in Sender. Early detection of a re-listing allows faster corrective action.

    Common issues

    Listed on a blacklist but emails are still delivering → Not all mailbox providers reference the same blacklists. A listing on a smaller or less-referenced blacklist may not immediately affect delivery. However, you should still request delisting promptly, as blacklist data can propagate to other providers over time.

    Delisting request was denied → The blacklist provider determined that the root cause has not been addressed. Review the denial reason, take the required corrective action (such as cleaning your list or reducing complaints), and resubmit the request. Some providers enforce a waiting period before you can resubmit.

    Re-listed shortly after successful delisting → This indicates the underlying problem was not fully resolved. Common causes include continued sending to spam traps, ongoing high complaint rates, or a compromised subscriber list. Review your Hard bounce rate and Average spam rate on the Dashboard, clean your list more aggressively, and reduce volume before requesting delisting again.

    Blacklist check shows a listing on an IP you don’t recognize → If you are on a shared IP plan, another sender’s behavior may have caused the listing. Contact Sender support to confirm your sending IP allocation and discuss whether a dedicated IP is available for your account.

    Dashboard metrics look normal but delivery is declining → Some blacklist listings affect only specific providers. Check Google Postmaster Tools for Gmail-specific reputation data, and use MXToolbox to verify your status across multiple blacklists. A domain-level listing on Spamhaus DBL or SURBL may not surface in standard IP blacklist checks.

    FAQs

    How do I know if my domain is on a blacklist?

    Use external tools like MXToolbox, Spamhaus Lookup, or Barracuda Reputation to check your domain and sending IP. If listed, follow the blacklist provider’s delisting process. Monitor your Hard bounce rate and Average spam rate on the Sender Dashboard for signs of blacklisting, such as a sudden spike in rejections from a specific provider.

    How long does it take to recover sender reputation after a blacklisting?

    Recovery time varies depending on the severity of the listing and the actions taken. Minor listings on smaller blacklists may resolve within days of delisting. Severe reputation damage from a Spamhaus listing combined with high complaint rates can take several weeks to months of clean sending to recover from. Consistent, low-volume sending to engaged subscribers accelerates recovery.

    What is a spam trap and how does it affect my reputation?

    A spam trap is an email address used by blacklist operators or mailbox providers to identify senders with poor list practices. Sending to a spam trap signals that your list contains unverified or outdated addresses. This can result in blacklisting or reduced inbox placement. Remove inactive subscribers regularly to reduce spam trap risk.

    Does Sender share my sending IP with other users?

    Sender’s infrastructure and IP allocation policies may vary by plan. Check your account settings or contact Sender support to understand whether your account uses shared or dedicated IPs, as this affects how other senders’ behavior may influence your reputation.

    Why are my emails going to spam even though I’m not on any blacklist?

    Blacklist status is only one factor in filtering decisions. Mailbox providers also evaluate sender reputation scores, engagement rates, complaint rates, and content quality independently. If your blacklist checks are clean but emails land in spam, review your Average spam rate and engagement metrics on the Dashboard, and check Google Postmaster Tools for domain reputation data specific to Gmail.

  • CAN-SPAM and GDPR Compliance

    This guide explains what CAN-SPAM and GDPR require from email senders and how to configure Sender’s tools to meet those requirements.

    Why This Matters

    Violating CAN-SPAM or GDPR can result in significant financial penalties, legal action, and permanent damage to your sender reputation. CAN-SPAM fines can reach over $50,000 per non-compliant email, while GDPR penalties can reach up to 4% of annual global revenue. Beyond legal risk, non-compliance leads to spam complaints, subscriber distrust, and potential account suspension on Sender.

    What Is Required

    Unsubscribe mechanism — Every commercial email must include a clear, working unsubscribe link. CAN-SPAM requires that opt-out requests be honored within 10 business days. GDPR requires that recipients can withdraw consent at any time. Failure to include an unsubscribe link violates both regulations and Sender’s sending policies.

    Physical mailing address — CAN-SPAM requires a valid physical postal address in every commercial email. This can be a street address, a P.O. box registered with the postal service, or a private mailbox registered with a commercial mail receiving agency. Omitting it is a direct violation of U.S. federal law.

    Accurate sender identity — CAN-SPAM prohibits misleading “From” names, email addresses, and subject lines. The sender information in your campaign must accurately identify the person or business sending the email. Deceptive header information or subject lines can trigger enforcement action.

    Lawful basis for processing (GDPR) — Under GDPR, you must have a lawful basis — typically explicit consent — before sending marketing emails to individuals in the European Economic Area (EEA) or the UK. Consent must be freely given, specific, informed, and unambiguous. Pre-checked boxes do not constitute valid consent.

    Data subject rights (GDPR) — GDPR gives subscribers the right to access, correct, export, and delete their personal data. You must be able to respond to these requests promptly. Failure to comply can result in regulatory complaints and fines.

    Note: This article provides general guidance on compliance requirements. Consult a legal professional for advice specific to your jurisdiction and business.

    Steps to Configure Compliance Settings in Sender

    Step 1 — Add your physical mailing address

    Go to Account settings → General settings. Under the Company info section, fill in the Address, City, State / Province / Region, Postal/ZIP code, and Country fields. Click Save.

    account-company-info

    Sender’s default email templates automatically insert this address into your email footer using variables like {{ account.address }} and {{ account.city }}.

    liquid-tags

    Once saved, every email sent using a default template will display your physical address, satisfying the CAN-SPAM address requirement.

    Step 2 — Verify unsubscribe link and confirmation settings

    Sender automatically includes an unsubscribe link in the footer of every email sent through default templates. The link text reads “If you would like to unsubscribe, please click here.”

    subscriber-confirmation

    To configure whether subscribers see a confirmation step, go to Account settings → General settings and locate the Ask for unsubscribe confirmation toggle under Other settings. Enable or disable this based on your preference. This satisfies the CAN-SPAM opt-out and GDPR withdrawal-of-consent requirements.

    Step 3 — Enable double opt-in for signup forms

    Go to Forms, select a form, and click the settings icon to open Publishing settings. At the top, locate Double opt-in settings and enable the toggle to send confirmation emails to new subscribers.

    double-opt-in-form-settings

    Customize the Confirmation email subject, sender name, and sender email address using the Edit button. When enabled, subscribers must confirm their email address before being added to your list. This helps demonstrate explicit consent as required by GDPR.

    Step 4 — Set accurate sender identity in campaigns

    When creating or editing a campaign, the Campaign settings page includes a Sender details section with From name and Sender’s email address fields.

    campaign-settings-sender-details

    Ensure these accurately represent your business or brand. CAN-SPAM prohibits misleading header information, so the “From” name and email address must truthfully identify the sender. Review the Email subject field to confirm it is not deceptive or misleading.

    Step 5 — Handle data subject requests

    To respond to a GDPR data access or deletion request, go to Subscribers and locate the subscriber using the search or filter tools. Click on the subscriber’s email to open their Subscriber’s profile. To export their data, return to the Subscribers list, select the subscriber’s checkbox, click Actions, and choose Export to CSV or Export to XLSX.

    subscriber-profile-delete

    To delete their record, open their Subscriber’s profile, click Actions in the top-right corner, and select Delete. Always confirm the request is legitimate before processing.

    Sender’s Policies

    Working unsubscribe link required — Every marketing email sent through Sender must contain a functional unsubscribe link. Sender’s default templates include one automatically. Removing or obscuring the unsubscribe link violates Sender’s sending policies and may result in account suspension.

    Purchased and scraped lists prohibited — Sender’s acceptable use policy prohibits sending to purchased, rented, or scraped email lists. Sending to non-consented contacts leads to high bounce rates, spam complaints, and account suspension.

    Misleading content prohibited — Sender prohibits the use of deceptive subject lines, false sender identities, or misleading email content. Campaigns flagged for misleading practices may be paused or blocked, and the account may be placed under review.

    Consent verification on onboarding — During account setup, Sender asks whether you have explicit permission (opt-in) from all subscribers on your list. Sender may request additional details about your email collection practices at any time to verify compliance.

    Account suspension and reinstatement — If your account is suspended for a policy violation, Sender sends a notification explaining the reason. You must correct the issue — such as removing non-consented contacts or updating content — and follow the reinstatement instructions. Contact Sender support if you need assistance.

    Compliance Tips

    Use double opt-in wherever possible — Enabling double opt-in in your form Publishing settings creates a verifiable record of consent, which strengthens your position under GDPR and reduces spam complaints.

    Audit your subscriber list regularly — Review your Subscribers list periodically and remove contacts who have not engaged. This reduces the risk of complaints and improves deliverability.

    Keep your address up to date — If your physical mailing address changes, update it immediately in Account settings → General settings under Company info. Outdated addresses violate CAN-SPAM.

    Document your consent records — Track when and how each subscriber gave consent (e.g., which form, what date, what disclosure was shown). This documentation is critical for responding to GDPR inquiries.

    Review campaigns before sending — Check every campaign’s From name, Sender’s email address, and Email subject on the Campaign settings page to ensure accuracy and transparency before clicking send.

    Common Issues

    Unsubscribe link missing from email → This happens when using custom HTML without including the Sender unsubscribe variable. Use Sender’s default drag-and-drop templates, which include the unsubscribe link automatically, or manually add the unsubscribe tag to your custom HTML.

    Physical address not appearing in email footer → The Address, City, and Country fields in Account settings → General settings are empty or incomplete. Fill in all address fields and click Save. The template variables will then populate correctly.

    Account suspended for sending to non-consented contacts → This occurs when emails are sent to purchased, scraped, or otherwise non-opted-in lists. Review the suspension notification email, remove non-consented subscribers from your list, and follow the reinstatement instructions provided.

    Double opt-in confirmation emails not sending → The Double opt-in settings toggle in the form’s Publishing settings is disabled. Open the form settings, enable the toggle, and verify the Confirmation email details are configured correctly.

    Subscriber requests data deletion but record still exists → Ensure you are using the Delete option from the Actions dropdown on the Subscriber’s profile page, not simply unsubscribing them. Unsubscribing stops emails but retains the record. Deletion removes the subscriber’s data entirely.

    FAQs

    Do I need an unsubscribe link in every email?

    Yes. Every marketing email sent through Sender must include a working unsubscribe link. This is required by CAN-SPAM, GDPR, and Sender’s own sending policies. Transactional emails are generally exempt, but including one is still recommended.

    Can I send to a purchased email list?

    No. Sender’s acceptable use policy prohibits sending to purchased, rented, or scraped email lists. Sending to these lists results in high bounce rates, spam complaints, and may lead to account suspension.

    What happens if my account is suspended for a policy violation?

    Sender sends a notification email explaining the reason for suspension. Review the details, correct the issue (e.g., remove non-consented contacts, update content), and follow the reinstatement instructions provided in the notification. Contact Sender support if you need assistance.

    Am I required to include a physical address in my emails?

    Yes. CAN-SPAM requires a valid physical postal address in every commercial email. Add your address in Account settings → General settings under Company info. Sender automatically includes it in your email footer when using the default templates.

    How do I handle a GDPR data deletion request from a subscriber?

    Locate the subscriber in the Subscribers section, click their email to open their Subscriber’s profile, then click Actions → Delete. If you need to confirm what data is stored, you can export the subscriber’s data first via Actions → Export to CSV from the subscriber list view. Consult a legal professional for guidance on your specific obligations under GDPR.

    What is double opt-in and should I enable it?

    Double opt-in means a new subscriber must confirm their email address by clicking a link in a confirmation email before being added to your list. Enable it in your form’s Publishing settings under Double opt-in settings. It is strongly recommended for GDPR compliance because it provides verifiable proof of consent.

    Does Sender automatically handle CAN-SPAM and GDPR compliance for me?

    Sender provides tools that help you comply — such as automatic unsubscribe links, physical address template variables, and double opt-in — but compliance is ultimately your responsibility. You must ensure your content, consent practices, and data handling meet the requirements of all applicable regulations. Consult a legal professional for jurisdiction-specific advice.