Author: admin

  • Filter active and inactive

    Active subscribers are those subscribers who can get email or SMS communication from you. This is the default status for all freshly imported subscribers.

    If you import subscribers’ email addresses, their email and transactional email status will be set to Active.

    If you import subscribers phone numbers, their SMS and transactional SMS status will be set to Active.
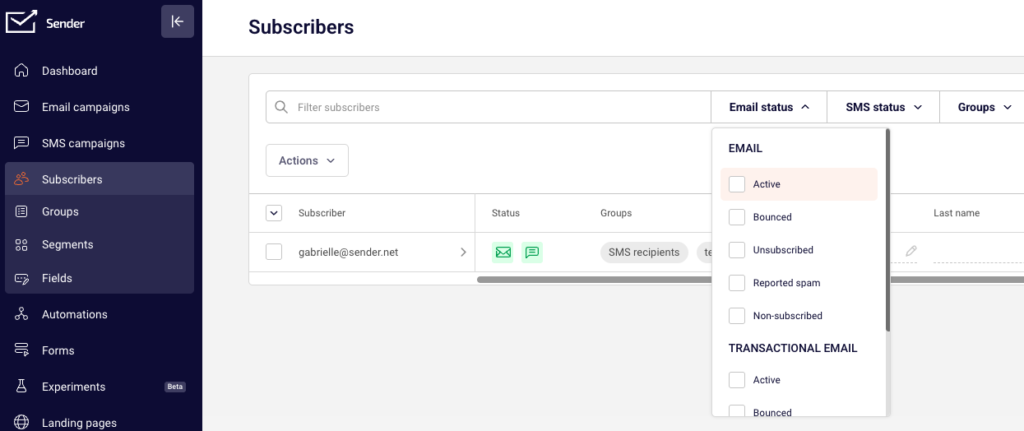
    To see your active subscribers, go to Subscribers, click Email status or/and SMS status choose Active:

    If you want to see all inactive subscribers, choose all but active status, and you will get the list of your inactive subscribers for that specific channel.


    If you got stuck on a specific task or can’t find a way to execute a particular job, contact our support team via LiveChat or [email protected] – we’re here to help 24/7.

  • Save reusable sections

    Saving sections can be beneficial for future designs – it can reduce workload while designing a brand-new newsletter, furthermore, well-developed sections will save time and help you later.

    While in the drag & drop editor, hover over the needed section and click on the “Save” icon.

    Once the “Save” icon is clicked, the section will be saved at the “Section” tab on the screen’s left side. You can access saved sections all the time while being in different campaigns as well. 

    Quick visualization below

    That’s it!

    If you got stuck on a specific task or can’t find a way to execute a particular job, contact our support team via LiveChat or [email protected] – we’re here to help 24/7.

  • Save email template

    Keeping newsletter design can be beneficial for future use, that’s why we advise saving final email designs. The saving process is quite simple. While in the editor,  click on the “Design settings” button, then tap on “Save as template”

    Now your newsletter design is saved in the “Email templates” section under “My templates”, which can be accessed by clicking the “Change template” or at the start of a new campaign. The templates are sorted by name.

    Note that the saved email template can also be used in Automation workflow emails.


    If you are stuck on a specific task or can’t find a way to execute a particular job, contact our support team via LiveChat or [email protected] – we’re here to help 24/7.

  • Use HTML block element

    The HTML element is essential for users who need to insert a custom-coded section or a full HTML template while using the “Drag & Drop” design editor. This feature allows you to have completely customized design elements.

    How can I use it? 

    First of all, drag the “Custom HTML” block into the selected section, and HTML console will appear on the left side. 

    Then, simply click the block that appeared and type or paste the HTML code in the console/editing area.

    If you wish to import a whole HTML template into the Design editor – follow identical steps on an empty template.


    If you got stuck on a specific task or can’t find a way to execute a particular job, contact our support team via LiveChat or [email protected] – we’re here to help 24/7.

  • Undo and restore changes

    The “undo” button is pretty self-explanatory. It works the same way as on the other programs. It lets you go back on and restore previous designs or edit. 

    The restore button works similarly, though it has few differences. For a start, it shows the exact date of the recent change and lets you move back and forth through the changes. That would affect not only the particular design but also the design editor’s changes, e.g. if you changed templates – that will be registered. 


    If you got stuck on a specific task or can’t find a way to execute a particular job, contact our support team via LiveChat or [email protected] – we’re here to help 24/7.

  • Provide verification information

    In order to protect our clients against spam, we have sophisticated a system that flag accounts that contain suspicious information.

    In most cases, the system works fine; however, sometimes perfectly innocent accounts get flagged. Many factors contribute to this, so – if you see this notice, don’t worry. It might not even be something directly related to you; for example, it could be you’re happening to use an IP that was flagged as suspicious in the past. These things happen – we’re just making sure everything’s all right.

    To make the process as fast as possible, please provide the following information to see if you’re a proper sender.

    1. Briefly describe how your business practices email marketing. What types of emails will you be sending?
    2. Where do you source your database/list of email addresses? Additionally, could you please provide the URLs to any of these sources (any websites or domains)
    3. What is your expected monthly email volume?

    Please answer these questions as completely as possible and forward them to [email protected]

    We’re doing this not to annoy you but to protect all our users on the system.

    That’s it!

    If you got stuck on a specific task or can’t find a way to execute a particular job, contact our support team via LiveChat or [email protected] – we’re here to help 24/7.

  • Use mobile editor features

    The new Design editor is more mobile responsive than ever.

    There’s a mobile view within the editor itself. You’ll be able to see how your campaign looks like on a mobile device, so you won’t need to send any campaigns to yourself to check how it looks on mobile.

    There are a few other functions you can use to make the mobile view even more attractive. One of them – the ability to hide elements if the campaign got opened on a mobile device.

    Or, you can choose to break elements in the section so that they’d line up instead of being next to each other.

    As you can see elements that are next to each other will line up one after another in the mobile view. That is done in order to maintain a good quality of your images and retain the best view possible on the mobile device.

    That’s it!

    If you got stuck on a specific task or can’t find a way to execute a particular job, contact our support team via LiveChat or [email protected] – we’re here to help 24/7.

  • Edit image block

    Let’s start with uploading the Image. It’s pretty simple – after you drag the image element into the block, the image library will pop out.

    image import

    In order to import your own image, press ‘Browse’ on the left bottom corner or simply drop the image file to the upload section.

    By the way, the Image Library has integrations with ‘Giphy!’ and ‘Unsplash!’, you can also get images and GIF from them:

    After you’re done with uploading the image, there are two main ways to style it –  via the ‘Content’ and ‘Customize’ options.

    The content part consists of the ability to Replace the image itself, to change where it links to and to change the alternative text. The alternative text shows up when the mouse cursor is dragged on the image.

    The ‘Customize’ part has way more utility. You can adjust the image size, the corner type, and also the horizontal and vertical spacing in the block settings.

    image size

    If you got stuck on a specific task or can’t find a way to execute a particular job, contact our support team via LiveChat or [email protected] – we’re here to help 24/7.

  • Add “view in browser” link

    All the templates from our template library have the static block at the top that has the text ‘Is this email not displaying correctly? View it in your browser’. The content of the text in the templates cannot be changed but you are free to change the language and design. Click here to read more on how to do that.

    If you import your own HTML coded template and want to add a ‘View this email in your browser’ link. You can create a link in your HTML with the merge tag that is provided below:

    <a href=”[BROWSER_PREVIEW]”>
    ’Is this email not displaying correctly? View it in your browser
    </a>

    Keep in mind that the link ‘View this email in your browser can’t be tested in the HTML Builder, so simply send a test email to see if it works properly.

    That’s it!

    If you got stuck on a specific task or can’t find a way to execute a particular job, contact our support team via LiveChat or [email protected] – we’re here to help 24/7.