It depends on your particular needs. If you’re sending content once in a blue moon, you’re probably better off buying credits. If you’re sending newsletters daily, weekly, or even monthly, you’re most likely going to save money by purchasing monthly plans.
Pay as you go credits don’t have a duration period nor subscribers limit. One credit equals one email sent.
Monthly subscription plans have subscribers limit and duration periods, so keep that in mind when acquiring a new subscription.
Note: The discount of two months value is applied only when purchasing a yearly plan. Click here for pricing.
That’s it!
If you got stuck on a specific task or can’t find a way to execute a particular job, contact our support team via LiveChat or [email protected] – we’re here to help 24/7.
At Sender.net, we do not have a daily limit for the amount of emails you send.
If you’re using a monthly plan, you can email as many subscribers as your plan allows, e.g., if you have a 5000 subscriber plan, you can email all of them as often as you would like, bearing in mind the monthly 60 000 email limit.
If you’re using the prepaid credit system, only the limitation of total emails applies – one credit equals to one email.
If you got stuck on a specific task or can’t find a way to execute a particular job, contact our support team via LiveChat or [email protected] – we’re here to help 24/7.
Automation workflows allow you to create thousands of scenarios for sending automated emails without lifting a finger. Nevertheless, every automation sequence must start with a trigger.
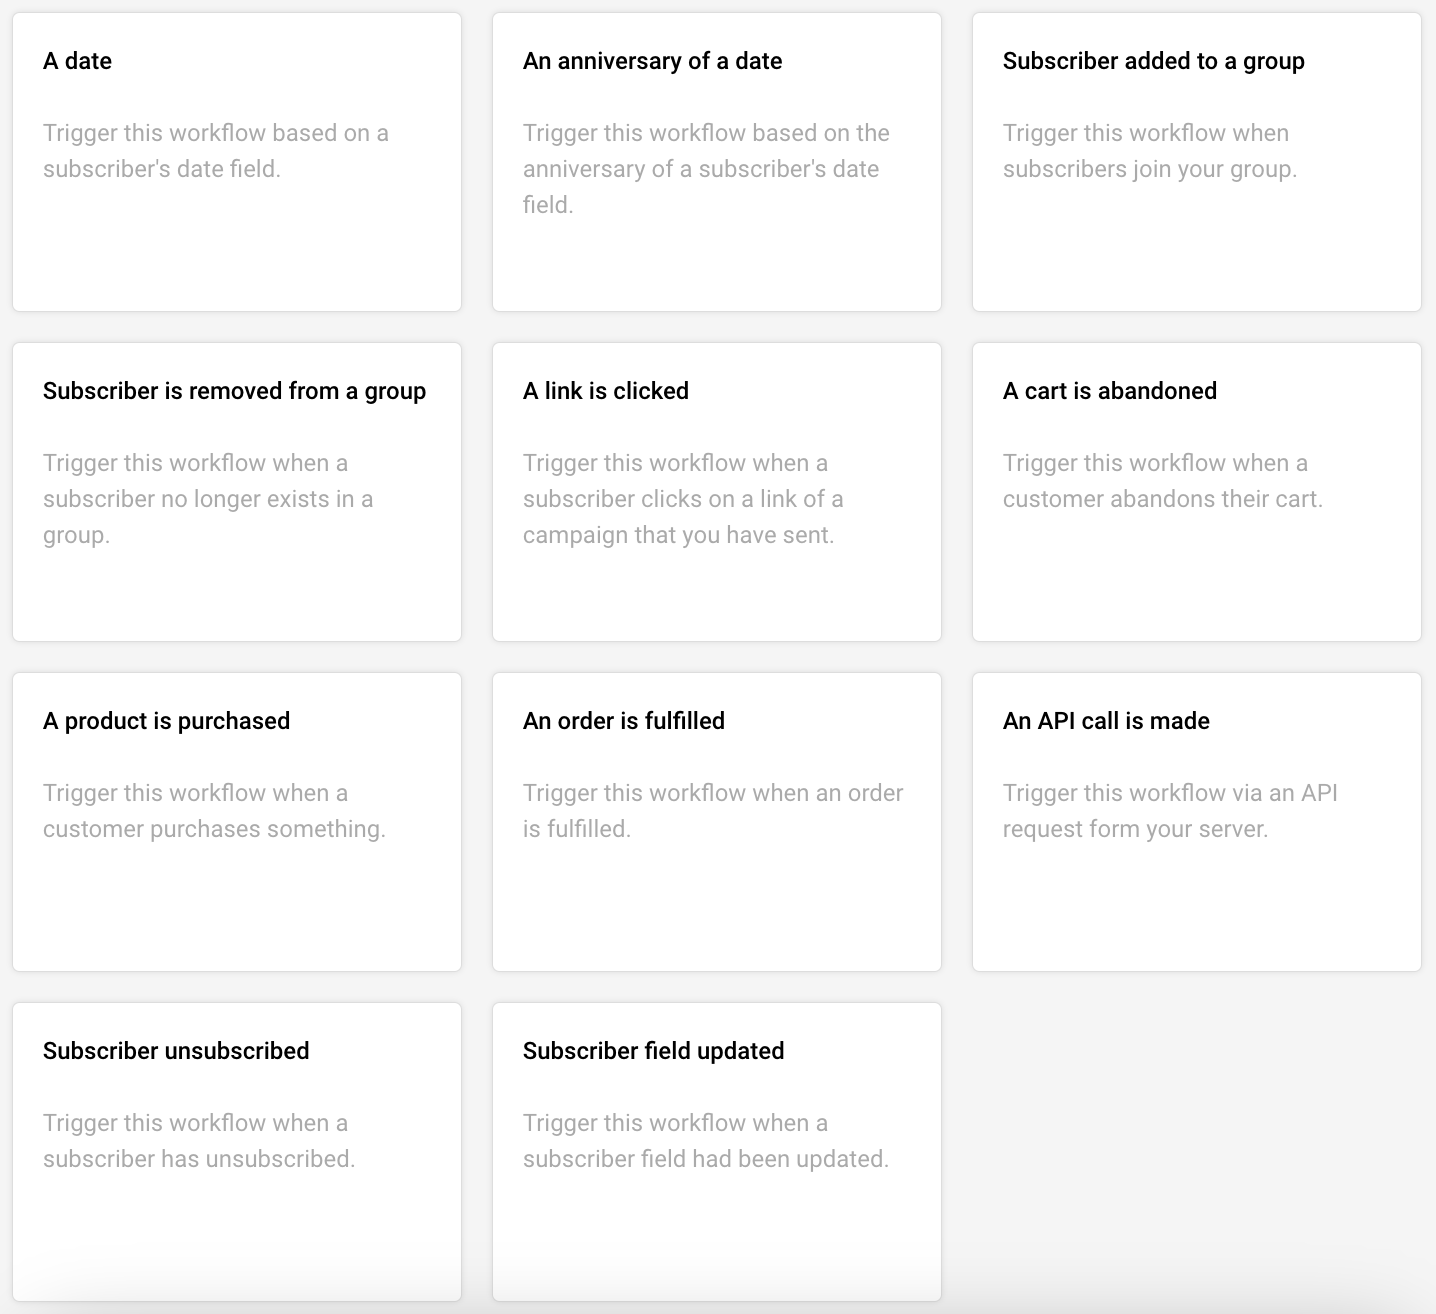
When creating a new automation workflow, you will be presented with different starting triggers:
A Date. For example, you have the ‘last purchased’ date as a custom field next to each subscriber and want to start a Win-Back Customer email series. In order to activate date trigger subscriber’s custom field must have “date” type selected.
An Anniversary Of A Date. Perfect for sending Birthday cards or for any other anniversary date. For this trigger, you need to have a defined date custom field information for each subscriber. The system will require date formatting and automation will start each year automatically.
Subscriber Added to a Group. This automation workflow will start when a subscriber gets added to a certain subscriber group via a subscription form or an API call.
Subscriber Is Removed From a Group. The automation will start whenever the subscriber is removed from a defined group via an API call or a separate automation workflow. Manually removing subscribers will not trigger the automation.
A link Is Clicked. Automation would start its first action whenever a subscriber clicks on a specific defined link. It might be a link to a particular product or any other link used in previous campaigns. After subscribers click on the link, they automatically participate in a secondary automation sequence which starts after the “A link is clicked” trigger.
Cart Is Abandoned. Abandoned cart reminders might be a great source of revenue. It starts the automation workflow once a cart is abandoned. Send them emails, add them to tailored-made groups, and get notified if a cart is recovered. This requires integration with e-commerce!
A Product Is Purchased. Send customers Thank-you letters, post-purchase feedback requests, or get notified when somebody buys your product or service. This requires e-commerce integration!
An API Call Is Made. Start the automation with any of your system’s events. Send an API call from any other system or program and start the automation.
Subscriber unsubscribed. Start the automation if any of your subscribers unsubscribes. It can be used to notify yourself about this occasion, move subscribers to a certain group, remove them from future messaging, and even send a confirmation email to the subscriber acknowledging their decision to unsubscribe.
Subscriber field updated. Start the automation sequence when any of the chosen fields receives new information.
Note: Automation is triggered according to the account’s time zone. If you’re facing any delays, please double-check the time zone set in your account settings.
If you got stuck on a specific task or can’t find a way to execute a particular job, contact our support team via LiveChat or [email protected] – we’re here to help 24/7.
The system recognizes duplicate email addresses and imports only one copy of each of them.
If you’re sending a campaign to a number of mailing lists that have the same email address on each of them – don’t worry, the recipient will receive only one copy of the sent campaign!
That’s it!
If you are stuck on a specific task or can’t find a way to execute a particular job, contact our support team via LiveChat or [email protected] – we’re here to help 24/7.
You can have up to 2 500 subscribers with your account under the Free Forever plan.
Therefore, you would need to remove 500 recipients and wait a few minutes until the subscribers are recalculated or upgrade to a larger plan.
That’s it!
If you are stuck on a specific task or can’t find a way to execute a particular job, contact our support team via LiveChat or [email protected] – we’re here to help 24/7.
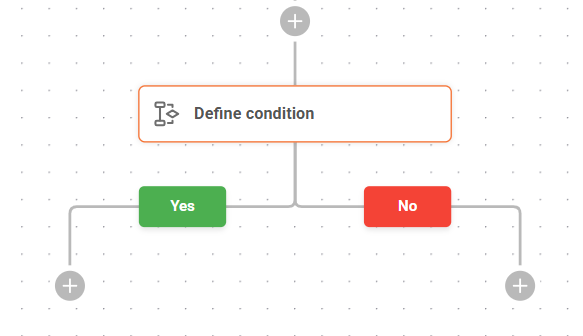
Conditions. Conditions define a certain rule and decide to which of following Paths the subscriber should go: Yes or No.
Campaign activity: Define the action based on a subscriber’s activity in the previously sent campaigns. You can choose a certain campaign and check if they opened it or clicked on any links.
List membership: Define the actions based on whether the subscriber belongs to a certain list or not.
Abandoned cart: Define the following action based on total cart value, also, whether the cart contains specific products or whether the cart was recovered.
There are several Condition Rule Types, which all appear in the ‘Select Condition Type’ dropdown:
Condition Types:
Subscriber details: Set the rule according to each subscriber’s Email, First Name or Last Name.
Custom fields: Define the rule according to subscribers’ values of custom fields, if you have imported some. It could be a subscriber’s’ birthday, education, gender, address, location, phone, company, title or any other relevant information you’re able to collect about your subscribers.
Workflow email activity: This type of condition checks all the actions related to emails sent on the same workflow. You can check if the subscriber opened previous emails or clicked on some links.
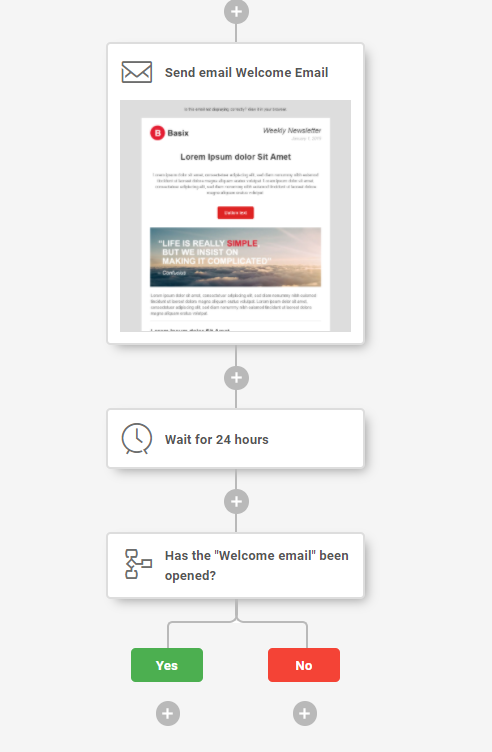
Example: You want to send the next educational/show-around email to those that have opened your previous emails, and repeat the same email to those that did not open it.
Create a “Welcome” email
Add a Delay of “XX” time
Add a condition and set it up as follows:
Choose condition type: Workflow email activity
Set activity type: Opened the campaign. Save.
Add a new email to NO path.
Add other actions to Yes path or leave it empty. It’s up to your imagination.
NOTE: Add a DELAY before the Condition and Email. Otherwise, this step will be taken immediately after email is sent. Most of the time that would lead all your recipients to the NO path.
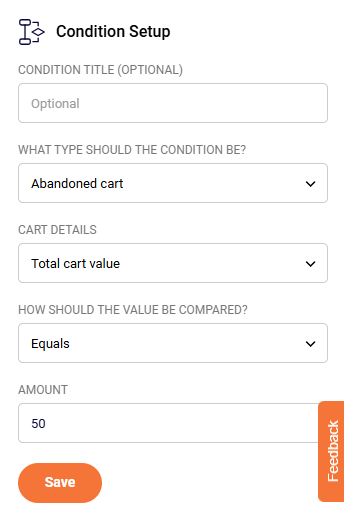
Example: You want to send a free-shipping voucher for those, whose cart value is more than 50$ and send a simple reminder to those, whose cart is less than 50$ value.
Choose starting trigger: A Cart is Abandoned.
Add a delay of XX time. (Give some time for the user to come back and recover it manually)
Add a condition and setup as follows:
What type should the condition be? -> Abandoned Cart.
Cart details -> Total cart value.
How should the value be compared? -> Is Equal or greater.
Value -> 50.
Add the Email containing free-shipping offer to YES path and Reminder Email to NO path.
Click ‘Activate’. Voila, the workflow is set!
The ecommerce integrations needs to be setup for this to work! You can find it here.
Purchased product: Define the following action depending on whether the product has been purchased or not. You can choose if it should check if any product was bought or a specific one. Moreover, you can choose the date – Should it check if the product was purchased on an exact day, before a specific date, or after a specific date.
Emails: Send transactional emails in different stages of automation workflows. These emails are sent automatically based on previously defined rules and actions above.
Delays: It’s a simple yet super important thing in your email marketing automation. If you imagine the workflow as a linear journey – once a subscriber steps on this action, it has to wait for a defined amount of time. After a period of time, it automatically goes through to the next step.
Time could be defined in minutes, hours, days, weeks or even months.
When an automated workflow is active you are able to see how many subscribers are waiting on every step, so you’re able to get the current picture.
Once you add an email action, you should define the following information:
Title of the email (Title is visible only to you, but NOT to the subscribers).
From line. Who is the sender of this email? This information is visible to subscribers as well.
Reply-to email address. You should write your email address so people could reply to this address. It is mandatory to use your own domain email address i.e. [email protected].
Subject line. Announce to the subscribers what the email is all about.
Emails: Send transactional emails in different stages of automation workflows. These emails are sent automatically based on previously defined rules and actions above.
Once you define the information, click on the button: ‘Edit content’ in order to choose the email template and create the content. Then, click ‘Save & Continue’ and voila! The email is ready!
Automation workflows are able to do even more actions than just sending emails. Action options:
Move a subscriber to another list.
Copy a subscriber to another list.
Remove a subscriber from a list.
Mark a subscriber as unsubscribed.
Update a subscriber’s custom field.
Notify me. (Sends an email to you with a notification text of what just happened).
Send a Webhook (Send a custom webhook to URL. Most commonly this feature is used for system integrations).
If you got stuck on a specific task or can’t find a way to execute a particular job, contact our support team via LiveChat or [email protected] – we’re here to help 24/7, 7 days a week.
The terms – unique and active subscribers might be a bit confusing at first, but hopefully, this article will help you differentiate between them.
Active subscribers number means the total amount of recipients that you have uploaded into your account (at the moment) minus those that have unsubscribed, bounced, or reported spam.
Unique subscribers emailed number tells you how many unique email addresses you’ve sent a campaign to. It also takes into account bounces, unsubscribes, and deleted ones. If you’ve sent an email to the address – it’s counted as a unique subscriber.
The active subscribers count gets recalculated every hour. The unique subscribers’ count gets reset each billing period (monthly). Both of these numbers cannot exceed your plan limits. For example, if you have a plan with 10 000 subscribers, the Active subscriber count, as well as the Unique subscriber count, cannot go over the 10 000 subscriber limit.
Imagine your plan limit is 120,000 emails and 10,000 subscribers. You send a campaign to 10,000 subscribers, then remove them and add 10,000 new ones. In this case, the system will see that as a total of 20,000 unique subscribers and will not allow you to send the campaign and, in consequence, for you to exceed the set limit.
If you got stuck on a specific task or can’t find a way to execute a particular job, contact our support team via LiveChat or [email protected] – we’re here to help 24/7.
A VAT (value added tax) identification number is an identifier used for VAT purposes. It will be printed on your invoices, so make sure to double-check if it’s correct. If your company does not have a VAT code, simply leave it as Not Available – input ‘N/A.’
That’s it!
If you got stuck on a specific task or can’t find a way to execute a particular job, contact our support team via LiveChat or [email protected] – we’re here to help 24/7.
VAT is not included in the price because it varies from country to country, from 5% to 25%. For example – Germany’s VAT is 19%, while Italy’s – 22%. We excluded for the initial price to be the same for all.
If you got stuck on a specific task or can’t find a way to execute a particular job, contact our support team via LiveChat or [email protected] – we’re here to help 24/7.
Normally the IP reputation is shared among most users. Dedicated IP addresses give you absolute control of your email reputation by giving you a separate IP address.
Any account with a Professional plan with 20,000 subscribers or more and any Enterprise plan receives a dedicated IP upon request.
If you have purchased such a plan and want a dedicated IP, please get in touch with us via LiveChat or at [email protected].
That’s it!
If you got stuck on a specific task or can’t find a way to execute a particular job, contact our support team via LiveChat or [email protected] – we’re here to help 24/7.