Blog

  • Manage your segments

    Once you’ve created segments, you’ll need to manage them effectively to keep your targeting accurate and organized. This guide covers how to view, edit, duplicate, and delete your segments.

    Viewing your segments

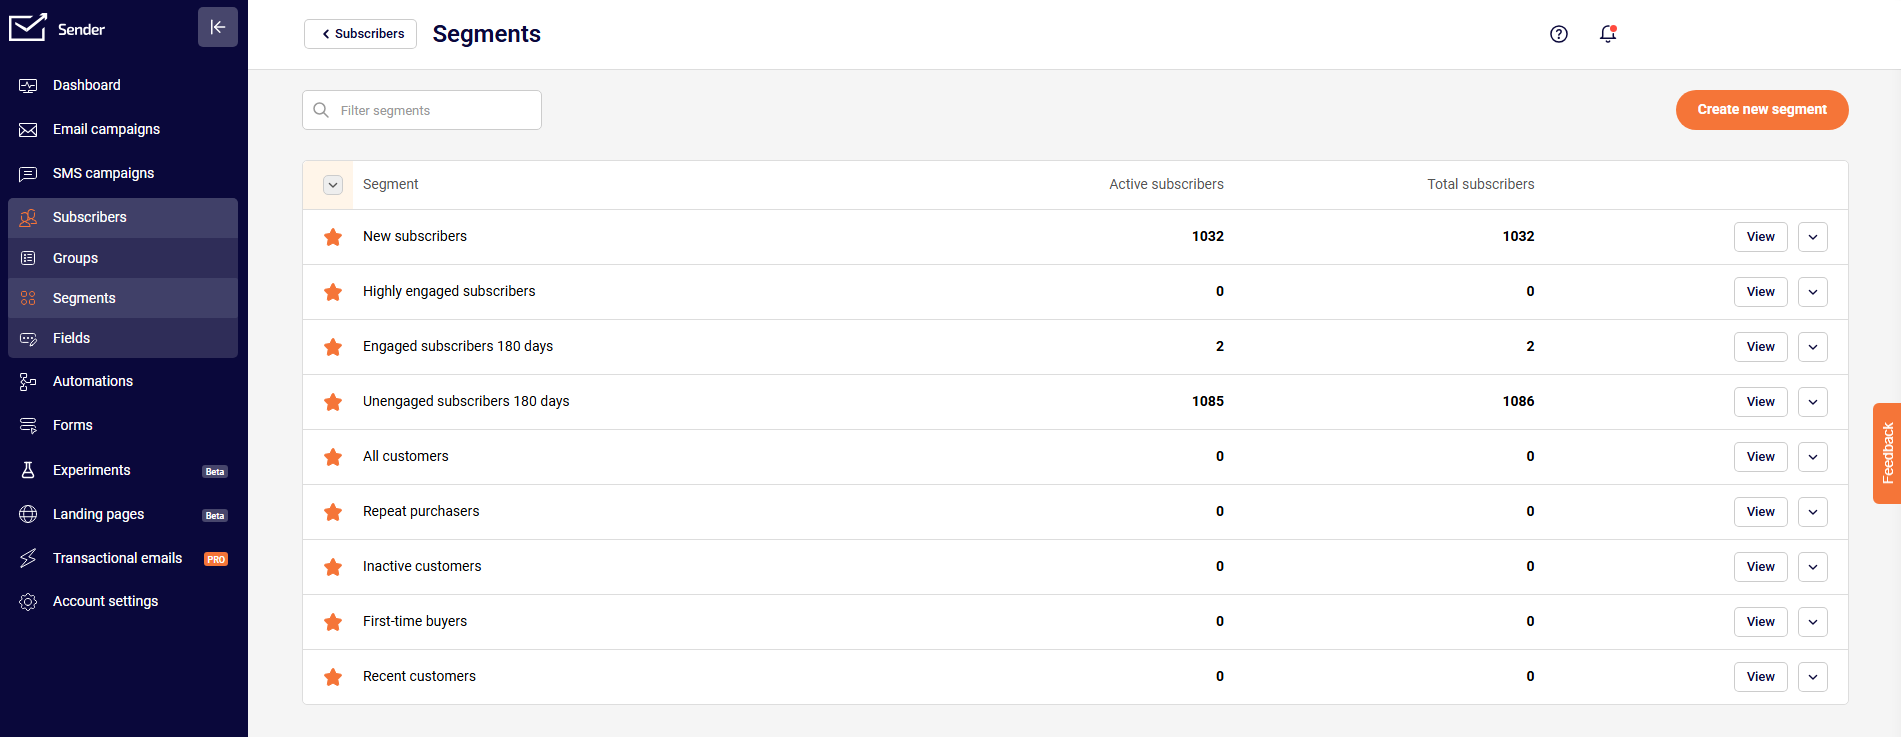
    Access all your segments from the segments dashboard. Here you can see:

    • Segment name – The label you assigned to each segment
    • Active subscribers – The number of active subscribers in the segment
    • Total subscribers – The total number of subscribers (active and inactive) in the segment

    Segments update automatically as subscribers meet or no longer meet your criteria, so the counts reflect real-time data.
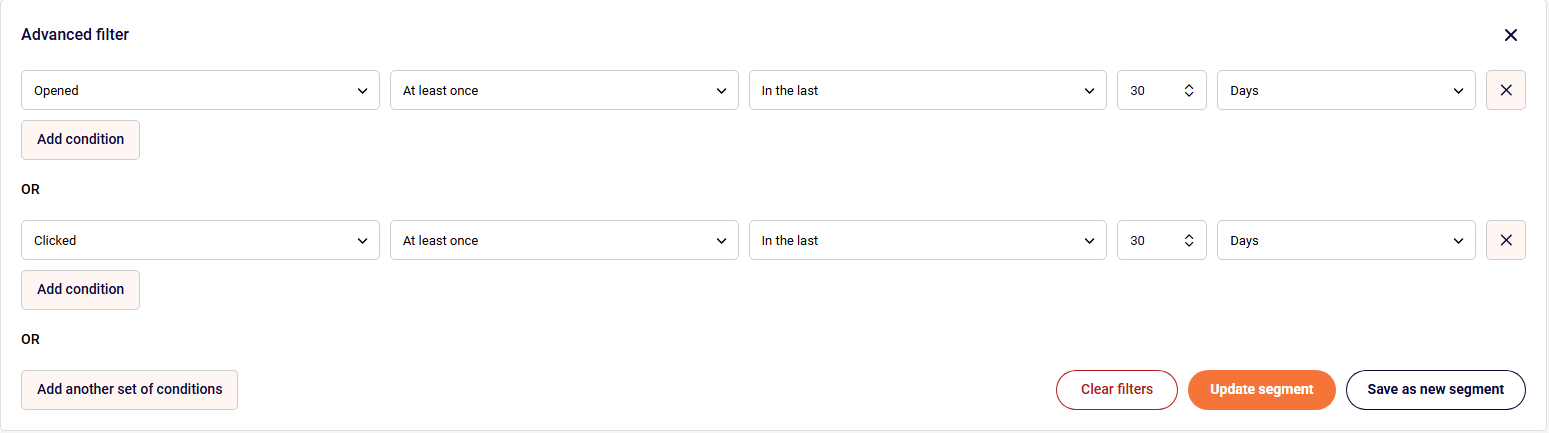
    Editing a segment

    To modify an existing segment:

    • Navigate to your segments list
    • Click on the segment you want to edit
    • Update the conditions using the advanced filter options
    • Add or remove conditions using the “Add condition” button
    • Save your changes

    When you edit a segment, the changes apply immediately. Subscribers who no longer match the updated criteria will be removed, and new subscribers who now match will be added automatically.

    Creating similar segments

    To save time when building related segments:

    • Open an existing segment that’s similar to what you need
    • Modify the conditions to match your new requirements
    • Click “Save as new segment”
    • Give your new segment a descriptive name

    This is especially useful when you want to create variations of the same audience, such as “Active users – Last 30 days” and “Active users – Last 7 days.”

    Deleting segments

    To remove a segment you no longer need:

    • Navigate to your segments list
    • Select the segment you want to delete
    • Click the delete option after opening the dropdown menu by clicking the arrow
    • Confirm the deletion

    Important: Deleting a segment does not delete the subscribers in it. It only removes the segment definition.

    Best practices for segment management

    • Archive unused segments – If you’re not actively using a segment but want to keep it for reference, consider marking it clearly or organizing it separately.
    • Use consistent naming – Develop a naming convention for your segments to make them easy to find and understand at a glance.
    • Document complex segments – For segments with multiple conditions, add notes about their purpose and intended use.
    • Monitor segment size – Keep an eye on how your segment sizes change over time. Sudden changes might indicate an issue with your conditions or subscriber data.
    • Clean up outdated segments – Delete segments that are no longer relevant to keep your workspace organized.

    If you got stuck on a specific task or can’t find a way to execute a particular job, contact our support team via LiveChat or [email protected] – we’re here to help 24/7.

  • Segment examples

    Segments help you target the right users at the right time. Here are practical examples you can use as inspiration for creating your own segments.

    Engagement segments

    Active users Users who have engaged with your campaigns recently.

    • Opened at least once in the last 30 days, OR
    • Clicked at least once in the last 30 days

    Highly engaged users Your most active users who interact frequently with your campaigns.

    • Opened at least 5 times in the last 30 days, AND
    • Clicked at least 3 times in the last 30 days

    Inactive users Users who haven’t engaged recently and may need re-engagement.

    • Was sent to at least once in the last 90 days, AND
    • Has not opened in the last 60 days

    Subscription segments

    Email subscribers Users who are subscribed to receive email communications.

    • Subscription status for Email is “Subscribed”

    Multi-channel subscribers Users who are opted in to multiple communication channels.

    • Subscription status for Email is “Subscribed”, AND
    • Subscription status for SMS is “Subscribed”

    SMS subscribers only Users who prefer SMS communications.

    • Subscription status for SMS is “Subscribed”, AND
    • Subscription status for Email is “Unsubscribed”

    Behavioral segments

    Campaign engagers Users who have interacted with your recent campaigns.

    • Campaign activity: Clicked at least once in the last 14 days

    Non-openers Users who receive campaigns but don’t open them.

    • Campaign activity: Was sent to at least 3 times in the last 30 days, AND
    • Campaign activity: Opened 0 times in the last 30 days

    SMS responders Users who have engaged with SMS campaigns.

    • SMS campaign activity: Clicked at least once in the last 30 days

    Subscriber detail segments

    New subscribers Recently added contacts.

    • Created date is in the last 7 days

    Specific location Target users in a particular geographic area.

    • Subscribers is from “European Union / UK”

    Group members Users who belong to a specific group.

    • Group membership includes “VIP Customers”

    Tips for creating segments

    • Start simple – Begin with one or two conditions and add more as needed.
    • Use meaningful names – Name segments clearly so anyone on your team understands who’s included.
    • Monitor segment size – If a segment is too small or too large, adjust your conditions.
    • Combine conditions strategically – Use AND for more specific segments and OR for broader reach.

    That’s it!

    If you got stuck on a specific task or can’t find a way to execute a particular job, contact our support team via LiveChat or [email protected] – we’re here to help 24/7.

  • Understand segments and rules

    Segments are dynamic groups of users or customers that are automatically updated based on specific criteria you define. They allow you to organize and target your audience based on shared characteristics, behaviors, or attributes.

    Unlike static lists, segments update in real-time as users meet or no longer meet your criteria, ensuring your targeting is always current and accurate.

    Why use segments?

    Segments help you:

    • Personalize communication – Send targeted messages to specific groups based on their interests or behavior
    • Improve engagement – Reach the right people with relevant content at the right time
    • Analyze user groups – Understand how different segments behave and perform
    • Automate workflows – Trigger actions when users enter or exit specific segments
    • Optimize campaigns – Test and refine your approach with different audience groups

    Common segment types

    • Demographic segments Group users by characteristics like location, age, language, or company size.
    • Behavioral segments Target users based on actions they’ve taken, such as pages visited, features used, or purchases made.
    • Engagement segments Identify active, inactive, or at-risk users based on their level of engagement with your product or service.
    • Lifecycle segments Organize users by where they are in the customer journey, from new signups to loyal customers.

    How segments work

    Segments are built using conditions and filters. When a user matches all the conditions you’ve set, they’re automatically added to the segment. If they stop matching the conditions, they’re removed.

    For example, you might create a segment for “Active Users” that includes anyone who:

    • Opened at least once in the last 30 days
    • Clicked at least once in the last 30 days

    As soon as someone meets these criteria, they join the segment. If they stop meeting the conditions, they’re automatically removed. You may see an example here:

    Best practices

    • Start simple – Begin with broad segments and refine them as you learn more about your audience
    • Name clearly – Use descriptive names that make it obvious who’s in the segment
    • Review regularly – Check that your segment criteria still align with your goals
    • Avoid over-segmentation – Too many small segments can be difficult to manage
    • Test and iterate – Experiment with different criteria to find what works best

    That’s it!

    If you got stuck on a specific task or can’t find a way to execute a particular job, contact our support team via LiveChat or [email protected] – we’re here to help 24/7.

  • Understand segments page

    Learn about the Segments page in Sender and how to navigate its features for creating and managing contact segments.

    What is the Segments Page?

    The Segments page is your central hub for creating, viewing, and managing all your contact segments. It allows you to build dynamic filtered lists based on specific criteria like engagement, behavior, demographics, and custom attributes.

    Accessing the Segments Page

    To access the Segments page:

    • Click on Subscribers in the left navigation menu
    • Select Segments from the submenu
    • You’ll see your segments overview

    The Segments Page Interface

    Main Components of the Segments Page

    Page Header

    At the top of the page, you’ll find:

    • Back to Subscribers button – Returns you to the main subscribers list
    • Segments title – Confirms you’re on the segments page
    • Help icon – Access documentation and support
    • Notifications – View system notifications
    • Account menu – Access your account settings

    Search and Filter Bar

    Located below the header:

    • Filter segments search box – Quickly find specific segments by name
    • Search through your existing segments to locate the one you need

    Create New Segment Button

    On the right side of the page:

    • “Create new segment” button – Click to start building a new segment
    • Opens the segment creation interface with advanced filtering options

    Segments List

    The main area displays all your existing segments:

    • Segment names and descriptions
    • Contact count for each segment
    • Creation date and last modified information
    • Quick access to edit or view each segment

    Creating a New Segment

    When you click “Create new segment”, you’ll access:

    Advanced Filter Interface

    The filtering system where you can:

    • Select condition categories (Subscription Status, Subscriber Details, Campaign Activity, etc.)
    • Choose specific conditions within each category
    • Set parameters for each condition
    • Add multiple conditions using “Add condition”
    • Create alternative condition sets using “Add another set of conditions”

    Filter Preview

    As you build your segment:

    • View the number of contacts matching your criteria in real-time
    • See a preview of contacts who meet the conditions
    • Verify your segment before saving

    Segment Actions

    After creating your segment:

    • Save the segment with a descriptive name
    • Edit segment conditions at any time
    • Delete segments you no longer need

    Navigation Tips

    Finding Segments Quickly

    Use the filter search box to locate segments by:

    • Segment name
    • Keywords in the description
    • Partial name matches

    Organizing Your Segments

    Keep your segments page organized by:

    • Using clear, descriptive names
    • Including dates or version numbers when relevant
    • Archiving or deleting unused segments
    • Grouping similar segments with consistent naming conventions

    That’s it!

    If you got stuck on a specific task or can’t find a way to execute a particular job, contact our support team via LiveChat or [email protected] – we’re here to help 24/7.

  • Segmentation conditions list

    Explore all the filtering options available in Sender to create precise contact segments for targeted campaigns.

    What Are Segmentation Conditions?

    Segmentation conditions are the criteria you use to filter and organize your contacts. By combining different conditions, you can create highly specific segments that match your campaign targeting needs.

    Accessing Segmentation Filters

    To use segmentation conditions:

    • Go to Subscribers > Segments
    • Click “Create new segment”
    • Open the Advanced filter dropdown
    • Select from available condition categories

    Available Condition Categories

    Subscription Status

    Filter contacts based on their subscription type and status:

    • Email – Subscribed to email communications
    • Transactional Email – Can receive transactional emails
    • SMS – Subscribed to SMS messages
    • Transactional SMS – Can receive transactional SMS

    Subscriber Details

    Create segments using contact information and profile data:

    • Group membership – Belongs to or doesn’t belong to specific groups
    • Email address – Filter by email patterns or domains
    • Phone number – Contacts with or without phone numbers
    • Created date – When contacts joined your list
    • Subscribers location – Geographic targeting by country, region, or city

    Campaign Activity

    Segment based on email engagement and behavior:

    • Sent – Received specific campaigns
    • Opened – Opened one or more campaigns
    • Clicked – Clicked links in campaigns
    • Unsubscribed from emails – Opted out of communications
    • Was inactive – No engagement for a specified period

    SMS Campaign Activity

    • Was sent to – Received SMS campaigns
    • Clicked – Clicked links in SMS message

    E-commerce Metrics

    Create segments based on purchase behavior and customer value:

    • Placed an order – Made a purchase
    • Total lifetime spend – Customer lifetime value ranges
    • Quantity of products per basket – Average order size
    • Ordered specific product – Purchased particular items
    • Order refunded – Returned orders
    • Order value – Purchase amount filters

    Abandoned Cart

    Target potential customers based on cart behavior:

    • Checkout started – Began but didn’t complete purchase
    • Returned through email – Came back via email link

    Custom Fields

    Filter by any custom attributes you’ve created:

    • Any custom field you’ve added to your contacts
    • Filter by field values, presence, or absence

    If you got stuck on a specific task or can’t find a way to execute a particular job, contact our support team via LiveChat or [email protected] – we’re here to help 24/7.

  • Manage duplicates across lists

    Learn how Sender handles contacts who appear in multiple groups and best practices for organizing your contact lists.

    Understanding Contacts in Multiple Groups

    In Sender, a single contact can belong to multiple groups simultaneously. This flexibility allows you to organize contacts based on different criteria like customer status, interests, location, or engagement level.

    How Sender Handles Duplicates

    Automatic Deduplication

    Sender automatically prevents sending duplicate emails to the same email address. Even if a contact appears in multiple groups that you’ve selected for a campaign, they will only receive one copy of the email.

    Example:

    • Contact Jane belongs to both “Newsletter Subscribers” and “VIP Customers”
    • You send a campaign to both groups
    • Jane receives only one email, not two

    This built-in protection ensures your subscribers never receive duplicate messages from a single campaign.

    Benefits of Multiple Group Memberships

    Flexible Organization

    Assign contacts to multiple groups based on different attributes:

    • Customer status (Lead, Customer, VIP)
    • Product interests (Electronics, Clothing, Home Goods)
    • Geographic location (North America, Europe, Asia)
    • Engagement level (Active, Moderate, Low)

    Better Targeting

    Select multiple relevant groups for campaigns knowing Sender will handle deduplication:

    • Send to “Customers” AND “Product A Buyers” without worrying about duplicates
    • Target “Newsletter Subscribers” AND “Event Attendees” in one campaign
    • Combine geographic and interest-based groups seamlessly

    Simplified Campaign Creation

    No need to manually exclude contacts or worry about overlap. Simply select all relevant groups and Sender ensures each contact receives only one email.

    Best Practices for Group Organization

    Create Purpose-Specific Groups

    • Status-based: Leads, Customers, VIP Members
    • Interest-based: Product categories, content topics
    • Behavior-based: Active, Inactive, Recent purchasers
    • Geographic: Regions, countries, cities

    Use Descriptive Names

    • “Newsletter Subscribers”
    • “Webinar Registrants – Q4 2025”
    • “VIP Customers – Lifetime Value $500+”
    • “Product Launch Interest – New Collection”

    Avoid Redundant Groups

    While multiple memberships are fine, avoid creating unnecessary overlap:

    • Don’t create “All Customers” and “Every Customer” groups
    • Combine similar purposes into single groups
    • Use segments for complex filtering instead of creating many overlapping groups

    Document Group Purposes

    Keep notes on what each group represents and when to use it. This helps maintain consistency, especially when working with a team.

    Common Scenarios of using Multiple Groups

    Product Launch

    Select multiple relevant groups:

    • “All Customers”
    • “Product Category Interest”
    • “Active Email Subscribers”

    Result: Each contact receives one email, regardless of how many groups they’re in.

    Event Invitation

    Target broad audience:

    • “Newsletter Subscribers”
    • “Past Event Attendees”
    • “VIP Members”

    Result: No duplicates, maximum reach for your event.

    Tips for Success

    • Take advantage of Sender’s automatic deduplication by freely assigning contacts to relevant groups
    • Review group memberships periodically to ensure accuracy
    • Remove contacts from groups when they’re no longer relevant
    • Use consistent naming conventions across all groups
    • Combine groups in campaigns without hesitation – duplicates are automatically handled
    • Focus on logical organization rather than worrying about overlap

    That’s it!

    If you got stuck on a specific task or can’t find a way to execute a particular job, contact our support team via LiveChat or [email protected] – we’re here to help 24/7.

  • Organize contacts into lists

    Learn how to add, move, and remove contacts from your groups to keep your subscriber lists organized and up-to-date.

    Managing Contact Group Membership

    Organizing your contacts into the right groups ensures you send targeted, relevant campaigns to the appropriate audiences. Sender makes it easy to add contacts to groups, move them between groups, and remove them when needed.

    Adding Contacts to Groups

    Method 1: During Import

    When importing contacts, you can assign them to specific groups:

    • Go to Subscribers and choose your import method
    • Upload or paste your contact list
    • Select the group you want to add contacts to
    • Complete the import process

    Method 2: From Subscriber List

    Add existing contacts to groups from your main subscriber list:

    • Go to Subscribers
    • Select the contacts you want to add using checkboxes
    • Click the “Actions” dropdown menu
    • Choose “Add to group”
    • Select the target group or create a new one
    • Confirm the action

    Method 3: From an Individual Profile

    Add a single contact to a group from their profile:

    • Click on the subscriber from your list
    • Find the group membership section in their profile
    • Select the groups you want to add them to
    • Click “Save”

    Method 4: From Segments

    Convert filtered segments into group membership:

    • Go to Subscribers > Segments
    • Create or select a segment with your desired filters
    • Select the contacts from the filtered results
    • Use the “Actions” menu to add them to a group

    Moving Contacts Between Groups

    Replace Group Membership

    To move contacts from one group to another:

    • Go to Subscribers
    • Filter or select contacts from the original group
    • Select the contacts you want to move
    • Click “Actions” and add them to the new group
    • Remove them from the original group (see removal section below)

    Add to Additional Groups

    Contacts can belong to multiple groups simultaneously:

    • Select the contacts
    • Use “Actions” to add them to additional groups
    • They will remain in their original groups while being added to new ones

    Removing Contacts from Groups

    Remove from Specific Groups

    To remove contacts from a group without deleting them:

    • Go to Subscribers
    • Filter by the group you want to remove contacts from
    • Select the contacts to remove
    • Click “Actions” dropdown
    • Choose “Remove from group”
    • Confirm the action

    By doing this, the contacts remain in your account but are no longer part of that group.

    Remove from an Individual Profile

    Remove group membership from a contact’s profile:

    • Click on the subscriber
    • Find the groups section in their profile
    • Deselect the groups you want to remove them from
    • Click “Save”

    Best Practices

    Plan Your Group Structure

    Before adding contacts, determine which groups you need and what each represents. A clear structure makes organization easier and prevents confusion.

    Use Consistent Criteria

    Establish clear rules for which contacts belong in each group. Document these criteria so you and your team can consistently organize contacts.

    Regular Maintenance

    Periodically review group memberships to ensure contacts are in the right groups. Remove contacts from groups that are no longer relevant to them.

    Avoid Over-Complicating

    Don’t create too many overlapping groups. Keep your structure simple and use segments for more complex filtering needs.

    Understanding Group vs Complete Removal

    Removing from a group:

    • Contact stays in your account
    • Removed only from specific group
    • Can still be in other groups
    • Can receive emails sent to other groups they belong to

    Deleting a contact:

    • Contact is completely removed from your account
    • Removed from all groups
    • Cannot receive any emails
    • Can be re-imported if needed later

    Tips for Success

    • Use bulk actions when organizing many contacts at once
    • Check contact count before and after moves to verify accuracy
    • Keep track of group changes for important campaigns
    • Use groups in combination with segments for flexible targeting
    • Regularly audit group memberships to maintain accuracy

    That’s it!

    If you got stuck on a specific task or can’t find a way to execute a particular job, contact our support team via LiveChat or [email protected] – we’re here to help 24/7.

  • Create lists from segments

    Learn how to convert your filtered segments into organized groups for targeted email campaigns.

    What Are Segments vs Groups?

    Segments are dynamic filters that automatically update based on criteria like engagement, behavior, or attributes. They’re created using Sender’s advanced filtering tools.

    Groups are static collections of contacts that you manually create and manage. Once contacts are added to a group, they remain there until you remove them.

    Why Create Groups from Segments?

    Preserve a Snapshot

    Segments change automatically as contact behavior evolves. Creating a group from a segment preserves that specific set of contacts at a point in time.

    Simplify Campaign Targeting

    Groups are easier to select when creating campaigns. Instead of rebuilding complex filters each time, you can quickly choose a pre-made group.

    Track Campaign Performance

    Using dedicated groups for specific campaigns makes it easier to track and analyze results over time.

    How to Create Groups from Segments

    Step 1: Create Your Segment

    • Go to Subscribers > Segments
    • Click “Create new segment”
    • Use the Advanced filter to define your criteria
    • Review the filtered results

    Step 2: Select Contacts

    • Once your segment shows the desired contacts, select them using the checkboxes
    • You can select all contacts in the current view or individual contacts

    Step 3: Add to Group

    • Click the “Actions” dropdown menu
    • Select the option to add contacts to a group
    • Choose an existing group or create a new one
    • Confirm the action

    Step 4: Verify

    • Go to Subscribers > Groups
    • Find your newly created or updated group
    • Verify that the correct contacts were added

    Common Use Cases

    High-Value Customers

    • Segment: Total lifetime spend > $500 AND 3+ orders
    • Group: “VIP Customers”
    • Use for: Exclusive offers, early product access

    Re-engagement Targets

    • Segment: No opens in last 90 days
    • Group: “Inactive Q1 2025”
    • Use for: Win-back campaigns

    Event Participants

    • Segment: Opened webinar email AND clicked registration
    • Group: “Q1 Webinar Registrants”
    • Use for: Follow-up emails, future events

    When to Use Segments vs Groups

    Use Segments When:

    • You need real-time, automatically updated lists
    • Targeting based on current behavior or attributes
    • Running ongoing campaigns with consistent criteria

    Use Groups When:

    • You need a fixed list for a specific campaign
    • Preserving a snapshot of contacts at a specific time
    • Simplifying recurring campaign setup
    • Tracking specific campaign cohorts over time

    Best Practices

    • Use descriptive names – Include the purpose and date, like “VIP Customers – Oct 2025”
    • Document your criteria – Keep notes on the segment filters used to create each group
    • Avoid over-creating – Only create groups when you actually need a fixed list
    • Archive old groups – Remove or archive groups once campaigns are complete
    • Test first – Verify your segment filters before creating groups

    That’s it!

    If you got stuck on a specific task or can’t find a way to execute a particular job, contact our support team via LiveChat or [email protected] – we’re here to help 24/7.

  • Optimize contact list deliverability

    Learn how to maintain a healthy contact list that improves your email deliverability and sender reputation.

    What is Email Deliverability?

    Email deliverability is the ability to successfully deliver emails to your subscribers’ inboxes. A well-maintained contact list is essential for ensuring your messages reach their intended recipients rather than being marked as spam or bounced.

    Why List Optimization Matters

    Protect Your Sender Reputation

    Email providers track how recipients interact with your emails. High bounce rates, spam complaints, and low engagement can damage your sender reputation, potentially causing future emails to be filtered or blocked, resulting in inconsistent deliverability.

    Improve Engagement Rates

    A clean, engaged list leads to better open rates and click-through rates. When you focus on contacts who actually want to hear from you, your campaign performance improves significantly.

    Maintain Compliance

    Keeping an updated list helps you stay compliant with email marketing regulations like GDPR. This protects both your subscribers’ privacy and your business reputation.

    Key Optimization Practices

    Remove Invalid Email Addresses

    • Hard Bounces – Immediately remove email addresses that hard bounce (permanent delivery failures). These addresses are invalid and will continue to hurt your deliverability if you keep sending to them after they are re-uploaded into your list, as our system automatically unsubscribes them from your list.
    • Syntax Errors – Check for and remove email addresses with formatting errors, missing @ symbols, or invalid domain names. These will never successfully receive your emails.

    Manage Inactive Subscribers

    • Identify Inactive Contacts – Use our advanced filters to find subscribers who haven’t opened or clicked your emails in 3-6 months. These contacts drag down your engagement metrics.
    • Re-engagement Campaigns – Before removing inactive subscribers, send a re-engagement campaign asking if they still want to hear from you. Give them a clear option to stay subscribed or opt out.
    • Remove Unresponsive Contacts – If subscribers don’t respond to re-engagement attempts, remove them from your regular sending list. You can keep them in a separate segment for occasional campaigns if desired.

    Validate Email Addresses

    • Use Double Opt-In – Implement double opt-in for new subscribers to verify their email addresses are valid and they genuinely want to receive your emails. This prevents fake or mistyped addresses from entering your list.
    • Regular Validation – Periodically validate your email list to identify addresses that have become inactive or invalid over time. This helps maintain list quality.

    Remove Spam Complaints

    • Monitor Complaints – Keep track of subscribers who mark your emails as spam. Remove these contacts immediately as continued sending will severely damage your reputation.
    • Understand Why – If you’re getting frequent spam complaints, review your email content, sending frequency, and signup process. Make sure expectations are clear when people subscribe.

    Segment by Engagement

    • Active Subscribers – Create a segment of highly engaged subscribers who regularly open and click your emails. These contacts should receive your most frequent communications.
    • Moderate Engagement – Segment subscribers who engage occasionally. Send them less frequently or with different content to maintain their interest.
    • Low Engagement – Keep low-engagement contacts separate and send them minimal, highly targeted content. Monitor for signs of renewed interest or continued disengagement.

    Using Sender’s Tools for Optimization

    Advanced Filters

    Navigate to Subscribers -> Segments and use advanced filters to identify contacts based on:

    • Campaign activity (opened, clicked, inactive)
    • Subscription status
    • Created date
    • Custom fields

    Regular List Audits

    Schedule monthly or quarterly reviews of your contact list:

    • Filter for inactive subscribers
    • Review bounce rates
    • Check for engagement patterns
    • Remove or re-segment as needed

    Optimization Schedule

    Weekly or Bi-Weekly

    • Remove hard bounces from your list completely
    • Process unsubscribe requests if any come through
    • Monitor spam complaints

    Monthly

    • Review engagement metrics
    • Identify inactive subscribers
    • Clean up obvious errors

    Quarterly

    • Run re-engagement campaigns
    • Remove unresponsive contacts
    • Validate overall list health
    • Update segmentation strategy

    Warning Signs Your List Needs Optimization

    • Open rates consistently below 30-35%
    • High bounce rates (above 5%)
    • Increasing spam complaints
    • Declining engagement over time
    • Large number of unsubscribes after sends

    Best Practices

    Set Clear Expectations

    Tell subscribers what they’ll receive and how often during the signup process. This reduces future complaints and maintains engagement.

    Monitor Metrics Regularly

    Keep an eye on your deliverability metrics including bounce rates, open rates, and spam complaints. Early detection of issues allows for quick corrections.

    Quality Over Quantity

    A smaller list of engaged subscribers is far more valuable than a large list of inactive contacts. Focus on maintaining quality rather than just growing numbers.

    Tips for Long-Term Success

    • Never purchase email lists – they damage deliverability and violate our Terms of Service, which will lead to your account’s suspension as well
    • Use consistent “from” names and email addresses
    • Maintain a regular but not excessive sending schedule
    • Personalize content to increase relevance and engagement
    • Test your emails before sending to catch potential issues

    That’s it!

    If you got stuck on a specific task or can’t find a way to execute a particular job, contact our support team via LiveChat or [email protected] – we’re here to help 24/7.

  • Split segments into lists

    Learn how to divide your contact segments into separate groups for more targeted email campaigns using Sender’s advanced filtering tools.

    What is Segment Splitting?

    Segment splitting is the process of dividing a larger group of contacts into smaller, more specific groups based on particular criteria. This allows you to create highly targeted campaigns for different subsets of your audience.

    Why Split Segments?

    More Precise Targeting

    Breaking down broad segments into smaller groups enables you to tailor your messaging even more specifically. This precision leads to better engagement and higher conversion rates.

    Test Different Approaches

    Split segments allow you to test different strategies, content, or offers with similar audiences. You can then analyze which approach performs best and apply those insights to future campaigns.

    Manage Campaign Frequency

    Different segments may require different communication frequencies. Splitting allows you to send more emails to highly engaged contacts while reducing frequency for less active subscribers.

    How to Create Segments

    • Go to Subscribers in the left menu
    • Click on Segments
    • Click “Create new segment”
    • Use the Advanced filter to define your segment criteria
    • Save your segment

    Available Filter Categories

    Subscription Status

    Filter contacts based on their subscription type:

    • Email
    • Transactional Email
    • SMS
    • Transactional SMS

    Subscriber Details

    Create segments using contact information:

    • Group membership – Belongs to specific groups
    • Email address – Specific email patterns or domains
    • Phone number – Contacts with phone numbers
    • Created date – When they joined your list
    • Subscribers location – Geographic targeting

    Campaign Activity

    Segment based on email engagement:

    • Sent – Received specific campaigns
    • Opened – Opened emails
    • Clicked – Clicked links in emails
    • Unsubscribed from emails – Left your list
    • Was inactive – No recent engagement

    SMS Campaign Activity

    Filter based on SMS interactions:

    • Was sent to – Received SMS campaigns
    • Clicked – Clicked links in SMS

    Ecommerce Metrics

    Create segments based on purchase behavior:

    • Placed an order – Made a purchase
    • Total lifetime spend – Customer value
    • Quantity of products per basket – Average order size
    • Ordered specific product – Product-specific targeting
    • Order refunded – Return behavior
    • Order value – Purchase amount ranges

    Abandoned Cart

    Target potential customers:

    • Checkout started – Began checkout process
    • Returned through email – Came back via email link

    Custom Fields

    Filter by any custom attributes you’ve created for your contacts.

    Building Advanced Filters

    Add Multiple Conditions

    Click “Add condition” to combine multiple criteria for precise segmentation. All conditions in a set must be met (AND logic).

    Add Alternative Conditions

    Click “Add another set of conditions” to create OR logic, where contacts matching any set of conditions will be included.

    Example Filter

    Create a segment of highly engaged customers:

    • Group membership: Belongs to “Customers”
    • Campaign activity: Opened (in the last 30 days)
    • Ecommerce metrics: Total lifetime spend (greater than $100)

    Common Segment Splits

    By Engagement Level

    • Highly engaged – Opened 5+ emails in last month
    • Moderately engaged – Opened 1-4 emails in last month
    • Inactive – No opens in last 60 days

    By Purchase Behavior

    • VIP customers – Total lifetime spend over $500
    • Regular customers – 3+ orders
    • First-time buyers – Placed exactly 1 order

    By Location

    • North America – Subscribers location contains US, CA
    • Europe – Subscribers location in EU countries
    • Asia Pacific – Subscribers location in APAC region

    Best Practices

    Plan Your Segmentation Strategy

    Before creating segments, clearly define what criteria you’ll use and how each segment will be used in your campaigns. Consider what filtering options are most relevant to your business goals.

    Start Simple, Then Refine

    Begin with basic segments and add more complex filters as you learn what works. Monitor performance to validate your segmentation approach.

    Name Segments Clearly

    Use descriptive names that explain the segment’s criteria, like “Engaged Customers – Last 30 Days” instead of “Segment 1”. This makes it easy to find and use the right segment when creating campaigns.

    Regularly Review Segments

    Contact behavior changes over time, so periodically review your segments to ensure they’re still relevant. Update filter criteria as needed to maintain accuracy.

    Tips for Success

    • Use the toggle fields option to customize which columns appear in your subscriber view
    • Combine multiple filter categories for highly specific targeting
    • Test your segment filters with a small group before using them in major campaigns
    • Keep track of which segments perform best for different types of campaigns

    If you got stuck on a specific task or can’t find a way to execute a particular job, contact our support team via LiveChat or [email protected] – we’re here to help 24/7.